High School Equipment Co-op Guide
This guide is intended to be used, and maintained by the co-op student in the Computer Support Assistant position. It will cover everything you'll need to know, and will be kept up to-date as of the last edit time. Whenever you're in trouble, just rely on this TWiki and the combined knowledge of the CSCF Staff.Table of Contents
Introduction
This guide was written by two different co-op students, just like you, as such, this may or may not be exactly what you experience, but it is a good starting point. You're going to have to learn a lot of new solutions to problems, as such, its best to start right away. For starters you're going to have to familiarize yourself with whatever operating system you use. Just try playing around with different features, and Googling the keyboard shortcuts than can help you save a lot of time. After that's all done, you should familiarize yourself with the essentials. Conveniently, these essentials are all located in the same massive TWiki page. Here it is: https://cs.uwaterloo.ca/twiki/view/CF/WebHome This page is essentially the keeper of anything and everything you'll need to know, save for a few "undocumented features". In any case it's good practice to start by to familiarizing yourself with the tasks you'll be doing the most, such as Printing, Imaging, and Moves and Removals.First Day
When first starting out in your position there are a couple things you should want to do. First, you should 'get to know your room'. Knowing what is in it and how your room operates is key for the first week because it's good to know what you have, don't have, and how to use everything you have in your room. Once you did a little self check, try making a to-do list; for example: what computers need surplussing, what needs to be re-imaged, wiped, or fixed. You'll be given a tour of the work place and also you'll be getting fobs to your workplace, and any other rooms you will have to attend to, for example room 2561 which is the room where we put the surplus machinery in. It is, for your job, necessary to know how to differentiate between models of computers, for example if one computer has a Pentium 4 while another one of same company has a Pentium 3, it is safe to say that you can toss out the Pentium 3 one since after all it is very old and probably wouldn't want to be used anyways. Some days you're going to get a load of computers and some of them might not have any notes, so it is your job to find their inventory code and with using that code you can figure out the history of that computer. To do so you go to https://cs.uwaterloo.ca/~lfolland/home (or get there directly from here -> https://cs.uwaterloo.ca/cscf/internal/inventory/web/inventory/ ) and from your own list of tasks you'll find at the top is a bunch of hyper links, find the tab that says E&I and from there you can put in the code and find out about the computer or you can search it up in your RT (or known as ST) and from there you can check if there are any requests for the computer and has any other information about it (whether it needs to be surplused or it needs to wipe/re-imaged).Second day
On your second day of work basically you should already have a feel of how everything works and you will begin your work as soon as possible. Typically Mike Gore (someone very good to ask if you have any questions, his room is diagonally across from yours) does a lot of the imaging in the workplace so whenever he has time he can train you as much as he can so that you can officially get started on imaging and wiping computers. Another task you will have to do is cleaning. While you have nothing to do as a few computers are getting wiped and what not, you have the chance to start cleaning in the supply room which Lawrence would have shown you and mentioned the cleaning job you would have to do. There you can use the wipes to clean the keyboards and mice and using a dust cloth to remove any excess dust. However, if there is a ton of dust and dirt and you can't remove it with a cloth then something Lawrence mentions in the tour is the 'power duster' which after plugging in the BLACK CORD and pushing the red button, you can just pull down the handle which hangs from the ceiling, and blow all the dust and dirt away on the keyboard. Keep in mind that there are people working in other offices so be sure to close both doors before turning on the machinery since it is pretty noisy. If you see a PS2 keyboard (so if it's not a USB) then safe to say you can just put it in the e-waste box. Same goes for mice that still have the ball on the bottom. Sometimes the mice will have oil and wax in between the crevices so ask Phil, someone you will be introduced to, and he can show you where a very handy tool is placed. The tool looks like what a dentist would use for teeth, it's small and has a very sharp hook on it, and it is located in the red tool box, first long horizontal drawer you see. Make sure to be careful when using the tool because it can be slippery. Cleaning is a very important job and you'll have to do it in your room, DC2606, as well for all the machinery you're with, just to make it all looks nice for the students,etc.General Information
Good Habits
Its a very good idea to document, and take note of the solutions to problems you have faced. This will make it much easier in the long run, as you will always have an answer on hand, and the co-op students after you will also have the answer. Triage everything. For instance, if not a lot of computers are coming in, but you notice there's a massive pile of keyboards needing to be cleaned its safe to say you should be cleaning the keyboards first. This prevents you from being overwhelmed with a day of just keyboard cleaning, as well as prevents you from doing the same thing every day. If all the mice and keyboards are cleaned, and all the computers imaged, you could either work on some co-op projects, or do some inventory work. Its important to keep yourself occupied, and inventory work will help you in the long run. Don't be afraid to take the initiative during work. Come in early, work a little later, this will allow you to dedicate some more time to less pressing matters, such as organization. If you think you're being overwhelmed by computers, drop some off in 2561, this frees up your workspace and also allows you to get more things done in a day. It's really good to keep everything organized. This will not only allow you easier access to needed tools, parts and equipment, but it will also allow the CSCF staff easier acceess to those items. This makes everything a lot easier, and as a result everyone is happy. Take notes when ANYONE is explaining something to you. It is likely you may know how to solve it, but it is also very likely that your method of solving it isn't an acceptable, stable method. Taking notes will reduce the number of times you'll ask for help, and as a result, save you and the department time.Important Items
The most important items you have should generally be kept around your desk. Should the time come and you find yourself unprepared for whatever you're dealing with, refer back to this guide.- BARCODE SCANNER : Should be attached to your computer at all times.
- DRIVE ERAZER ULTRA: Should be with you, or in Devon Mercer's office.
- LABELER: Should be kept in your office, though there is another one in DC2560G.
- SCREWDRIVERS: Should be kept in the "Toolbox" on your shelf. Elsewise go to DC2560G.
- PENS AND PAPER: Should be stocked up, though there is a place you can go should you need more. Ask Lawrence or Mike about that.
Training
During your training you will also see that you'll be most likely given a set of ST's for training. Here are some examples of what you will be dealing with: From our Twiki site, here is a list of training topics:https://cs.uwaterloo.ca/twiki/view/CF/NewCoopStudents#Training
Training
The following topics can be trained in short sessions, which can/should be spread amongst several staff:
ST (supervisor)
Email (Supervisor)
Web
UWdir (first day - supervisor)
Imaging a system (Phil?)
Inventory (Daniel?)
-
Unix Basics (directory structures, ls, cd, pwd, df, mv, md)
-
This is a good set of introductory tutorials
-
-
Using Linux (Supervisor / Mike G / Moving to Linux book)
http://www.houseofthud.com/vilearn.html
UW Calendar (supervisor)
Networking/VLANs/ONA (supervisor)
Core environment, Samba
Printing (setup current machine to print to Ricoh)
(Optional) Learning LAMP
LAMP is a useful set of tools for building and managing a web-based data application. Here are some reference sites:
LAMP (Wikipedia): https://en.wikipedia.org/wiki/LAMP_%28software_bundle%29
Setup notes: http://www.howtoforge.com/ubuntu_debian_lamp_server
Jobs
Your job here will require a variety of multiple tasks, that are including but not limited to all the tasks listed below. What follows are some quick little tips, and general how-to's for nearly everything you'll be asked to do during your stay in DC 2606. Your fellow co-op students and staff will most likely be asking you to do several other jobs when they require so, so expect the unexpected.Processing equipment
One of the most common tasks you will do is to process incoming equipment. It may be equipment left in DC 2606, or in DC 2561, or equipment you go pick up. You must decide for each whether it is something that should be turned back over to the Infrastructure group, kept for re-use and loaning out, or whether to get rid of it either as surplus (equipment that may still be useful and can be sold) or eWaste (broken or so old that it should be destroyed). Here you can find a checklist for processing PCs: https://cs.uwaterloo.ca/cscf/internal/edocs/admin/Surplus/Computer%20Processing%20Checklist.pdf You will need access to eDocs to get to this checklist - talk to your supervisor if this doesn't work for you.Creating User Accounts
Sometimes, you will be asked to create a new account on a PC. You may need to give the user administrative powers on the computer.For Windows:
1. Sign into the cscf-op account 2. Right click on the start menu 3. Click on "Computer Management" 4. Click on "Local Users and Groups" 5. Go into the "Users" file 6. Right click on the white space under the accounts already on the computer 7. Click "new user" 8. Enter the username and password required for the new account. > Make sure to un-tick the "user must change password at next log-on" box (for passwords, see below) 9. If giving admin powers, click on the "groups" file. 10. Double click on Administrators 11. Click "Add..." 12. In the "object names" dialog box, enter the user id of the user you are giving administrator and click ok.For Linux:
1. Press the Windows key 2. Search for users 3. Go to user accounts 4. Click on "Unlock" on the top right of the window 5. Enter the corresponding CSCF-OP password 6. Click the plus on the bottom left of the window 7. Change the users account type to administrator, enter their full name, and their username. 8. Click on the user account that you just made 9. On the right side of the user accounts window, you will see "Login Options" 10. Under "Login Options", click on the text next to password 11. Click on the "action" box and set it to "set a password now" 12. Enter the users password (for passwords, see below) 13. Click changePasswords:
To set a password for a user account, their are two ways. 1. On Linux, open up command terminal (ctrl+alt+T) and type "pwgen" Choose one of the passwords and write it down NEATLY. You will use this password for both Windows and/or Linux Operating systems. 2. There should be page with a bunch of stickers near the light switch of the office. Each sticker has random password on it. Choose one and use it for both Windows and/or Linux Finally, make sure the password is written somewhere on the PC itself, whether it is on a sticky note, or if you took the sticker and slapped it on the front.Organizing
Its likely that your room will start out as a bit of a mess, this is due to the large population of people using DC2606 as storage for nearly everything. A big job at the beginning of your work term will be to make sure everything is clean. This can take the form of several things. You'll mostly be moving things to and from DC2560G and DC2606, but its important to keep everything you could possibly need stocked up, and ready to grab. This could include everything from Network Cards to Hard Drives, to even KVM Stations and cables. With all these different parts you need, you'll have to rely on boxes. Boxes, once stacked and clearly labeled, allow others to grab anything they want when they want, but also force them to put things back in their CLEARLY MARKED BOXES. As a general rule of thumb all different cable types should have their own plastic box, as well as RAM, HDDs and Network Cards. This seems good, but there's a couple rules you'll need to follow, as putting the DDR2 RAM with the DDR3 RAM will put you in a world of pain when you have to find a specific stick you need. Likewise goes with hard drives. Rules of Boxes: 1. Make sure different RAM types have their own box (ex. DDR2 and DDR3). 2. Make sure different hard drive sizes have their own box (ex. 250GB-500GB, 500GB-1TB). 3. NEVER MIX WIPED AND NOT WIPED HARD DRIVES. 4. If you have more of a cable than you have room for, fill up the boxes in DC2560G, or surplus them. 5. Its good practice to save the larger boxes for cables, such as DVI, VGA, and Power.Identity Stickers
You should assume that there is a roll of stickers for the sticker machine inside it and if not or it runs out then ask either Lawrence or Mike and they'll be able to help you out. A tip for using the sticker machine would be looking at the sticker rolls (that look like cassettes from years ago) and see what size they are, if they have a black print on a white background or a black print on a clear background. Very important to be using the correct sticker roll so always double check. Another one of your jobs will be to label all of the incoming and outgoing computers on your shelf. If you're in any version of Linux, you can install "screenfetch" which will show you how much RAM you have, your CPU, and your GPU. A link to the GitHub repository and installation instructions (check the README) is found here : https://github.com/KittyKatt/screenFetch1. Barcode on top of PC (example : CS******)
2. System name on the front above the optical drive. (example : RSG-PC***)
3. System specs on the top right corner of the right side of the PC. Make sure to include type of motherboard, storage size, CPU cores/GHz and amount of RAM.
4. Newest known working image should be right below the specs. (example : W10U16041-VM-500G-F16-V1)
Imaging
Imaging is a large part of what you'll be doing in DC2606. The definition of imaging is that of the "reproduction of an objects form". Software Imaging is essentially the same thing as it includes creating an image, essentially a screenshot of a computer, and all the drivers along with it. Using that image, we can install it on various computers, meaning that all of them will be almost identical to the original computer it was imaged on. This allows us to install Windows, Ubuntu, and Mac on all of our computers quickly and easily.KVM Operation
This information applies only to the current KVM in use, CS004857- Very rarely the keyboard will not work/be detected by the computer. Just restart the computer in question.
- Double tap scroll lock on the keyboard connected to the KVM to switch channels without having to get up and press the physical button.
- Double Tap Scroll Lock + Enter sets it to the next channel
- Double Tap Scroll Lock + Number from 1 - 4 + Enter sets it to the channel entered
For PC:
To begin, you'll need to enter the "Boot Options" of a computer, this is usually done by pressing either F12 or F8 during start-up (note: you may need to press the key several times for it to register). Once in boot options you'll see a list of devices, go to the one labeled "NETWORK", once selected hit ENTER. If there is no "NETWORK" option, you'll need to go into BIOS (hit DELETE or F2 during start-up) , and under the "Advanced" tab you should find a setting close to, or called OnBoard LAN Boot". This needs to be enabled to be able to boot from "NETWORK". Another common error is the Ethernet cable not being plugged into the VLAN 420 plug. You might also come across a PC that won't let you into the BIOS or change the startup device without a password. This is a Bios Password. To get around it, follow these steps 1. Turn OFF the computer and unplug the power cord. 2. Press the Power On/Off button (PC-Case) 3-5 times to discharge the mainboard condensers. 3. Remove the coin cell battery (CMOS battery). 4. Move the CMOS-Jumper to his clear-position (read your motherboard manual to find the jumper). 5. Wait ~ 15 seconds (the longer the better). 6. Move the CMOS-Jumper to his default position. 7. Insert the coin cell battery (CMOS battery). 8. Plug the power cord. 9. Turn ON the computer, enter the BIOS-Setup and load the "Setup Defaults/Optimized Settings". 10. Save the BIOS settings and restart the computer.For Mac:
Press and hold the N key as soon as you hear the tone at startup, and let go as soon as you see the image of Earth appear. After you've sucessfully booted from "NETWORK" you'll usually default to the "GAIA" server, which you'll need to change to "devonshire" (which should be right below). To see if the Apple computer is able to upgrade to OS X El Capitan go hereNext Steps?
For tips on these two different imaging tools refer to their respective TWiki pages.- For Clonezilla go to : https://cs.uwaterloo.ca/twiki/view/CF/CloneZilla
- (obsolete except on really old systems) For Acronis (use 11 unless otherwise specified) go to: https://cs.uwaterloo.ca/twiki/view/CF/Acronis11
- For tips and tricks on imaging, go to: https://cs.uwaterloo.ca/twiki/view/CF/ImageDeployment
- For post-imaging instructions, refer back to the image TWiki page (located in https://cs.uwaterloo.ca/twiki/view/CF/CscfGradImageNotes)
Ubuntu 16.04 Manual Installation.
Ubuntu images have been notoriously buggy, as a result its gotten a lot easier to simply install Ubuntu natively. After booting from NETWORK, go to "Ubuntu", and then select the latest amd64 compatible distro (hint: amd64 will be in the name). Follow the regular Ubuntu install steps, except the with the following details. USER: cscf-op PASS:(current cscf-op password) Once logged in, create a CSCF-ADM account from the GUI interface, and give it a password(ex. something1111). Enter terminal (CTRL+ALT+T), plug in the USB key with all the necessary files and enter the following commands. cd /media/*Name_of_usb*/folder cp apt/* -r /etc/apt cp ssh/* -r /etc/ssh cp shadow /etc/shadow cp group /etc/group cp cups/* -r /etc/cupsUnsure of What Image to Use?
If you don't know very much about the machine you're working with, it can be very difficult the choose an image. Fortunately, we can use a tool called RIP that is capable of providing lots of information about the computer at hand. To access RIP, first enter the boot options menu and enter network boot. Navigate to the RIP item and press enter. Continue to select the latest version (top of the list) for the next 2 pages. Now wait for RIP to launch. You will notice you are now faced with a command line prompt. type "root" and then press "enter" to log in. There are now several commands you can use to access various information about the machine.- lshw | more
- This command can be used to list extensive information about the computer including: motherboard, cpu, RAM, disks, video cards, network cards, etc.
- lspci
- This command lists information about all connected PCI buses and devices. Includes info about video, audio, network, etc.
- fdisk -l
- Lists information about connected disks
- parted -l
- Lists information about partitions.
When unsure of which image to use for a certain motherboard, always refer to: https://cs.uwaterloo.ca/twiki/view/CF/ImagesByMotherboard These may not be well documented for certain laptops though, therefore you'll need to test to see if certain similar ones work. If the image you need is not found there then refer back to: https://cs.uwaterloo.ca/twiki/view/CF/CscfGradImageNotes When in doubt, ask Mike for help.
Methods of data destruction
During your stay in DC2606, you're going to have to learn how to wipe hard drives. UWaterloo privacy policy means that we cannot send out any hard drive containing student, staff, or faculty information (unless we're sending them to be shredded). We're going to have to follow standards on data-wiping, which means that we must make sure no one can retrieve data off of it. There are many ways to do this, but here are just a few.Hdparm
hdparm is a Linux command line program with the ability to wipe multiple HDDs and SSDs installed within a single workstation. To wipe with hdparm, see the procedure below, which is also included in your Position Guide: -Connect the power supply to the SATA data ports and power connectors of all drives that require wiping -Select IBA GE Slot -In BIOS CSCF Boot menu, navigate down and choose Live Boot Images -Choose Live Images -Choose first option -Choose Ubuntu-server 18.04.2 - live-server It loads... -Hold Ctrl>>Alt>>F2 to get command prompt (black screen, looks like a terminal window) -Type sudo-i to switch to root access (theres no pswd for command prompt) -Type apt install hdparm lsscsi -lsscsi (scsi is an ancient protocol for communicating with hard drives) -This gives you info about hard drive -Note: You can use the fdisk -l command to get the information but the info becomes more detailed and cluttered -Type y for yes if prompted -Start from step 4 on here: https://grok.lsu.edu/Article.aspx?articleid=16716DBAN
DBAN is an open source data destruction tool, it destroys data by overwriting data with pseudorandom numbers. It requires a computer to run, and as such can be put on a CD-ROM, USB Drive, or any other form of removable media. For wiping with DBAN, follow the steps here: https://cs.uwaterloo.ca/twiki/view/CF/WipeDiskDBANDrive Erazer Ultra by Wiebetech
This is an actual physical disk wiper, it only works for IDE and SATA drives. It generally works a lot faster than the rest of the tools, and does not require a computer to run. As such, any left over drives can be easily wiped this way. For wiping with Drive Erazer Ultra simply use the DOD Clear command, which wipes the drive according to US Department of Defence Standards.Disk Shredding
When a disk is deemed useless and unwanted, such as an IDE drive, and we don't have the nessecary materials to wipe it, we still have a way of destroying it. Central Stores has a disk shredder, which does what it sounds like it does. For wiping by shredding, label a box of the drives "CONFIDENTIAL INFORMATION - DISKS TO BE SHREDDED". Don't forget to include them in your spreadsheet.Hammer Method *(WARNING: NOT TO BE USED)
Whenever you have tons of free time, you can do what's called them hammer method. First, take out the magnets of the hard drive, as well as the read/write head. Replace the top, and you are ready to go. For wiping with the hammer method, simply take a hammer to a prepped hard drive.Surplusing and E-Waste
You'll most likely be surplussing something when in DC2606. This means getting rid of unwanted or dead technology, whether that be monitors, desktops, or even servers. A good habit is to occasionally go around asking the staff if they need to get rid of anything when low on work. There's a lot of protocol to follow stemming from the nature of this job, but all of it is very important.Follow the procedures here
Surplus Equipment Be sure to reference this page if you are unsure of what do do at any stage of the process. This includes steps for the entire process, but if you are simply surplusing an already full bin of equipment, continue to follow the process below.Create an asset disposal form
Can be found online hereCreate a new spreadsheet
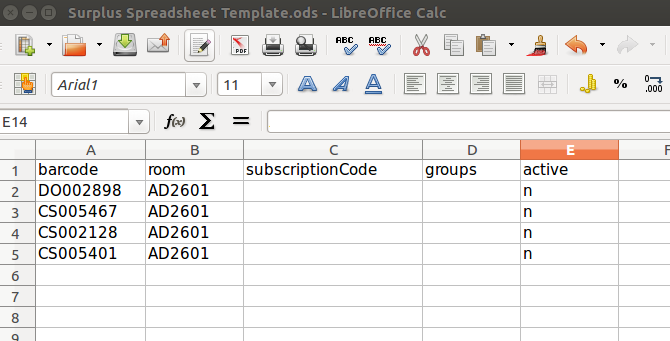
Download Template Once the spreadsheet is in place, save it, then gather all the barcodes of equipment being surplused into the "Barcodes" column of the "Inventory Update" tab (Located in the bottom left of LibreOffice calc). You will also need to set the room column for each item to the AD number determined when you created the AD Form earlier. The active column must be set to "n" for each item. Once finished, it will look something like this. Proceed to save as a CSV file. This will make it a lot easier to copy into the Mass Updater. Open the .CSV file with a simple text editor such as gedit. Copy the contents to your clipboard, and the job. Next, you will need to paste the contents into the Mass Update tool. Open inventory -> More Options -> Mass Update -> Mass Update. Paste the contents into the box, and click Mass Edit. Paste the results into the job.Update DNS
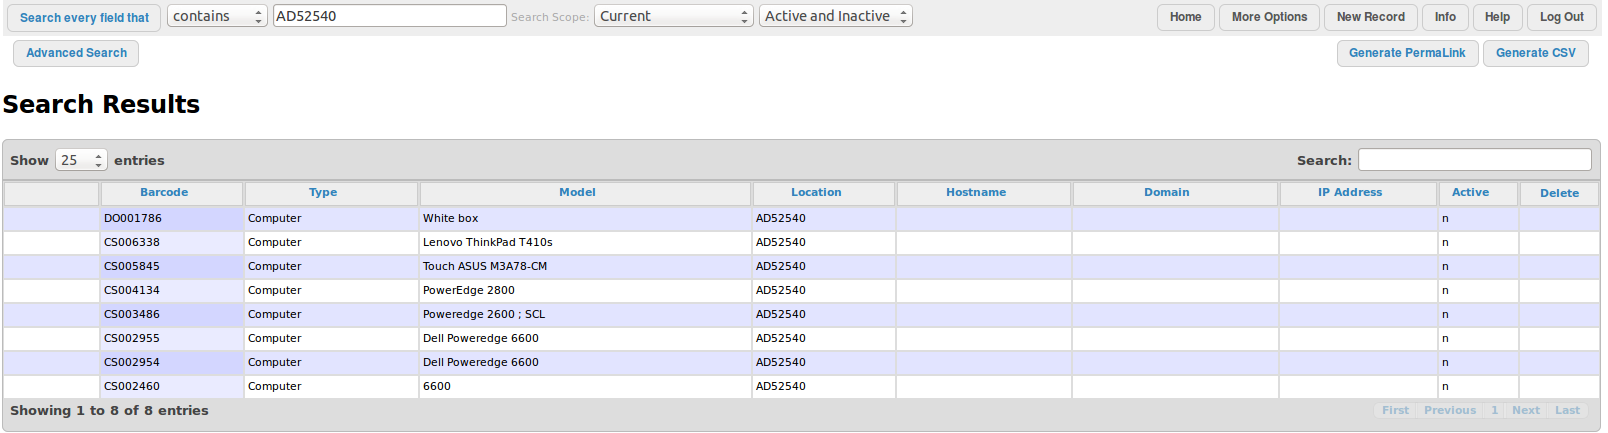
There's only one more step in which you need to manually delete the DNS for each named workstation. Navigate to each item's inventory page (Make sure you set the search scope to active and inactive), and under the DNS section in the Record Action column click "Remove". You will also need to note in the item's description that it has been destined for surplus. You have now successfully surplussed something in inventory records. If you search for the AD number in question, the DNS related columns should be empty and look something like this. You will now need to create a printable spreadsheet containing information about the items in the surplus bin. To do this, we will be using a tool called Evergreen. Navigate to Inventory -> More Options -> Evergreen (Note the formatting notes) -> Evergreen. Enter the barcodes of all the items and click "Evergreen". The resulting data can be easily copied to the spreadsheet's first tab which should be titled with a room, AD, and ST number. Save the spreadsheet, email it to the job, and print it off.Lawrence will now need to sign off on both the AD form and the spreadsheet. Once signed, these 2 documents can be scanned, and sent to the job. Send a copy of the scans to csss@uwaterloo.ca, and specify that you have a bin for pick-up, and would like a replacement bin. CC the job before sending.
If you're ever unsure about what is surplus or e-waste, ask Lawrence if he thinks its useful, but as a general tip don't keep ANY of these following things. FOR E-WASTE 1. Anything that you believe is broken beyond repair.
2. Anything labeled "EWASTE"
3. Anything marked "DEAD". 4. Hard Drives you CANNOT WIPE NORMALLY. FOR SURPLUS 1. Anything with less than 4GB of RAM
2. Anything with Windows XP
3. Anything with a PS/2 connector. (think old keyboards and mice, not KVM cables)
4. Anything you deem we have too much of. (ex. VGA Cables, Power Cables) REMEMBER TO REMOVE AND WIPE THE HARD DRIVES BEFORE SURPLUSSING
- Surplus_Spreadsheet_Template.ods: Surplus Spreadhsheet Template


| I | Attachment | History | Action | Size | Date | Who | Comment |
|---|---|---|---|---|---|---|---|
| |
ClearDNS.png | r1 | manage | 64.5 K | 2016-03-31 - 13:55 | CscfTechnician | Inventory records after being cleared of DNS records |
| |
InventoryUpdate.png | r1 | manage | 46.3 K | 2016-03-31 - 13:00 | CscfTechnician | Inventory Update tab of Spreadsheet |
| |
Surplus_Spreadsheet_Template.ods | r1 | manage | 25.8 K | 2016-03-31 - 12:41 | CscfTechnician | Surplus Spreadhsheet Template |
| |
vi_coding_.odt | r1 | manage | 19.3 K | 2013-10-18 - 15:46 | JenniferKlimova | Here is a very good information page which can give you a quick overview on vi coding |
Information in this area is meant for use by CSCF staff and is not official documentation, but anybody who is interested is welcome to use it if they find it useful.
- CF Web
- CF Web Home
- Changes
- Index
- Search
- Administration
- Communication
- Hardware
- HelpDeskGuide
- Infrastructure
- InternalProjects
- Linux
- MachineNotes
- Macintosh
- Management
- Networking
- Printing
- Research
- Security
- Software
- Solaris
- StaffStuff
- TaskGroups
- TermGoals
- Teaching
- UserSupport
- Vendors
- Windows
- XHier
- Other Webs
- My links
 |
|
Ideas, requests, problems regarding TWiki? Send feedback