TWiki> CF Web>Software>WebCapabilities>OdysseyApplications>OdysseyApplications3>OdysseyDocumentation (2020-09-14, AnnaXing)
 EditAttach
Odyssey Documentation
Overview
This page provides technical information about the Odyssey web application's online help.Background
https://odyssey.uwaterloo.ca/overview/Location of the Live Help Files
Odyssey's live (production) implementation is located on the linux.cs.uwaterloo.ca server at this path:/.software/regional/odyssey-3_apache/data/vhosts/odyssey.uwaterloo.ca/ The help files are primarily in HTML format and are located mainly in the help subdirectory under the application root.
The GitLab Repository
A Git repository for the Odyssey project has been created on UW's GitLabCollect the Files On Your Workstation
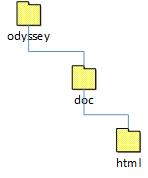
We're going to copy files and directories from the live implementation to the workstation.- On your workstation, create a directory called "odyssey". This will be the root directory of the repository. The whole application, with its entire directory structure will eventually be under this directory.
- Under "odyssey" create a directory called "doc". This will be the documentation branch of the repository. Later, sibling directories (project, java, etc.) can be added to hold the application files.
- Under "doc" create a directory called "html". This will hold the existing documentation, which is mostly in HTML format. Later, other types of documentation could be put into sibling directories as needed: pdf, mpeg, etc. You should now have a directory structure that looks like this:

Figure 1: The Top three directories in the repository - Open an SSH connection to linux.cs and copy these items from the path indicated above to the workstation's "html" directory:
- the ".htmenu" file
- the "index.shtml" file
- the "help" directory and all of its contents
- the "overview" directory and all of its contents
- the "system" directory and all of its contents
Make a Local Git Repository
- Install Git
 on your local machine if you haven't already.
- Open a command window and configure Git with your name and e-mail address, if you haven't already.
>git config --global user.name "Joe Schmoe"
>git config --global user.email "jschmoe@uwaterloo.ca"
- Go to the "odyssey" directory that you created in Collect the Files On Your Workstation, above.
- Turn this directory into a Git repository. This will create a ".git" directory under "odyssey", where versions, state, and history will be stored.
>git init
- Add all of the contents of the current directory (odyssey) to the repository.
>git add .
>git commit -m "Initial creation of repository.  Documentation only."
- Create a README file in the "odyssey" directory on your workstation.
Project: Odyssey

Waterloo Odyssey is a web application that provides the following services:
    Instructional Support — Examination Management, TA Assignments
    Graduate Admissions — Support for processing of applications for graduate studies

It is written primarily in Python and uses a PostgreSQL database and an Apache web server on a Linux host.

The production implementation is located here:
https://odyssey.uwaterloo.ca/

Internal documentation is available at:
https://cs.uwaterloo.ca/twiki/view/CF/OdysseyDocumentation
If you would prefer to use a richer document format than plain text, name the file "README.md" and use GitHub Flavored Markdown (GFM).
- Add the README file to the local repository.
>git add README
>git commit -m "Added README file"
Create the Project on GitLab
- In a web browser, go to https://git.uwaterloo.ca/
 .
.
- Sign in on the LDAP tab, using your WatIAM
 credentials. If they fail, have an administrator set up access to GitLab for you and try again.
- On the Your Projects page, click the New Project button.
- In the New Project page, fill in details:
Field Value Project path odyssey Namespace cscf Description Odyssey instructional support and graduate admissions web application Visibility Level Private - Click the Create project button.
Send the Repository Contents to GitLab
- On your workstation, define a remote repository called "odyssey", pointing to our new GitLab repository.
>git remote add odyssey gitlab@git.uwaterloo.ca:cscf/odyssey.git
- Push the local repository to the remote repository.
>git push -u odyssey master
Counting objects: 141, done.
Delta compression using up to 8 threads.
Compressing objects: 100% (127/127), done.
Writing objects: 100% (141/141), 567.36 KiB | 0 bytes/s, done.
Total 141 (delta 7), reused 0 (delta 0)
To gitlab@git.uwaterloo.ca:cscf/odyssey.git
 * [new branch]      master -> master
Branch master set up to track remote branch master from odyssey.
- See your README file displayed on the main page of the GitLab Odyssey repository here:
https://git.uwaterloo.ca/cscf/odyssey
Working With the Documentation Files
Clone the Project For Local Development
To make a development copy of the Odyssey project on your workstation, follow these steps.- Get access to the CSCF Git Repository
 . You will have to be added as a user by someone with authority, such as Daniel Allen
 . You will also need to provide an SSH key for your local machine.
- If you have not already done so, install Git
 on your local machine.
- If you have not already done so, configure Git with your name and e-mail address. Open a command shell in Linux or DOS.
>git config --global user.name "Joe Schmoe"
>git config --global user.email "jschmoe@uwaterloo.ca"
- In a command shell, go to the directory under which you want to put your Odyssey repository.
- Clone the repository.
>git clone gitlab@git.uwaterloo.ca:cscf/odyssey.git
This will create an odyssey directory at your current file system location, with the project under it. The odyssey directory is also your local copy of the repository.
Update the Repository
There are a variety of workflows- Verify that you have a remote called "odyssey" pointing to the GibLab repository and, if not, define it.
>git remote -v

>git remote add odyssey gitlab@git.uwaterloo.ca:cscf/odyssey.git

>git remote -v
odyssey gitlab@git.uwaterloo.ca:cscf/odyssey.git (fetch)
odyssey gitlab@git.uwaterloo.ca:cscf/odyssey.git (push)
- Refresh your local repository and your working files from the central repository on GitLab to ensure that your files are current.
>git pull odyssey master
From git.uwaterloo.ca:cscf/odyssey
 * branch            master     -> FETCH_HEAD
 * [new branch]      master     -> odyssey/master
Already up-to-date.
- Edit a file. Let's add a note to the bottom of the README file, indicating how to define a Git remote for the repository.
Project: Odyssey Waterloo Odyssey is a web application that provides the following services: Instructional Support — Examination Management, TA Assignments Graduate Admissions — Support for processing of applications for graduate studies It is written primarily in Python and uses a PostgreSQL database and an Apache web server on a Linux host. The production implementation is located here: https://odyssey.uwaterloo.ca/ Internal documentation is available at: https://cs.uwaterloo.ca/twiki/view/CF/OdysseyDocumentation To define a Git remote called "odyssey" for this repository, use this command: git remote add odyssey gitlab@git.uwaterloo.ca:cscf/odyssey.git - Stage the changed file for updating in the local repository.
>git add README
You might repeat steps 3 and 4 several times, making and staging changes to various files, before you commit them to your local repository. - Commit all staged files to the local repository and include a message describing the change.
>git commit -m "Added Git note to README"
[master 78d8fb5] Added Git note to README
 1 file changed, 3 insertions(+)
- Push the update to the master branch of the central repository on GitLab.
>git push odyssey master
Counting objects: 3, done.
Delta compression using up to 8 threads.
Compressing objects: 100% (3/3), done.
Writing objects: 100% (3/3), 429 bytes | 0 bytes/s, done.
Total 3 (delta 1), reused 0 (delta 0)
To gitlab@git.uwaterloo.ca:cscf/odyssey.git
   287761e..78d8fb5  master -> master
Deploy the Updates
To deploy your documentation changes, simply open an SSH connection to linux.cs and copy the new or updated files to the correct locations at or under this path:/software/odyssey-3_apache/data/vhosts/odyssey.uwaterloo.ca/
An automated deployment method using scripted Git commands to pull updates from the GitLab repository is possible.
Using Git
When the main Odyssey project—source code, schemas, etc.—has been added to the GitLab repository that current contains only the documentation, there may be multiple people working on different aspects of the project. Then a more complex (and more common) Git workflowMost Common Git Commands
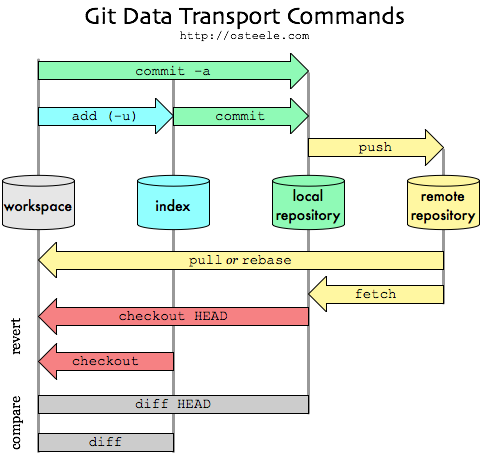
Here's a succinct summary of the most common Git commands in an easy-to-grok diagram.
Git Resources
- A Git Tutorial
 —a good place for the uninitiated to start
- Git - The Simple Guide
 —another introduction
- Basic Git Commands
 —a short list of the commands you're most likely to need
- Reference
 —a more detailed command reference
- Git Cheat Sheet
 —a succinct, printable one-page reference
- Comparing Workflows
 —four Git workflows for different sizes and types of teams
- 5 Effective GIT Practices For Small Agile Teams
 —sage advice from a voice of experience
-- JeffGuild - 2015-11-09
| I | Attachment | History | Action | Size | Date | Who | Comment |
|---|---|---|---|---|---|---|---|
| |
git-transport.png | r1 | manage | 43.0 K | 2016-02-16 - 17:30 | DanielAllen | git data transport commands |
| |
topthreedirs.png | r1 | manage | 1.8 K | 2015-12-16 - 16:27 | JeffGuild | Diagram of the top three directories of the repository |
Information in this area is meant for use by CSCF staff and is not official documentation, but anybody who is interested is welcome to use it if they find it useful.
- CF Web
- CF Web Home
- Changes
- Index
- Search
- Administration
- Communication
- Hardware
- HelpDeskGuide
- Infrastructure
- InternalProjects
- Linux
- MachineNotes
- Macintosh
- Management
- Networking
- Printing
- Research
- Security
- Software
- Solaris
- StaffStuff
- TaskGroups
- TermGoals
- Teaching
- UserSupport
- Vendors
- Windows
- XHier
- Other Webs
- My links
Ideas, requests, problems regarding TWiki? Send feedback


