New Users' Guide to Computer Science Computing Resources
Welcome to the University of Waterloo's Computer Science Computing Facility (CSCF). This document contains essential information that will help get you familiarized with the University's computing environment.
The computing environment
The "general.cs" or general computing environment is a collection of machines meant to support general-purpose computing. The "student.cs" or student computing environment is a collection of machines meant to support student computing, mostly coursework, and shares many aspects with the Math Faculty Computing Facility (MFCF) student computing environment.
New faculty members are provided with a thin client but can request PCs that will be funded by their start up grants. Graduate students are given either a thin client or a PC, at the discretion of their supervisor.
Getting started with WatIAM
WatIAM (Waterloo Identity and Access Management) is a database of information about all students, faculty, and staff at the University of Waterloo. Currently, WatIAM is used for the following purposes:
- Phone and e-mail address directory
- Authentication for various campus computing systems and services
- Forwarding e-mail sent to userid@uwaterloo.ca
To learn how to use WatIAM and edit your displayed personal information, refer to the WatIAM documentation
Wireless internet access
Wireless access is provided across most of the University campus, including the Math Computing building and the Davis Centre. Set your wireless card to use DHCP. You will automatically receive an IP address but cannot connect anywhere until you authenticate yourself by attempting to load any web page and entering your WatIAM credentials at the portal to which your browser will be redirected.
Waterloo email
Undergrad email addresses are of the form userid@edu.uwaterloo.ca. Non-undergrad addresses in Computer Science (CS) are of the form userid@uwaterloo.ca except for very special cases (which you need to talk to your Point of Contact to create). E-mail clients should be configured using "authenticated SMTP" (with "SSL/TLS enabled") and IMAP (with "SSL enabled") to the server "connect.uwaterloo.ca". Mozilla Thunderbird is the CSCF recommended e-mail program. A tutorial for Thunderbird may be found here.
Printing
The CS Faculty has access to several departmental printers, e.g. in Davis Centre (DC) 3507, DC 3341 and DC 3622. Many CS research groups have their own printer. Graduate students' machines are configured, by default, to print to the departmental printers in the grad student mail room (DC 2583). See printers and printer "classes" for the current list of shared CS printers.
Full-services printing and copying is available on campus from W Print. Services include thesis printing and binding, wide format printing, and large jobs,
Waterloo students may use the uPrint web-based printing service to print from any device to any of the uPrint printers located around campus.
Managing web space
Computer Science allocates web space for all faculty members and graduate students. By default, web space is designated at this address: http://www.cs.uwaterloo.ca/~userid.
Secure Copy (SCP) and Secure Shell (SSH) can both be used to transfer files into the default web space folder "public_html". If the folder does not exist, you have to create it in your home directory, and put your index.html file inside it. Make sure the permissions are set properly:
$ chmod a+r public_html
$ chmod a+r public_html/index.html
To connect, use CSCF's CPU server hosts "linux.cs". For an SSH tutorial, go here.
To transfer files using the Unix command line, enter "scp <filename> <host>: <path>". An excellent resource that explains how to effectively use your designated Waterloo personal web space can be found here.
Additional support
Research support is provided by two different mechanisms: Dedicated support and Desktop support. Dedicated support is designed to allow the researcher or research group to choose how best to prioritize tasks to be performed by the CSCF support staff and can be used to cover work on servers, desktop machines, laptops, printers, etc. Desktop support is an inexpensive way to obtain support for specific individual machines. Faculty members may already belong to support groups, but if not, may subscribe to support groups using individual payment. New faculty should refer to their department to check their existing support group subscriptions. Grad students seeking help should refer to their supervisors. For further support, please refer to the list of Useful Links at the end of this document or consult Lawrence Folland ext. 32214. Administrative staff should contact the CSCF Help Desk or Stephen Nickerson.
Useful links
Creating and using SSH Keys to access SCS hosts
To access CS computing hosts, you may need to use SSH Keys. You must first generate a public/private pair of keys and then install the public key on the host you want to connect to. Below are some steps to accomplish that. IST has provided documentation for SSH Key Generation on a variety of client machines.
For example, to create an ssh key to connect to linux.cs.uwaterloo.ca from a typical Linux (Ubuntu) client system, simply type the following on your local machine. Please note, once the SSH restrictions are in place, you will need to have the VPN active for the ssh-copy-id command to work:
ssh-keygen -t ed25519
     (accept the default options), thens
sh-copy-id -i ~/.ssh/id_ed25519 linux.cs.uwaterloo.ca
    (you should be prompted for your CS General password)
You can also manually copy your public key into the remote host by appending your key into linux.cs:~/.ssh/authorized_keys with a text editor. This method requires a new line for each key and no empty lines (especially at the end of the file). Formatting errors will likely block access to your account. Please test access from a different client window/session before logging out of the session where you make the change!
Software and Programs
Exchange calendar
For details on how to use/setup Exchange calendar on Outlook, please refer to IST's documentation.
Mozilla Thunderbird
Mozilla Thunderbird is a mail client that allows users to retrieve, view, and compose messages from multiple email accounts.
- Adding an email account
- Deleting an email account
- Setting an account as default
- Setting your outgoing SMTP server
1. Adding an email account
To add an email account:
- In the menu, select File > New > Account
- Select "Email Account" and click "Next"
- Enter your desired outgoing name and email address and click "Next"
- Select "IMAP".
- Enter the name of your incoming server in the field beside "Incoming Server"
- If you are an undergraduate student, the name of your incoming server is "mailservices.uwaterloo.ca"
- If you a graduate student, staff or faculty member, the name of your incoming server is "connect.uwaterloo.ca"
- Click "Next" twice
- Enter a name for your new account beside "Account Name" and click "Finish"
- Do not click on your new email account in the folder pane on the left to retrieve messages yet
- In the menu, select Tools > Account Settings
- In the left hand menu, click on "Server Settings" in the account you want to edit
- Make sure the "User Name" is your userID. If your full Waterloo userID is greater than eight characters long, use the shortened eight-character version
- Checkmark the "Use secure connection (SSL)" option in the "Server Settings" section
- Click "Ok" to save your settings
- In the folder pane, click on the name of the account from which you want to retrieve messages
2. Deleting an email account
To delete an email account:
- In the menu, select Tools > Account Settings
- In the left hand menu, click on the name of the account you want to delete
- In the bottom left hand corner, click on "Remove Account"
- Click "Ok" twice to save your settings
Note: After deleting an account, Thunderbird may display an alert that reads, "Failed to remove this account." You should disregard this alert, which is due to a bug in Thunderbird's system, because your account has in fact been deleted.
3. Setting an account as default
The email account you set as default will appear first in the list of accounts in the folder pane. In addition, messages you compose will automatically be sent from your default account unless you specify otherwise.
To set one of your email accounts as default:
- In the menu, select Tools > Account Settings
- Click on the name of the account you want to set as default
- In the bottom left hand corner, click on "Set as Default"
- Click "Ok" to save your settings
4. Setting your outgoing SMTP server
To set your outgoing SMTP server, please do the following:
- In the menu, select Tools > Account Settings. (Edit -> Account Settings on some platforms)
- In the left-hand pane, click on "Outgoing Server (SMTP)"
- Set the "Server Name" to the name you specified in the section "Adding an email account"
- If your computer is or may be off-campus, set the Port to 587, otherwise, leave it as the default 25
- Checkmark the option "Use name and password", and enter your userID in the "User Name" text box
- Check the option "TLS" under "Use secure connection"
Microsoft Outlook
For details on how to use/setup Exchange account on Outlook, please refer to IST's documentation
Printing
-
Installing a CS printer on Windows
-
Installing a CS printer on Mac OSX
-
Installing a CS printer on Ubuntu
Installing a CS printer on Windows
A printer on Windows will not be added without proper drivers.
To add a printer on Windows:
- Open "Devices and Printers" from the Start Menu or Control Panel
- Select "Add a Printer" from the options above, followed by "Add a network, wireless or Bluetooth printer"
- The wizard will start searching for a printer, ignore this and select "The printer that I want isn't listed"
- Choose to "Select a shared printer by name", and enter the URL of the printer in the field provided
- The URL must look like:
"http://print.cs.uwaterloo.ca:631/printers/printerID"
i.e. just replace the printerID with a valid printer name. Check the list of CS printers here. For example, the grad mailroom printers,
"http://print.cs.uwaterloo.ca:631/printers/cs009969"
OR
"http://print.cs.uwaterloo.ca:631/printers/cs010151/"
are both valid URLs (since there are two printers there) - Select the correct manufacturer for the printer chosen, along with the driver for the given printer. (The correct manufacturer can be obtained from the list of printers in Step 5.)
- A driver for a similar printer may be used if a driver can't be found, i.e. using Xerox Phaser 8560 instead of 8550
Alternatively a network printer can be added using its IP Address or Host name.
- In Step 4, instead choose "Add a printer using TCP/IP address or hostname" and press Next.
- Enter the printerID.cs.uwaterloo.ca or IP address under "Hostname or IP address" and click "Next"
- The computer should then try to connect and install the correct driver
Installing a CS printer on Mac OS X
To add a printer in OS X:
- Open "System Preferences"> "Print and Fax"
- Click the lock and authenticate to allow changing settings
- Click on the "+" button to add a printer.
- Fill in the fields as follows:
> Address: "print.cs.uwaterloo.ca
> Protocol: "Internet Printing Protocol - IPP"
> Queue: "printers/printerID", check the printer listings
for the correct printerID to use, replace bolded text with the preferred printerID - > Print Using: Generic Postscript Printer, or a specific driver if available
> The Generic Postscript driver supports duplexing - The name of the printer is different from the address and can be changed to fit the users needs, also adding the room number is recommended.
- Click the "Add" button to finish.
Installing a CS printer on Ubuntu
- Open a Terminal window
- > sudo vi /etc/cups/cups-browsed.conf and add these lines:
            Browsing On
            BrowsePoll print.cs.uwaterloo.ca
            BrowseInterval 3600
            BrowseTimeout 7200
3. > service cups-browsed restart
This should add all the CS printers. Go to the printers page to see which printer is closest to you.
VPN Connection
To setup a VPN connection, you will need to install the Waterloo Virtual Private Network (VPN) client.
- Go to the Waterloo VPN webpage
- Login using your WatIAM credentials
- On the left sidebar, click on AnyConnect
- Click Start AnyConnect
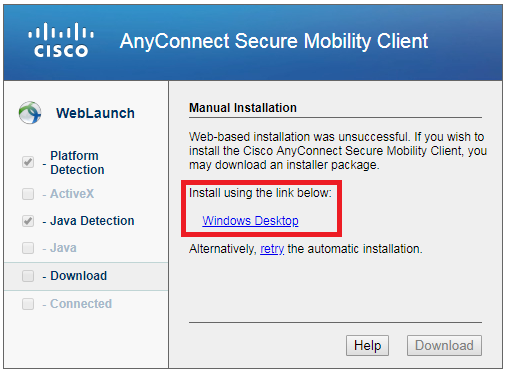
- Download the installer using the link provided under the text "Install using the link below"
- Run the installer after it has finished downloading
- You may receive a security warning asking to run the installer, click Run to proceed
- A window will pop up to install package and will require you to accept the Cisco software licence. Eventually, the installation wizard will complete: click Finish
- Launch the Cisco AnyConnect VPN Client
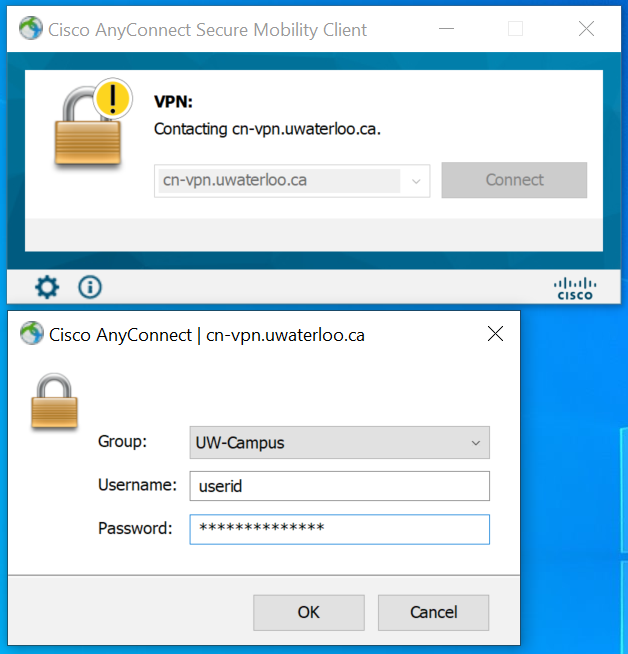
- Enter cn-vpn.uwaterloo.ca in the address field as shown

- Enter your WatIAM credentials and click OK.
Mapping network drives
Off-campus
If you are off-campus and require to connect to your network drive, you will need to make sure you have a VPN connection setup. Please refer to the steps above.
Once you've set up the VPN connection, follow the steps below.
On-campus
1. Windows 10
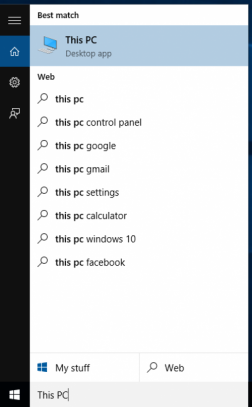
- Click the Start button, and search for This PC
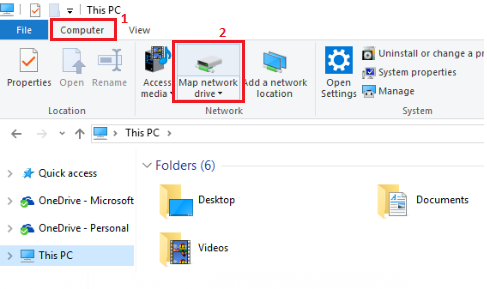
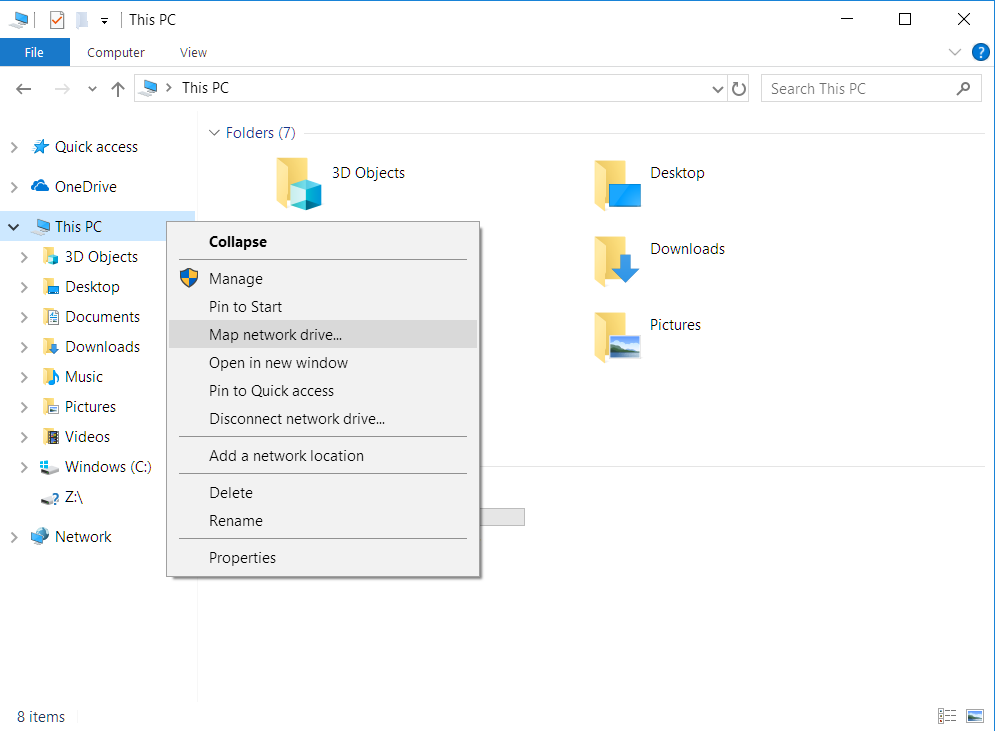
- Click the Computer tab on the top, followed by the Map network drive (as shown below)
- In the Drive list, pick the letter you would like for your network drive
- In the Folder box, type \\smb-files.cs.uwaterloo.ca\userID , replace the "userID" field with your own userID
- Select the Reconnect at sign-in and Connect using different credentials boxes
- Click Finish
- You will be prompted to enter a username and password. For the username, enter it as GENERAL\userID with the same password you use to login to your machine. If you're unable to login, please contact CSCF help desk
2. Mac OSX
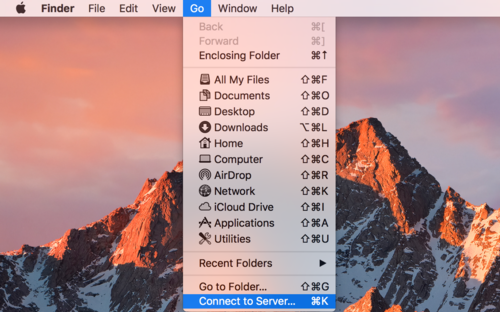
- Press Command+K on your Mac keyboard, or, Finder > Go > Connect to Server
- Enter the following address:
smb://smb-files.cs.uwaterloo.ca/userID
where the userID should be replaced with your corresponding userID - You will be prompted to enter your username and password. Select "Registered User" option and enter your username as:
GENERAL\userID
with the same password used to login to your machine. If you are unable to login, please contact the CSCF help desk.
TEACHING and/or GENERAL Environment
TEACHING (formerly named CS-TEACHING)
The TEACHING Computing Environment is a collection of hosts meant to support the computing requirements of CS courses.
Before you attempt to login, please setup your TEACHING password HERE (this is different from your WatIAM password).
For Mac and Linux users, you can connect to this environment using the following command in your Terminal application:
ssh -Y user_id@linux.student.cs.uwaterloo.ca
Use the same credentials you setup above.
For Windows users, you can connect using a software application called PuTTY.
Once you launch PuTTY, enter the Host Name (or IP Address) as:
linux.student.cs.uwaterloo.ca
None of the other settings need to be changed, so click Open and use your login credentials that you setup above.
GENERAL
The CSCF General Computing Environment (GENERAL) is a collection of machines meant to support general-purpose computing. Essentially, this means anything except for specialized research computing and coursework-related student computing.
Before you attempt to login, please setup your GENERAL password HERE (this is different from your WatIAM password) or at the CSCF help desk.
For Mac and Linux users, you can connect to this environment using the following command in your Terminal application:
ssh -Y user_id@linux.cs.uwaterloo.ca
Use the login credentials you setup at the help desk.
For Windows users, you can connect using a software application called PuTTY.
Once you launch PuTTY, enter the Host Name (or IP Address) as:
linux.cs.uwaterloo.ca
None of the other settings need to be changed, so click Open and use your login credentials that you setup at the help desk.
Remote Desktop to windows.student.cs
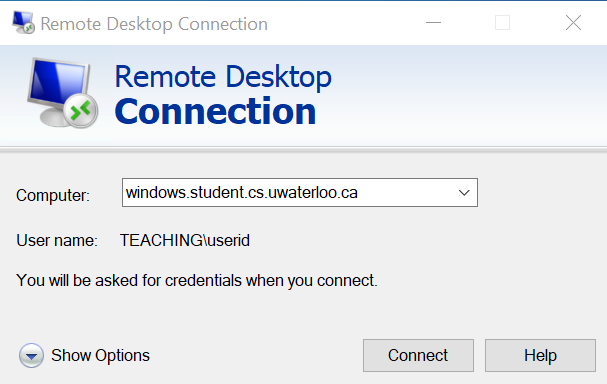
All students can set up a remote desktop connection to windows.student.cs.uwaterloo.ca using the Remote Desktop Connection application.
- For Windows & Mac users, launch the Remote Desktop Connection application. (You may need to download it from the App store on macOS)
- For the Computer field, enter windows.student.cs.uwaterloo.ca (as shown in the image below) and click Connect. You will be asked for your credentials, where the username will be TEACHING\userid and your TEACHING password. If you do not know your TEACHING password then you can (re)set it HERE.
Accessing the smb-files.student.cs
For Windows Users
- If you're not on UW campus, you have to first connect to the campus network using the UW Cisco AnyConnect VPN
 (download the VPN client).
- Open File Explorer. Right-click This PC. Choose Map network drive...
-
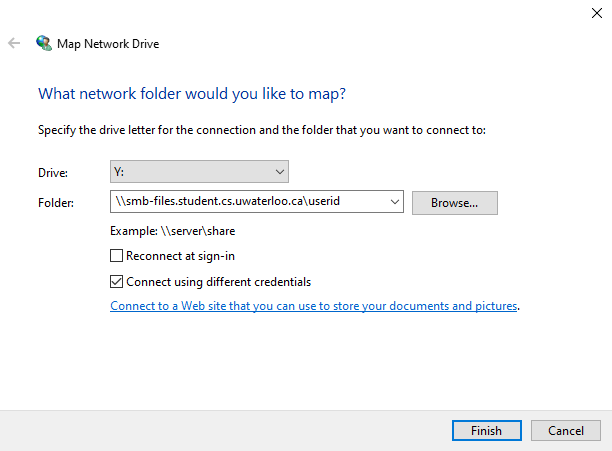
For the Folder, enter
\\smb-files.student.cs.uwaterloo.ca\useridwhere userid is you Quest userID.Check Connect using different credentials and click Finish.
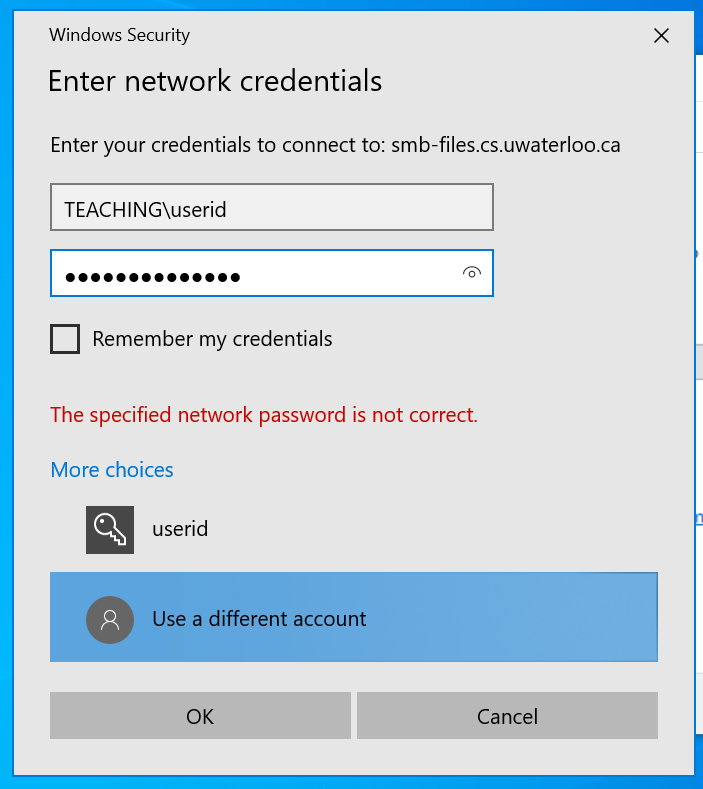
- Click More choices and Use a different account.
For the username, enterTEACHING\useridwhereuseridis your Quest ID, up to 8 characters. The password is the same password you use to logon to the Macs in MC 3rd floor. You can reset your password if you don't know it.
For Mac Users
Samba lets you mount the course account as a drive/folder so that you can work with the course's files in a Finder window.
Step 1: Click on the desktop or the Finder icon in the Dock (bar at the bottom of the screen). Then in the Finder menu bar at the top of the screen, click on Go and choose "Connect to Server..."
Step 2: Use Server Address:
smb://smb-files.student.cs.uwaterloo.ca/userid
You can click the '+' button to save the address. Click Connect.
Step 3: For Name enter TEACHING\userid, where userid is your WatIAM or Quest ID, and use your student.cs password (reset password if needed). Click Connect.
Open edX - online.cs.uwaterloo.ca
If you are experiencing issues with Open edX, please try to clear your browser cache and cookies by following the steps here.
Make sure to clear ALL your cache and cookies. Not just for the last hour.
This should solve the majority of the issues.
If clearing your cache and cookies doesn't solve the problem, please try opening the page again using Incognito / Private mode in your browser.
If you have recently enrolled in a course and do not see the course listed on your Open edX dashboard, please give the systems 2 BUSINESS days to sync.
If you are still experiencing issues, please email the Open edX support email at cs-online@uwaterloo.ca. The email is monitored Monday - Friday.