Vault file service: User Documentation
Nextcloud User Manual
https://docs.nextcloud.com/server/latest/user_manual/Overview
This service provides a "DropBox-like" file service to our CS clients. You must have an account in our CS-GENERAL Active Directory. That is the authentication it uses (not WatIam/Nexus/Quest). This service is built using NextCloud open-source software (the successor to OwnCloud). Both the front-end and back-end file storage are built with three-building redundancy (DC/MC/M3) so it designed to be highly fault-tolerant. There is a total of 216TB of back-end storage. Each user has 500GB of file space by default. Contact cscfhelp@uwaterloo.ca if you need more. You can use this service in a few different ways:- as a backup to key files on your local workstation - install the client software, configure a directory on your local system to synchronize and connect that to a folder on the Vault server. You can configure multiple clients to synchronize the same folder, or have different clients use separate directories as you choose. As files are updated on one system, they are synchronized with any other of your clients that share that directory.
- you can access files using the web client directly at https://vault.cs.uwaterloo.ca
 Files can be stored there and not synchronized, if you wish.
- You can send a link to others to share files with them. Those external users do not need a CS-GENERAL account
- You can share files with another CS-GENERAL user account. They will get an email from Vault.cs notifying them, and it will appear in their Vault directory.
Warnings
- Do not have 2 files/directories with the same name/path but different case; while this is valid on Unix filesystems, Nextcloud does not handle it well.
How to setup Nextcloud Client to sync files (Windows + Mac)
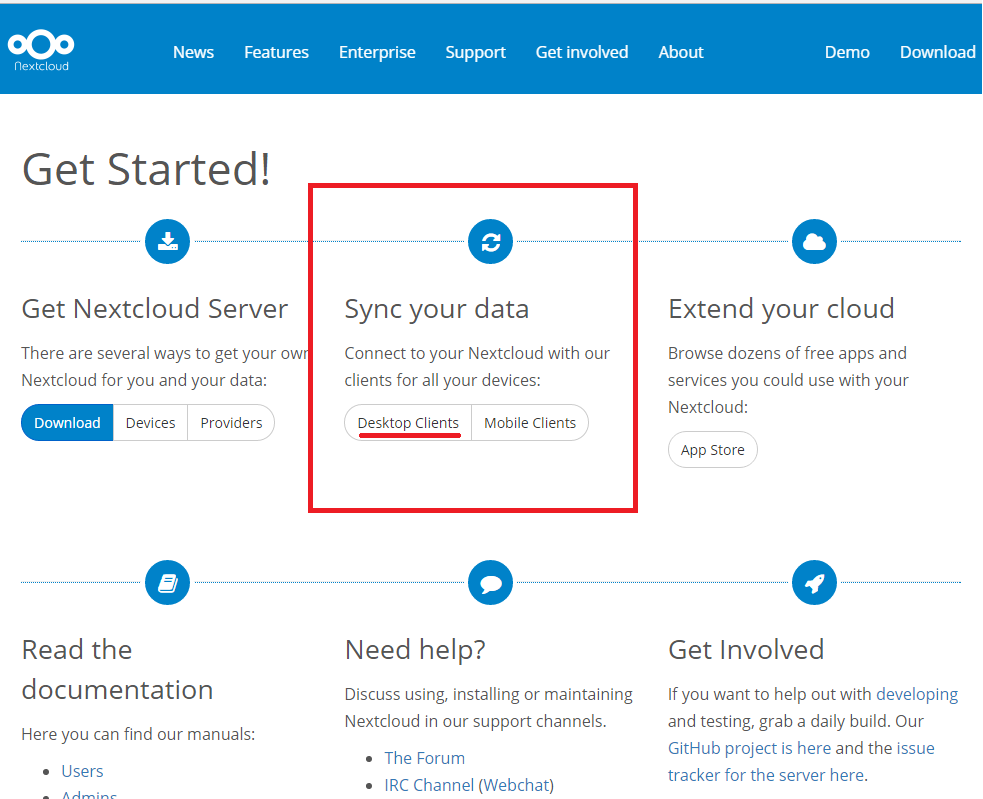
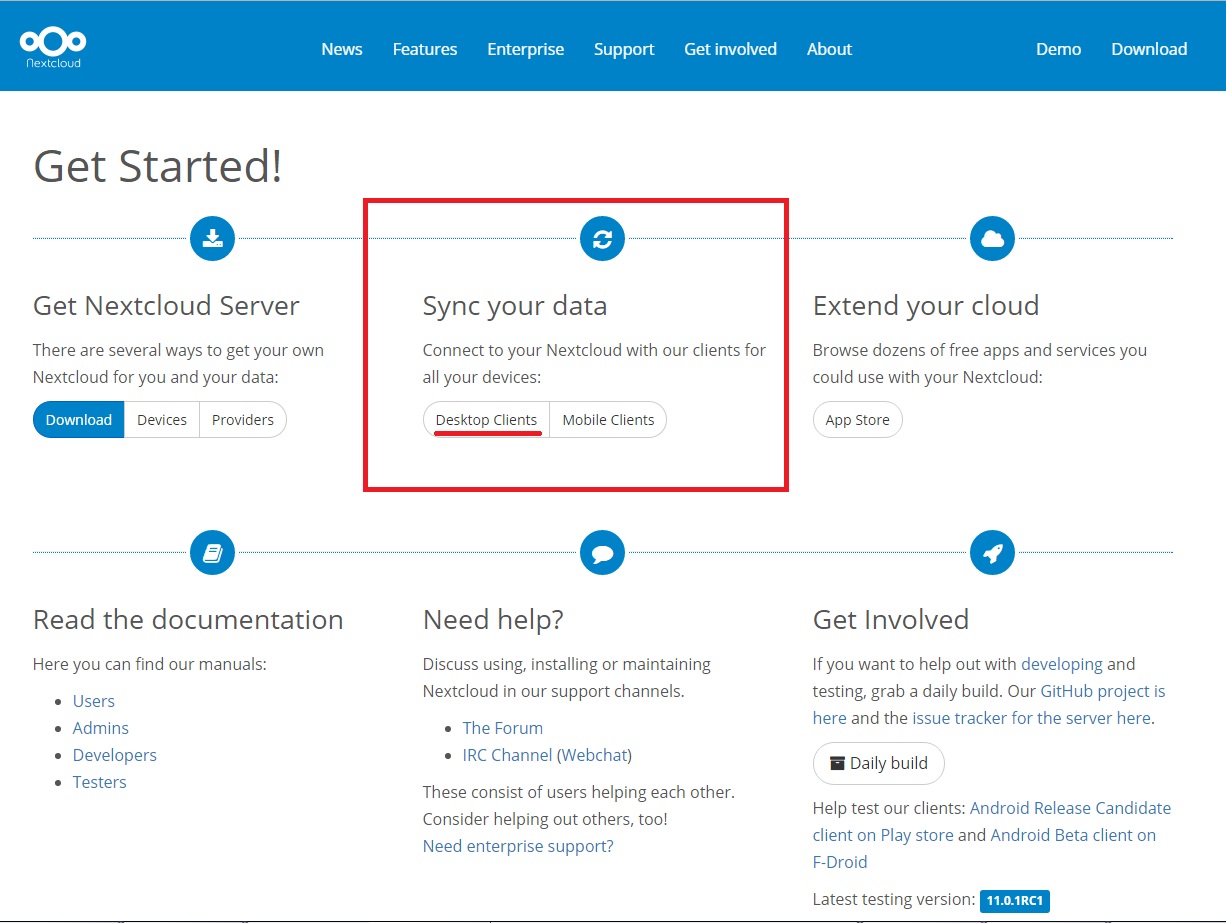
- Step 1: Navigate to https://nextcloud.com/install/ and click on Desktop Clients as highlighted in the picture below
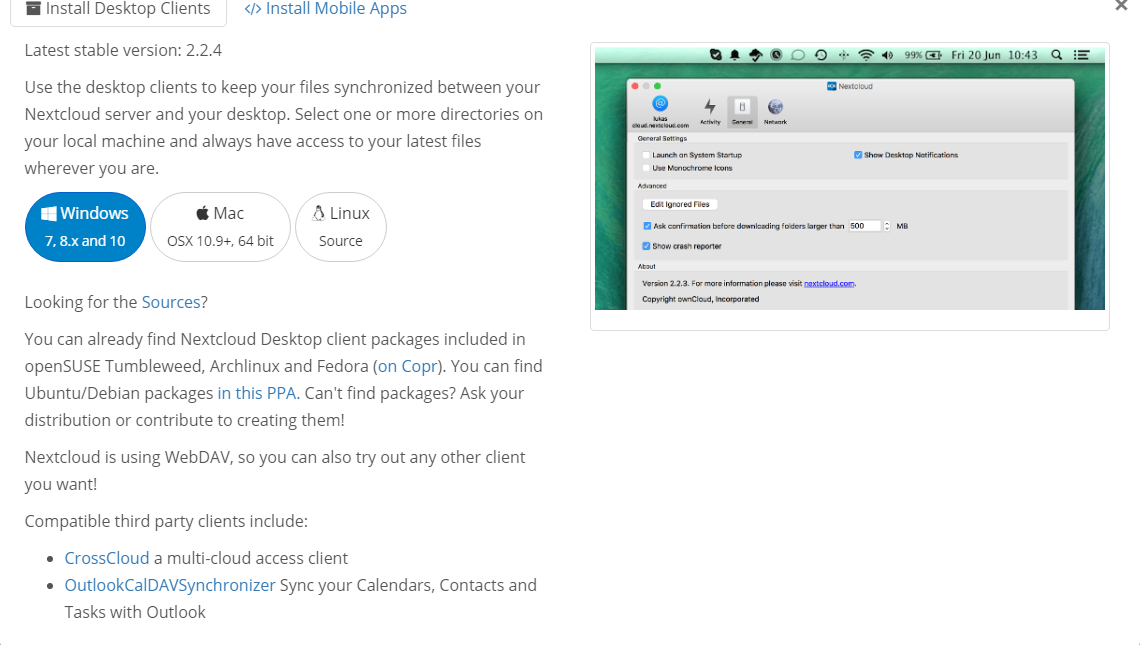
- Step 2: Next, pick the client based on what system you are currently using

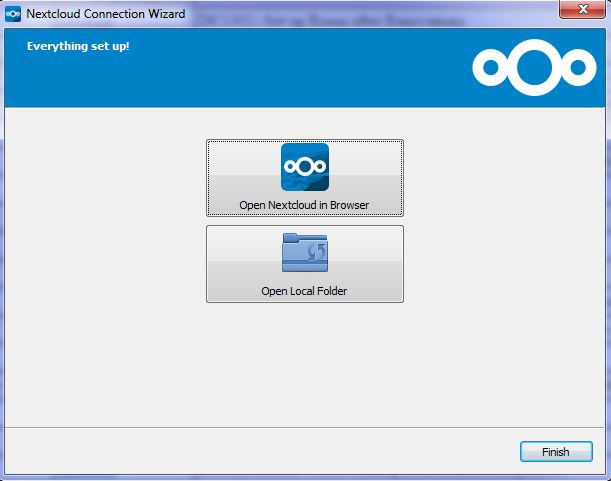
- Step 3: Open the installation file, and click "Next" till the installation starts. Once it's done, click Finish.
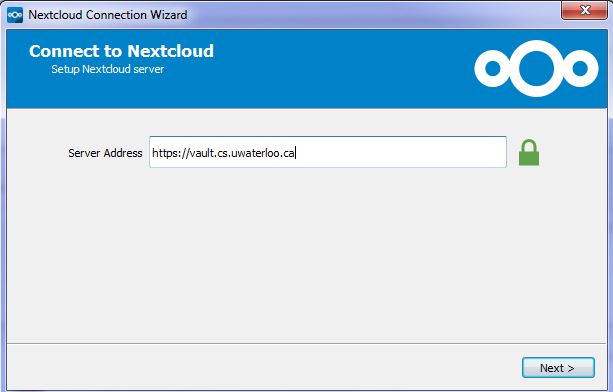
- Step 4: Once the installation is complete, launch the client and you should see the prompt as shown below. Enter the following address: https://vault.cs.uwaterloo.ca and click Next
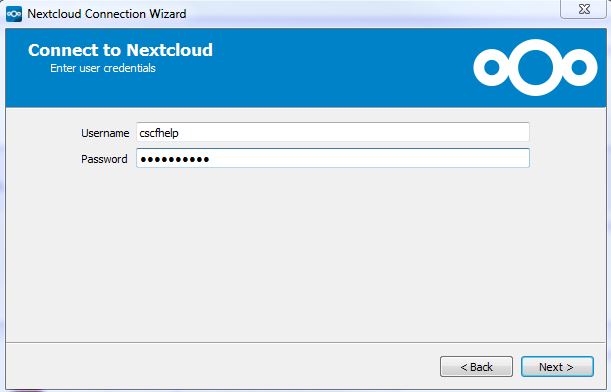
- Step 5: Next, you will need to enter you UWaterloo userID and CS-GENERAL password (For Administrative staff, this is the password used to login to your Windows machine; this is the same password as linux.cs as well)
- Step 6: Next, you will set up your sync folders and options. If you wish to sync your "Documents" folder, simply click on the Local folder button and navigate to the folder you wish to choose. (as show below)
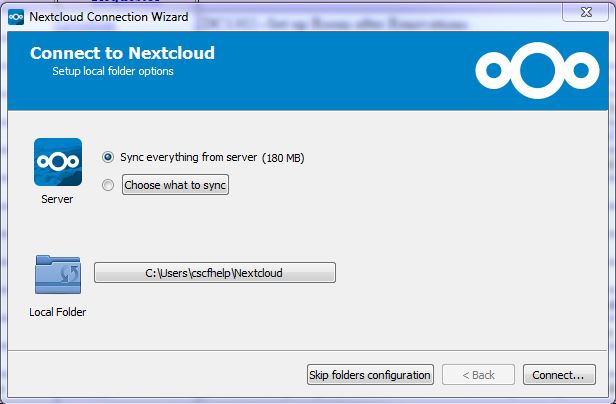

- Step 7: Once you're sure which folders you wish to sync, and whether you want to sync everything or some selected folders/files, click on the "Connect..." button.
- Step 8: Now you're all set to have your files synced up in the folder you chose. You can view the files on the Web browser by going to https://vault.cs.uwaterloo.ca and viewing your files there.
General documentation on using WebDAV with Nextcloud:
https://docs.nextcloud.com/server/latest/user_manual/files/access_webdav.htmlHow to setup Nextcloud Client on Linux
For Ubuntu users, we need to use PPA:# sudo add-apt-repository ppa:nextcloud-devs/client
# sudo apt-get update
# sudo apt-get install nextcloud-client nextcloud-client-nautilus
Once you've finished the installation, follow the steps above starting at Step 4.
Accessing vault.cs using WebDAV on Ubuntu
WebDAV using Nautilus
- Using Nautilus (GUI file browser) window, type Control-L to open location bar.
- Enter
davs://vault.cs.uwaterloo.ca/remote.php/webdav - You will be prompted from credentials.
Persistent (fstab) WebDAV mounts in Ubuntu
You can also mount WebDAV directories from the command line using the following steps:- Install davfs2
# sudo apt-get install davfs2
- Reconfigure davfs2 to enable to use davfs under unprivileged users
# sudo dpkg-reconfigure davfs2
- Add a line to
/etc/fstababout the remote WebDAV directory
https://vault.cs.uwaterloo.ca/remote.php/webdav /home/UWuserID/webdav davfs user,noauto,file_mode=600,dir_mode=700 0 1
- Copy the system config as a template
mkdir -p ~/.davfs2/; cp -r /etc/davfs2/davfs2.conf ~/.davfs2/
- Edit
~/.davfs2/davfs2.confto enable automatic credentials use
Uncomment the linesecrets ~/.davfs2/secrets
- Edit
~/.davfs2/secretsfile to add credentials to remote WebDav directory- Add a line to the end of file:
https://vault.cs.uwaterloo.ca/remote.php/webdav USERNAME PASSWORD
Set the permission:
# chmod 600 ~/.davfs2/secrets
- Add a line to the end of file:
- Add your user to davfs2 group
usermod -a -G davfs2 $USER- Log in again to apply
Temporary WebDAV mounts in Ubuntu
Occasionally, you need a temporary, read-only mount from a command shell/on a server. This can be accomplished with the following command:mount -t davfs -o ro https://vault.cs.uwaterloo.ca/remote.php/webdav /mntYou will be prompted for credentials.
Accessing with wget and curl
Shared links
- Use curl -O -J and append the link with /download eg.
curl -O -J https://vault.cs.uwaterloo.ca/s/glidKAWku5M4NG3/download
- Use --content-disposition and append link with /download eg.
wget --content-disposition https://vault.cs.uwaterloo.ca/s/glidKAWku5M4NG3/download
Authenticated uploads and downloads
One can get and put files (up to 24GB in size) into a Nextcloud account using the curl command. This is useful for uploading files from a command line session on a server.- From lower left corner of "Files" view on vault.cs web session, get "WebDAV" address eg. https://vault.cs.uwaterloo.ca/remote.php/dav/files/8B97E7EA-9E6D-4CE3-82D6-EB6CE0EC0D44/
- Use this address to access vault.cs with curl and credentials:
curl --user ldpaniak -H "Transfer-Encoding: chunked" -T $file_to_upload https://vault.cs.uwaterloo.ca/remote.php/dav/files/8B97E7EA-9E6D-4CE3-82D6-EB6CE0EC0D44/$destination_folder_on_vault/destination_file_name
How to setup Nextcloud Client on iOS
- Download the Nextcloud app from the App Store HERE
- Launch the app and you will be greeted with a slideshow of messages.
- Next, it will ask you to input an encryption key. This key is for when you wish to upload encrypted files. If you do not foresee yourself encrypting files then you can input whatever you want and need not worry about this. (Note for encryption users: The encrypted files are only view-able from your iOS device.)
- Now it will prompt you to enter an email address that the encryption key can be sent to. Ignore this and just hit "Done" on the top right.
- Next, hit "Add your Nextcloud account" this will ask you for the server address, username and password. The server address is https://vault.cs.uwaterloo.ca and then enter your Uwaterloo userID and CS-GENERAL password.
- Once you're logged in, you can view your files or you can upload your photos/videos from your iOS device.
Syncing with iOS device
If you wish to sync your photos from your iOS device, you may do so by clicking the Settings option on the bottom right. Click on the "Automatic upload of camera images" option and it will now sync up your photos to Nextcloud.How to use the Web Client
- Open any web browser and navigate to https://vault.cs.uwaterloo.ca
- Once on the page, enter your username and CS-GENERAL password (For Administrative staff, this is the password used to login to your Windows machine; this is the same password as linux.cs as well)

- Upon logging in, you will be redirected to your Files page. You can add, remove and share files from here.
Navigating the User Interface
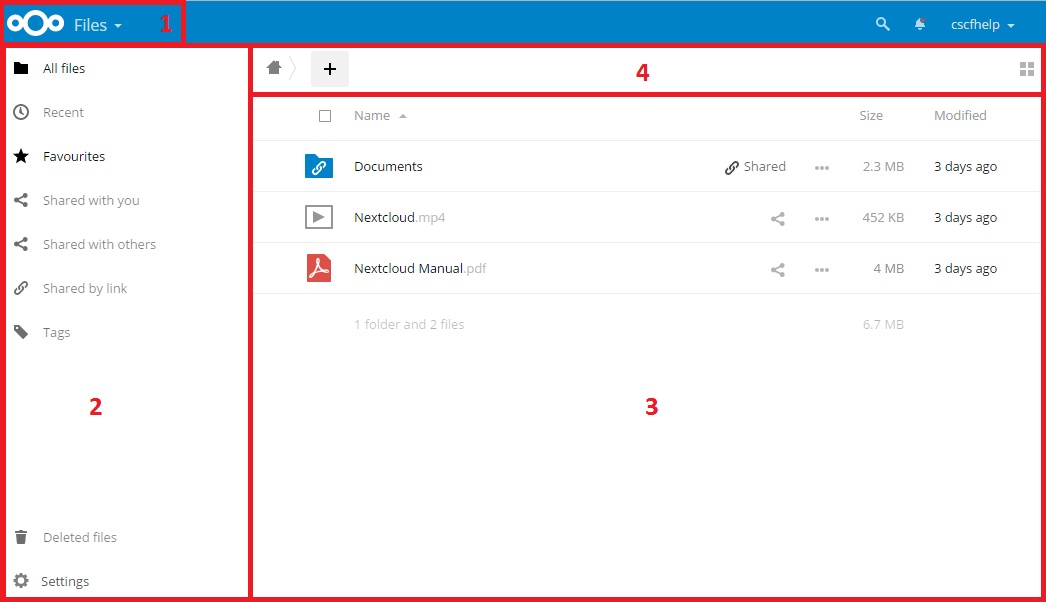
- 1. Apps Selection Menu: Located in the upper left corner, click the arrow to open a dropdown menu to navigate the available apps.
- 2. Apps Information: Located in the left sidebar, this provides filters and tasks associated with your selected apps.
- 3. Application View: This field displays the contents or user features of your selected app.
- 4. Navigation Bar: Located over the main viewing window, this bar allows easy navigation back to parent folders.
- New button: Located in the Navigation Bar (+) allows you to create folders or upload files.
File Versioning and Retention
The vault.cs Nextcloud service supports both file versioning (keep track of older versions of files) and file retention (undelete) features.File versioning
As you make changes to files in your Nextcloud share, versions of the changes are retained as follows: The versioning app expires old versions automatically to make sure that the user doesnt run out of quota space. This pattern is used to delete old versions:- For the first second we keep one version
- For the first 10 seconds Nextcloud keeps one version every 2 seconds
- For the first minute Nextcloud keeps one version every 10 seconds
- For the first hour Nextcloud keeps one version every minute
- For the first 24 hours Nextcloud keeps one version every hour
- For the first 30 days Nextcloud keeps one version every day
- After the first 30 days Nextcloud keeps one version every week
File Retention
When a file is deleted from your Nextcloud share, it is retained in the Deleted Files folder for a minimum of 180 days (if not violating storage quota limits). Deleted files are permanently purged from this folder as additional files are deleted and space is required to respect your quota. If you are not in conflict with your quota, deleted files are retained indefinitely. Further details can be found here: https://docs.nextcloud.com/server/latest/user_manual/files/deleted_file_management.htmlFeedback
If you have any questions, or would like to give any feedback, please contact cscfhelp@uwaterloo.ca

| I | Attachment | History | Action | Size | Date | Who | Comment |
|---|---|---|---|---|---|---|---|
| |
LUL.jpg | r1 | manage | 69.7 K | 2017-01-23 - 15:42 | CscfHelp | |
| |
NC2.PNG | r2 r1 | manage | 59.5 K | 2017-03-01 - 15:40 | CscfHelp | |
| |
NC2.jpg | r1 | manage | 210.1 K | 2017-01-23 - 16:03 | CscfHelp | |
| |
NC3.PNG | r1 | manage | 166.7 K | 2017-01-23 - 16:01 | CscfHelp | |
| |
NC3.jpg | r1 | manage | 132.8 K | 2017-01-23 - 16:15 | CscfHelp | |
| |
NC4.JPG | r1 | manage | 32.1 K | 2017-01-23 - 16:15 | CscfHelp | |
| |
NC5.JPG | r1 | manage | 31.2 K | 2017-01-23 - 16:15 | CscfHelp | |
| |
NC6.JPG | r1 | manage | 38.8 K | 2017-01-24 - 09:53 | CscfHelp | |
| |
NC7.JPG | r1 | manage | 43.9 K | 2017-01-24 - 09:53 | CscfHelp | |
| |
NC8.JPG | r1 | manage | 33.7 K | 2017-01-24 - 09:53 | CscfHelp | |
| |
NC9.jpg | r1 | manage | 36.2 K | 2017-01-24 - 09:53 | CscfHelp |
Topic revision: r33 - 2021-09-23 - LoriPaniak
Information in this area is meant for use by CSCF staff and is not official documentation, but anybody who is interested is welcome to use it if they find it useful.
- CF Web
- CF Web Home
- Changes
- Index
- Search
- Administration
- Communication
- Hardware
- HelpDeskGuide
- Infrastructure
- InternalProjects
- Linux
- MachineNotes
- Macintosh
- Management
- Networking
- Printing
- Research
- Security
- Software
- Solaris
- StaffStuff
- TaskGroups
- TermGoals
- Teaching
- UserSupport
- Vendors
- Windows
- XHier
- Other Webs
- My links
 |
|
Ideas, requests, problems regarding TWiki? Send feedback