TWiki> CF Web>ResearchSubscription>ResearchSubscriptionUserDocs (2024-08-27, DanielAllen)
 EditAttach
Research Subscriptions User Documentation
Overview
You can find the application here.Application Description
The Research Subscriptions application maintains a database of the CSCF Research Support Group's clients and support subscriptions, generates bills and reports, and interfaces with the Inventory and Service Tracking applications. The project is covered by STs and RTs found within the subscriptions app. (ST#78100Subscriptions Versus Users
Faculty members and graduate students in the School of Computer Science contract the services of CSCF's Research Support Group (RSG) on a subscription basis. A subscription represents a purchased number of person-hours of RSG work per term allocated to a group of researchers or to a special project. The faculty members and students in a group or on a project are 'users' in the Subscription application. A subscription typically belongs to multiple users and a user may be party to more than one subscription. Billing for a subscription is allocated among the subscription's users according to a schedule defined in the subscription's record. A bill is sent to the subscription's faculty contact.Types of Subscriptions
There are two types of subscriptions: desktop and dedicated. A subscription must be of one type or the other, not both.- Desktop
- Service is billed on a per-machine basis. A subscription enumerates the specific machines that it covers. Machine data is drawn dynamically from the Inventory database. Support of each included machine costs one desktop unit. This translates into actual money according to these system parameters:
Field Definition Desktop Machine Cost Cost of a desktop unit in dollars Desktop Units/Hour Number of hours of service per term that correspond to one desktop unit.
(Note that the field label is incorrect; it implies the inverse.)
- Dedicated
- Service is billed on the basis of the person-hours of labour that it is anticipated a subscription will require in a term. This varies with the needs of the project or group. The number of units purchased under each subscription is reviewed each term and adjusted for the new term according to usage expectations based on historical usage. This translates into actual money according to these system parameters:
Field Definition Dedicated Unit Cost Cost of a dedicated unit in dollars Dedicated Units/Hour Number of person-hours of service per term that correspond to one dedicated unit.
(Note that the field label is incorrect; it implies the inverse.)
Who Uses the Research Subscriptions Application?
The application is mainly used by CSCF staff. They can view and modify all user profiles and subscriptions and have full read and write access. Faculty can see their own user record and subscriptions, but cannot see billing information and cannot save any changes. You can find the application's main page here. Log in with your WatIAMThe Common Page Header
A standard header section appears at the top of every page.
| Button | Function |
|---|---|
| Subscriptions | Return to the Subscriptions Summary page. |
| Users | Maintain users of the subscription application. |
| Admin | Perform administrative functions such as setting unit prices, editing invoice templates, and billing clients. |
| Report | Generate reports. |
| Help | Display the online documentation in a new browser tab. |
| Log Out | Exit from the application. This will tell you that it has logged you out of the university's Central Authentication Service (CAS) |
Maintaining Subscriptions
The Subscriptions Summary page lists subscriptions.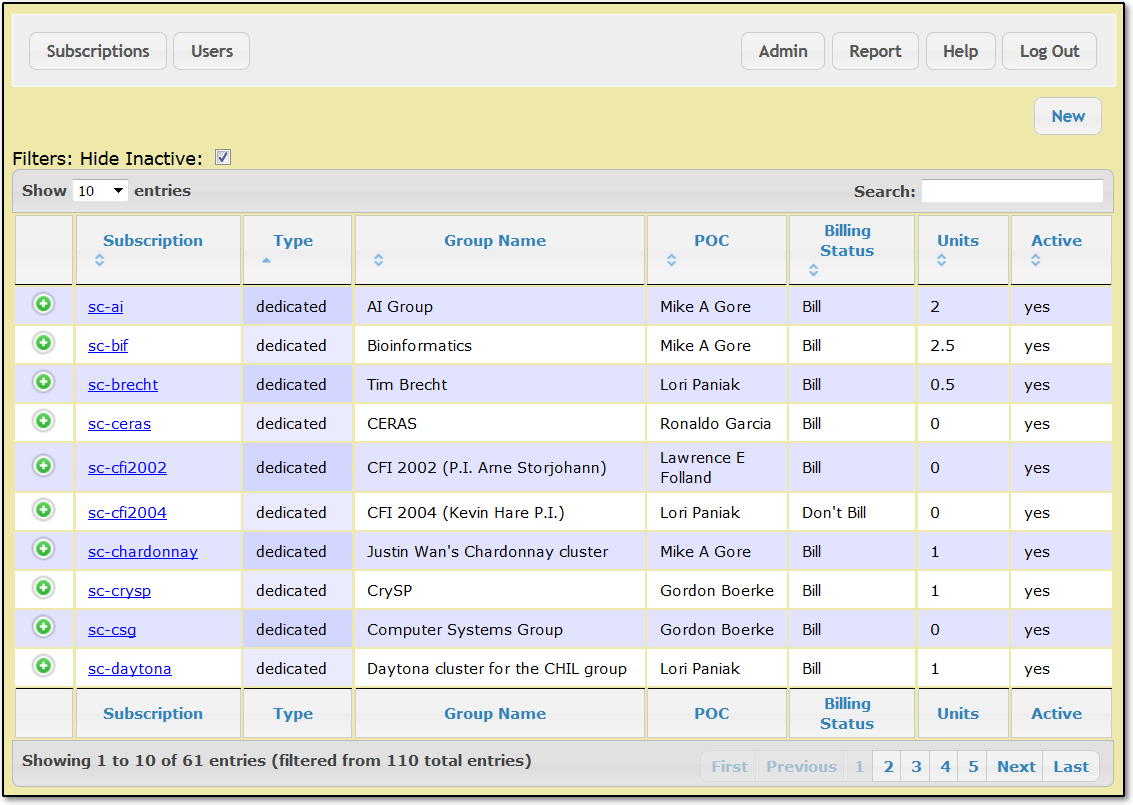
Browsing Subscriptions
By default, all active subscriptions are listed, sorted by subscription code, and presented in pages of 100 subscriptions. To include inactive subscriptions, uncheck the Hide Inactive checkbox. To change the number of subscriptions listed on each page, select a number from the Show [#] entries drop-down list. You can show 10, 25, 50, or 100 subscriptions per page. Use the buttons in the bottom-right corner of the page to navigate among the pages of listed subscriptions. To sort the list by a column's data, click the column heading. To reverse the sorting order, click the column heading again. To sort by two columns, click the secondary column's heading first and the primary column's heading second. Subscriptions will then be sorted by the primary column and any items with the same value in the primary column will be sub-sorted by the values in the secondary column. For example, to sort subscriptions by point of contact and sub-sort by number of Units, most to least, click the Units heading twice and then click the POC heading once. To restrict the list of subscriptions, enter a search string in the Search box. As you type, the list will be filtered to show only subscriptions that have your search string somewhere in one of these fields:- Subscription
- Group Name
- Web Site
- POC (point of contact)
- Organizational Unit
- Comments
Viewing and Editing a Subscription
At the Subscriptions Summary page, click a link in the Subscription column to see and edit full details. In the Subscription Details page, you see the full details for a single subscription.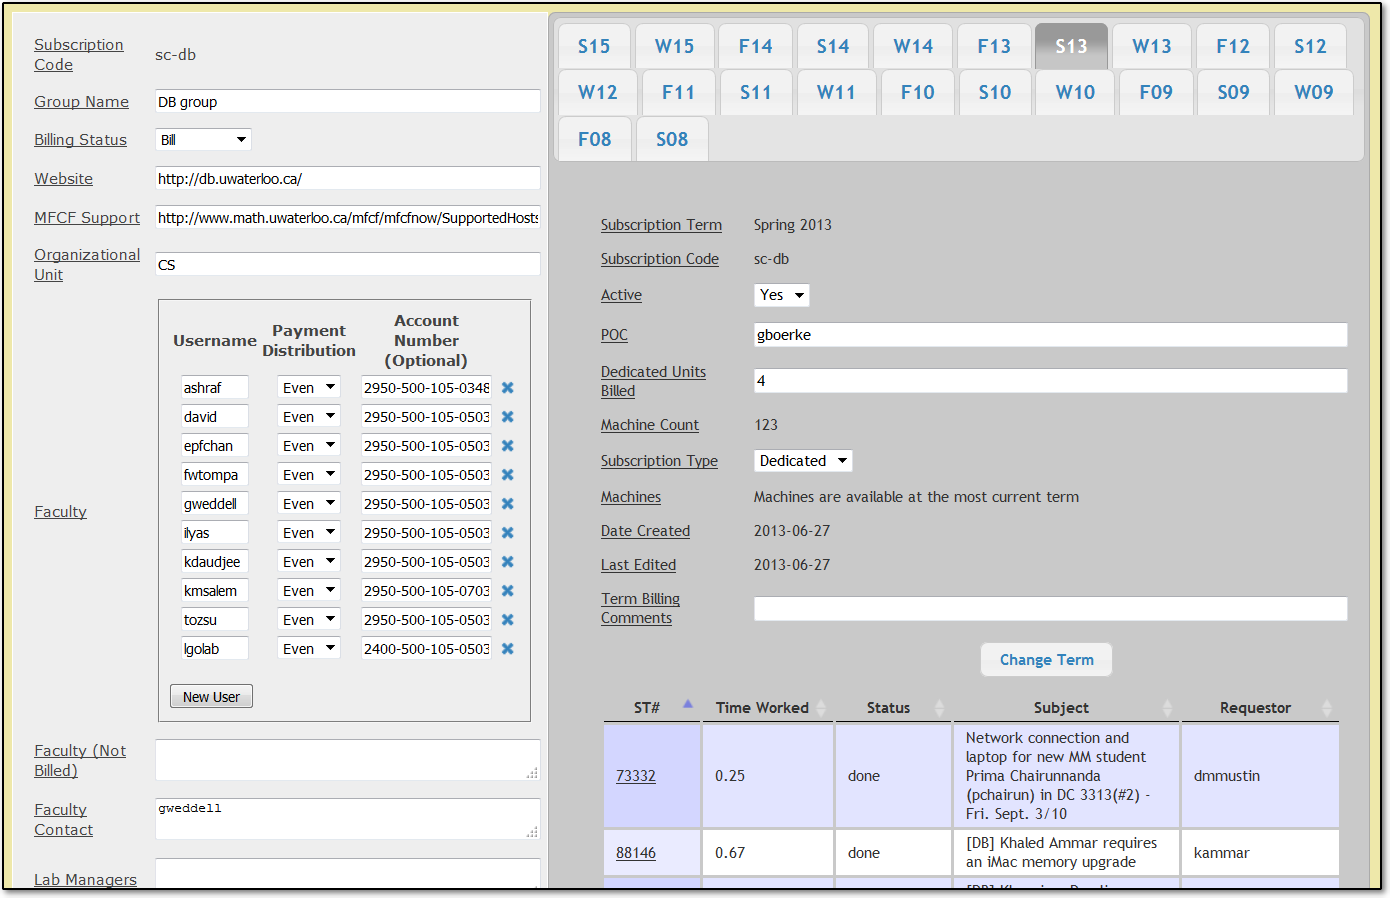
Note: When you make changes in one side of the page, save your changes before you make changes in the other side. If you make changes in both sides before saving, only the changes made on the side where you click the Change Account or Change Term button will be saved. Changes on the other side will be discarded as the page is refreshed.
Valid Data
- In the Faculty grid, people in the Username column do not have to be already-registered users in the subscription database. They can be added on the fly. Use WatIAM user ids.
- A Point of Contact (POC) must already be a registered user in the subscription database. (See Maintaining Users, below.)
- Dedicated Units Billed must be numeric, but may include decimal places (e.g. "4" or "1.75").
- Faculty (Not Billed), Faculty Contact, Lab Managers, Financial Admins, and Others are WatIAM usernames separated by commas. Be especially careful with ids in the Faculty grid as they will receive bills.
Adding a New Subscription
To add a new subscription, follow these steps.- Click the New button in the top-right corner of the Subscriptions Summary page, just below the page header. A blank subscription template appears.
- Fill in details of the subscription. These fields are required:
- Subscription Code
- Group Name
- POC
- If this subscription will be billed, you should also enter one or more Faculty
- Click the Add button.
Deleting a Subscription
You cannot delete a subscription through the web interface. Instead, flag a subscription as inactive by setting its Active value to "No". If it should ever be necessary to delete a subscription, a developer could use an SQL command directly against the database instead.Maintaining Users
To maintain users, click the Users button in the page header. A Users Summary page appears.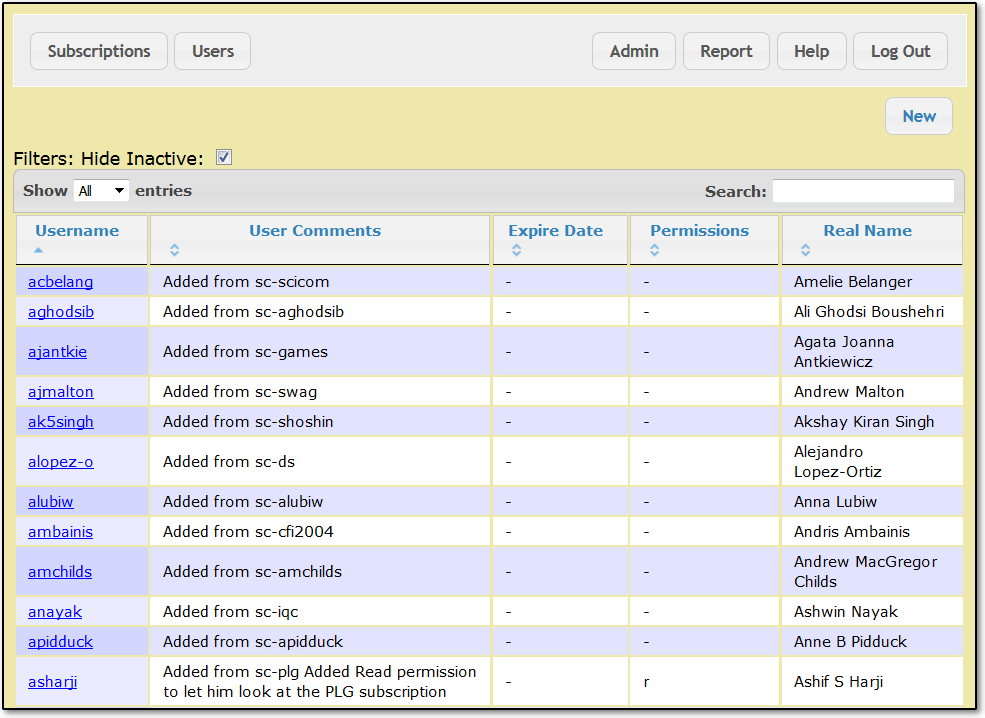
Browsing Users
By default, all users are listed, sorted by Username. To sort the list by a column's data, click the column heading. To sort by two columns, click the secondary column's heading first and the primary column's heading second. Users will then be sorted by the primary column and any users with the same value in the primary column will be sub-sorted by the values in the secondary column. To restrict the list of users, enter a search string in the Search box. As you type, the list will be filtered to show only users that have your search string somewhere in one of these fields:- Username
- User Comments
- Expire Date
- Permissions
- Real Name
Viewing and Editing a User
At the Users Summary page, click a link in the Username column to see and edit user details. In the User Details page, you see the full details for a single user.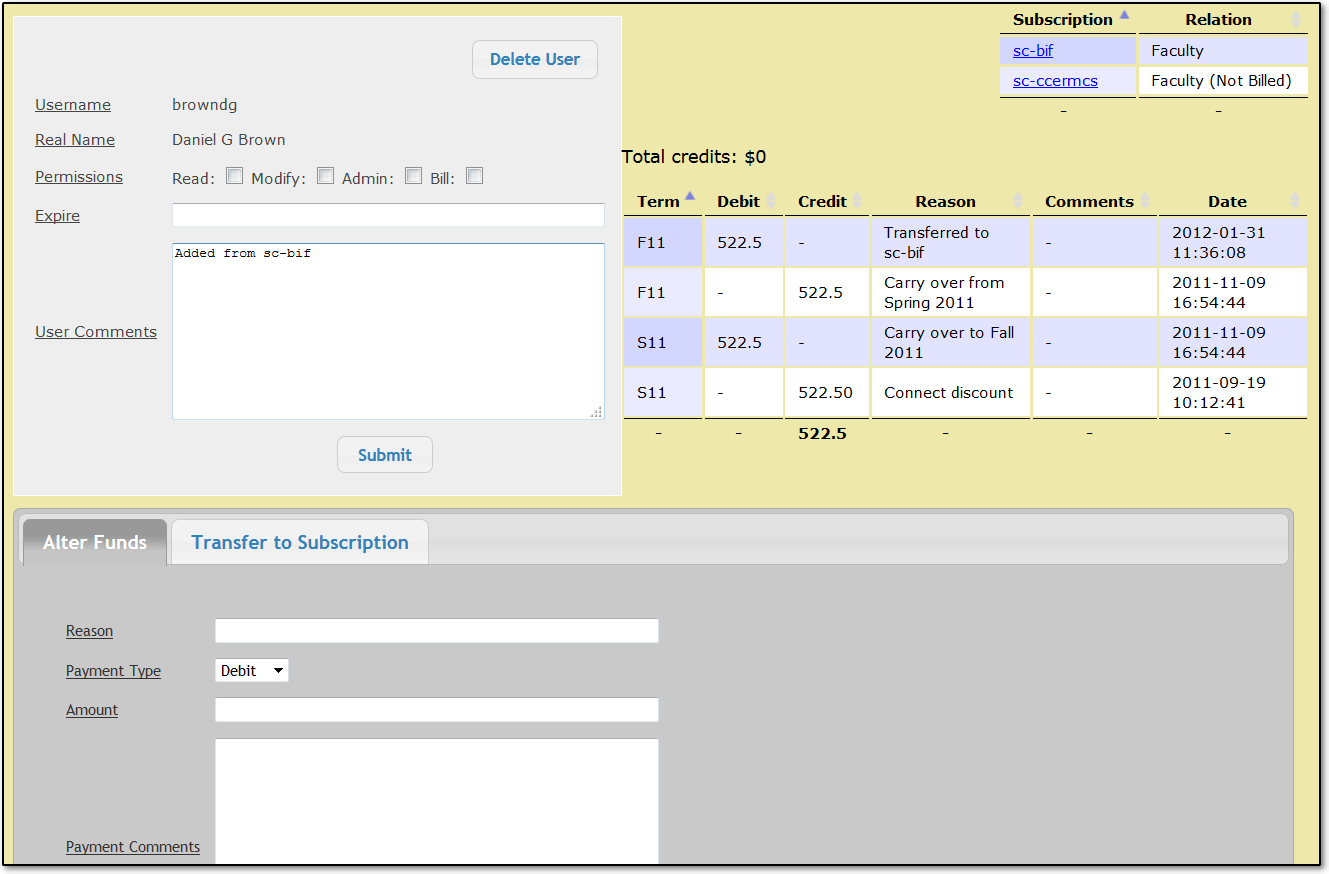
- The top-left area shows general information, including user permissions:
- Faculty can view their own subscriptions with no permissions checked. Read permission lets one view all users' subscriptions—not just one's own. The CSCF help desk user has Read permission.
- Modify permission allows one to change user and subscription details.
- School administrative staff who handle payment receipt need Read and Bill permission.
- Admin permission allows one to alter the application's configuration and perform administrative processes such as reviewing subscriptions and rolling the term. It also implicitly includes all other permissions. This is generally limited to RSG staff.
- The top-right area shows a record of the user's credit transactions and the user's role in various subscriptions.
- The bottom area has two tabs for financial functions. See Adjusting User Credits, below.
Valid Data
- Expiry date must be in yyyy-mm-dd format (example: 2017-12-31). A built-in date picker helps in date selection.
Adding a New User
To add a new user, follow these steps.- Click the New button in the top-right corner of the Users Summary page, just below the page header. A blank user template appears.
- Fill in the user's details.
- Click the Submit button.
Deleting a User
It is unlikely that you will need to delete a user. If, for some reason you do need to delete a user, simply click the Delete User button in the top-right corner of the general information area of the User Details page.Adjusting User Credits
At the bottom of the User Details page are two tabs for making adjustments to the user's credit.Alter Funds
Use this tab to add to, or deduct from, the user's outstanding credit or debt.Transfer to Subscription
Use this tab to apply some or all of the user's credit to a particular subscription.Valid Data
- Any monetary amount must be numeric, non-negative, and precise to no more than two decimal places. Do not include the dollars ("$") sign. If you need to show a 'negative credit', give a debit.
- Credit can be transferred to a subscription only if the user is a faculty member.
- The Transfer to Subscription field takes a valid subscription code that is already and in the database.
Administrative Functions
The application supports the following administrative functions:- Configuring system parameters on a term-by-term basis
- Setting up the up-coming term
- Reviewing subscriptions
- Billing clients for their subscriptions
- Generating spreadsheets for upload to the school's financial system
System Parameters By Term
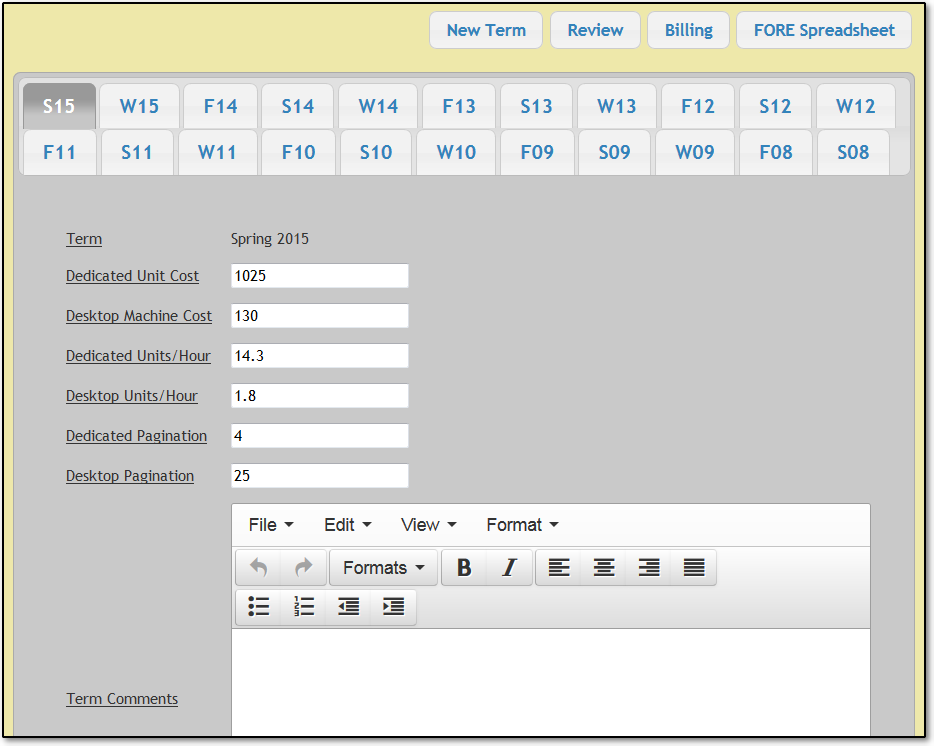
Each tab in the Admin page holds the application configuration parameters for a particular term. Each tab's label consists of a letter representing a term (F = Fall, W = Winter, S = Spring) and a two-digit year. For example, "W15" represents "Winter 2015". Click a tab to select a term. Parameters are configurable only in the current term. You can view other terms, but you can't change them. To save changes to the current term, click the Change button.Valid Data
- Dedicated Unit Cost and Desktop Machine Cost are dollar amounts. Enter a number, precise to up to two decimal places. Do not include the dollars sign.
- Dedicated Units/Hour and Desktop Units/Hour must be numbers. Decimal places are allowed. (Note that the field labels are misleading. These fields define hours per unit, not units per hour.)
- Dedicated Pagination and Desktop Pagination must be positive integers.
- Term Comments are in rich text format. They are for internal information only; they do not appear in bills or reports.
- Dedicated Template and Desktop Template require valid LaTeX
 .
.
LaTeX Templates
Dedicated Template and Desktop Template contain boilerplate text, marked up in LaTeX| Variable | Use |
|---|---|
| [[term]] | Shows the term (e.g., "Spring 2015") |
| [[groupname]] | Shows the subcription's 'group name' (e.g., "AI Group" or "Ali Ghodsi Boushehri") |
| [[units]] | Shows the count of desktop machines or dedicated units, depending on the subscription type |
| [[unitprice]] | Shows the price per service unit |
| [[total]] | Shows the total cost for the term (units × unit price) |
| [[dicounts]] | Shows discount lines (or extra charges) |
| [[balance]] | Shows the balance after discounts are applied |
| [[facultycontact]] | Shows name of the subscription's faculty contact |
| [[membercount]] | Shows the number of users in the subscription |
| [[costperson]] | Shows the subscription's cost per person |
Billing
Sometime in the first month of a term, the Manager of Research Support or his designated surrogate needs to perform these tasks:- Roll the Subscriptions application to the new term.
- Review subscriptions.
- Generate and print bills and send them to school administration.
Managing subscriptions not to bill
In the subscription view you can set a subscription to have a "Don't Bill" status. Setting a status of "Don't Bill" is useful if you want to exclude certain subscription from being included in the generated bills. When bills are generated and downloaded you will not see the "Don't Bill" subscriptions present in the documents. You also will be unable to generate an individual bill for a subscription that is marked to not be billed. Visibly you will see the "Billing Status" in most tables and in the "Report" section you can filter "Don't Bill" out of the result set shown. Despite the difference in status and not appearing in the set of bills, you can track debit and credit charges, and perform all of the other regular functions much like a normal record. Switching back and forth between the two billing statuses is possible by simply switching the status in the subscription view.Rolling the Term
At the Admin page, click the New Term button. The New Term page shows the name of the current ("Old") term, the name of the new term, a confirmation message text box, and a Go button.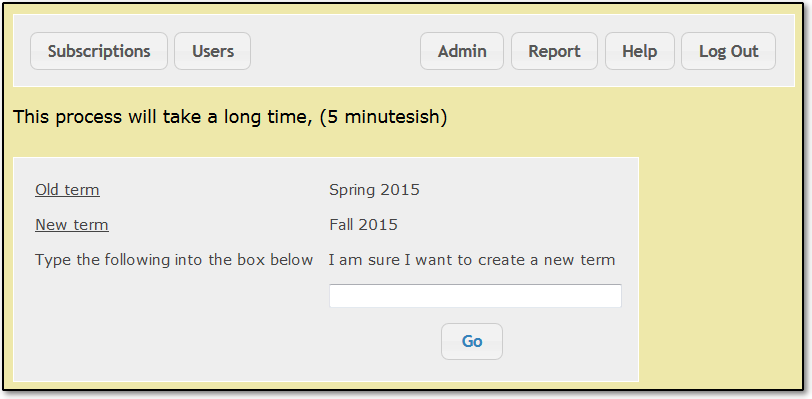
Reviewing Subscriptions
You review subscriptions to ensure that:- They are still required in the new term.
- Desktop subscriptions are assigned the correct machines.
- Dedicated subscriptions are allocated appropriate numbers of dedicated units, based on past and anticipated service usage.

Filters
To see only active subscriptions, uncheck the Hide Inactive checkbox. To include subscriptions that have already been reviewed, uncheck the Only Unreviewed checkbox. A subscription is considered reviewed if it has text in its Term Billing Comments field. Comments will be added in the reviewing process described below. To see only billable subscriptions, check the Only Billable checkbox. To see more or fewer subscriptions per page, adjust the Show [#] entries drop-down list to 10, 25, 50, or 100 subscriptions per page. To filter the list of subscriptions, enter a search string into the Search field. As you type, the list will be narrowed to include only those subscriptions that have the specified string in one of these fields:- Subscription
- Group Name
- Web Site
- POC (point of contact)
- Organizational Unit
- Comments
The Reviewing Grid
The Subscription Review page shows a summary of the work purchased and provided for each subscription over the last 3 terms in a grid with one subscription in each row and the following columns:| Column | Contents |
|---|---|
| SC | The subscription code with a link to the subscription details |
| Type | The subscription type (desktop or dedicated) |
| New Unit | A field where you can specify the subscription's number of units for the new term |
| Change Unit | The number of units by which the new term's allocation differs from the previous term's allocation (new minus old) |
| U, Hr, E, De | For each of the previous three terms, a group of four columns:
|
| Average Delta | The mean of the deltas of the three previous terms |
| Billing Status | The billing status of the subscription
|
- Enter a number of units for the new term in the New Unit column.
- Open the subscription's Term Billing Comments field by clicking the green (+) button in the left-most column. Billing comments from the previous three terms are also displayed.

Figure 9: Entering term billing comments - Enter billing comments for the subscription. The existence of comments indicate that the subscription has been reviewed for the new term. If you're not making any change for the new term, you might just put "OK" or "No change" in the Term Billing Comments field. Comments are only for internal reference and may include such things as:
- what work was done in the previous term
- observations about the accuracy of past unit allocations
- expected upcoming projects
- whether the number of units accurately reflects anticipated work in the new term
- the rationale for any changes in the number of units or for keeping them the same
- Click the Change Term button to save the remarks.
Valid Data
- Units must be positive numbers and may include decimal places.
Generating and Printing Bills
When subscriptions have been reviewed, you can generate and print bills for a term en masse. When bills have been printed and distributed, you might get feedback and/or corrections from a client. If so, you can alter the subscription details and regenerate and reprint an individual bill. To generate bills, follow these steps.- Click the Admin button in the common header. The System Parameters page appears.
- Click the Billing button. The Billing Summary page appears.
- Click the Generate Bills button. PDF and LaTeX versions of all of the bills are generated as two large files. Any subscription that has a billing status of "Don't Bill" will be omitted from the batch. This step may take several seconds to a minute.
- Click the Admin button in the common header. The System Parameters page appears.
- Click the Billing button. The Billing Summary page appears.
- Click the Download Bills button. You are offered a choice of PDF, TEX, or Excel format. (Excel format does not appear to be working at present.)
- Click one of the format icons to select the desired format. The file is downloaded to your workstation.
- Send the file off to printing. It is formatted for duplex (two-sided) printing, with blank pages as required.
- Send the printed bills to the school administration office for distribution to faculty.

- Click the Admin button in the common header. The System Parameters page appears.
- Click the Billing button. The Billing Summary page appears.
- Locate the relevant subscription and click its link in the Subscription column. A Billing Details page appears. This page shows the subscription's complete billing and payment history.
- Click the Generate Bill button. A single bill is generated in both PDF and TEX format.
- Click the Download Bill button. (The button will appear only if a bill has been generated, and even if the amount owed is zero.) You are offered a choice of PDF, TEX, or Excel format. (Excel format does not appear to be working at present.)
- Click one of the format icons to select the desired format. The file is downloaded to your workstation.
- Send the file off to printing. It is formatted for duplex (two-sided) printing.
- Send the printed bill either to the school administration office or directly to the subscription's faculty contact.
- Click the Back to All button to return to the Billing Summary page.
Adding a Charge
If you need to apply a charge that is outside of the normal subscription formula, follow these steps.- Click the Admin button in the common header. The System Parameters page appears.
- Click the Billing button. The Billing Summary page appears.
- Locate the relevant subscription and click its link in the Subscription column. A Billing Details page appears.
- Scroll to the bottom of the Billing Details page. You'll find a charges and payments area. If there is no amount owed, you will see only the Add Charge fields. If an amount is owed, you will see two tabs: one for adding charges and one for receiving payments.
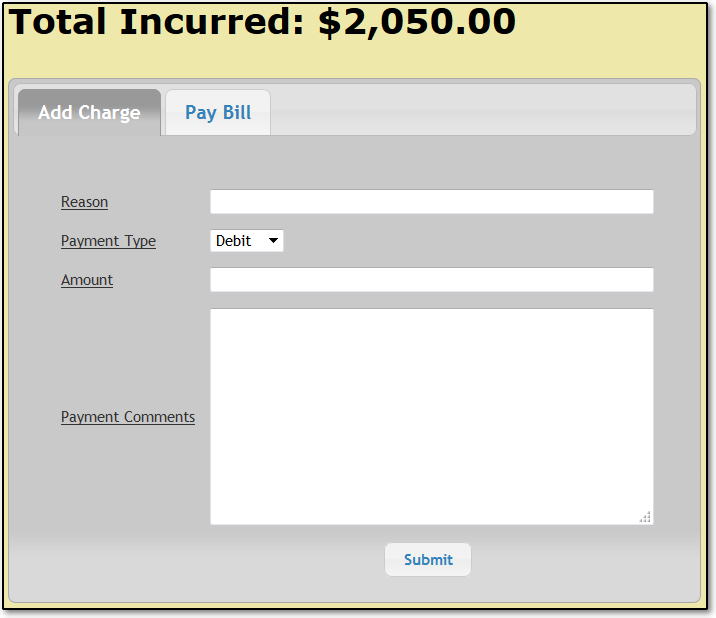
Figure 11: Adding a charge - On the Add Charge tab, fill in details (reason, payment method, amount, and comments).
- Click the Submit button. The account is updated and the transaction appears in the bills and payments history, above.
Receiving a Payment
Receipt of payments is typically handled by school administration. If you need to receive a payment yourself, follow these steps.- Click the Admin button in the common header. The System Parameters page appears.
- Click the Billing button. The Billing Summary page appears.
- Locate the relevant subscription and click its link in the Subscription column. A Billing Details page appears.
- Scroll to the bottom of the Billing Details page. You'll find a charges and payments area. If there is no amount owed, you will see only the Add Charge fields. If an amount is owed, you will see two tabs: one for adding charges and one for receiving payments.
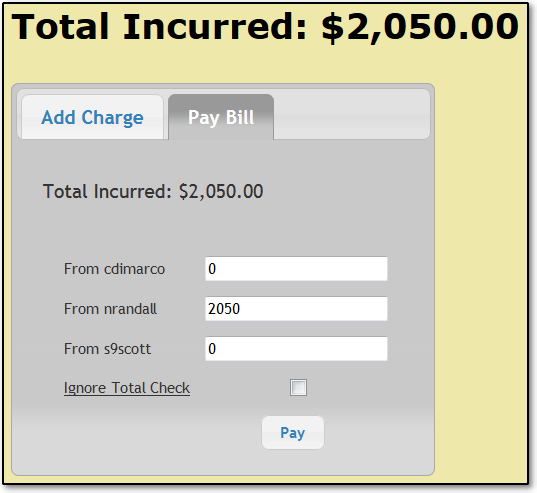
Figure 12: Receiving a payment - Go to the Pay Bill tab. There is a field for each user on the subscription.
- Fill in the amount that each user is paying.
- Click the Pay button. The account is updated and the transaction appears in the bills and payments history, above.
Valid Data
- All payment amounts must be numeric, positive, and precise to up to two decimal places. If you need to enter a negative credit, choose payment type debit and enter a positive amount). Up to two decimal places are allowed.
- The sum of all momentary amounts must equal the total incurred amount.
FORE
FORE was the accounting system before we switched to Unit4. Please see below for Unit4 details.Unit4 Spreadsheet Generator
Unit4 account numbers have the following format: 12345 67890-12345 678. Payment information must be uploaded to the university's Unit4 system. It's facilitated by a feature of the Research Subscriptions application that generates a spreadsheet that can be uploaded directly to the Unit4 system. This is normally done by school administration staff rather than by CSCF staff, but the process is described here in broad strokes in case you need to know. To generate a spreadsheet for Unit4, follow these steps.- Click the Admin button in the common header. The System Parameters page appears.
- Click the Unit4 Spreadsheet_ button. The CSCF Unit4 Spreadsheet Generation page appears. It shows bills that have been paid through the payment receipt process. Generated and/or printed bills that have not yet been paid will not appear.
- Adjust account details as required.
- Click the button corresponding to the format in which you want to download payment data. Unit4 accepts data in either CSV or Excel format. You can safely try all of these options to see what the output looks like.
- Copy copies the table data to the system clipboard in a tab-delimited format.
- CSV exports the data to a simple comma-separated-values (CSV) file.
- Excel exports the data to a comma-separated-values (CSV) file with some added stuff that makes Excel happier.
- Print presents the data in your web browser window in a tabular format that you can then print using your web browser's printing feature.
- PDF saves the data as a Portable Document File (PDF), formatted like an Excel spreadsheet.
- Save the file to your workstation's file system.
- Upload the file to Unit4. (This procedure is outside the scope of the Research Subscriptions application.)
- When you are sure that the data have been successfully received by Unit4, click the Clear Bills button. This resets the list of paid bills.
Reports
Throughout the term, you can produce reports to monitor how well the group is meeting expectations. To produce a report, follow these steps.- Click the Report button in the common page header. A Reports page appears.
- Choose how you would like to limit the report's time range.
- To report on a term, choose a term from the drop-down menu in the Reporting Term field and leave the Report Start Date and Report End Date fields empty. Terms are bounded by these dates.
Term Starting Date Ending Date Fall September 1 December 31 Winter January 1 April 30 Spring May 1 August 31 - To report on a custom period of time, choose "Search by Date" in the Reporting Term field's drop-down menu and then specify your starting and ending dates in the Report Start Date and Report End Date fields. When using this method, both dates are required. These dates are compared with the dates on which work was done on any ST items associated with the subscriptions.
- To report on a term, choose a term from the drop-down menu in the Reporting Term field and leave the Report Start Date and Report End Date fields empty. Terms are bounded by these dates.
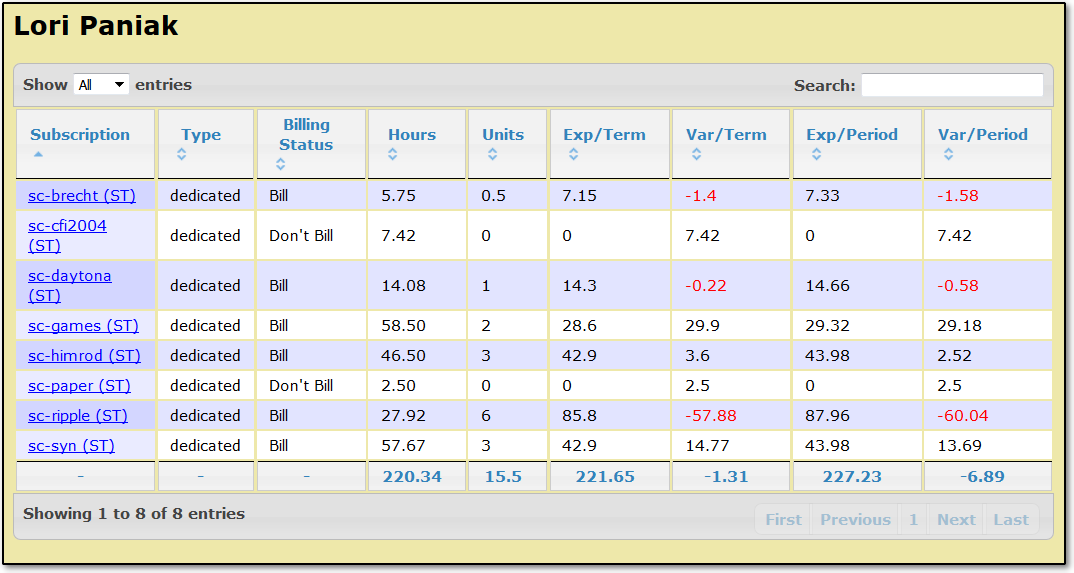
- Choose a report type from the Report By field's drop-down menu. Your choices are:
- Subscription Codes
- POC
- Person Hours
| Column | Data |
|---|---|
| Subscription | Subscription code with a link to a term-by-term log of tasks |
| Type | Subscription type: dedicated or desktop |
| Billing Status | Bill or Don't Bill |
| Hours | Total hours actually worked in the time period |
| Units | Number of units subscribed |
| Exp/Term | Expected hours of work in the term specified, based on units subscribed |
| Var/Term | Difference ('variance') between actual and expected work hours for the term specified (actual minus expected). Negative amounts indicate fewer hours worked than subscribed and are highlighted in red. |
| Exp/Period | Expected hours of work in the portion of the term up to the current date |
| Var/Period | Difference ('variance') between actual and expected work hours for the portion of the term up to the current date (actual minus expected). Negative amounts indicate fewer hours worked than expected and are highlighted in red. |
| Column | Data |
|---|---|
| Subscription | Subscription code |
| Hours Worked | Number of hours worked by this staff person against this subscription |
Sample Reports
Here is a taste of what the reports look like.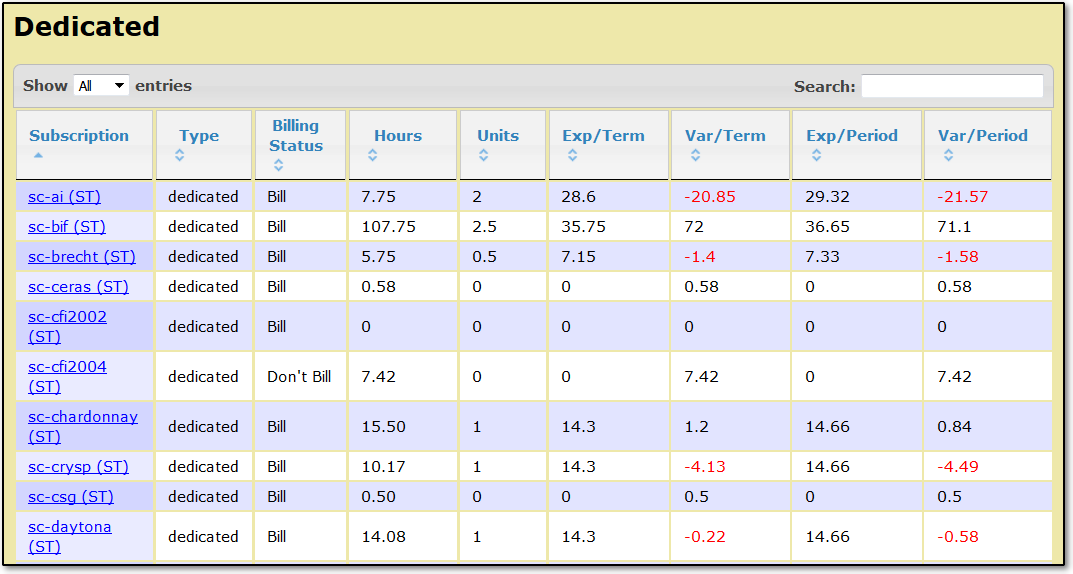

See Also
| I | Attachment | History | Action | Size | Date | Who | Comment |
|---|---|---|---|---|---|---|---|
| |
AddingACharge.png | r1 | manage | 17.7 K | 2015-12-10 - 11:56 | JeffGuild | Adding a charge in the Research Subscriptions application |
| |
AdminPage.png | r1 | manage | 38.6 K | 2015-12-08 - 14:57 | JeffGuild | The Administration page of the Research Subscriptions application |
| |
FORESpreadsheetGeneration.png | r1 | manage | 49.7 K | 2015-12-10 - 12:29 | JeffGuild | The CSCF FORE spreadsheet generation page |
| |
NewTermPage.png | r1 | manage | 15.9 K | 2015-12-08 - 15:51 | JeffGuild | The New Term page of the Research Subscriptions application |
| |
ReceivingAPayment.png | r1 | manage | 18.9 K | 2015-12-10 - 11:57 | JeffGuild | Receiving a payment in the Research Subscriptions application |
| |
SamplePOCReport.png | r1 | manage | 43.7 K | 2015-12-10 - 16:29 | JeffGuild | Sample report by point of contact |
| |
SamplePersonHoursReport.png | r1 | manage | 34.8 K | 2015-12-10 - 16:29 | JeffGuild | Sample report by person |
| |
SampleSubscripReport.png | r1 | manage | 42.9 K | 2015-12-10 - 16:28 | JeffGuild | Sample report by subscription code |
| |
SubscripDetailsPage.png | r1 | manage | 79.9 K | 2015-12-07 - 16:13 | JeffGuild | The Details page in the Research Subscriptions application |
| |
SubscripMainPage.png | r1 | manage | 81.9 K | 2015-12-07 - 13:55 | JeffGuild | Main page of the Research Subscription application |
| |
SubscripPageHeader.png | r1 | manage | 5.2 K | 2015-12-07 - 14:22 | JeffGuild | Standard page header in the Research Subscriptions application |
| |
SubscripReviewPage.png | r1 | manage | 100.4 K | 2015-12-09 - 14:48 | JeffGuild | The Subscription Review page of the Research Subscriptions application |
| |
TermBillingComments.png | r1 | manage | 45.4 K | 2015-12-10 - 09:13 | JeffGuild | Term billing comments in the Research Subscriptions application |
| |
UserDetailsPage.png | r1 | manage | 46.8 K | 2015-12-08 - 09:32 | JeffGuild | The User Details page in the Research Subscriptions application |
| |
UserSummaryPage.png | r1 | manage | 49.2 K | 2015-12-08 - 10:51 | JeffGuild | The Users Summary page of the Research Subscriptions application |
Topic revision: r41 - 2024-08-27 - DanielAllen
Information in this area is meant for use by CSCF staff and is not official documentation, but anybody who is interested is welcome to use it if they find it useful.
- CF Web
- CF Web Home
- Changes
- Index
- Search
- Administration
- Communication
- Hardware
- HelpDeskGuide
- Infrastructure
- InternalProjects
- Linux
- MachineNotes
- Macintosh
- Management
- Networking
- Printing
- Research
- Security
- Software
- Solaris
- StaffStuff
- TaskGroups
- TermGoals
- Teaching
- UserSupport
- Vendors
- Windows
- XHier
- Other Webs
- My links
Ideas, requests, problems regarding TWiki? Send feedback


