Icinga
Glossary
Overview
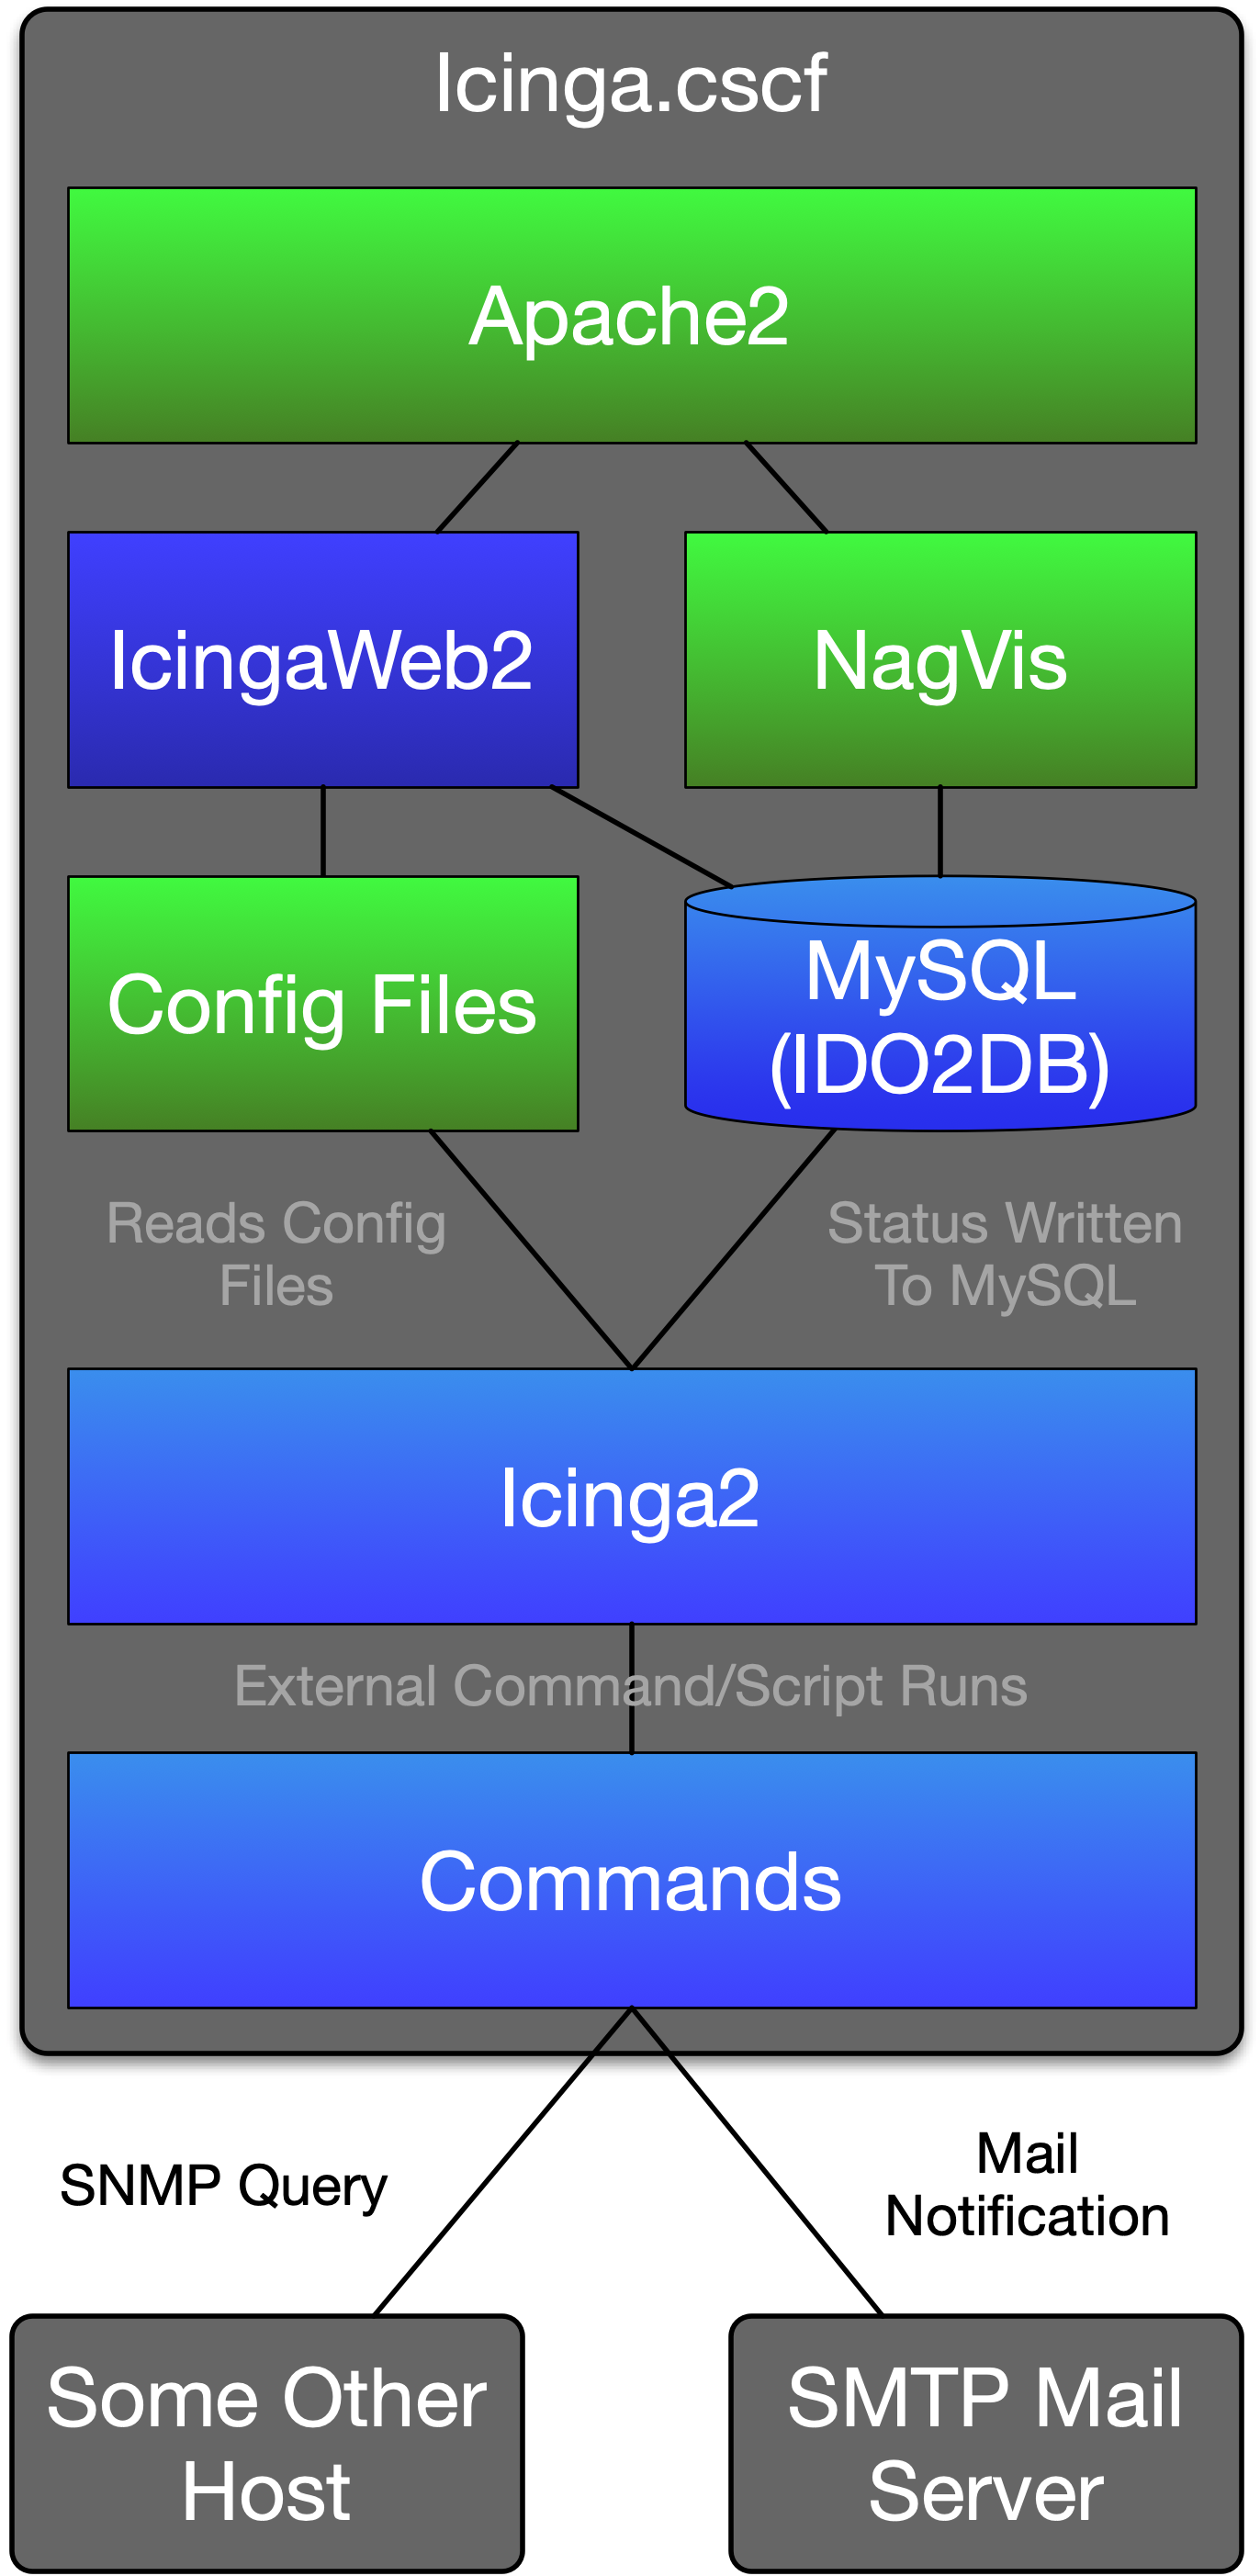
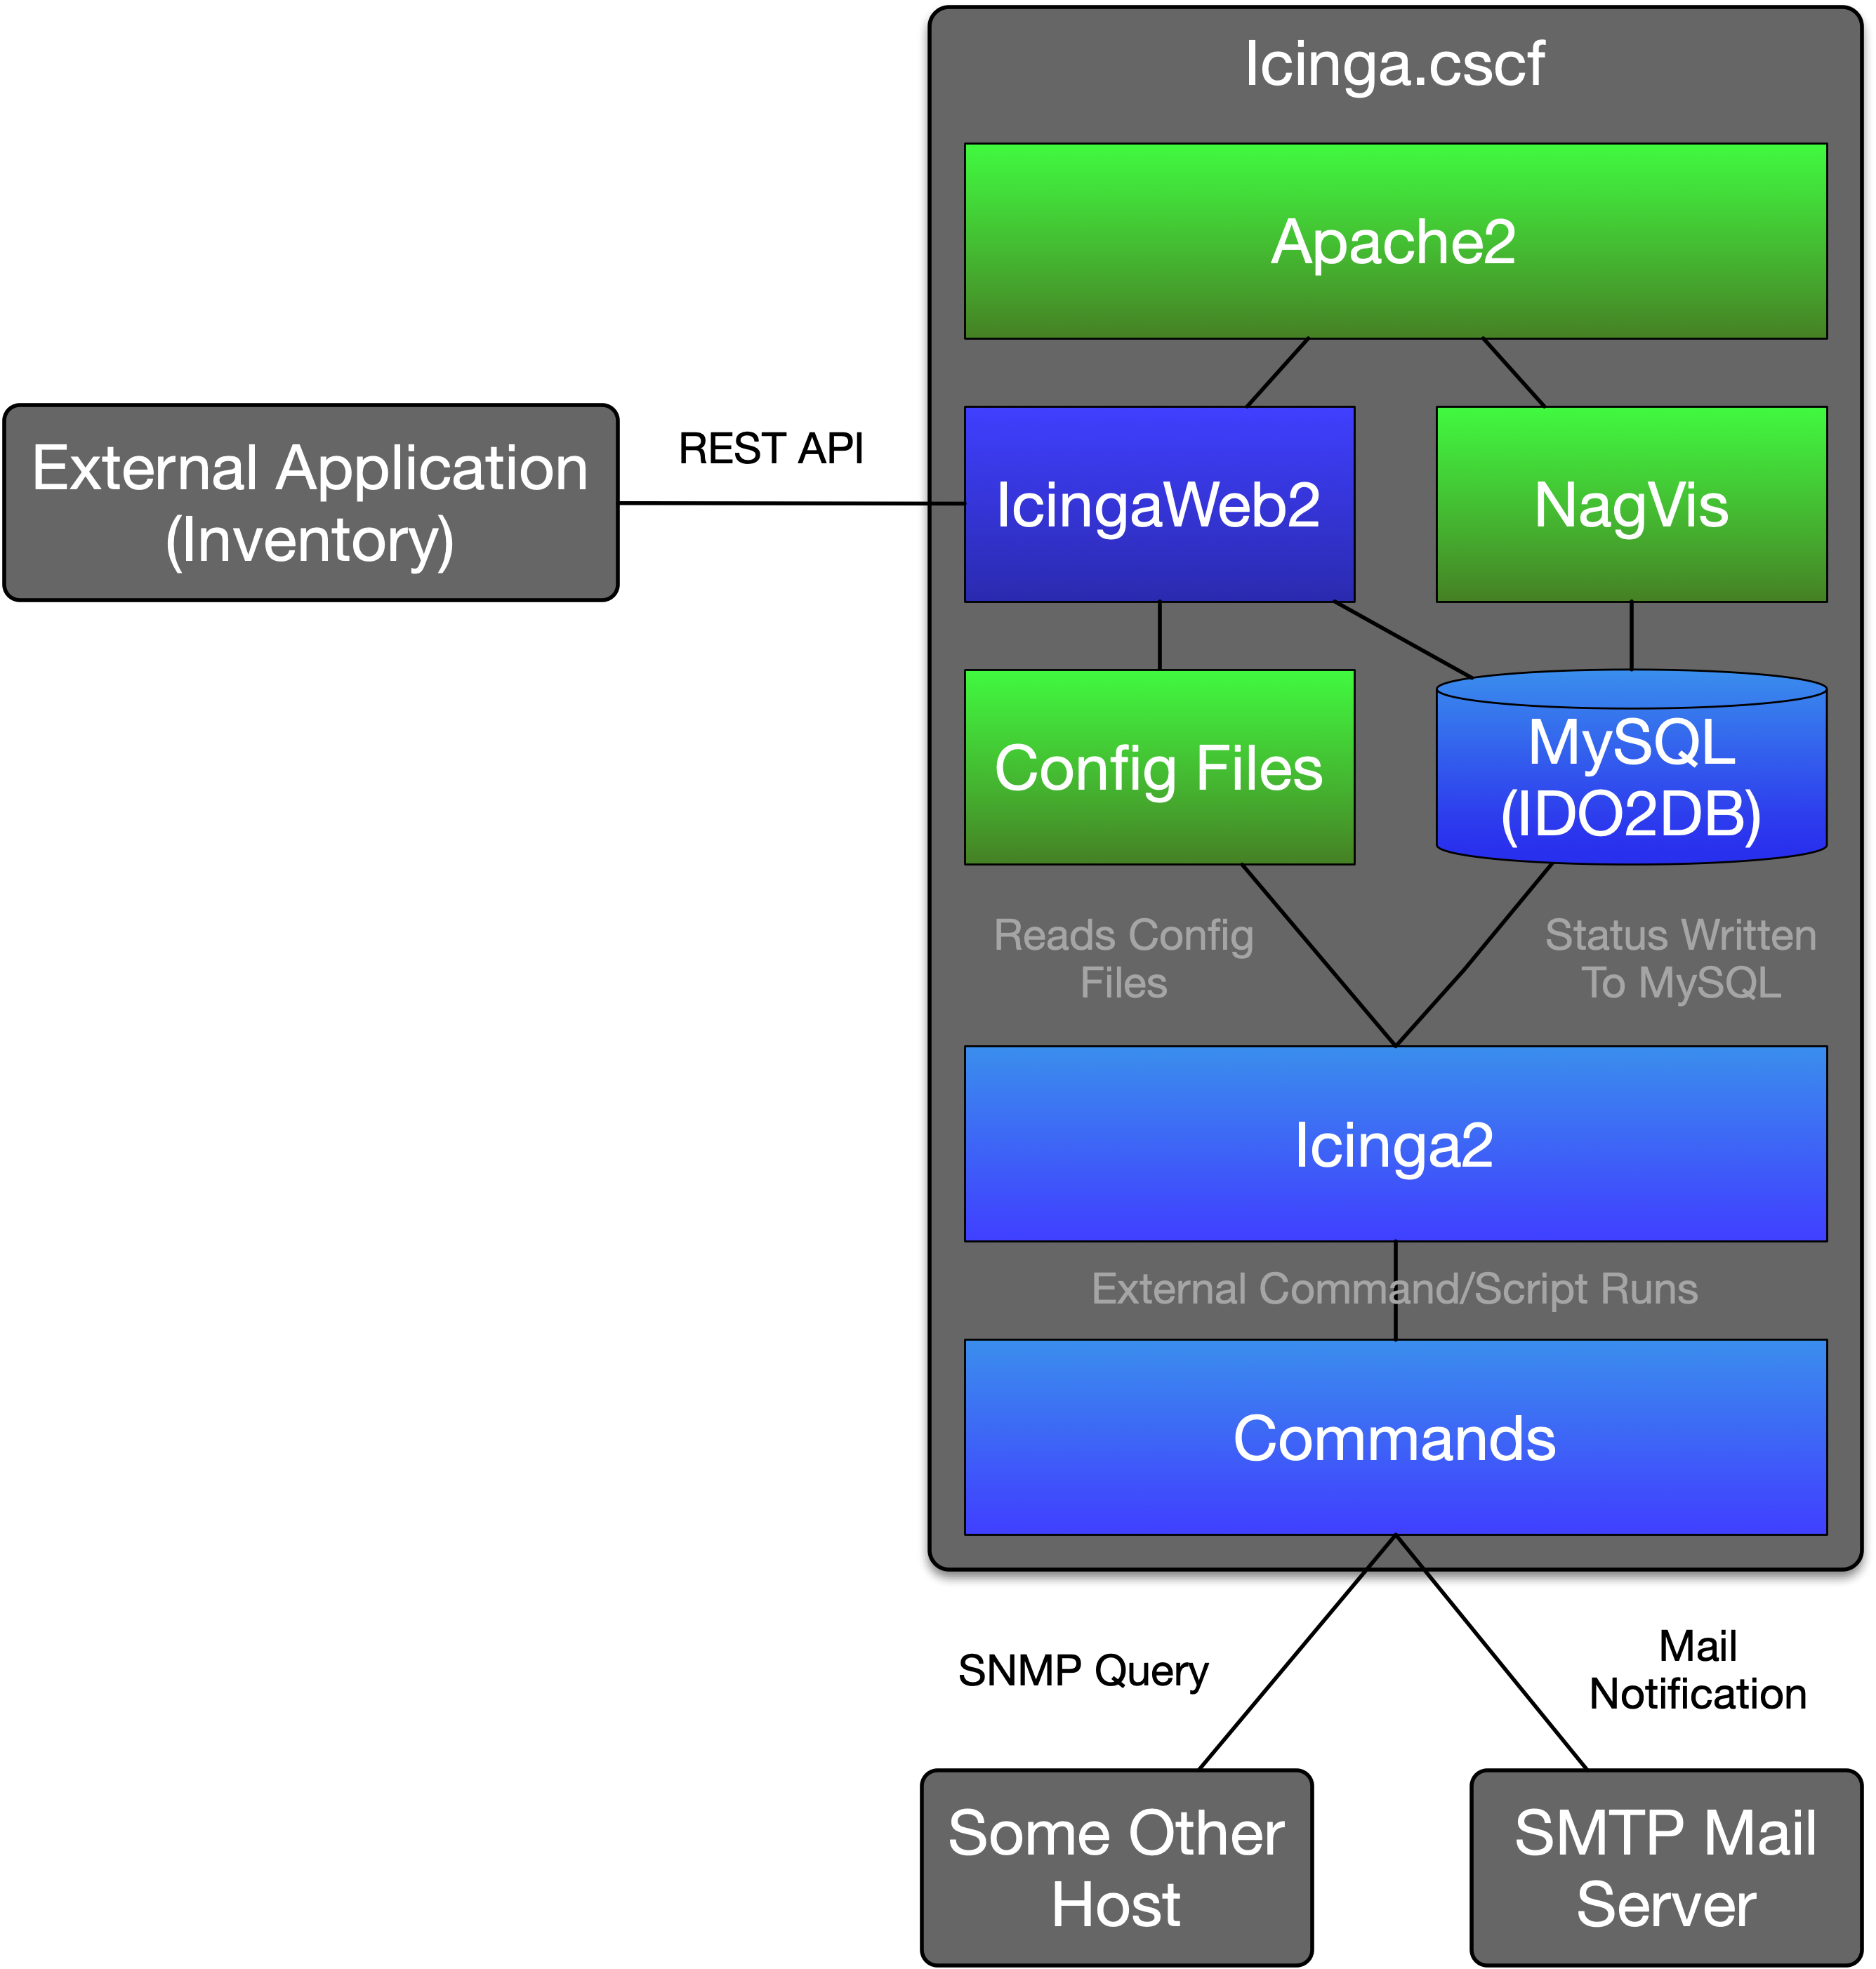
Icinga in our case is a collection of services and applications that are used in conjunction to create the Icinga Stack.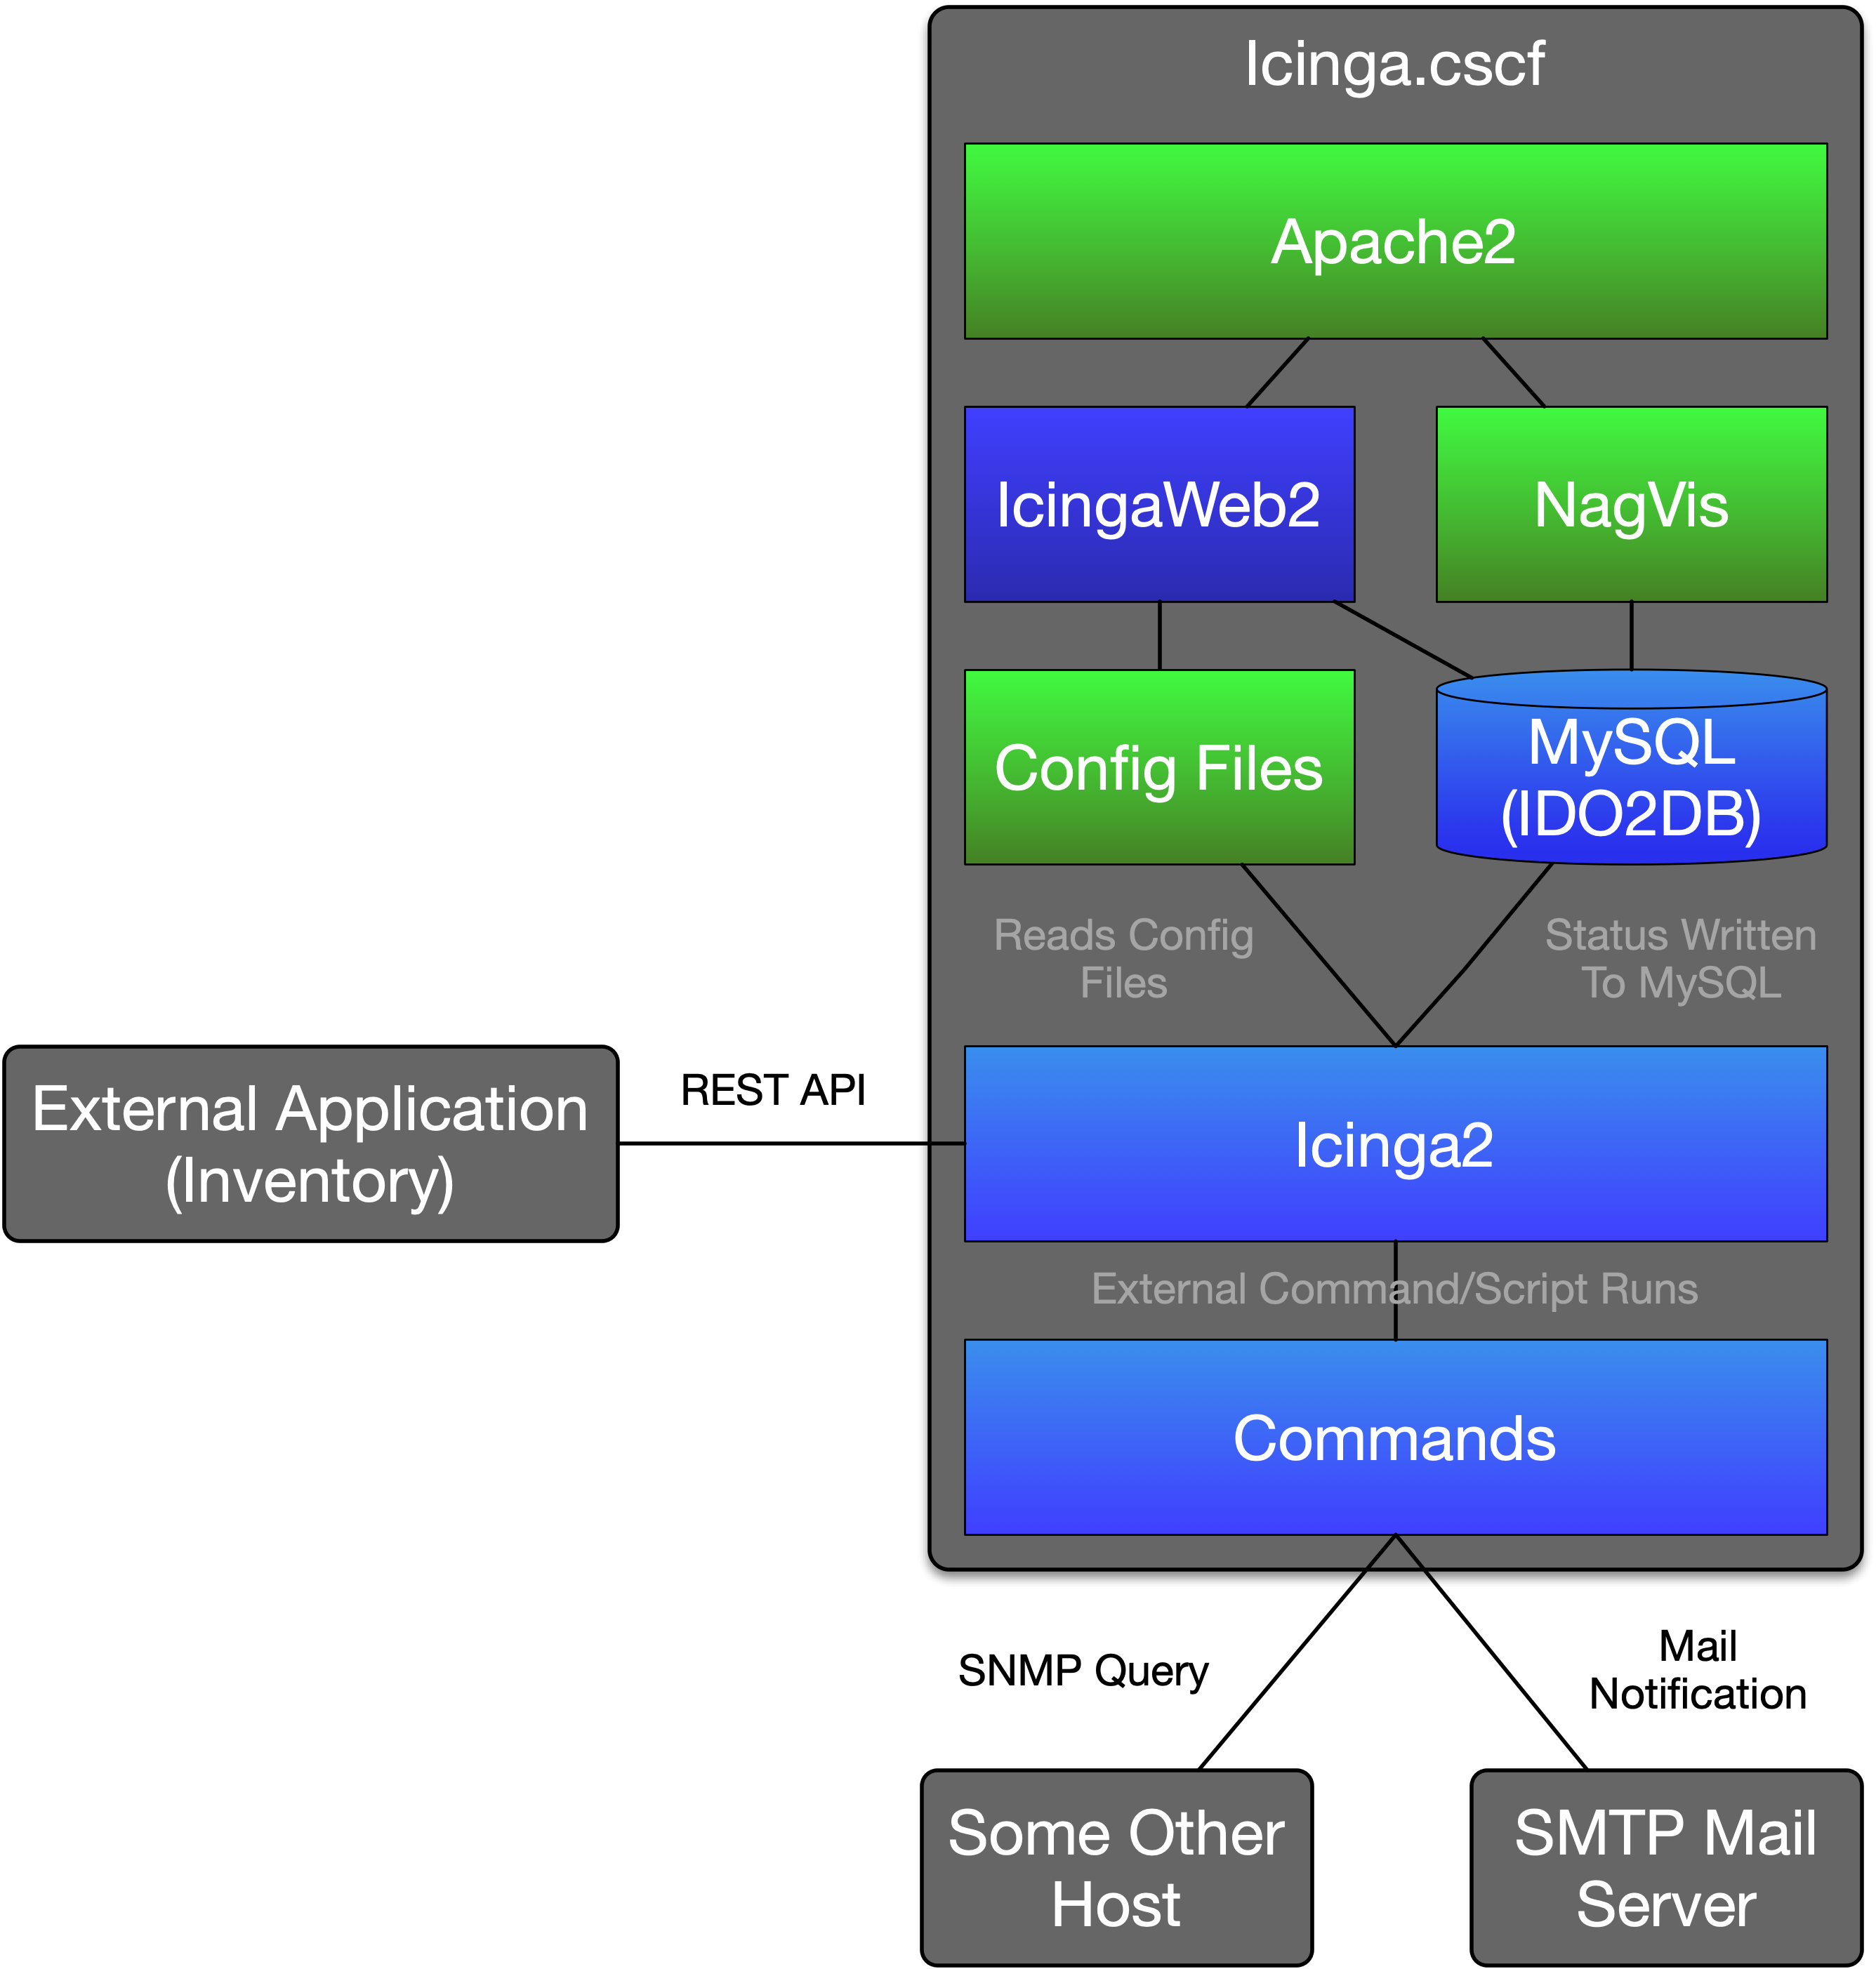
Icinga2
The Icinga2 service is the core of the stack. It runs as a systemd service under the name "icinga2". It does not have a GUI and can only be directly interacted with via the icingacli command tool. The Icinga2 service is what reads the written configuration files for hosts, services, commands.etc and schedules/runs checks on hosts/services. Based upon the output of a check, a result script is run that could do anything from sending an email/slack message to automatically trying to fix the issue over SSH. The Icinga2 service writes its current status (i.e a cache) to the local MySQL instance using IDO2DB. Other services such as NagVis and IcingaWeb2 do not read from the Icinga2 service directly but instead read from the database.IcingaWeb2
IcingaWeb2 is a web-based frontend. It consists of multiple components to monitor and generate configuration files for the Icinga2 service. IcingaWeb2 reads the current status and events from the local MySQL database. The Director module is used to generate and manage configuration files for monitoring hosts and services. Commands (such as scheduling downtime) are sent to the Icinga2 service directly via the REST API.IDO2DB
IDO2DB (Icinga Data Out to Database) is used by the Icinga2 service to write current status and events to a local database (MySQL in our case) for later reading.NagVis
NagVis is a graphing and visualization addon that was created for Nagios. As Icinga started as a fork of Nagios and shares the same host/service layout system, it is capable of integrating with Icinga via the MySQL database and IDO2DB feature. NagVis is used by CSCF to map out the monitored network using automatically generated tree-view graphs. These graphs are generated based upon room hostgroups and host parent/child properties.Server Installation
Ubuntu 18.04 LTS
- Setup Icinga package repository.
- Update the current package repository.
apt-get update
- Install curl and GPG packages.
apt-get install curl gnupg
- Install the Icinga package repository key.
curl https://packages.icinga.com/icinga.key | apt-key add -
- Add the Icinga package repository to the apt sources list.
echo -e "deb https://packages.icinga.com/ubuntu icinga-CodeName main\ndeb-src https://packages.icinga.com/ubuntu icinga-CodeName main" | sed -e "s/CodeName/`lsb_release -c -s`/" > /etc/apt/sources.list.d/icinga.list
- Update the current package repository now that the Icinga repository has been added.
apt-get update
- Update the current package repository.
- Install Icinga2 and IcingaWeb2 packages.
apt-get install icinga icingaweb2 icingacli php-gd
 Enter a secure password for the icingaadmin user when prompted. When asked whether to enable external commands, select No.
- Setup Let's Encrypt/Certbot
- Install required packages.
apt-get install software-properties-common
- Add the required Certbot repositories.
add-apt-repository universe
add-apt-repository ppa:certbot/certbot
- Update the current package repository and install the certbot packages.
apt-get update
apt-get install certbot python-certbot-apache
- Run certbot to install a certificate on the Apache server setup by Icinga in the previous steps.
certbot -n --apache -d SERVER_FQDN --agree-tos -m ADMIN_EMAIL --redirect
Replace SERVER_FQDN with the fully qualified domain name for your server. Replace ADMIN_EMAIL with an administrative email for emergency SSL based alerts to be sent to.
- Install required packages.
- Setup the local MySQL server and IDO2DB module for the Icinga service.
- Install the required packages.
apt-get install mysql-server mysql-client icinga2-ido-mysql
- When prompted, enable the ido-mysql plugin
- Configure icinga2-ido-mysql with dbconfig-common
- Enter a secure password for later use
- This will create a mysql database and appropriate user both called "icinga2" and will import the IDO schema. The password for that user is what you entered when prompted. The database information will also be added to /etc/icinga2/features-available/ido-mysql.conf
- Run the mysql setup wizard.
mysql_secure_installation
- Enable the password validation plugin (and select an appropriate security option)
- Enter a secure mysql root password to remember (for admin use only)
- Remove the anonymous users
- Disallow remote root login for MySQL
- Drop the test database
- Reload the privilege tables
- Enable the IDO MySQL module and restart the Icinga2 service.
icinga2 feature enable ido-mysql
systemctl restart icinga2
The Icinga2 service should now automatically enter information into the local MySQL server's icinga2 database.
- Install the required packages.
- Setup the Icinga2 API
- Enable the API feature.
icinga2 api setup
- Edit
/etc/icinga2/conf.d/api-users.confand add the following info to create an API user for IcingaWeb2.object ApiUser "director" { password = "RANDOMPASSWORD" permissions = [ "*" ] } object ApiUser "icingaweb2" { password = "RANDOMPASSWORD" permissions = [ "status/query", "actions/*", "objects/modify/*", "objects/query/*" ] } Replace RANDOMPASSWORD with a secure password. This API user will be used by IcingaWeb2 to control and send commands to the Icinga2 service.
- Restart the Icinga2 service.
systemctl restart icinga2
- Enable the API feature.
- Setup Mellon/ADFS for authentication. Refer to CSCF's ADFS Documentation for setup information.
- Configure IcingaWeb2.
- Create the configuration directory.
icingacli setup config directory --group icingaweb2
- Create a setup token.
icingacli setup token create
Copy the setup key. It will be used in the next step.
- Navigate to /icingaweb2 on your webserver via a web browser.
- Click on the button to start the setup wizard and enter the previous setup key.
- Follow the setup process while using the following information:
- Ensure that the Doc and Monitoring modules are enabled (no others are needed for now)
- For Authentication Type, select "External" (since we're using ADFS)
- Leave Authentication Backend as default
- Set the Administration Username to your ADFS user
- Leave Application Configuration as default
- Configure the Monitoring module
- Leave the Backend name as "icinga" for now
- Make sure that the backend type is set to IDO
- Enter the icinga2 for the database name and user.
- Enter the user password that was setup in the previous IDO MySQL steps (the same password in /etc/icinga2/features-available/ido-mysql.conf)
- On Command Transport, enter the FQDN of the server and API username/password for the icingaweb2 API user created earlier (stored under /etc/icinga2/conf.d/api-users.conf)
- Leave Monitoring Security as default
- Create the configuration directory.
- Setup NagVis.
- Install the required packages.
apt-get install git php-mbstring php-gd php-sqlite3 graphviz sqlite3 rsync icinga-idoutils
- Install and enable the NagVis Icinga module.
git clone https://github.com/Icinga/icingaweb2-module-nagvis.git /usr/share/icingaweb2/modules/nagvis
icingacli module enable nagvis
This module isn't NagVis itself but is instead a menu option to view the graphs within IcingaWeb2.
- Clone the NagVis git repo to your home directory.
git clone https://github.com/NagVis/nagvis.git nagvis-repo
cd nagios-repo
- Run the install script to install NagVis.
./install.sh -a y -q -i ido2db -w /etc/apache2 -s icinga -p /usr/local/nagvis
- Enable the NagVis Apache configuration and restart the Apache service.
a2enconf nagvis
systemctl restart apache2
- Edit the logonmodule, logonenvvar, logonenvcreateuser and logonenvcreaterole options in
/usr/local/nagvis/etc/nagvis.ini.phpto be set as the following:logonmodule="LogonEnv" logonenvvar="REMOTE_USER" logonenvcreateuser=1 logonenvcreaterole="Guests"
This sets NagVis to use external authentication.
- Install the required packages.
- Setup the Director module
- Create a mysql database for the director module (replace some-password with a secure password)
mysql -e "CREATE DATABASE director CHARACTER SET 'utf8';
   CREATE USER director@localhost IDENTIFIED BY 'some-password';
   GRANT ALL ON director.* TO director@localhost;"
- Install the dependencies required for the Director module
git clone --single-branch --branch stable/0.5.0 https://github.com/Icinga/icingaweb2-module-incubator.git /usr/share/icingaweb2/modules/incubator
git clone --single-branch --branch stable/0.7.0 https://github.com/Icinga/icingaweb2-module-reactbundle.git /usr/share/icingaweb2/modules/reactbundle
icingacli module enable incubator
icingacli module enable reactbundle
- Install the Director module
git clone https://github.com/Icinga/icingaweb2-module-director.git /usr/share/icingaweb2/modules/director
icingacli module enable director
- Navigate to Configuration -> Application on the web interface and open the
Resourcestab- Create a new resource with the type
SQL Database - Set the Resource name to
director - Set the Database Name to
director - Set the Username to
directorand password to the password set in the earlier MySQL query - Set Character Set to
utf8 - Save Changes
- Create a new resource with the type
- Navigate to the Director module on the web interface to finalize the setup process.
- Select the "director" resource when asked during the setup. Click Create Schema when asked.
- During the kickstart process, enter the FQDN for the server under endpoint name and enter the "director" API user credentials
- Setup the Director Background Daemon
- Create and setup the icingadirector user
useradd -r -g icingaweb2 -d /var/lib/icingadirector -s /bin/false icingadirector
install -d -o icingadirector -g icingaweb2 -m 0750 /var/lib/icingadirector
- Create the systemd service file under
/lib/systemd/system/icinga-director.servicewith the following contents:[Unit] Description=Icinga Director - Monitoring Configuration Documentation=https://icinga.com/docs/director/latest/ Wants=network.target [Service] EnvironmentFile=-/etc/default/icinga-director EnvironmentFile=-/etc/sysconfig/icinga-director ExecStart=/usr/bin/icingacli director daemon run ExecReload=/bin/kill -HUP ${MAINPID} User=icingadirector SyslogIdentifier=icingadirector Type=notify NotifyAccess=main WatchdogSec=10 RestartSec=30 Restart=always [Install] WantedBy=multi-user.target - Reload systemd, enable and start the icinga-director service
systemctl daemon-reload
systemctl enable icinga-director
systemctl start icinga-director
- Create and setup the icingadirector user
- Create a mysql database for the director module (replace some-password with a secure password)
- Setup the Business Process module
- Install and enable the Icinga PHP Library (IPL) module required for the Buisness Process module.
git clone --single-branch --branch stable/0.4.0 https://github.com/Icinga/icingaweb2-module-ipl.git /usr/share/icingaweb2/modules/ipl
icingacli module enable ipl
Do not clone the master branch, only clone the latest stable branch on the github repo for IPL.
- Install and enable the Business Process module.
git clone https://github.com/Icinga/icingaweb2-module-businessprocess.git /usr/share/icingaweb2/modules/businessprocess
icingacli module enable businessprocess
- Install and enable the Icinga PHP Library (IPL) module required for the Buisness Process module.
Client installation
- Log into target machine and install software:
apt update apt install icinga2 freeipmi-tools smartmontools ipmiutil libipc-run-perl systemctl stop icinga2 cd /usr/lib/nagios mv plugins plugins-debian git clone https://git.uwaterloo.ca/cscf/icinga-plugins.git cp icinga-plugins plugins - Add a sudoers file for icinga access to certain system attributes:
#/etc/sudoers.d/icinga nagios ALL = NOPASSWD: /usr/sbin/smartctl nagios ALL =(root) NOPASSWD: /usr/sbin/ipmi-sensors, /usr/sbin/ipmi-sel, /usr/sbin/ipmi-dcmi - Log into icinga Director host manger: https://icinga.cscf.uwaterloo.ca/icingaweb2/director/dashboard?name=hosts#!/icingaweb2/director/hosts

- Select "Add" to add a new host
- Select "Linux Agent Host" in Host Template
- Enter FQDN of target at hostname
- Enter shortname for Display name
- Enter host address in dotted decimals
- Add to appropriate group (GPU machine in GPU group). Can add multiple groups after creation
- Click "Add"
- Click "Store"
- Click "Deploy"
- Proceed to the "Agent" tab and copy the ticket for the Manual configuration. The ticket will be added to the target configuration
- Back to the target machine configure with the icinga node wizard:
-
icinga2 node wizard
-
Please specify if this is an agent/satellite setup ('n' installs a master setup) [Y/n]:Y -
Please specify the common name (CN) [growl.ripple-domain.cs.uwaterloo.ca]: growl.cs.uwaterloo.ca
-
 Please specify the parent endpoint(s) (master or satellite) where this node should connect to:
Master/Satellite Common Name (CN from your master/satellite node): icinga.cscf.uwaterloo.ca
-
Do you want to establish a connection to the parent node from this node? [Y/n]:
-
 Please specify the master/satellite connection information:
Master/Satellite endpoint host (IP address or FQDN): icinga.cscf.uwaterloo.ca
-
Master/Satellite endpoint port [5665]:
-
Add more master/satellite endpoints? [y/N]:
- Accept parent certificate info
-
 Please specify the request ticket generated on your Icinga 2 master (optional).
 (Hint: # icinga2 pki ticket --cn 'growl.cs.uwaterloo.ca'): (enter ticket from Agent above)
-
Please specify the API bind host/port (optional):
-
Bind Host []:
-
Bind Port []:
-
Accept config from parent node? [y/N]: y
-
Accept commands from parent node? [y/N]: y
-
Local zone name [growl.cs.uwaterloo.ca]:
-
Parent zone name [master]:
-
Do you want to specify additional global zones? [y/N]:
-
Do you want to disable the inclusion of the conf.d directory [Y/n]:
- Restart the service
systemctl start
-


| I | Attachment | History | Action | Size | Date | Who | Comment |
|---|---|---|---|---|---|---|---|
| |
icinga-stack.png | r1 | manage | 443.0 K | 2019-12-10 - 13:15 | DevonMerner | |
| |
icinga-stack2.png | r1 | manage | 555.9 K | 2019-12-10 - 14:01 | DevonMerner | |
| |
icinga-stack3.png | r1 | manage | 555.3 K | 2019-12-10 - 14:17 | DevonMerner | |
| |
logo_icinga1.png | r1 | manage | 58.3 K | 2019-12-10 - 13:15 | DevonMerner |
Topic revision: r10 - 2025-04-10 - LoriPaniak
Information in this area is meant for use by CSCF staff and is not official documentation, but anybody who is interested is welcome to use it if they find it useful.
- CF Web
- CF Web Home
- Changes
- Index
- Search
- Administration
- Communication
- Hardware
- HelpDeskGuide
- Infrastructure
- InternalProjects
- Linux
- MachineNotes
- Macintosh
- Management
- Networking
- Printing
- Research
- Security
- Software
- Solaris
- StaffStuff
- TaskGroups
- TermGoals
- Teaching
- UserSupport
- Vendors
- Windows
- XHier
- Other Webs
- My links
 |
|
Ideas, requests, problems regarding TWiki? Send feedback