7 Working with tables
Tables have a reputation for being difficult to grasp, but this doesn’t have to be the case. Possibly they are just underdocumented. When people are given a powerful, general mechanism, some of them try to take it as far as they can go, and the results can look really complicated in demo videos. But there are many simple uses of tables. LSDJ, the Game Boy software that was the inspiration for M8, does not have an equivalent of Instrument Modulation View for envelopes and LFOs; there, modulation is done with tables (some instruments have envelopes in recent versions). We’ll show you how to use tables to get extra modulators and LFOs in M8, or more complex ones.
We saw tables briefly in chapter 4, where we used one to have more than three FX commands on a step (to specify a chord for the dub stab). There, we described a table as "a parallel sequencer running at tick speed", and described how each instrument has an associated table, plus there are 128 unassociated tables. The instrument table will be started with every note trigger. We instead used an unassociated table, which we started in parallel with a TBX command on a given note. That allowed us to build different chords on different notes. There is also a TBL command to change the table of the current instrument.
When we wanted to time drum hits between steps in the first song in chapter 3, we talked about there being six ticks to a step, and about FX commands that timed events in ticks. The default tick rate for an instrument table is 01, meaning six rows of the instrument table will fire for each step of the phrase. That is, the table sequencer is moving six times as fast as the note sequencer. But this can be changed with a setting visible at top right in Instrument View. When the table is changed with TBL, the new table uses this tick rate also.
The default tick rate for a table started in parallel with TBX is 06, that is, the table sequencer runs at the same speed as the note sequencer. We didn’t notice this in chapter 4, because we only used two rows of the table, and the second row immediately jumped back to the first using a THO command (to hold the pitch we chose for our chord for the duration of the note). It didn’t matter what speed the table was running at.
The tick rate can be changed with an FX command. TIC in a phrase will set the tick rate of the associated instrument table. There are a few commands that act differently in phrases and tables, usually for good reasons, and we will try to point this out when we use one. TIC is one of these. In a table, it will set the tick rate of that column of the table. Yes, the three columns in a table can run at different rates! One usually wants to do this right away, but the first row is in high demand for other commands to be run at the same time as the note triggers. So there is a special way to set the tick rate for a column: put the TIC command in the last row. THO jumped all playheads to a specified row; we can move just one playhead for one column with a HOP command. HOP works differently in tables than in phrases, and this is true for a few other commands, which we’ll point out as we go. THO is another example; when used in a phrase, it starts the instrument table on the specified row, or an auxiliary table if one is specified with TBX on the same phrase row.
There are five special tick rates. TIC00 sets the table to step per triggered note. That is, if there are two notes in a phrase, then the table will move one row exactly when each note triggers. There is a special case within this special case: TIC00 in row F of a column in a table started with TBX will step only when a TBX for that table is triggered in a phrase. This allows for very slow movement through a table, if desired. On the other end of the time scale, TICFF sets the table to run at 200 Hz, that is, one row every five milliseconds. This is the way to get "microtiming", or resolution better than 1/6 of a step, but there is only one choice of fast speed. Someone called it "the speed of light on the M8". TICFE is a recent addition, that isn’t really a time-based rate at all; rather, it changes the behaviour of a table to something called a "note map", which we’ll talk about later on. Similarly, TICFD is a "velocity map", and TICFC is an "octave map".
That summarizes the basic tools we need to work with tables. Now we need to see how to combine them with other FX commands to achieve our desired results. It’s important to keep in mind that there are two types of commands: absolute and relative. Absolute commands just set a parameter to the given value. Relative commands change the value that the parameter already has by a given increment/decrement. If you forget this, your tables might not do what you expect.
7.1 Arpeggios and their variations
If you are familiar with arpeggiators on other synths, it might help to think of a table as a generalized arpeggiator. If you’re not, the metaphor will not help, but you’re about to learn what an arpeggiator is. Either way, you’ve probably seen the ARP command, because it’s the default inserted when you first edit a command field, but that is a very specific kind of arp used in early game devices as a chord substitute.
An arpeggio is a chord, but played one note at a time instead of all together. Some keyboard synthesizers have an arpeggiator feature, and when it is engaged, the behaviour of the keyboard changes. One can hold down several notes, and they will play one at a time, and then repeat. The order and speed of the sounds can be configured. Holding down notes is a lot easier than playing them over and over.
We can’t use a table to build an arpeggiator that works like on a hardware synth, because a table only gets information about the note that triggered it. There’s no way to send it additional information. Instead, we’ll use the N column in the table, which transposes the triggering note. We can build a specific chord this way. To change chords, we will have to change tables, or split the table into sections and use THO to land in the relevant section.
If you want to play along, create a new, empty project, with one chain containing one phrase, and that phrase containing a single C-6 note in row 0 with an instrument of your choice. Set that instrument up with a simple, short sound, say FM Synth in its default configuration, with a short volume envelope.
It’s easiest to use the instrument table, but more likely in practice that you would use an unassociated table for this task, so you could be selective about when the arpeggio plays, and also change the chord (as discussed briefly above) from time to time. In the FX1 column for the single note in Phrase View, add a TBX80, and use that to navigate to table 80.
Here’s what an empty table looks like.
![]()
The N column is an offset from the note in the phrase that triggers the table (similar to the transposition column in Chain View). It respects the current scale, so it counts in semitones if the default chromatic scale is used, but in general it counts in scale steps.
The V column is a multiplier for the velocity from the phrase note. 00 is completely off, not surprisingly, but 7F is 100%, and that is the default (which only explicitly appears when you try to edit this field). The help text at the bottom will tell you the percentage in decimal, so you don’t have to do the math.
The playhead for the note and velocity columns moves at the same rate as the first FX column. The default tick rate for a table started with TBX is six, so the table will play at the same rate as the phrase. To slow things down a bit, both so it sounds better musically and so we can see what the playheads are doing, put a TIC0C in the last row of the FX1 column. That’s a tick rate of twelve, so the table rows have duration equal to eighth notes.
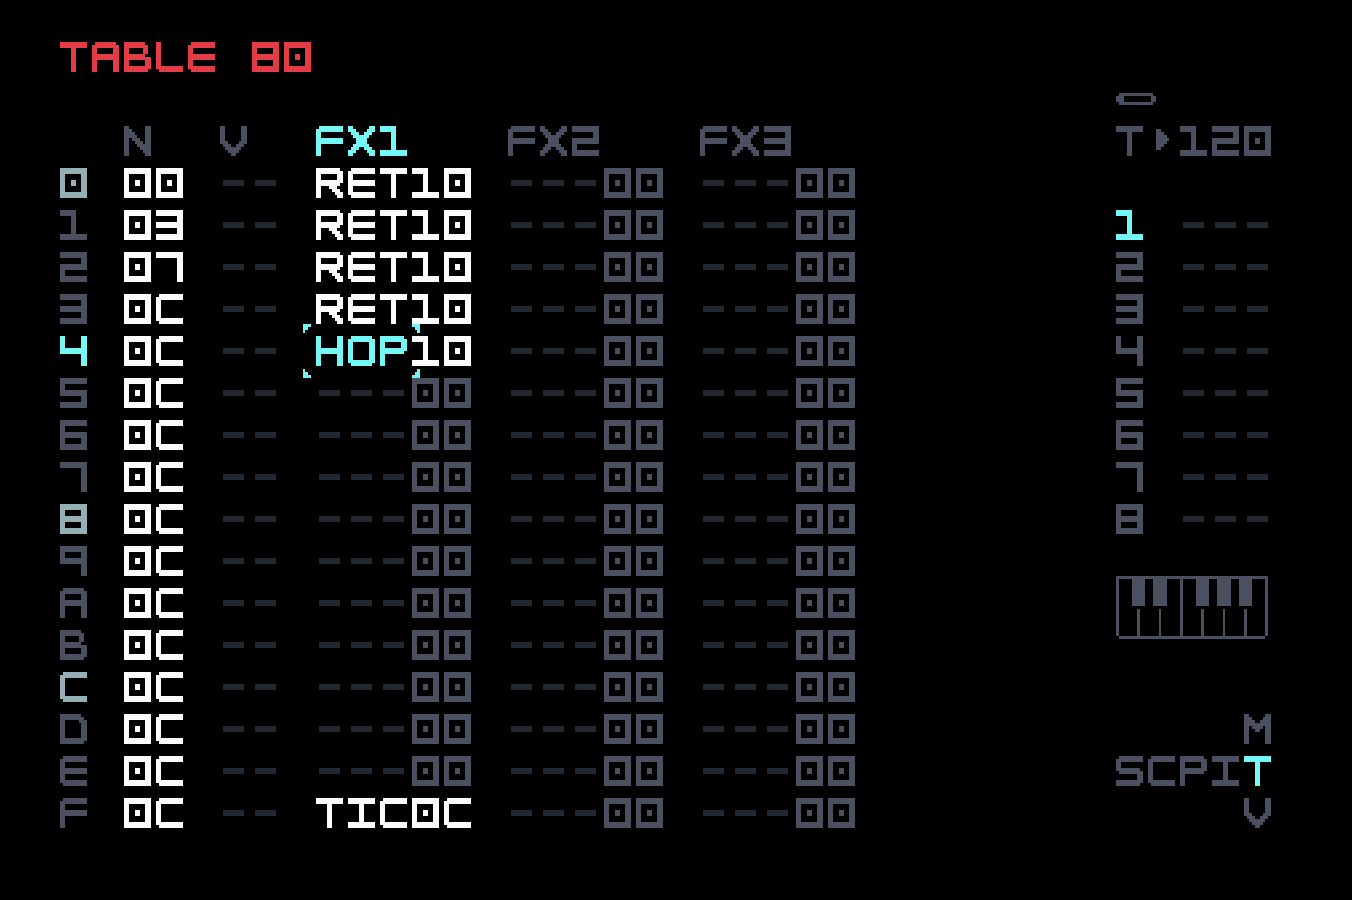
If you add note values of 00, 03, 07, and 0C in rows 0 through 3 of the N column, that spells out a 4-note minor chord. Listening to the result, you will notice that two things are wrong. First of all, the volume envelope is only triggered with the first note in each bar, and the other notes are heard as the envelope decays. Second of all, the four notes only play once per bar; they don’t repeat, as an arpeggiator would.
The first behaviour is actually desired in some situations, and it is called legato. You can have it happen in a phrase by using the PIT command in an FX column to alter the pitch of the previously-triggered but still-playing note, without retriggering the envelope. But in our case, we want to retrigger the envelope, and we can do that by adding RET10 in rows 0 through 3 of the FX1 column.
To have the arpeggio repeat, we can put a HOP00 command in row 4 of the FX1 column. Now the playhead for that column, on reaching row 4, immediately jumps back to row 0. That’s why we needed the RET10 in row 0, not to play the note the first time, but for all the repeats. If we had more nonempty phrases or chains in our song, the arpeggio would play until another note or an OFF command is encountered on this track. You can see the playheads on the other empty FX columns make it through the first half of the table before the phrase repeats and its first note restarts the table.
HOP is one of those FX commands that acts differently in phrases and tables. In a phrase, the second digit of its value specifies the row in the next phrase to jump to, and the first digit is ignored. In a table, the second digit specifies the row in the table to jump to, and the first digit is either 0 (meaning it always happens), or a non-zero value (in which case it happens that many times, allowing short loops). You can see how playhead motion can get pretty complicated with clever programming.
Other ornaments and note modifications can be handled in a similar fashion. For example, grace notes. A grace note is a short related note played to delay the specified note slightly. When played on a drum, it is called a flam. We can use three ticks in a table moving at tick rate 01 to play a 32nd note. In the example below, the grace note is one semitone below and softer. Notice how we have to specify the transposition for all three ticks. We’ve been lazy and used an instrument table, but in practice this is also an occasional ornament, and should be put in an unassociated table with the proper tick rate set in the last row of the FX1 column.
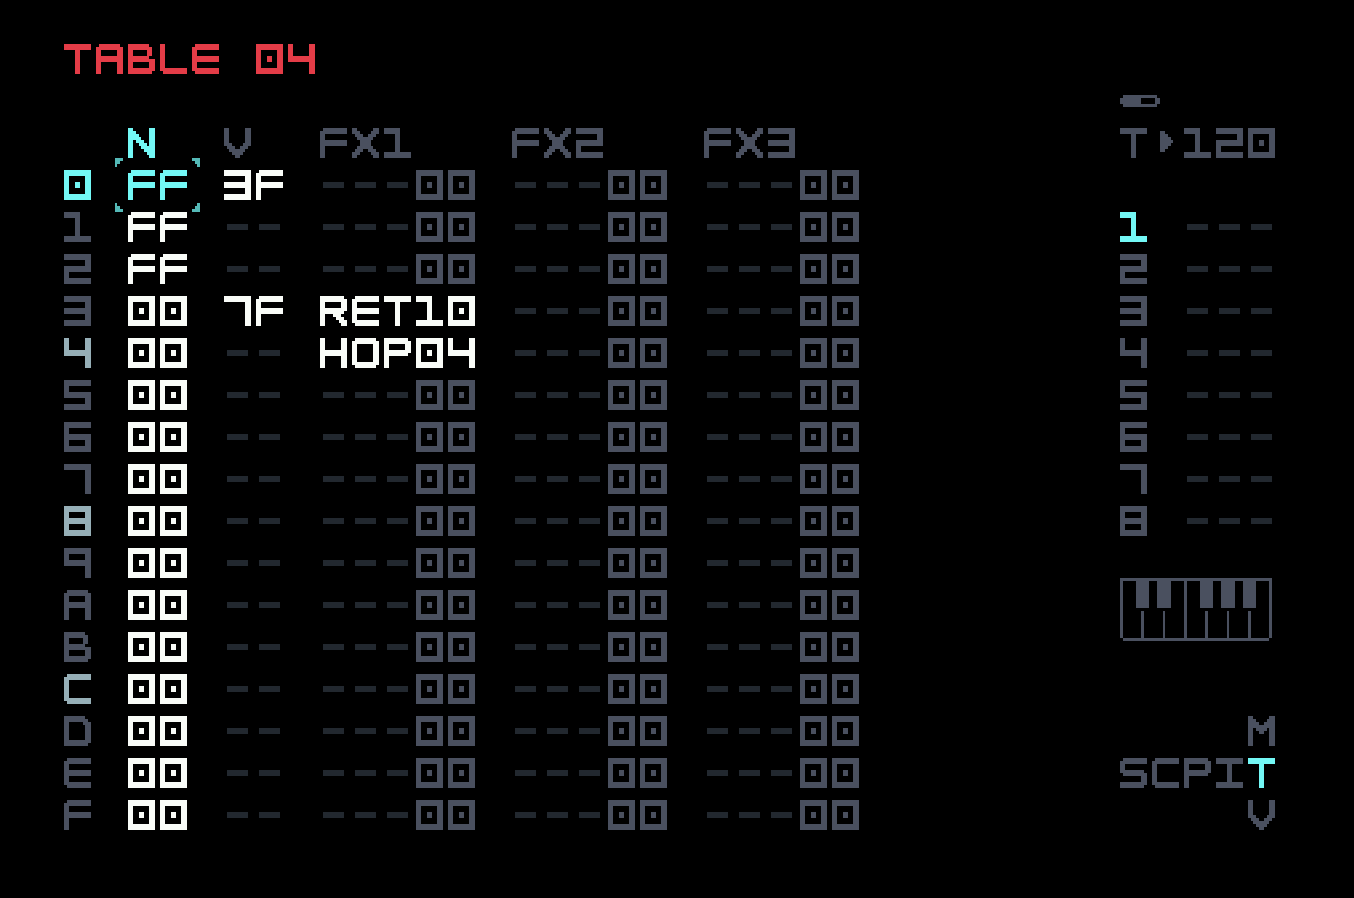
Here we use HOP04 in row 4 to stall the playhead, because we don’t want the effect to repeat, unlike with the arpeggiator.
These techniques can be iterated to create all sorts of repeatable note and rhythmic variations. By using the CHA (chance) command in a phrase to make the starting of an auxiliar table a probabilistic event, and then further using CHA in the table (different behaviour) to do the same for individual rows or FX commands, one can build generative songs with more structure.
7.2 LFOs and Envelopes
When one gets enthusiastic about sound design, it is easy to run out of modulators. Tables can be an additional source of modulation. They can’t do everything that instrument modulators can do. Specifically, they are "steppy"; values only change at the column tick rate, and with the two-hex-digit range, so the graph of the modulation might resemble a Wavsynth waveform. Often this is not noticeable (for example, if the modulation is on volume) and tables can be used to build additional modulation shapes.
To perform the modulation, we use a relative command affecting a parameter. For example, CUT for the filter cutoff. CUT 10 will increase the filter cutoff by 10 (hex). Such a change will persist until the next change, or a retrigger. We’ll combine this with the REP (repeat) command. In a table, REP repeats the previous row of the same column for the specified number of repeats (this is different behaviour from its use in phrases; there, a change value is specified, and the result is smoothed). CUT 10 followed by REP 02 will have the effect of raising the filter cutoff by 10, then twice again on subsequent column steps for a total increase of 30, which will be held until the next change. Instead of REP 02, we could also use RTO 20, because RTO in tables can be used directly after a relative command (no intervening REP needed, as in phrases) to specify an additional total increment.
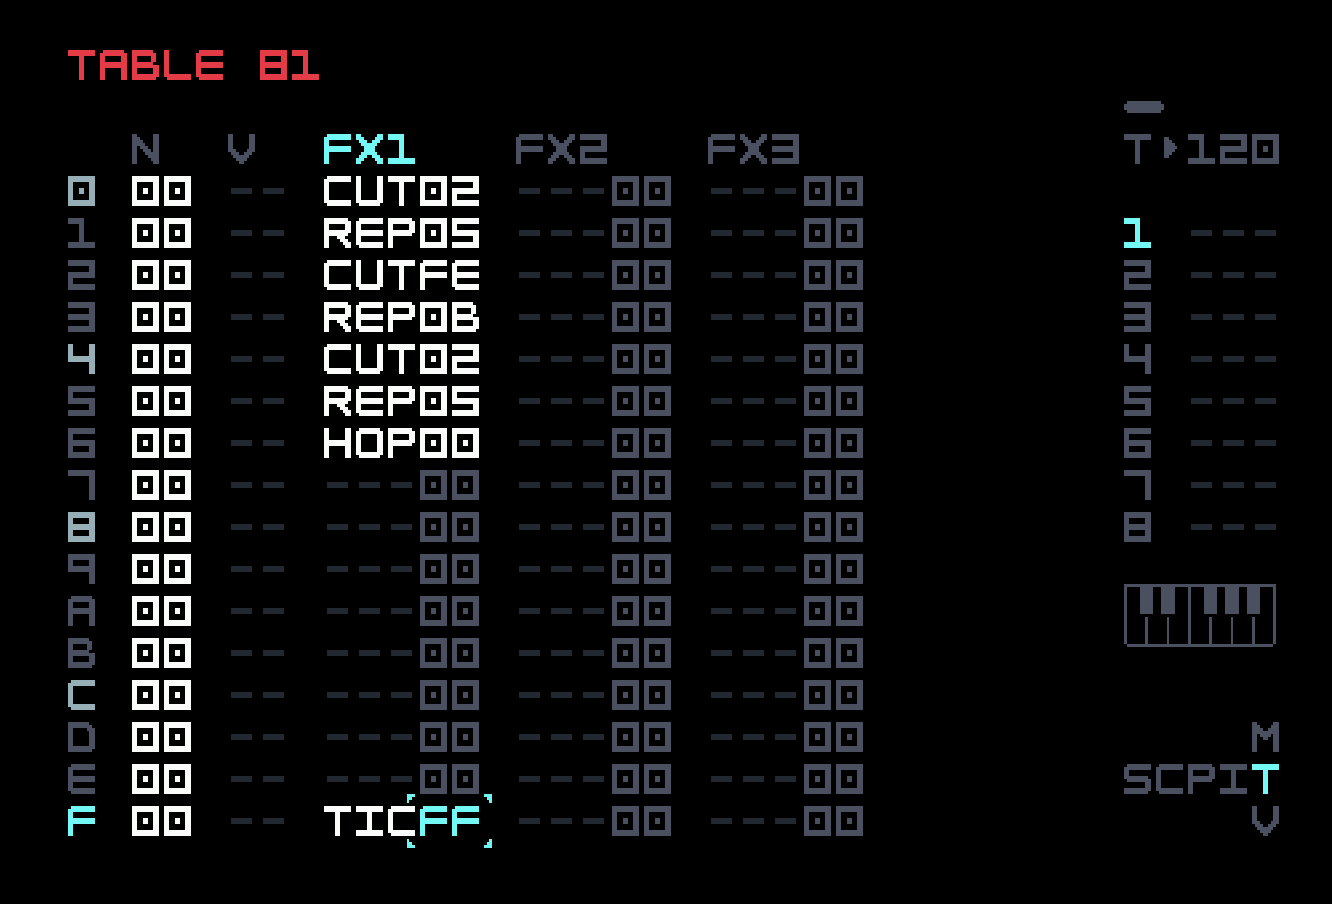
Let’s design an approximation to a triangle LFO with a period of 24 table steps. To get a total rise of 12 (decimal), we can CUT 02 and then REP 05, for a total of six steps. CUT FE (a drop of 2) followed by REP 0B (eleven more such drops) gives us a drop of 24 from the height of 12, reaching negative 12. Then another CUT 02 and REP 05 gets us back to zero, and we can repeat with a HOP00. Here’s the table. We’ve set the tick rate to 200Hz so you can hear the effect.
If we increase the magnitude of the cutoff changes to 03 and FD, we get a range from +18 to -18. But we can’t get a range between 12 and 18, unless we compromise on the shape of the LFO. If we change the last REP05 to REP04, the cutoff change will not get back to zero before the table repeats. That makes it no longer an oscillator, but a sort of jagged envelope, like a saw with a tapering blade.
REP works perfectly well when the row above is empty; it just holds at that table row for the specified number of steps. The same thing is true if the row above is an absolute command or another REP. To convert an LFO to an envelope, we only need to use the grace note technique of hopping to the same row to stop the table instead of letting it repeat. For example, we can build an AHD envelope using a positive CUT possibly followed by a REP (for the attack), then an empty row and REP (for the hold), and finally a negative CUT and possibly a REP (for the decay). Again, only certain shapes are possible, but also it is easier to make bipolar or inverted envelopes.
We cannot approximate ADSR envelopes so easily, because the sustain phase relies on the implementation of OFF in the M8 firmware initiating the release phase, and we don’t have a way of being notified in a table of an OFF phrase event. What we can do is have a sustain phase where we specify both level and duration. We can also have the sustain phase decay as it does for a piano, which isn’t possible for an instrument modulator.
A certain amount of math (elementary, but still) is needed to make sure a complex LFO or envelope shape returns to zero, or to know where it is at when the table repeats. One of the M8 community members, twwi, has created a very nice table generator website that does the basic math and graphs the result. Handy as it is, you shouldn’t use it without being able to understand the table it gives you, because if the result doesn’t sound quite right, you should know how to fix it. If you are using a browser that supports WebUSB, you can even use this website to write the table back to your M8, rather than copying it labouriously.
7.3 Sound design
As our use of tables gets more complicated and less methodical, we are moving into the area of general sound design. We’re going to show just one example, a deconstructed version of the clap preset in the factory content (in the Drums instrument folder). Our version is slightly modified to make it easier to explain. Tim’s version has artifacts in it from the experimental phase of his design process. For example, there are REP01 commands in it to shift a column’s timing. These can be edited more quickly than moving part of a column up or down. After the explanation of our version, you can go back to the original, and it will make more sense.
The clap is based on a fairly simple synth patch, using the default FM Synth configuration, but with all levels and feedback turned up to FF, to create a particular kind of noise.
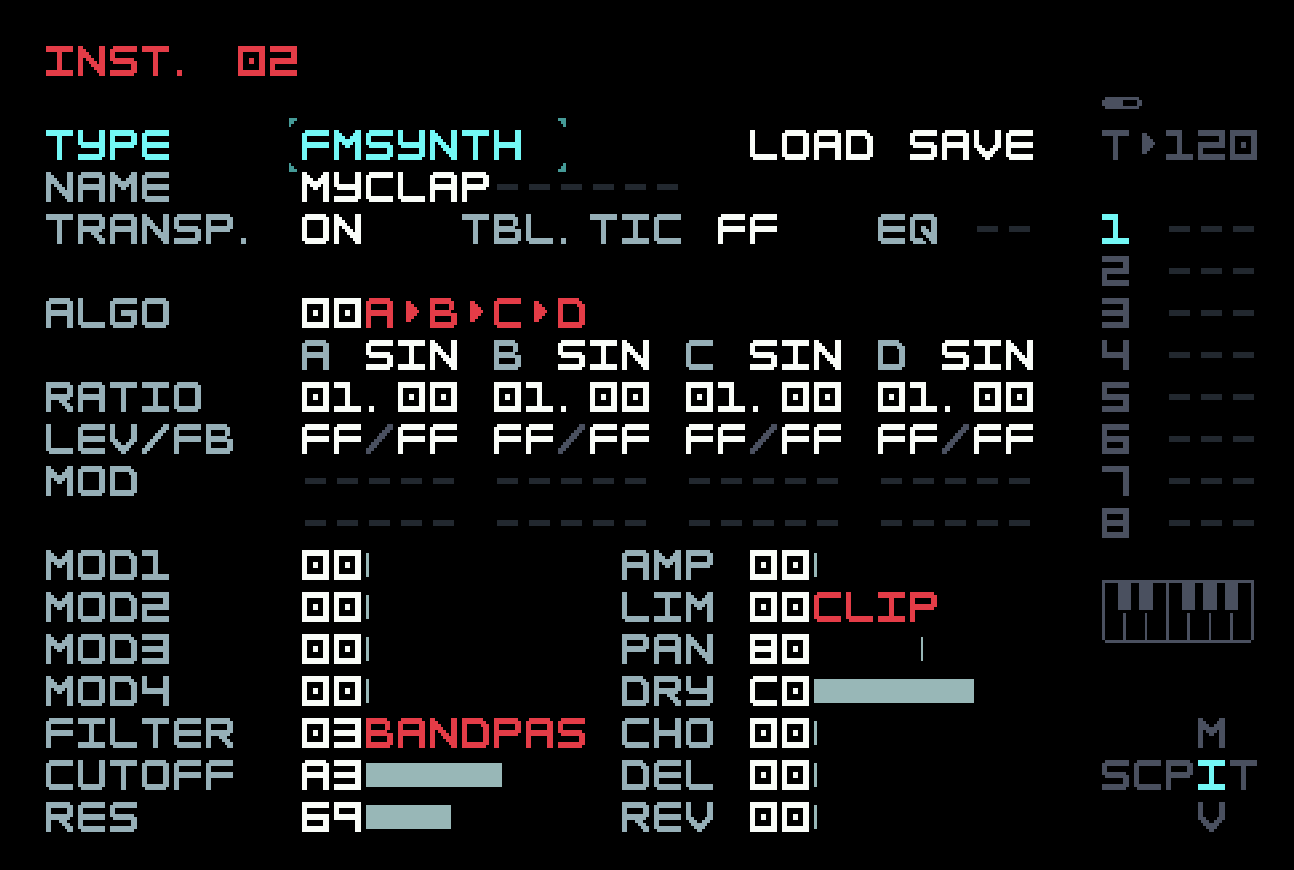
This is tamed considerably with a single instrument modulator that is just a short envelope. The resulting sound is just a click. Turn up the decay a bit to hear more of the sound. Then turn it back down.
A transient plus noise is pretty much how we designed our FM snare in chapter 4, and if we play enough with the transient and the effects, we can probably get close to something that sounds like one person’s clap. But what about several people trying to clap together? They aren’t going to get the timing precisely right. So the table (running as an instrument table, at 200 Hz) starts out with three retriggers to reflect this slight inconsistency.

The table ends with a HOP0F, so we know it will only run once. What happens after the first three retriggers is a fourth retrigger, in row A of the FX2 column, but it is accompanied by a change in the decay envelope (the DE1 command that does this is absolute). This is done to introduce the diffuse noise that would result from the reverberations of the room, but with more control than just sending to the reverb effect.
The help text says that DE141 results in decay of 10 steps and 5 ticks, but this does not take into account the table speed. The default tick rate for an instrument table is 1, and the default number of ticks per phrase step is 6, so this means 65 ticks (41 in hexadecimal). But the table is running at 200 Hz, or one table step every 5 milliseconds, so the decay time of the envelope is being set to 65 times 5 or 325 milliseconds. The precise time is not as important as the sound it initiates, especially as the envelope decay is modified thrice more, in rows B, C and E. Tim probably arrived at these values through experimentation.
You should slow the table tick rate down to something from 01 to 06, and listen to the separate events. Then restore the 200 Hz tick rate, and alter the timing of the first three retriggers, and the values of the three DE1 commands, to see how they affect the sound of the clap. The table length of 16 is a constraint, but you can push that a little by using REP commands early on, as Tim does (you can put a REP right below a RET and it acts as if an empty row were above it; it does not repeat any retriggers).
This example is more of an inspiration, and a glimpse of possibilities, than a specific technique that one can generalize. The point is that a table offers much more scope for precise timing and alteration of sound parameters than a phrase does.
7.4 Alternate table maps
If the tick rate of a table is set to FE, it behaves very differently. The note name and octave are used as an index into the table, so a C-0 note sends the playhead to row 0, C#-0 to row 1, and so on up to D#-1 mapping to row B. Then E-1 will map to row 0, E#-1 to row 1, and so on. The playhead stays on that row for the duration of the note. Although this means only three FX commands can be used, one of them could start an auxiliary table. It is possible to reduce the range of the mapping in each column independently by putting HOP00 after the last desired row. For example, if HOP00 is in row B of a column, then D-1 would map to row A but D#-1 would map to row 0.
In the live video meetup introducing this feature and others in firmware 4.0, Tim said that he didn’t have a particular use case in mind, that it was more of an experimental feature that users could run with. The most obvious use is with an external MIDI keyboard. One could map each note in an octave to a different percussion sound (the INS command could be used to change instruments), or map all the white keys to the notes of a particular scale to make improvisation easier, while the black keys trigger sound effects. In general, one can use this feature for live control using a MIDI controller that can send notes.
But there are also internal uses. Since note value indexes slices in a sample, one could use the table to set parameters differently for sixteen slices (the seventeenth, if there is one, would have the same settings as the first, or you could wrap around more quickly). Adding a TICFE instrument table to the dub stab chord we built using FM Synth in chapter 4 would let us play any of sixteen chords with just the choice of phrase note, leaving the three FX columns in the phrase available for use. We could position each chord using the transposition column in the table.
Firmware 6.0 enables two more of these "special tick rates". A table at tick rate FD becomes a velocity map, that is, the table row chosen depends on the velocity of the associated note. This can be used in a manner similar to velocity tracking, but it is more general, since a full auxiliary table can be triggered for each velocity range. Similarly, a table at tick rate FC becomes an octave map. This could be used, for example, to create a keyboard split, where different regions of an attached MIDI keyboard trigger different instruments. One common use of this is to play bass with the left hand and lead with the right.
Note, velocity, and octave maps are only implemented for instrument tables, so put away your dreams of cascading them! Furthermore, they operate on the note and velocity as specified in those phrase columns (or in an incoming MIDI note) and not on any modifications due to FX commands.