3 A first song
Here’s the audio of the song you’ll create. You can listen to it in your browser, or download it. It has a campy, retro feel, like the theme song for a spy thriller TV show that doesn’t take itself too seriously. It is nowhere near as interesting as the M8 demo songs, or other demos of M8 you may have watched on social media, but it is short and simple enough for one to recreate it without too much effort, yet complex enough to hold our attention and to give a feel for what creating something longer and more complicated would be like. It also introduces several important techniques, certainly not all of them, and some others that are relatively minor in the grand scheme of things, but serve us well in the immediate context.
Download link: FIRST.mp3
Creating this just from listening to the sound could be a daunting task even for experienced M8 users. But you don’t have to do that. We’ll explain how to create it, step by step, and at the end, you’ll have a full song on your machine that sounds like this. An M8 project file is available for download at the end of the chapter, but you will have it (or something equivalent to it) if you follow the instructions, and you’ll understand it a lot more if you work through them.
3.1 Creating chains and phrases
The end of the previous chapter left you with one chain, 00, containing four phrases, all references to phrase 00. We’re going to leave phrase 00 empty, making chain 00 four empty phrases (which still take up four bars). As discussed earlier, this will be useful for padding. Some people organize their labelling (for example, having all chains and phrases for track 3 have left digit 3) but you can decide later whether you want to do this.
Something you need to think about sooner is how to organize tracks. You have eight tracks, but you cannot label them; they are numbered 1 through 8. You just have to remember what each track is used for. Some sort of default can make this easier (lead melody and supporting elements to the left, percussion to the right, for example). For this first song, we’ll tell you how to use tracks.
We’ll start with the kick drum track, which will be track 6 (the idea is that tracks 6, 7, 8 will be for percussion). Navigate over to track 6 in the first row in Song Mode, which should be an empty cell. Don’t do this, but you know that if you tap [EDIT], you will get the last chain label you entered or deleted, namely 00. You want a new chain to work with, and you can get that by double-tapping [EDIT], which in the manual is called [EDIT]+[EDIT]. That will get you 01. This key combination generally gets you a new object, but the mechanism is pretty simple; it just keeps counters and increments them. Consequently, if you interrupt the flow of this lesson to go off and try things on your own (and we certainly encourage you to do this) the numbering you get when you return to the lesson might not be the same as ours. It doesn’t matter what labels are used, as long as they are used consistently.
With your cursor still on the chain label 01 that you just created, use [SHIFT]+[RIGHT] to navigate to Chain View for this chain. Chain 01 will be empty, with your cursor on the first row. Double-tapping [EDIT] will fill that cell with a reference to an unused phrase, phrase 01 in this case. We’re going to make this chain four phrases long eventually, but we don’t need to do that right away. Instead, use [SHIFT]+[RIGHT] to navigate to Phrase View for this phrase.
Your cursor will be in the leftmost cell of the first column, the one labelled N. N stands for "note". If you tap [EDIT], C-4 will appear. This is "middle C", the fourth occurrence of C on a full piano keyboard. The little keyboard visualization to the right of this view shows a single octave on such a keyboard, starting with C. The keys that would be white on a piano (but are black in this reverse-video view) are, from left to right, C, D, E, F, G, A, B. The two black keys at top left are C# and D#; the three at top right are F#, G#, and A#.
With the cursor remaining on this cell, [EDIT]+[RIGHT] will change it to C#-4 (displayed as C#4 on the M8, to fit a three-character column), that is, raise it by one semitone. [EDIT]+[LEFT] will lower it back down to C-4 again. [EDIT]+[UP] will raise it by an octave to C-5, and [EDIT]+[DOWN] will lower it again. These key combos have the same small/large effect in many other settings, and are important to memorize.
The next cell to the right, in the V column, was automatically filled in with 64. V can be thought of as "volume", but since there are so many types of volume, this is commonly referred to as velocity (a reference to the speed at which one strikes a piano key or drum, which in turn affects the volume of the sound). The velocity range is 00-7F (so that negative automation can turn it all the way off).
Though we have added a note to the phrase, playing it will still produce no sound, because we have not specified an instrument. This is done in the third column, the one labelled I at the top.
Navigate to the I column of the first row and tap [EDIT] to add a reference to new instrument 00. Then tap [SHIFT]+[RIGHT] to navigate to Instrument View for this instrument. The screen will look like this:

To the right of the cursor in the first row, you will see the words LOAD and SAVE. LOAD will let you browse instrument presets. There are a lot in the factory content, but we’re going to make our own. SAVE can save the current instrument as a preset so that it can be used in other songs, but you have to name it first. Within a song, we refer to an instrument by its number, so we won’t bother naming our instruments for now. The numbered instruments in a song are saved with the project. If an instrument preset is loaded, it is a copy, and the same thing is true if an instrument is saved as a preset. That is, the saved instrument presets and their possible copies in various projects are independent; a later change in one will not be reflected in the other.
With the cursor where it is, on NONE to begin with, you can use [EDIT]+[RIGHT] to start navigating through instrument types. The cursor won’t move, but the field under it will change to show different text, and the screen below will reflect the ways to interact with the chosen type. [EDIT]+[LEFT] will back up in the list of types. Find the Sampler instrument.

We will need to load a sample. This is done on the line labelled SAMPLE, with choices LOAD and REC. REC will record a sample, but we’re going to use one of the factory samples. So navigate to LOAD and tap [EDIT]. You will see a browsing screen that looks like this:

It doesn’t say so, but you are in the SAMPLES folder. Remember that /.. (which the cursor is on) means "parent" or "enclosing folder"; if you choose that, you will be at the root folder of the SD card’s file system. It’s still only showing you things relevant to samples. Your song project lives in this folder, but you don’t see it in this view. With your cursor on SAMPLES, tap [EDIT] to descend back into it. (At any point, you can tap [OPTION] to say "no" and go back to Instrument View without loading a sample. This would be useful if you change your mind about replacing a sample already loaded into the instrument.) Then go into DRUMS. You will see folders called HITS and SLICES. Go into HITS. This contains a number of folders, one called DCM8, and the rest starting with TR. These are all samples of various drum machines. There are no acoustic drum samples in the factory content, as far as we know.
The Roland TR-808 is an iconic drum machine that has been used on many songs that you’ve heard, whether or not you knew it at the time. Choose that folder. You will see a long list of subfolders (SD at the bottom of the list is off the screen). These are abbreviations for types of percussion; SD means "snare drum". But choose BD, the bass drum. Again, you’ll get a long list, but this time of files, with extension .WAV (a type of audio file).
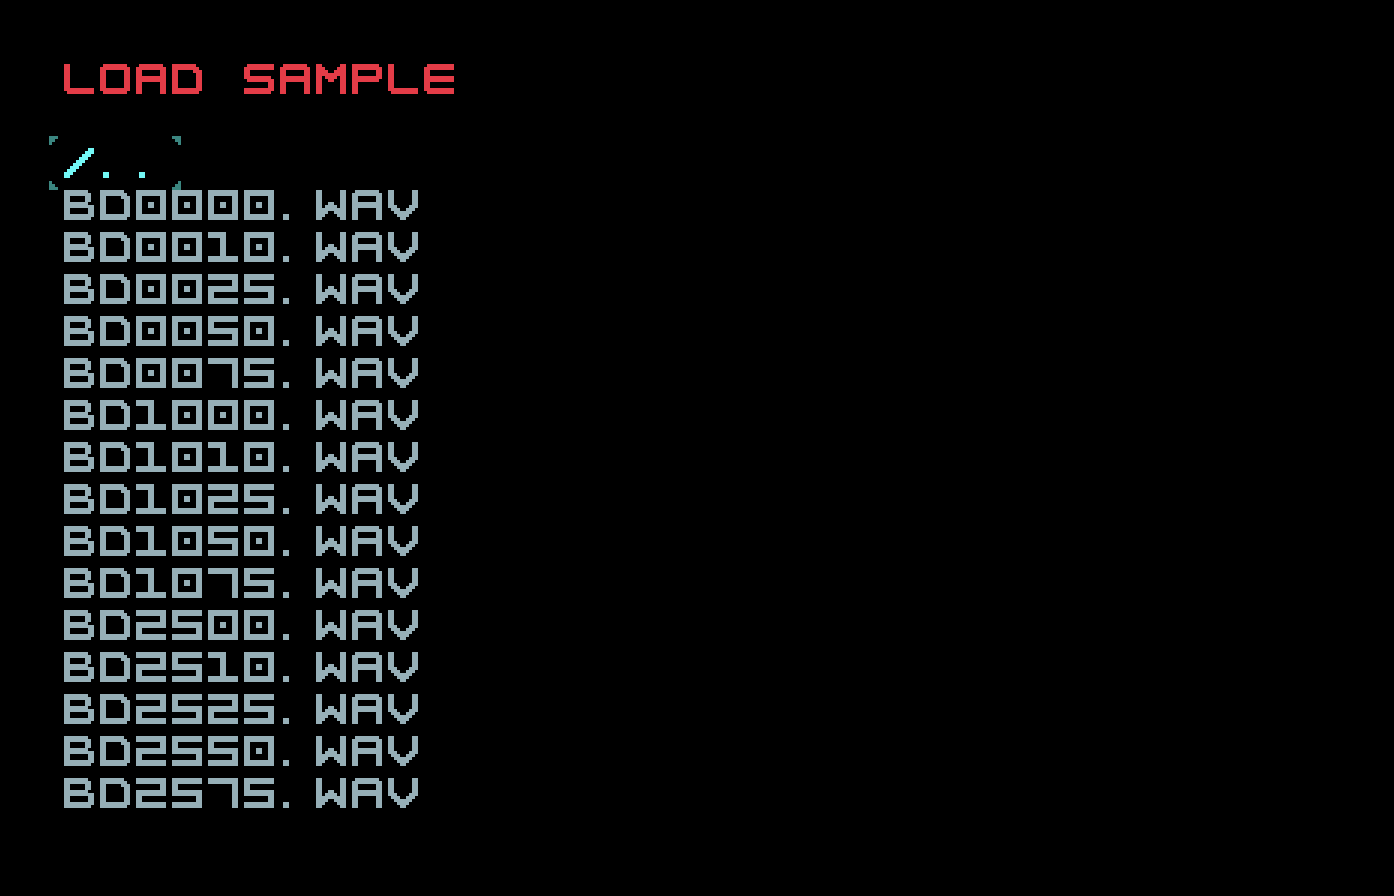
These are the bass drum samples. There are a lot (again the list goes off the screen) because there were two parameters controlling "tone" and "decay" on the TR-808, and it has been sampled at various settings. You can put the cursor on one and hold [PLAY], and you will hear the sample playing (this works for instrument browsing as well). Choose BD2525.WAV, and tap [EDIT] to confirm your choice. You will be back at Instrument View with your cursor on the name of the sample you just chose. Tapping [EDIT] again will return you to the folder where that sample lives, if you want to make another choice. But right now, you don’t.
Navigate back to Phrase View. Now, finally, you can hear some sound when you press [PLAY]. Doing this in Phrase View will loop only the phrase being viewed, and play only the sounds in that phrase. Pressing [SHIFT]+[PLAY] will play all tracks of the song, starting from this phrase, while keeping you in Phrase View. Right now this is the only sound in the whole song, and this phrase is the first one on its track, so this doesn’t make a difference yet. The note value of this sound, C-4, happens to play the sample exactly as recorded (no alteration of its speed to change the pitch). So we’ll keep using that note.
Before we start on the bass drum sounds for our target song, let’s take a short diversion to learn some more useful editing commands while making a "four on the floor" pattern. This is just four equally-spaced hits in one bar, so in rows 0, 4, 8, and C. These row labels are even highlighted to point this out. You know enough to be able to put in the other three hits using just arrow keys and [EDIT], but we will explore some other methods of achieving the same result.
With your cursor on that single C-4, tap [SHIFT]+[OPTION]. The entry will be surrounded by a green rectangle. This is selection mode. You can extend or shrink the selection in either direction with the arrow keys. Extend it so that it covers the N, V, and I entries in the first row.

Then, to leave selection mode, tap [OPTION]. The green rectangle will disappear, but the selection (the three cells in the first row) will have been copied into an internal clipboard. (A message at the bottom reminds you of this.)
To paste the contents of that clipboard, you can use [SHIFT]+[EDIT]. So to create the second hit, navigate to the first cell in row 4, and tap [SHIFT]+[EDIT]. You now know a faster way of creating rows 8 and C, but we can do even better.
Let’s get rid of the row 4 we just created. You know how to select it, but here’s a faster way. Hold [SHIFT] and keep holding it. Tap [OPTION], and you will go into selection mode. Tap [OPTION] again, and the whole column will be selected! That’s cool, but we don’t want to select the whole column. Tapping [OPTION] once more will select the whole row, including the FX cells we haven’t talked about yet. That’s what we want, but tapping [OPTION] once more would select the entire set of cells, and once more just leaves selection mode without doing anything (remember this, because it preserves your clipboard as well).
But with the whole row selected, let go of [SHIFT], and tap [EDIT]+[OPTION], the delete combo. The whole row will be deleted. Actually, it will be cut, which means removed from the screen but copied into the internal clipboard. So here’s another place where undo is available to us. If we have deleted a selection, we can just paste it back if we change our minds.
Now we just have row 0 as we want it. Go back up to row 0, use your new fast method to select the whole row while holding [SHIFT] down, then let go of [SHIFT]. Tap the [DOWN] key three times, and the selection will extend to the first four rows.
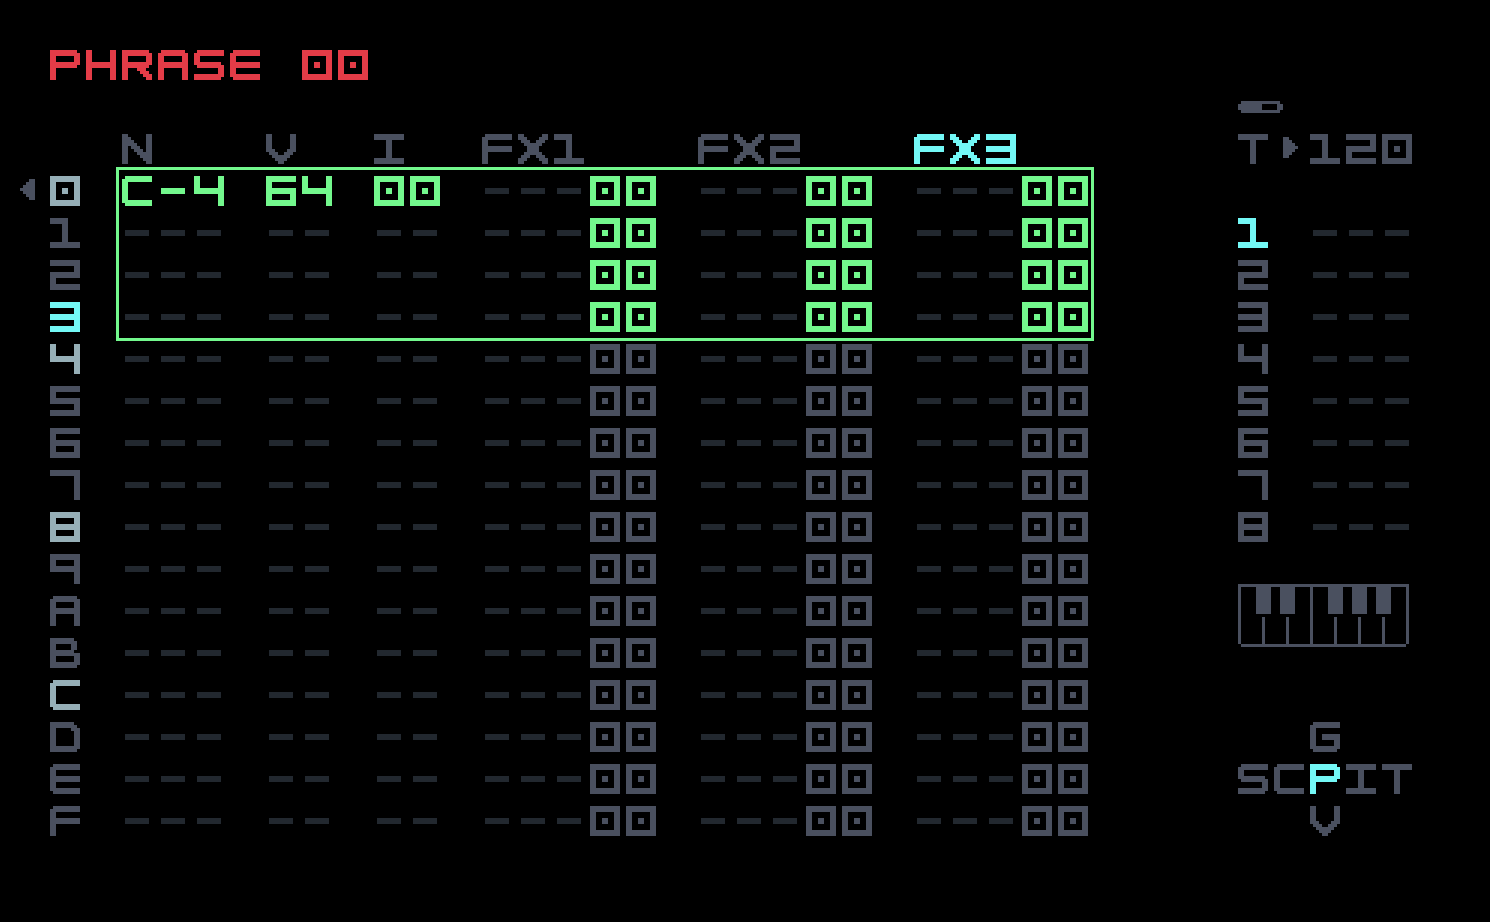
Tap [OPTION] to leave selection mode (and copy those rows to the clipboard). Where is your cursor? On the first cell of row 4, exactly where you can paste the clipboard (with [SHIFT]+[EDIT]) to fill in row 4 and empty rows 5 through 7. If you did this, the cursor would then be on row 8, ready for another paste. So just two more pastes will finish the job. But don’t do this. Instead, go up and delete row 4, then move your cursor to the note on row 0.
Select the whole column, then hold [OPTION] (keep holding it) and tap [LEFT]. All the notes will get filled in, with the V and I values from the first row. We don’t want all of them filled in, though; we want every fourth row. Tap [LEFT] again, and every second row will be filled in. Once more will fill in every third row, and once more will get us to every fourth row. (Don’t do this, but if you tap [RIGHT], you get a random selection filled in, and tapping [RIGHT] again changes to another random selection.)
You can now leave selection mode by tapping [OPTION]. Our song doesn’t use four on the floor, so we need to get rid of most of this. In the case of a fill operation, the clipboard contains the previous contents of what was filled over. So if we do a paste, we’ll be back to just row 0 filled in. This ends our mini-lesson on selection mode.
The first bar of our drum pattern has kicks on 0, 2, and 8. Put those in and tap [PLAY] to listen to them. It also has snare hits on 4 and C. Since those don’t overlap, we could put them in the same track, or we could put them on track 7. Some advantages of using one track are that we save a track for something else, and all the information is on one screen. Some disadvantages are that it might be too much information to take in at a glance, we might want simultaneous hits later on, and we can’t mute kick or snare separately while performing, only together. For now, let’s put them in the same track. We’ll leave track 7 open if you want to move them later.
Move the cursor to the N column in row 4 and tap [EDIT], which will create a new kick hit here. We want a snare hit, and we don’t have a snare instrument yet. You could go over to the I column and tap [EDIT]+[EDIT] to get a reference to instrument 01, and then set that up from scratch. But instead, we’re going to make a copy of instrument 00 and put it in instrument 01. This is called cloning. The key combination for this (which works in many other contexts, as we’ll see) is holding [SHIFT] and tapping [OPTION], then while still holding [SHIFT], tapping [EDIT]. The manual uses [SHIFT]+[OPTION, then EDIT] to refer to this action. This is moderately complicated, but it doesn’t get worse than this, so if you can internalize the cloning action, you can consider that a milestone achievement.
Go to the I column in row 4, cursor on 00, and clone it into 01. Then navigate to Instrument View with [SHIFT]+[RIGHT], and you will be in instrument 01 set up as a bass drum sample. Change the sample to a snare drum sample (go to the name of the sample, tap [EDIT] to bring up the sample browser, go up to the parent folder and then down into the SD folder, which won’t be visible on the screen until you scroll down to it). Choose SD0050.WAV. Now go back to Phrase View and add the snare hit on row C. Listen to the result.

Cloning is useful for making a copy with slight variations. Because we didn’t do much to set up our bass drum beyond choose a sample, it didn’t save us much time in making the snare. But in general, an instrument has many specific settings for parameters, and cloning will copy all of those, saving more time.
Cloning also works for chains and phrases. We’re going to use it to fill in the other phrases in our four-bar drum pattern. The third phrase is the same as the first, but the second is a variation, and the fourth is another variation. Go back to Chain View, navigate to the second phrase, tap [EDIT] to get a reference to 01, and clone it into 02 with [SHIFT]+[OPTION, then EDIT]. Then navigate to Phrase View, and you will be in phrase 02, which will look exactly like phrase 01. The variation here is kick hits on A and D, so add those, and listen to the result with [PLAY]. You can navigate among phrases in a chain without leaving Phrase View, using [OPTION]+[UP] and [OPTION]+[DOWN]. At this point, the whole song is a two-bar drum pattern, and [SHIFT]+[PLAY] will loop it. (We’ll later learn how to gracefully and automatically stop a song.)
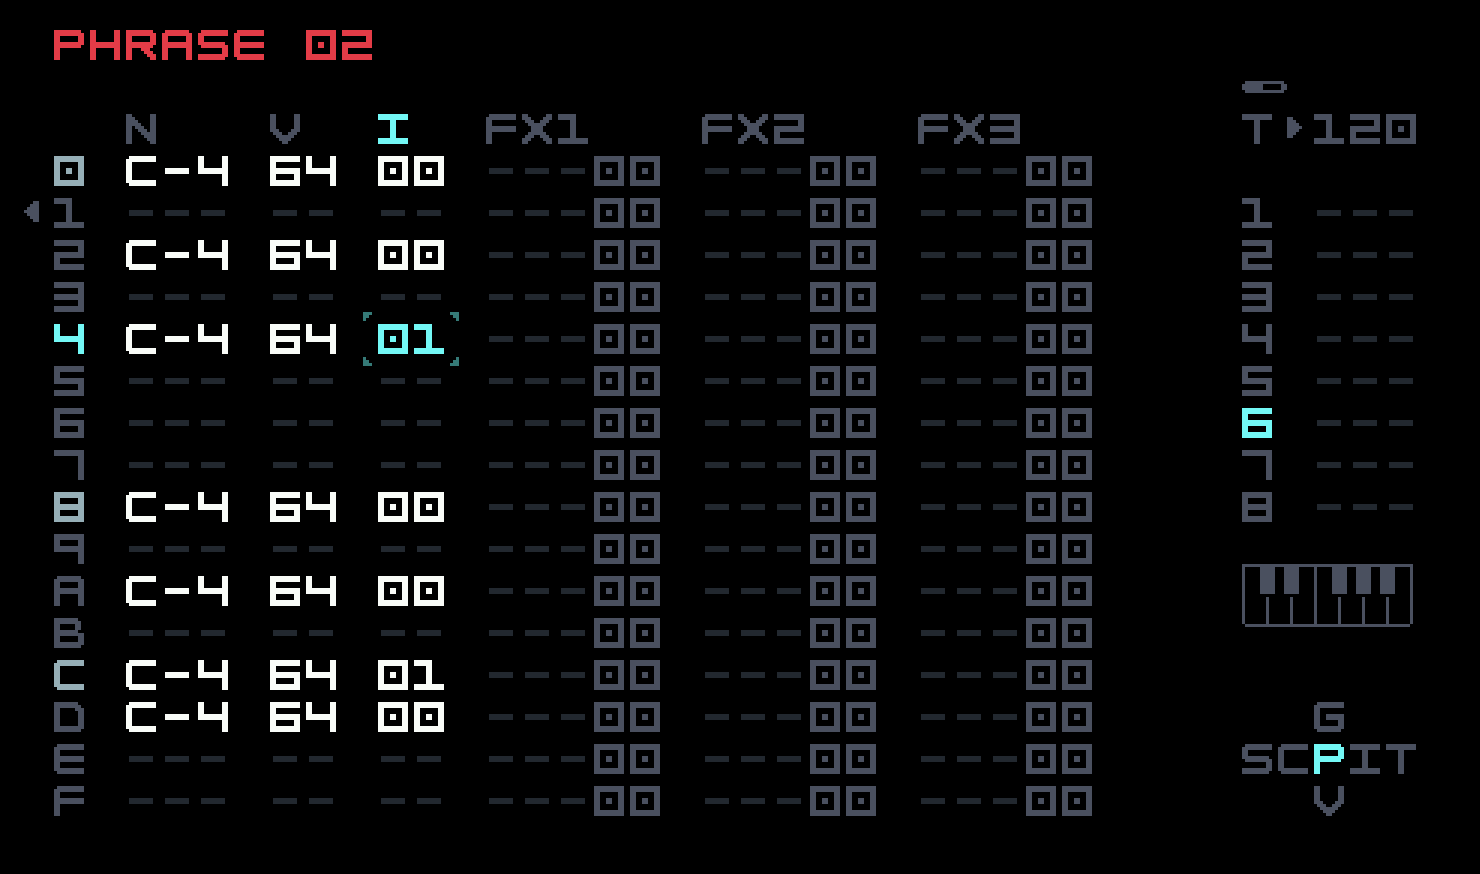
To put in the third and fourth bars, navigate to Chain View and row 2, enter 01 there, then go to row 3, enter 02, and clone it into 03. The difference between phrase 02 and what phrase 03 should be is this: the kick on 8 moves down to 9, and the kick on D moves to E. There’s a new snare on 7.
But that isn’t everything. There are extra snare hits in the audio, and they seem to be between steps. This is achieved with the help of the three pairs of columns that take up the right half of Phrase View. These are labelled FX1, FX2, FX3. FX is short for "effects", but to avoid confusion, we will always use the abbreviation FX in this context, and never for the send effects such as delay or reverb. Each column holds a command and an associated value.
The commands for the extra quick hit need to be on row C. Move the cursor to the FX1 column in this row, so that it surrounds the three hyphens next to the greyed-out 00. Hold [EDIT]. That adds a default command (ARP in this case) and a default value next to it (00, not greyed-out any more). This is not the command we want, so if you keep holding [EDIT] and tap [UP], you will enter the command browser.

As of firmware 4.0.0, the commands are organized into four pages, because there are so many of them. The command we want, RET, is on the first page, just below ARP. But the cursor is on ARP in the top left corner, and you can see help text for the command, telling us in the first word that ARP stands for "arpeggio". We’re not going to use this command yet, but you can see the word "tick" in the description.
A tick is an even smaller unit of time than a sixteenth-note step. There are six ticks per step. Still holding [EDIT], tap [DOWN] to move the cursor onto RET.
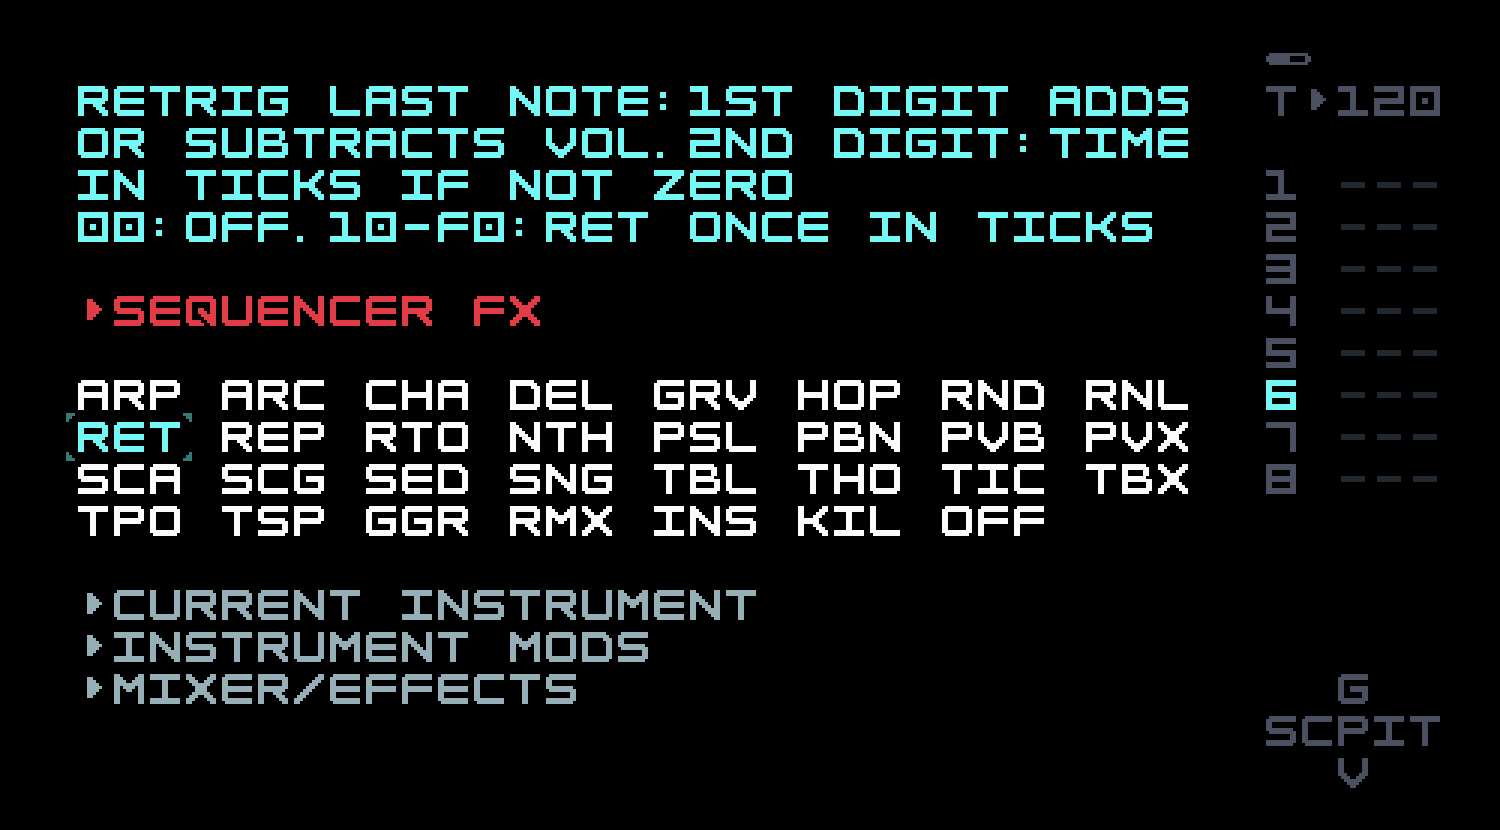
The help text tells us that RET stands for "retrigger". The first digit adjusts the volume change on each retrigger; we’ll leave that at 0. The second digit specifies the number of ticks between retriggers, and we’ll change that. Letting go of [EDIT] will leave the command browser and go back to Phrase View, with the chosen command filled in. We used RET 04 for the audio, but try other values. You will notice a problem: even with our value, there are way too many extra hits.
The reason for this has to do with how the length of notes is calculated. Each note in our phrase lasts until the next note entry. This didn’t matter before, because we are playing one-shot samples to completion. To alter this, we can use the OFF command. Putting OFF 08 into the FX2 columns of row A will mean that the snare hit in this step will become two hits, the first starting on the beat and lasting for four ticks, the second lasting for four more ticks. It’s also possible to put an OFF command (with no associated value, that is, it takes effect immediately) into the note column by using the delete key combo on an empty slot. Here’s what the final view of phrase 03 looks like.
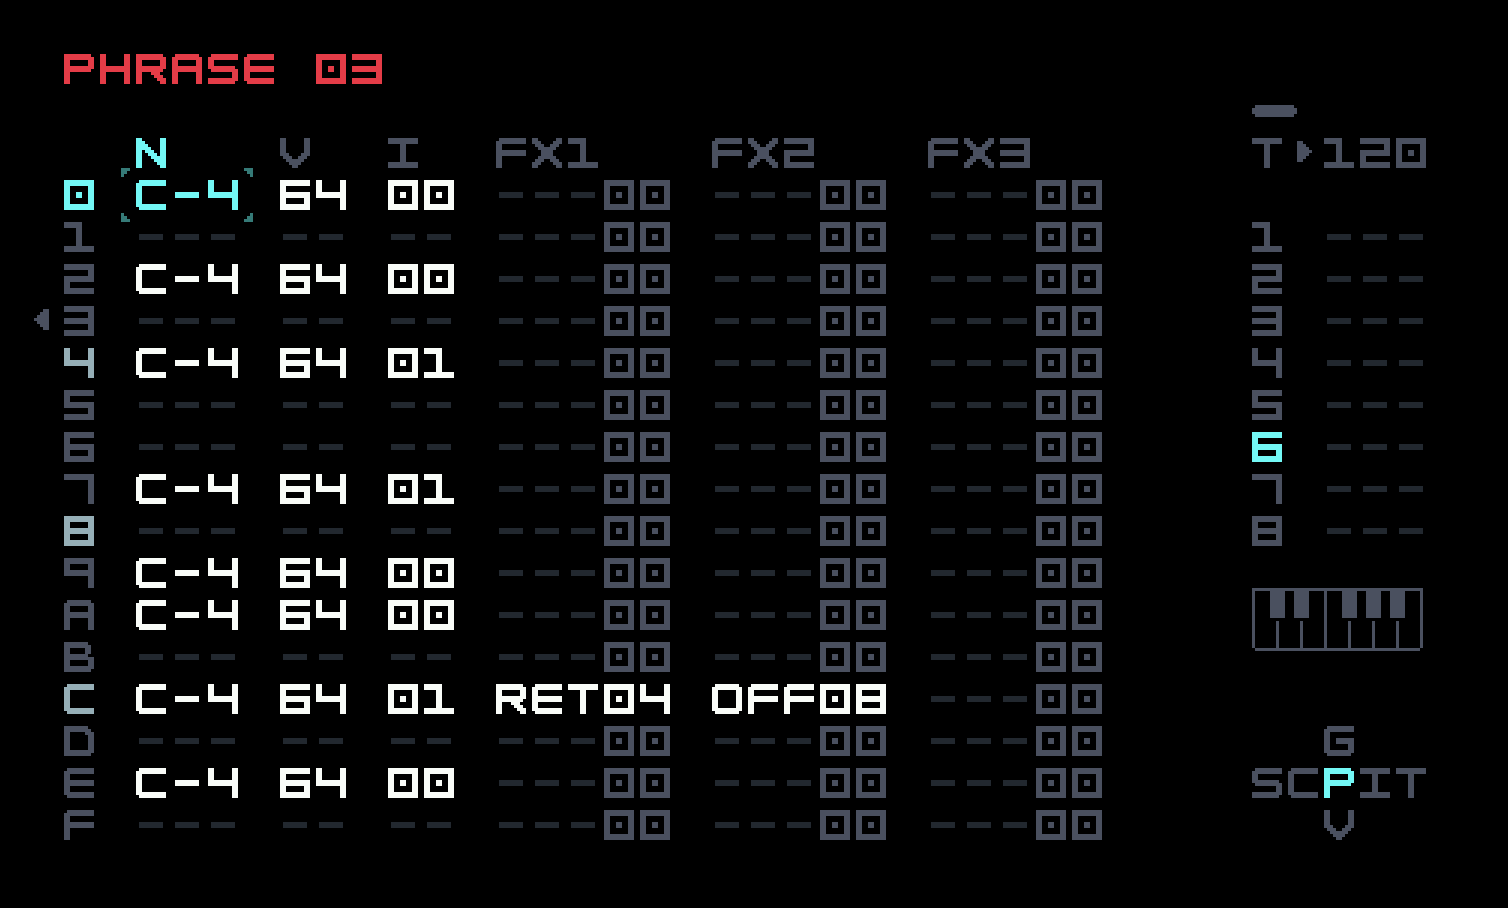
Another way of achieving this effect would be to put a hit on row B, but delay it with the DEL command. One can do a lot with FX commands, and even more power is provided by the table mechanism, which is a very general extension of these ideas that we’ll discuss in a subsequent chapter.
Let’s quickly add a hi-hat track. Navigate back to Song View, move to track 8 in the first row (we’ll leave track 7 for future independent snares or other uses), and add a reference to new chain 02. Navigate to Chain View, add a reference to new phrase 04, and put in three more identical references to preserve our uniform four-bar chains.
Then navigate to Phrase View, add a reference to new instrument 03, and navigate to Instrument View to set it up. Choose Sampler type, and fill the sample slot with a 606 hi-hat with medium decay (sample name 606MHAT.WAV). Go back to Phrase View, set the velocity of the first note to 24, and then fill the remaining rows with the same values. In these two brief paragraphs, we haven’t mentioned any keystrokes, so this is a good test of how well you’ve learned the navigation and editing commands mentioned above.
The hi-hat track can sound a bit robotic by itself, but it’s a subtle element in the final track, so it won’t be noticeable. There are ways to make it more interesting. One could put in a more varied pattern, or use probability to drop out the occasional hit or vary the velocity of each hit. One could also delay some hits slightly. We’ll see ways of doing all of these things shortly.
We’ve seen that tapping [PLAY] when in Phrase View will loop just that phrase. In Chain View and Song View, it will start playing from the cursor position (and loop the chain in Chain View). There are also key combos to mute and solo the current track which you can learn about in the M8 manual. One thing that is not mentioned in the manual yet is that when in selection mode, tapping [PLAY] will loop the selection for just this track, and [SHIFT]+[PLAY] will loop the selection but play all tracks. There are thus many ways to focus in on a small part of a larger work under development and listen to just that part while tweaking it. In looping a restricted region, you need to keep in mind that any effect whose scope extends outside that region could sound different. This is obvious for, say, a note that would keep playing outside the region. Other changes might be more subtle and possibly confusing.
We haven’t completed our song! We only have the drum pattern, and it’s only four bars long and not very sophisticated (still, we will leave it like this). Before we add the melodic elements, let’s learn a bit more about instruments.
3.2 General parameters in Instrument View
All the instrument types, except MIDI out, have a section at the top in Instrument View with information specific to the type, and two columns of parameters below, with most of the left column also specific to the type.
The common area at the bottom of the left column describes a multi-mode filter. You choose a filter type and specify values of two parameters, cutoff frequency and resonance. Resonance is a property of hardware filters that allows control of the amount of a volume boost at the cutoff frequency. This can be musically pleasing, especially if either or both of the parameters are modulated, so it is emulated here in software.
The filter types available are lowpass (cutting off higher frequencies), highpass (cutting off lower frequencies), bandpass (cutting off both), bandstop (cutting out frequencies around the cutoff, so the opposite of bandpass), and LP>HP (like bandpass, but resonance controls the HP cutoff frequency, so the width of the range of preserved frequencies can be adjusted; this is called a base-width filter on Elektron devices). They all have musical purposes that we’ll explain as they arise.
The common right column in Instrument View is for effects. The signal path can be thought of as two amplifiers with a limiter in between, after which selected amounts of the result are sent to a single global "mod effect", delay, and reverb. The mod effect defaults to chorus, but optionally could be a phaser or flanger.
The AMP parameter allows a boost of the signal before the limiter. This seems paradoxical, but it is used to create distortion or overdrive. The simplest form of limiting is clipping, which is like shaving off the top of the waveform when it exceeds a set value. The other types of limiter are described in the M8 manual; they can sound considerably different, and it is worth experimenting with them early on to know what is available. The DRY parameter then allows the signal thus distorted to be lowered again.
There is also a PAN parameter here that allows placement of the monophonic sound in the stereo field, and three parameters for the send amounts to the global effects. The parameters of the global effects can be set in Effects Settings View, which is under Mixer View.
3.3 Synth instrument types
The M8 manual has detailed descriptions of parameters for all synthesizer types, but it assumes some prior experience with synthesis. We’ll give a more introductory, high-level overview of the types, and leave the details to the manual. Your own experimentation will give you a sense of where and why you might use each type. You can adjust parameters while a song is playing, and the oscilloscope at the top of several views (including Instrument View) helps to understand what is going on.
Wavsynth provides a deliberately degraded "8-bit" sound to emulate the music and sound effects of early handheld games. That is, the waveform is coarse in resolution, despite the much better resolution possible on the M8. Not surprisingly, wavsynth can be used for chiptune, though this is not its only use. Bit reduction is often prized as an effect in other synths, though here the amount of bit reduction is fixed and cannot be varied or modulated. Wavsynth provides several basic waveforms, and the 4.0 firmware release added many more wavetables (within the shape formerly known as "overflow") that remain undocumented but available for exploration.
Macrosynth is a port of the open-source code for the Eurorack module Braids, by Mutable Instruments. MI had a considerable influence on the Eurorack community, not only for the variety and usability of their modules, but because nearly all of the software is open-source, so it shows up in many places, including some very expensive synthesizers.
Macrosynth provides no fewer than 44 engines, ranging from basic waveforms to variations on them (such as a swarm of saw waves), through to physical models of plucked, blown, bowed, and struck instruments, various types of percussion, and various types of noise. The prefix "macro-" means "large" in Greek, and its use here is used to refer to the design of the interface, where each engine has two parameters, generically called Timbre and Color, that under the hood control more specialized parameters of the given model in a fashion that is not documented and not open to change by the user. The tradeoff is that the user does not have to understand the effects of cumulatively hundreds of parameters, at the cost of some loss of control. This is a common approach in many Mutable Instruments modules, and their popularity is a testimonial to the effectiveness of the approach. Macrosynth will reward extended study.
FM Synth also rewards extended study, but here all the parameters are available. FM stands for "frequency modulation", meaning one oscillator (repeating waveform) controlling the frequency of another. In this context, the oscillators are called operators. The mathematics of sound treats repeating waveforms as the sum of sine waves, a sine looking like a triangle made curvy rather than straight. This is discussed in detail in a sister flânerie, The Sound of Math, but all you really need to know is that FM is easiest to control when the oscillators are sines, and sounds best when the frequencies of controller (modulator) and controlled (carrier) are related by small integer multiples or ratios.
FM Synth provides four operators, and "algorithms" that hook them up in various carrier-modulator combinations. You don’t have to stick to sines; other basic waveforms are available, and one algorithm is just the four operators with no cross-modulation, meaning you can use it for limited polyphony (multiple voices forming a chord). This is by far the deepest of the instrument types, and we could write a whole flânerie just on it (though here we will stick to a single later chapter), but you shouldn’t be intimidated by the potential complexity. It is possible to use it in simple ways (just one operator, or one carrier and one modulator) to get very nice sounds, and there are recipes and presets for more complex sounds. FM excels at glassy or bell-like sounds, but is also capable of reasonable approximations to many physical instruments. It will work well for long, evolving sounds ("pads").
One of the best FM synth devices available is the Elektron Digitone (the Digitone II was recently released). Simon "Ess" Mattison, who worked on the Digitone, and now makes software synths under the label Fors, is a big fan of the M8, and advised Tim on the design of FM Synth (though it also draws from other sources, such as classic Yamaha devices). FM Synth can’t do everything the Digitone can, but it provides a respectable chunk of it.
Hypersynth is the most recent synthesizer type, being added in firmware release 3.0. It is a "supersaw", offering six saw wave pairs, where each pair can be detuned slightly with a parameter (providing natural variation over time), and pairs can be offset in pitch (forming chords) with user-defined intervals (sixteen such chords can be defined per instrument). This is the easiest way to add polyphony in M8, but the sonic variation is limited. Saw waves are rich in harmonic overtones, resulting in a "buzzy" sound, and several of them can sound like a swarm of bees. The filter options are definitely helpful here, as restricting the frequency range can result in a much more versatile sound.
3.4 The sampler instrument type
Just as FM Synth provides a respectable chunk of the Elektron Digitone, the Sampler instrument type brings to the M8 a good portion of the Elektron Digitakt, a highly-regarded sample-based device. Sampler does not have all the bells and whistles of Digitakt or other popular samplers. It does not have dozens of "mangling" effects, and one cannot "timestretch", or play a sample slower while preserving its original pitch, though there are low-fi techniques to approximate this that can be effective. But it has a good set of capabilities, and some say it has the best sampling workflow available.
A sample can be played forward or backward, one-shot or looped, pitched up or down (by changing the speed, so a sample pitched one octave higher plays in half the time), and looped without reset on a new note, so a very short sample can be used as a waveform to define an oscillator. One can speak or sing briefly into the microphone and extract several oscillators from the sample to build a song whose sounds do not betray their origin. In a process generally known as resampling, a selection in Song View can be rendered to a WAV file that can immediately be used as a sample. There is a Render View for more complex rendering.
The start and length of a sample can be modulated. Sample choice is fixed per instrument (cannot be modulated), but several samples can be combined into one (there are external editors and browser-based tools to facilitate this) and then sliced on the M8. One can slice a sample at regular intervals, or one can manipulate slice points, trim, and perform other actions in a sample editor on the M8. The editor allows arbitrary zoom-in at any time. On the Digitakt, zoom-in is only available at sampling time, and never for imported samples. Digitakt users would kill for this facility. Once sliced, slices can be selected for playback using note values (this is handy for a multisample of an instrument) or addressed using commands (to make breakbeats from drum loops, or to build kits from different sounds).
The Sampler instrument type offers so much sonic capability that even if the M8 had no synth types, it would still be a sought-after device. Many samples are available on the Internet free or at low cost. Your challenge will be to not go wild and fill up your device with huge folders that you have to scroll through and preview. There is some factory content to get you started, both percussive and melodic. Note that this content differs on M:01 and M:02; there are no included drum loops for you to slice on M:02, for example.
We’ll go into more detail on the Sampler instrument in chapter 5.
3.5 Adding the bass
Since the song player has probably scrolled off your screen, and you might want to refer to it as we work on the song some more, here’s another copy of it.
We’ll use the Wavsynth on track 5 for the bass. Yes, the Wavsynth has a lo-fi sound, but we’re going to be using a pulse wave, which only has two levels, so Wavsynth sounds as good as a more precise synth engine would.
If you count carefully from the beginning of the song, you will hear that the first three notes of the bass come in at the end of the fourth bar. They are really a leadup to the second four-bar chunk. This is informally called a pickup (the formal term is anacrusis). We will need a whole chain just for these three notes, and another one for the four-bar chunk that follows them.
In Song View, put a reference to a new chain 03 on row 00 of track 5. Navigate to Chain View, and put in three empty phrases (phrase 00), followed by a reference to a new phrase 05 in row 3. With your cursor on the 05, navigate to Phrase View. The last three eighth notes of this bar are rows A, C, E. Put a note on row A (it doesn’t matter what it is, we will change it later), move to the instrument on this row, and make it a reference to new instrument 04. Then navigate to Instrument View for this instrument. Choose Wavsynth, and set the Shape, Size, Warp, and MFX (chorus) parameters as shown in this view.
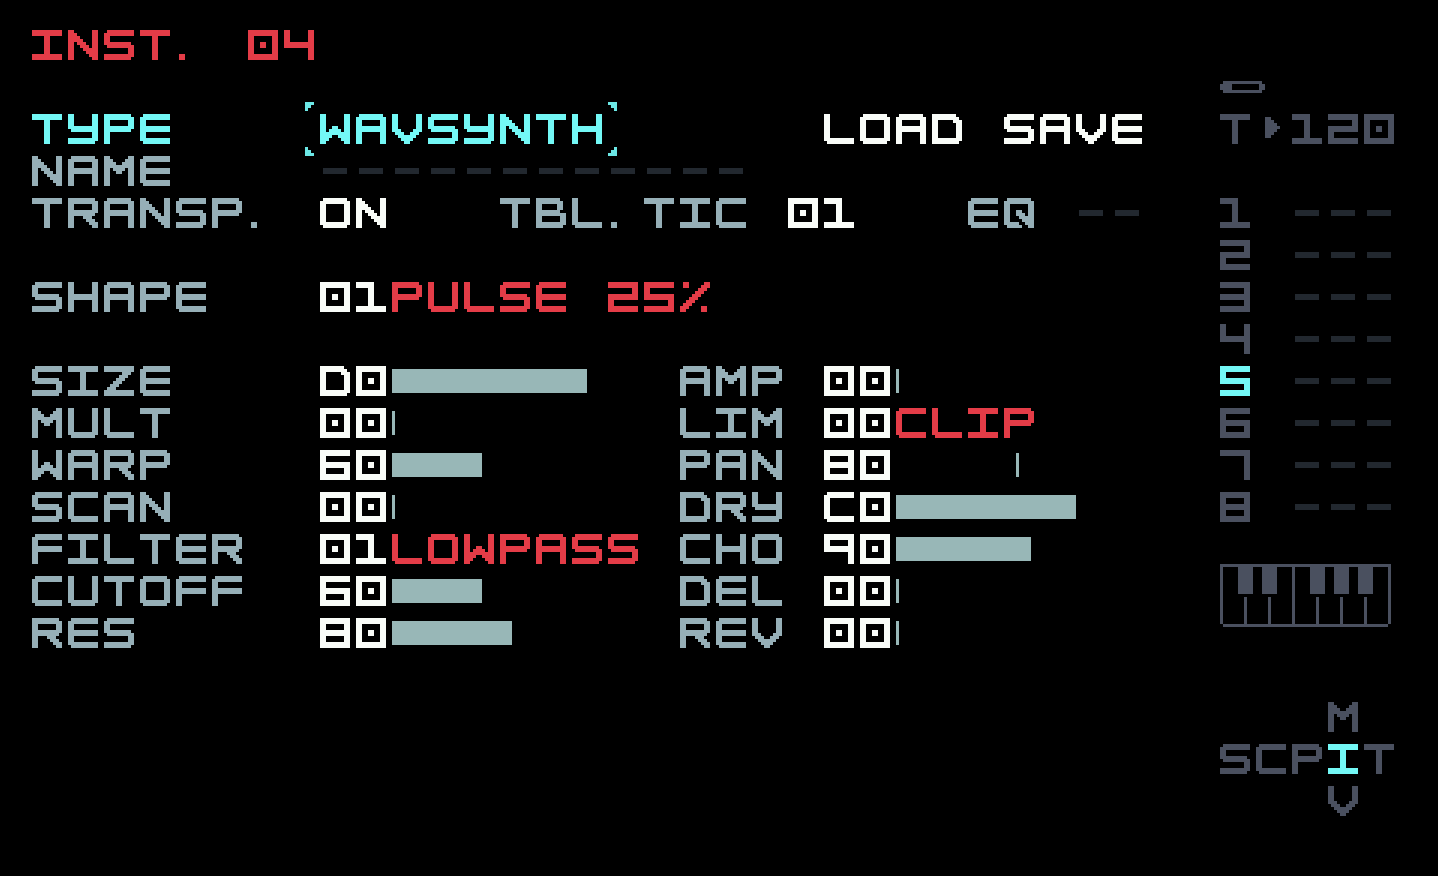
These are arbitrary choices, so you can change them to your taste. You can preview the sound with [EDIT]+[PLAY]. But it won’t sound like it does in the final song, because that has modulation on the velocity and the filter frequency cutoff. Set the Filter, Cutoff, and Res (resonance) parameters as shown, and then navigate upward to the Instrument Modulation View, which we haven’t previously seen.

With earlier firmware, each instrument had two LFOs (low-frequency oscillators; imagine twisting a knob back and forth slowly) and two envelopes (roughly, a contour that rises from zero and falls back down). But more recent firmware generalizes this to four modulators, each of which could either be an LFO or an envelope (and there are further choices within each of those categories). However, the defaults are still like the old two-and-two arrangement. Since we are going to use two envelopes, we might as well use the defaults for mod sources 1 and 2.
The envelope modulators default to AHD, which stands for "attack, hold, decay". This is an envelope that rises to its maximum value at a rate set by the ATK parameter, holds for the time specified by the HLD parameter, and then decays at the rate set by the DEC parameter. We are going to keep HLD at zero, so it is just a AD envelope. You can see the required settings for mod source 1, modulating volume, but try other settings to hear what they sound like (the preview key combo [EDIT]+[PLAY] works here as well). With this modulation active, the sound will no longer drone on at the same volume until you lift your fingers (with preview) or until another note is played (in a phrase). The sound will diminish as we would expect from an acoustic or electric bass.
Mod source 2 will affect filter cutoff, which mutes the higher frequencies of the sound before lower ones. Putting an envelope on this (with the possibility of different parameter values than for the volume envelope) shapes the sound further, with the added dimension of the moving resonance boost. Once again, try various combinations, and go back to Instrument View and change the cutoff and resonance there to see how all these parameters interact. The ones in the screenshot are an arbitrary choice that sounded good. All of these can be changed on a per-note basis with FX commands.
Now go back to Phrase View, and remember phrase 05 is for the three note pickup in the fourth bar of chain 03. Here are these three notes.

If you don’t have the ability to take a melody in your head and translate it into note names and octaves (we’re not very good at this), you will have to sculpt your melodies on the M8 making liberal use of the ability to loop a phrase or to start it playing at the cursor position. It is not the same as picking out a melody on keys, but it can be almost as fast, if you’re not proficient on a musical keyboard. If you have the time and inclination, you can try to listen to the recording of the song, and see if you can recreate the bassline by yourself (or do better).
Recall that in selection mode, holding [OPTION] and then pressing [LEFT] cycles through various fill modes. If you instead press [UP], the notes in the section will be "randomized upward", and similarly for [DOWN], while [RIGHT] will randomize both the triggers (rows on which notes appear) and the note values. If you don’t have a specific melody in mind, you could use this random choice as a starting point, tweaking it into shape. But we didn’t use this method here.
Once you have the pickup set in phrase 05 in chain 03, go back to Song View and put a reference to a new chain 04 in row 01 of the bass track 5. Here a one-bar phrase starts which is used a lot in the bassline. Navigating to Chain View for chain 04, add a reference to new phrase 06 in row 0, and navigate to Phrase View for it. Here is what it looks like.
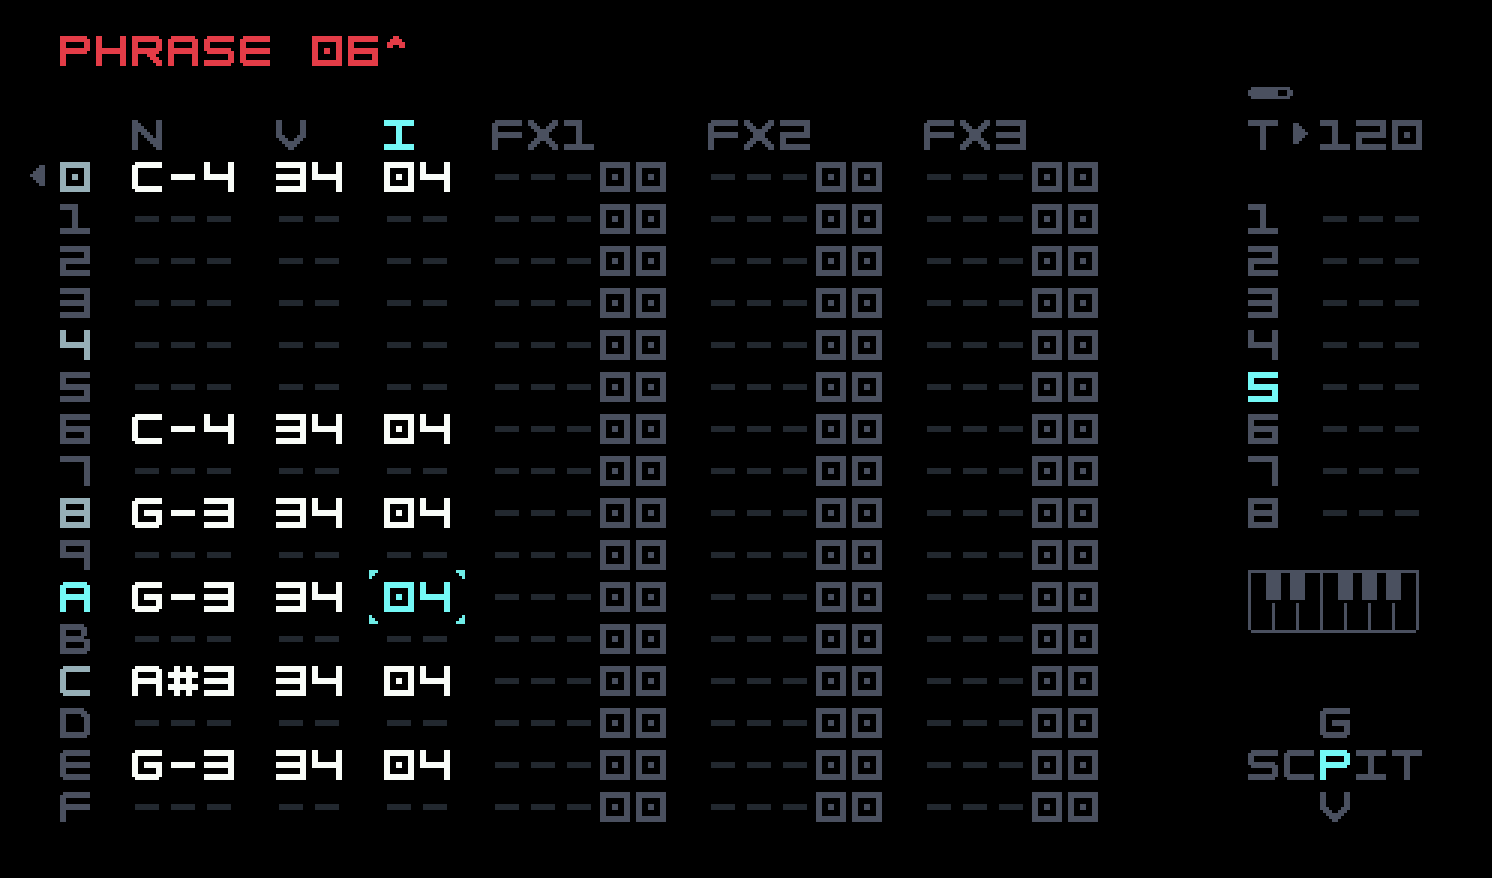
This phrase is used in the first three bars of chain 04 (so you should add references to it in rows 1 and 2), but the fourth bar starts differently, and ends with a new pickup. So add a reference in the fourth row of chain 04 to new phrase 07 (or clone phrase 06, whichever you prefer) navigate to Phrase View for phrase 07, and set it up.

The percussion tracks 6 and 8 repeat their four-bar chain, so we could just leave them as is. But, to maintain the discipline of having the playheads for each track all on the same row in Song View while the song is playing, we should extend them downward by repeating their chain references. This will also let us end the song cleanly, once we set out to do that.
So far, we have two rows of our song completed (rows 00 and 01), using three tracks and four chains, and since we are using chains with four rows, we have eight bars of the song done. Now we will work on the third row of the song (row 02), that is, the ninth through twelfth bars.
The pad comes in at the beginning of the third song row. A pad is a long sustained sound, often with gentle attack and decay. We will set the pad up shortly, but we are still working on the bass, and in these four bars that correspond to row 02, it sounds the same for the first three, but has yet another pickup in the fourth. That similarity makes it easy to set up. Put a reference to chain 04 in song row 02 of bass track 5, clone it into a copied chain 05, navigate to Chain View for the new chain, clone a new fourth bar phrase 08 in it, navigate to Phrase View, and change the last three notes.
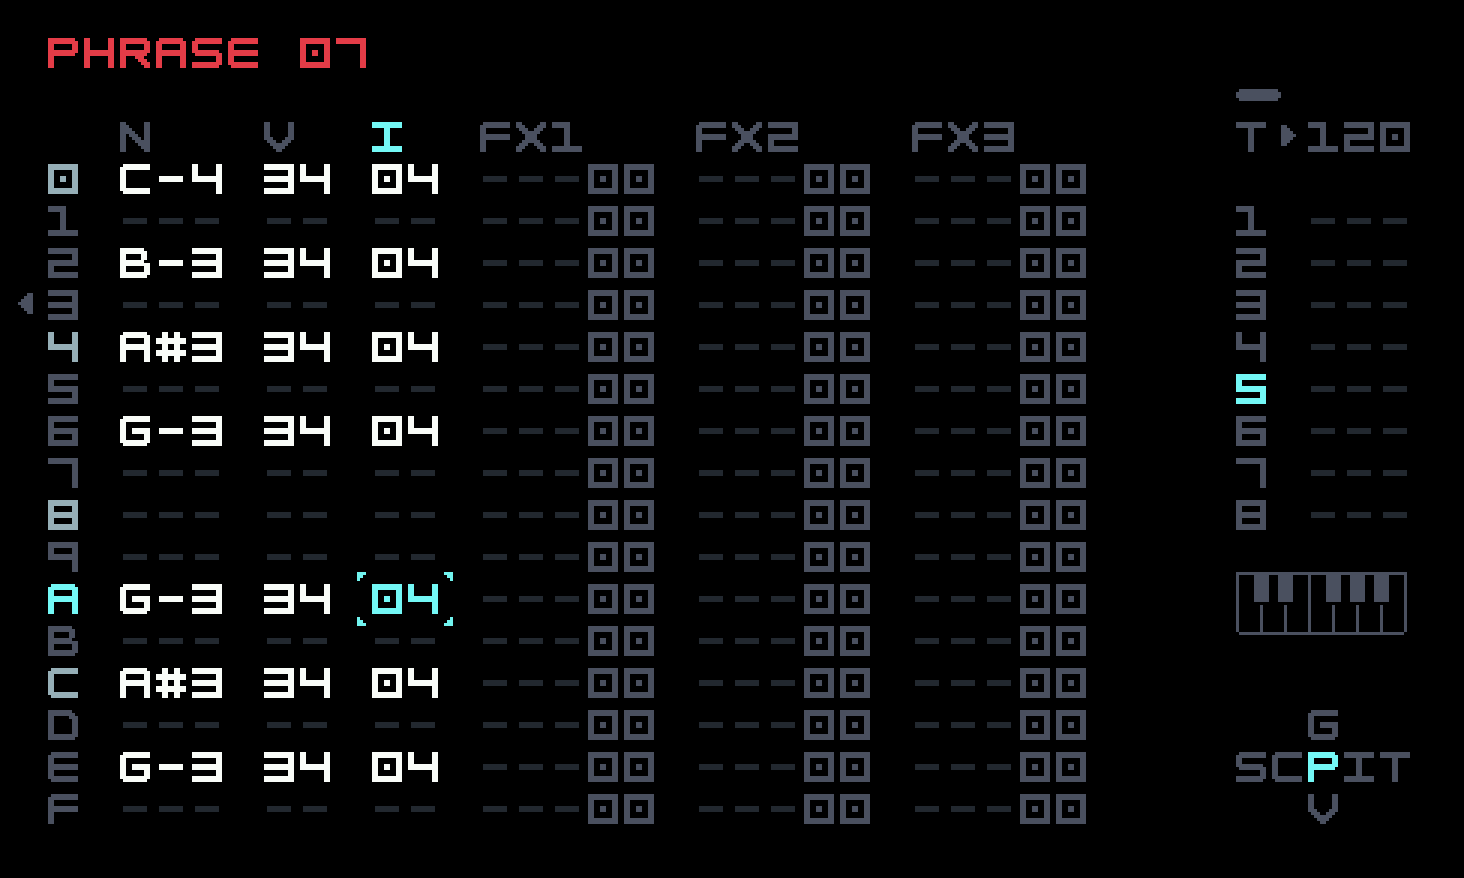
Since we have nearly completed all the bass variations, we can extend them to the full length of the song, almost. To do this, navigate back to Song View, and copy the second row (row 01), then paste it onto rows 03, 04, 05, 06. The actual row 05 is different in the final song, but we will change it later, after we’ve worked on the pad and pluck.
We are now ready to work on the end of the song, at the beginning of song row 07. This is a single bass note, slightly louder, and with more sustain. So go down to row 07 in the bass track 5 and add a reference to a new chain. By mistake, we numbered this 07 (there is no chain 06 in our arrangement). Within the new chain (whether you number it 06 or 07), we want a single new phrase 09 in the first row (no others are needed). Navigate to Phrase View for this phrase, and put in that single note, a C-4, velocity 44. To let it ring out, we change the envelope decay with an FX command, DE170 in the FX1 column (that is, changing the decay of envelope 1 to 70). Then, to stop this track to end the song, put HOPFF in the FX1 column of the last row (row F).
We want to similarly stop the percussion tracks, but we don’t need a final note for them. So in one of them, create a reference to a new chain 08, and in it, a reference to a new phrase 0A, and in that, a HOPFF in the FX column of the first row. Then use that chain in song row 07 of tracks 6 and 8.
3.6 Adding the pad and pluck
In this song, the pad is extremely simple: it is a single note that starts low, builds in volume to a plateau, and then persists at that level to just before the very last bass note that ends the song. We’ll use track 4 for the pad. In Song View, put a reference to new chain 09 in row 02 of track 4. Navigate to Chain View for that chain, and put a single new phrase 0B in the first row. Navigate to Phrase View for that phrase, and put a single C-4 note on its first row. Add a reference to new instrument 05, and navigate to Instrument View for it.
We’ll use Hypersynth as our synth type. Although Hypersynth has chord capability, we won’t be using it here; the six oscillators will sound in unison, with slight detuning using the Swarm parameter, and a bit of spread in the stereo field using the Width parameter. We’ll also add a bit of suboscillator for support.
For the generic synth parameters, we will use the lowpass filter to tame the sound a bit, and add not only chorus as before, but also reverb. Here is the full Instrument View.

There is some evolution in the pad over the length of the song. Part of this is achieved by an LFO on filter cutoff, moving it steadily up and down. Here’s how you should set up Mod3 (by default an LFO).
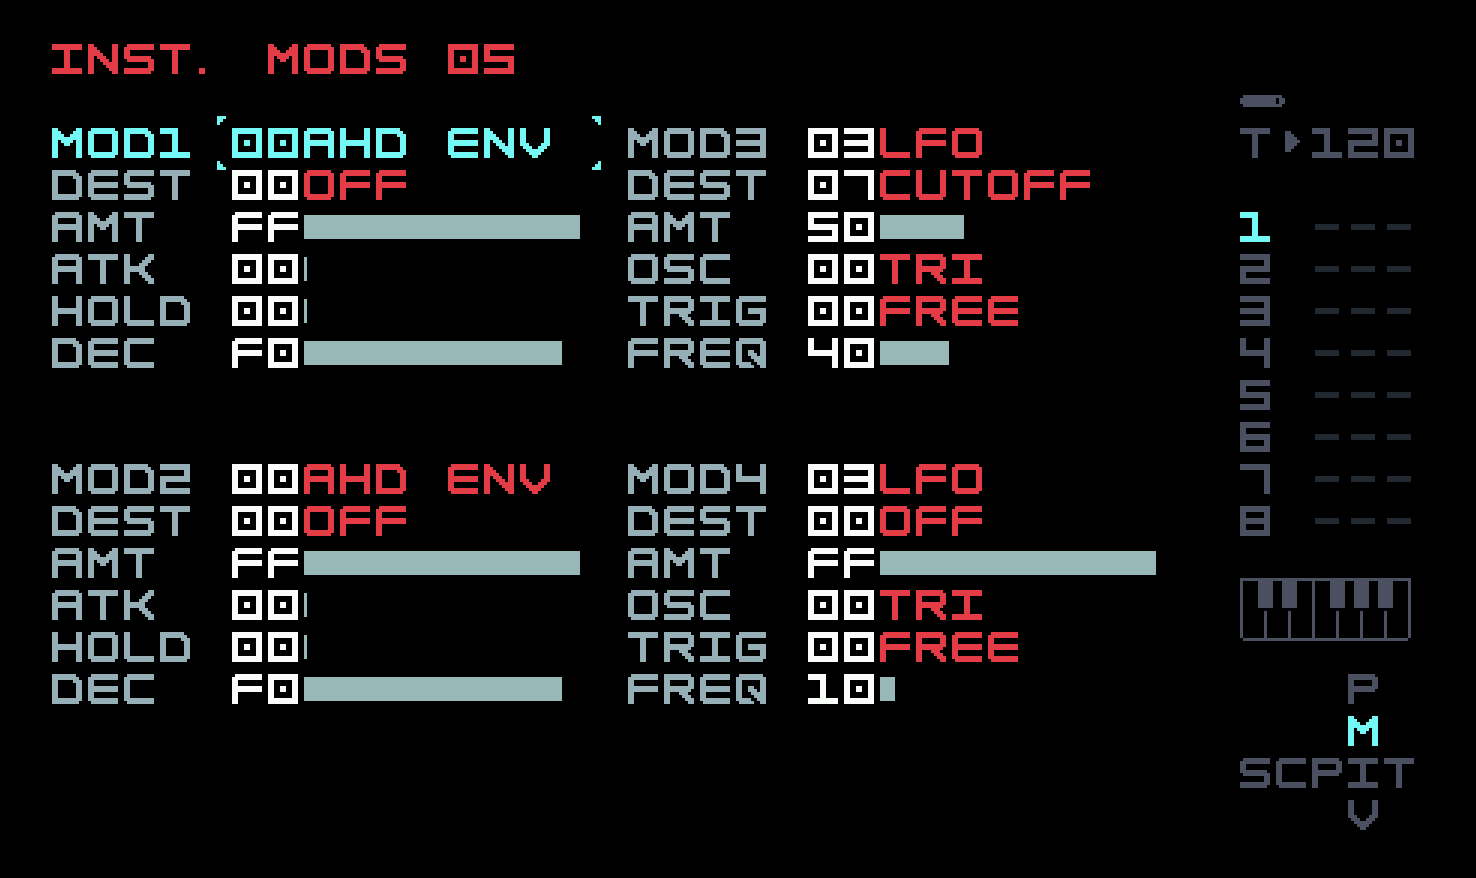
When you press [EDIT] to change the frequency of the LFO, note that at the bottom of the screen, there is a translation of the 2-digit hex amount into a time period. There are three more modulators left unused; you could put them on Swarm and Width, and add another one to modulate pitch slightly for a vibrato effect. But we didn’t.
The slow volume build is a challenge for the envelope shapes available. We won’t use another of the four instrument modulators to achieve this. Instead, we’ll use some FX commands in the phrase. Go back to phrase view, set the velocity to 00 in the V column of row 0, and add the VOL command in the FX1 column, setting the amount to 10.
That seems silly at first, because we could just set the V column to 10. But we’re going to modify that value by putting a REP command just below the VOL command, in the FX1 column of row 1. This will repeat the previous command at each step, with an optional change. REP01 will increment the argument of the VOL command at a rate of one per step. The change is smooth, not stepped, which is just what we want. The repetitions are cancelled by another command in the same column or REP00. But to hold the volume at the plateau level, we use the RTO ("repeat to") command. Putting RTO20 just below the REP01 (the FX1 column of row 2) will stop the repetitions when the increment reaches 20, for a total volume of 30 (adding in the result of the VOL command itself). Here’s the final view of this phrase.

Stopping the playhead for the pad in song row 07 will not kill the sound. That has to be done explicitly with a KIL command. So back in Song View, create a reference to a new chain 0A in row 07 of track 4, navigate to Chain View for that and add a reference to new phrase OC on row 0, navigate to Phrase View for that, and put KIL00 and HOP00 commands in rows 0 and 1 of the FX1 column.
The pluck is the main melody. We’re calling it that because it’s less generic than "lead", and because we are actually using a physical synthesis model simulating the sound of a plucked string. This is one of the models available in Macrosynth, called "Plucked".
The pluck starts four bars after the pad, in song row 03. We’ll use track 3 for this sound. Navigate to that spot in Song View, add a reference to new chain 0C, and navigate to Phrase View. There are three notes in this bar, on rows 2, 4, 6, and the first one is conveniently a C-4. So add that note, velocity 40, and a reference to new instrument 06, then navigate to Instrument View.
Choose Macrosynth as the instrument type, and then set up the remaining parameters like this.
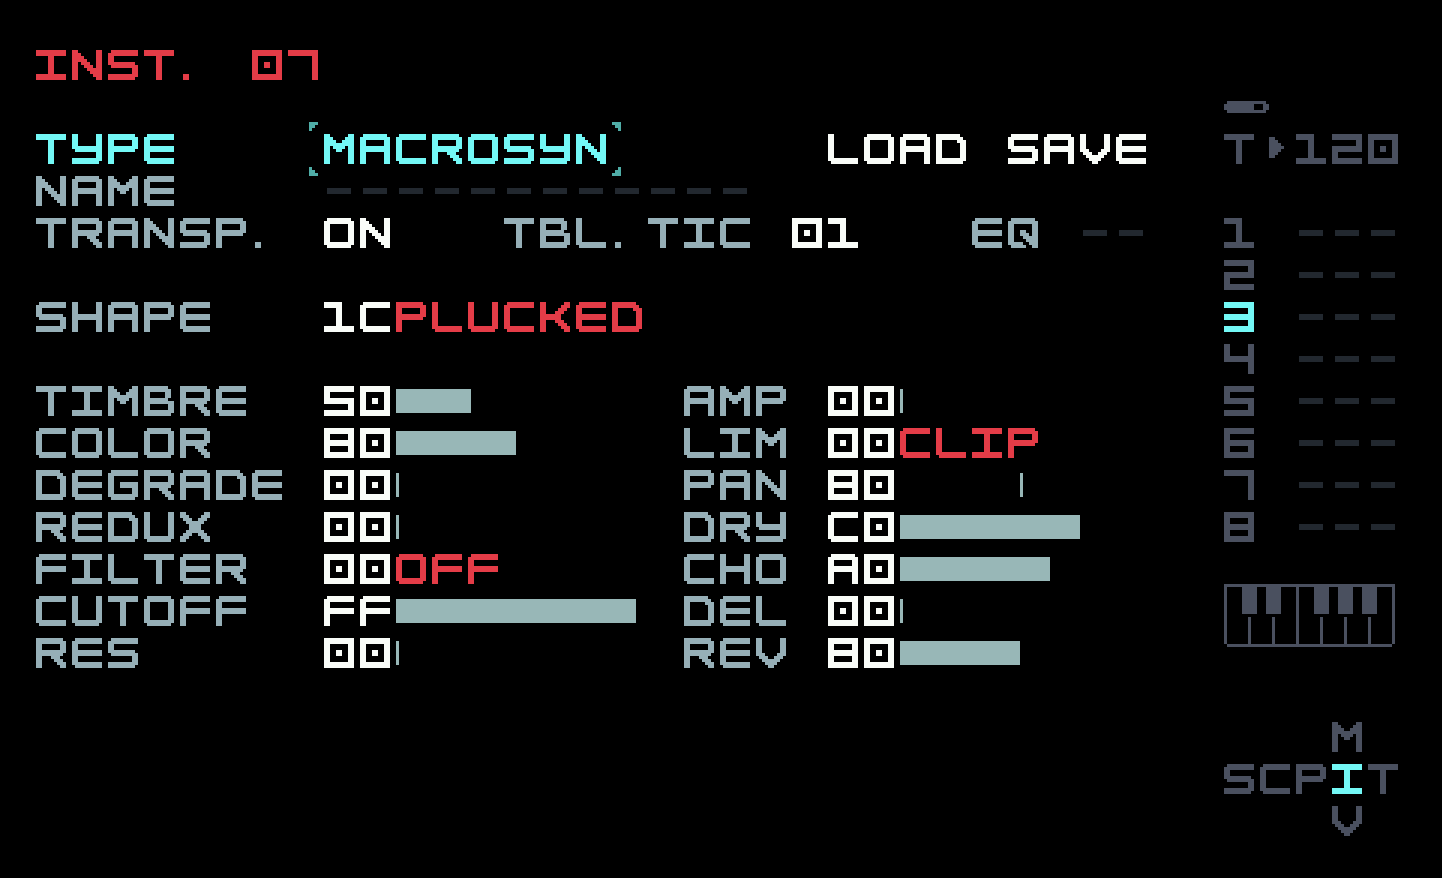
The important ones are the shape (plucked model), the timbre and color (these change the sound, try some other values), and the chorus (MFX) and reverb settings. We put an envelope on the volume to make the pluck shorter, and you know that is done in Instrument Modulation View.

You will notice, when doing sound previews, that consecutive notes don’t sound identical, even if all the settings are the same. The engine has a certain amount of variation built into it. We won’t always be this lucky, and we’ll usually have to program our own modulations to achieve this.
Navigate back to Phrase View and put in the other two notes. We want the third one to ring out longer, so we’ll use the DE1 FX command, as we did for that last bass note.

Back to Chain View for chain 0B. The third bar is the same as the first, but the second bar is different. Add references to phrase 0D in the second and third rows. The fourth row is silent, so use the empty phrase 00. Then go back to the second row and clone phrase 0D into phrase 0E. Navigate to that and set up the five-note pattern in this second bar.

That completes the work on chain 0B. Navigate back to Song View. In the pluck track 3, chain 0B is in row 03. It repeats in row 04, and again with a slight variation in row 06. But row 05 has a larger variation. Here we are close to the classic AABA song pattern, though that uses eight-bar chunks, and we are using four-bar chunks for simplicity.
Add references to chain 0B in rows 04, 05, and 06, and then clone the one in row 05 into new chain 0C. The B section (sometimes called the "bridge") would normally be something more ambitious, but again for the sake of simplicity and learning, we have chosen something very simple: we just transpose the previous chain 0B up by five semitones (a fourth). This would be a nuisance to do by cloning phrases and adjusting each note, but it is very easy using the transpose column in Chain View.
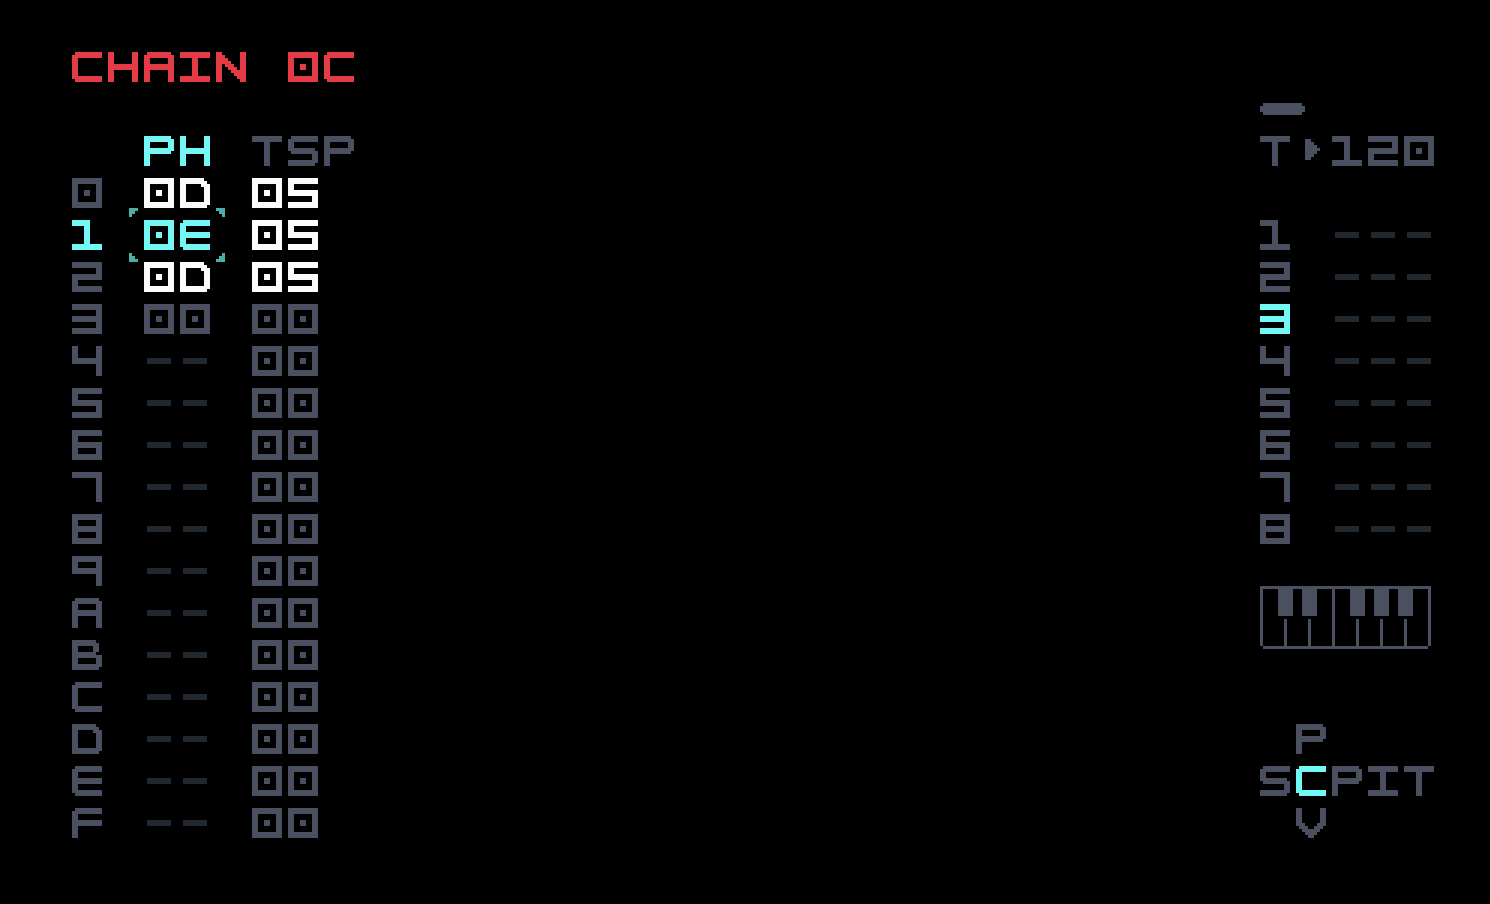
For the slight variation on the A section in row 06 of Song View, clone the reference to 0B into new chain 0D, and navigate to Chain View. The variation is in the second bar, so clone the reference to phrase 0D in row 1 to new phrase 0F, navigate to Phrase View, and make the changes.

Back in Song View, track 3 can be stopped with phrase 08 as with the drums. Because row 05 has the pluck transposed, we should do the same with the bass in this row. So navigate to track 5, clone the reference to chain 04 into new chain 0E, navigate to Chain View, and add the transpositions (up five semitones). We chose not to transpose the pad. If you want to do that, it’s not quite as simple, because the pad is a single note triggered in row 02, and there is no trigger in row 05 to transpose. You would need a new chain in this row with a phrase that uses the PIT ("pitch") command in an FX row, and another one when the note needs to be transposed down again.
We’re done! Here is how Song View should look.
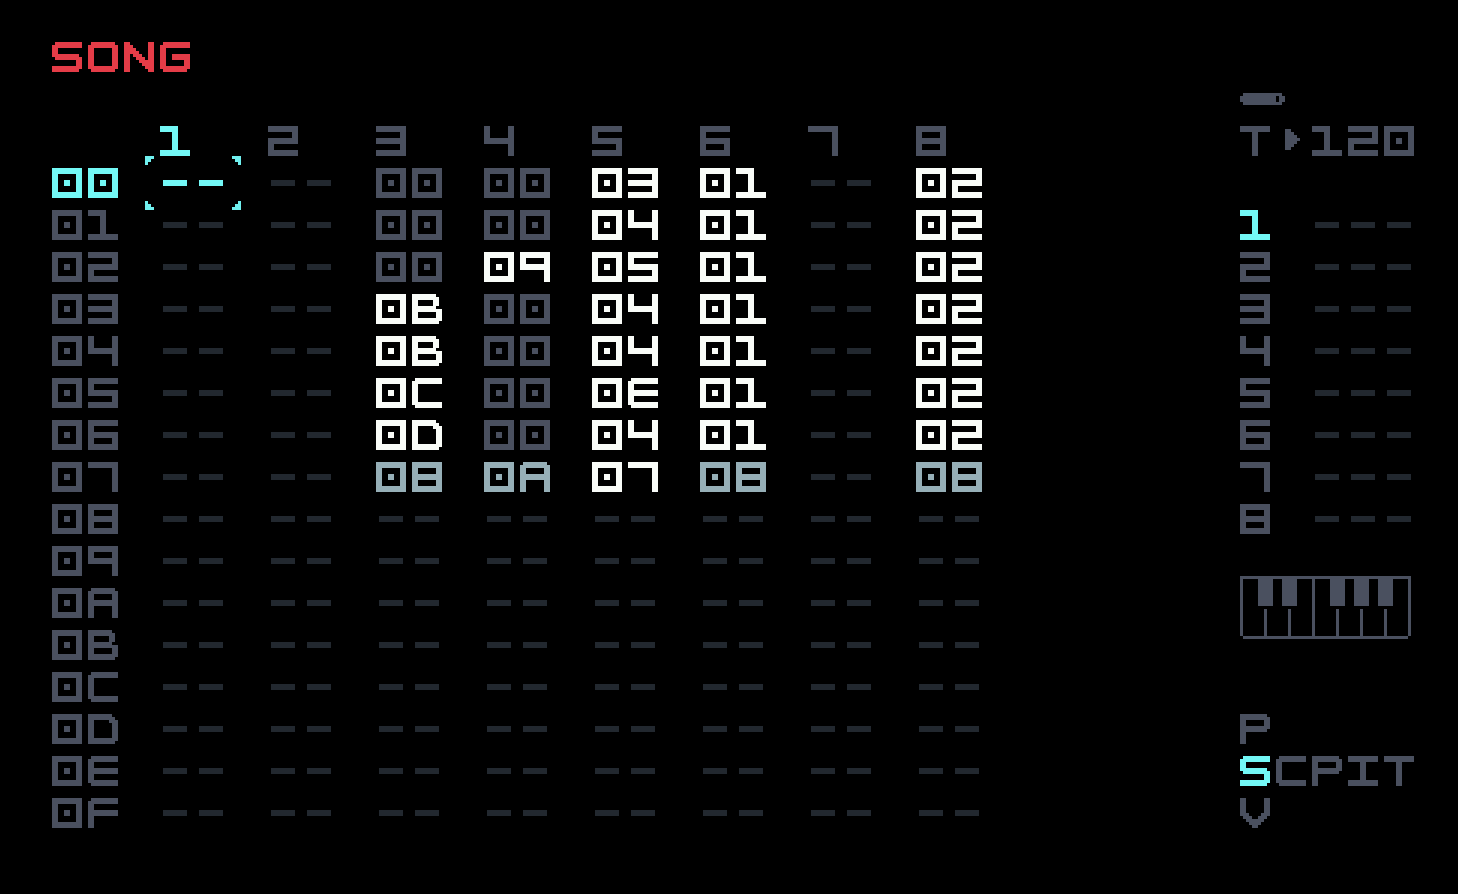
Download link for project file: First.m8s
This file does not contain the factory samples used. If for some reason these are not on your M8, you can substitute any available samples of a similar nature, since the precise sound is not so important.
This song is too short and simple. But expanding it into something more respectable can be done by just doing more of what you already did to create it. You could make the percussion tracks more varied and interesting, and maybe add some additional percussive sounds in the unused track 7. The pad could easily be made more interesting, and there are unused modulators in the bass and percussion tracks as well. The B section could be rewritten to diverge more from the A section, or you could go further, beyond AABA form, to a more complex melodic exploration. The idea of cloning a phrase or chain to make a variation on it is the key to further development of this sort. Tracks 1 and 2 could be used for ornament, vocal samples, or whatever sounds you care to fit in. You may also be more inspired to do this kind of work on something that you create yourself from scratch, and you now have the tools to let you do that.
In future chapters, we’ll look further into the more general sound engines of M8, as well as some major features we haven’t covered yet.