5 Crafting beats with the Sampler
A sample is a digital recording of a sound. The Sampler, at heart, plays back such sounds. This is quite different from the synthesizer instrument types such as the FM Synth, which synthesize or create their waveform in real time through computation. The Sampler provides a number of ways to alter the playback of recordings in real time, arguably making it as powerful as the FM Synth, albeit in a very different way.
If you have paid any attention at all to popular music in the last several decades (or even earlier), you have heard samples used extensively. Whole new genres of music exclusively or dominantly use samples. If you’ve used samplers before, you’ll recognize many of the features that M8 offers, right away. If you’re brand new to such manipulations, don’t worry; you’ve picked a great device to start with.
We said in chapter 1 that the M8 streams samples directly from its mass storage device (the SD card), while many other devices that manipulate samples put them into RAM (fast but volatile memory). One consequence of this is that those other devices have a limit of how long a sample can be (from a few seconds to a minute or so) while the only limit on M8 samples is the size of the memory card. The price to be paid for this is that only a few SD cards have high enough specifications to be usable with the M8. One such is included with it new, but if you have bought one used, or want to use more than one card, check the list maintained on the Dirtywave website. Another issue is that heavy use of samples (across many tracks, changing frequently) can result in glitches or dropouts. This is rare, but be warned, and don’t expect miracles.
An analog waveform is continuous, but a digital representation of it is discrete in two dimensions, time and amplitude. The resolution for each of these two dimensions can vary in the WAV format used by M8 for samples. One common choice is 44.1kHz, 16-bit, as used in compact discs. This means 44100 values per second, each one represented by 16 bits (binary digits) with a total of 2 to the power 16 or 16656 possibilities, used to represent points in the range of the waveform (symmetric about zero). (Annoyingly, these values are also called samples; if we need to disambiguate, we’ll refer to them as little samples.)
Audiophiles argue endlessly over whether 16-bit audio is good enough, but M8’s internal audio is 24-bit (as of firmware 6.5), which is definitely good enough. M8 can handle WAV files up to 32-bit (integer, not float), but there are some consequences beyond larger file sizes which we’ll discuss as they arise. In the other direction, we’ve seen that Wavsynth deliberately uses 8-bit resolution for its low-fidelity sound. M8 provides limited ways to change the resolution and sample rate of a sample; computer software typically has more options for this.
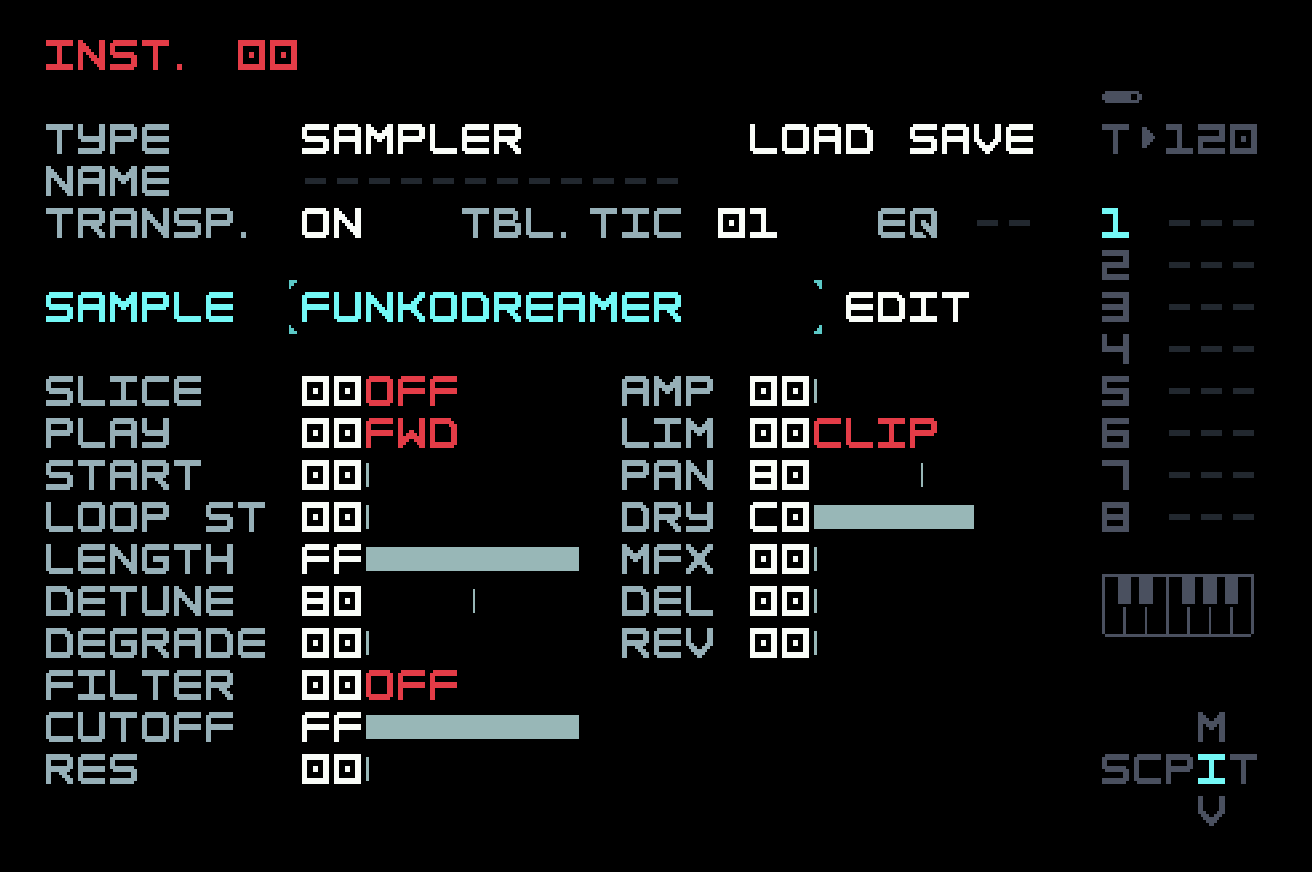
You can think of the M8 Sampler as consisting of two parts: the Instrument View, and the Sample Editor. The Instrument View is the first thing you see when you load up the Sampler. Like the other instruments on the M8, the Sampler’s Instrument View is a single screen that covers all the essentials of the real-time playback manipulations that create the sound of the instrument.
The Sample Editor goes one layer deeper than the Instrument View. It does not manage playback; rather, it prepares a sample surgically before that. Here you can precisely slice your sample, loop and crossfade regions, change sample rate, normalize the waveform, and much more. This is also where you record samples directly into the M8, whether you’re using the audio inputs or, on the M:02, the built-in microphone.
It would be impossible to cover everything the Sampler can do in a short chapter. Here, we’ll focus on the basics of sound-shaping and beatmaking, with the goal of helping you achieve musical results quickly. With that in mind, we’ll mostly stay in Instrument View, though we’ll allude to features in the Sample Editor when applicable, and discuss it briefly at the end. Though we focus on drum samples and loops, the Sampler can also be used to good effect with melodic or atmospheric material.
First, let’s talk about perhaps the most important and overlooked part of working with samples.
5.1 The art of sample selection
The M8 ships with a nice assortment of samples to get you started — drums, synth stabs and pads, odd textures. You can be happy for a long time playing with these sounds and seeing how much music you can squeeze out of them. If you bought your M8 used and it’s missing the factory samples, email support@dirtywave.com and they should be able to help you out.
At some point, you may decide that you want to load some of your own samples onto the M8. The process is straightforward, provided that they are in WAV format (with file extension .wav). Eject the SD card from the device and mount it on your computer via a card reader or adapter. Find the "Samples" folder, open it, and drop in your samples. Easy enough. It’s even easier using firmware 6.5 or later, since USB Drive mode can be used to avoid physical manipulation of the SD card by mounting the M8 directly on your computer, tablet, or smartphone. However, this is best for small transfers, not backups or transferring large numbers of files. To use it, just connect M8 to the USB host and select USB Drive mode in Project View.
If you’re thinking about loading your entire sample collection onto the M8, you might want to consider a couple of things. First, it’s generally easier to work with a small, well-curated set of samples than a massive stockpile. The process of sifting through sounds can be time-consuming and uninspiring — perhaps you’ve experienced the tedium of previewing one snare sample after another, painstakingly sorting through subtle sonic variations until you’ve forgotten the musical idea you were pursuing in the first place. Sample-based music-making works best when you know what sounds you like and how to access them quickly.
The second consideration here is a practical one. The M8, by default, does not sort large folders of files. They display in an order dependent on the file system of the SD card. If you have a giant folder of kick drum samples that you’re familiar with, you may be surprised when you open the same folder on the M8 and see your samples appear out of order as far as you’re concerned. Fortunately, there’s a quick key combination to sort directories, which is [SHIFT]+[OPTION], but it might take a second or two to process depending on how many files you’re sorting. But you still have to navigate a large folder with the limited user interface of the M8, where you can’t as easily scroll, point and click. It’s only the display that is sorted, and you’ll have to do this again on your next visit. There is also a limit of the number of files that M8 will display in any folder (1000).
You might think that organizing your samples into a large tree of folders, with long, descriptive filenames that include the source and BPM, would enable quicker navigation. But there is also a limit of 128 characters on the file path, which includes the file name plus all the names of enclosing folders. So you’ll find yourself taking out vowels and rendering everything unreadable when you return to the folder later.
As you’re thinking about which samples you might want to add to your device, have a look at the section of the official M8 manual titled "The microSD Card". Here you’ll find directions for formatting your SD card and some tips for avoiding “CPU TOO BUSY” errors. In general, you’ll get the best performance using 16-bit mono samples, though this isn’t a strict requirement.
If you’re looking for some new sounds for your M8, we can recommend Legowelt’s free collection of sampled synths and drum machines. There’s a ton of high-quality material there to explore. For a wider range of noises and field recordings, try Freesound, where you can search and filter according to sound category and licensing level. You’ll find a nearly endless supply of recordings available under a Creative Commons license, free to use in whatever way you like.
5.2 Loading and using samples
Now that you’ve got your samples ready, let’s make some music with them.
As we did at the beginning of chapter 4 with the FM Synth, create a new project, add a new chain in Song View, a new phrase in that chain, and a single C-4 note in that phrase, then navigate to Instrument View and choose Sampler as the type. At the beginning of chapter 3, we used Sampler twice, to load a kick sample and a snare sample into two different Sampler instruments. A Sampler instrument can only hold one sample, though we’ll see creative ways to get around that later on. One sample may be loaded into several Sampler instruments for different treatments.
The process is the same for any sample: navigate to Load, tap [EDIT], and navigate in the file system to the sample. You can preview a sample by tapping [PLAY] while the cursor is on it, without it being selected; tap [EDIT] to select it and return to Instrument View, or [OPTION] to get out of the load process without loading anything. If you return to Phrase View and tap [PLAY], you’ll hear your chosen sample repeating once per phrase.
You can repeat this process again within the same phrase — create a new instrument by navigating to the "I" column and double-tapping [EDIT], then choose the Sampler, assign a sample, return to your phrase and drop in some notes. As we did in chapter 3, you can also clone this instrument into a new instrument and change the sample, saving a bit of time and effort. But you should keep in mind that each track on the M8 is monophonic. That means if you trigger a sample and then trigger another one in the same track, the new sample will cut off the earlier one if it is still playing. This was not a problem in chapter 3 because the samples were very short, but in general this kind of overlap can happen.
This may seem like a limitation, but it can be used as a creative tool. For example, you can think of each track as its own "Choke Group" or "Mute Group" (interchangeable terms used by Ableton Live and the Akai MPC respectively), a collection of sounds that cut each other off so only one can play at a time. The quintessential use-case for a Mute Group is the grouping of open and closed hi-hat samples as a way to emulate the behavior of a real hi-hat: you hit an open hi-hat and it rings out, then cuts off abruptly on the next hit when it’s closed.
Another creative way to make use of the M8’s monophonic tracks is to explore the technique of Linear Drumming, where a complete drum beat is played across a drum kit but no hits occur simultaneously, just a discrete sequence of kick, hi-hat, snare etc. This is a cool approach for creating interesting grooves and feels, and also helps create a little space in your mix by giving each drum hit its moment to shine. There are human players who use this technique with physical drum kits, even though they have two drumsticks and one or two kick pedals that can all be used simultaneously.
Of course, if you find the monophonic nature of individual M8 tracks a bit stifling, you can always slide over to the next track and continue layering your pattern there — more on that later.
There’s something uniquely joyful about working with samples, because it’s easy to end up with unexpected results and stumble upon happy accidents. With fairly basic techniques, you can transform the sound of a sample into something that sounds completely different. Let’s walk through some of the sample-tweaking tools available on the M8.
First, while we’re still in Phrase View, let’s focus on a couple of very important parameters right in front of us, ones we’re already familiar with from earlier chapters: Note (the N column) and Volume (the V column). Note will typically change the pitch of your sample, which is done by changing its playback speed. Doubling the playback speed increases the pitch by an octave (and also cuts the total playing time in half). Changing the pitch/speed of a sample can be transformational all on its own — for instance, if you pitch a sample down, it will play back at a slower speed, which often reveals interesting audio artifacts or new dimensions to the sound. If you’ve worked with samples on a computer, you may be familiar with techniques to change just one of pitch or playback speed without affecting the other. These are computationally intensive, and can’t be done in real time on the M8.
The bit resolution of the sample can make a difference while changing pitch. Higher resolution places restrictions on how much a sample can be pitched up. A sample with 32-bit resolution cannot be pitched up at all. For maximum flexibility while retaining fidelity, it’s best to convert it to 16-bit resolution.
Similarly, adjusting Volume can dramatically change how you perceive your sample as part of a pattern. Our ears tend to pick out different elements in a song depending on how loud or soft they are in the context of a mix, so it’s important to listen closely and get your sounds balanced the way you like. You can create lively, dynamic patterns by carefully setting the Volume value on each step of your phrase, even if you’re working with simple, static sample sources.
Let’s return to the Instrument View screen and go through some of the parameters specific to the Sampler. These all have corresponding FX commands to adjust an instrument on the fly.
PLAY lets you change the sample playback direction and loop the sample. Besides the obvious choices on these (forward/backward and loop/no-loop, or one-shot), there are more advanced ones we’ll discuss later. One common technique is to reverse the playback direction on a one-shot sample like a crash cymbal, giving you a satisfying "whoosh" sound that fades in dramatically.
START changes the start point of the sample. At 00, the sample plays from the very beginning, and as you increase this value, you nudge the start point incrementally forward. This can be useful if you want to trim a bit of noise or silence at the beginning of a sample (though you can do this more permanently with the Sample Editor discussed below). It can also be handy if you want to tame a harsh transient — for instance, a drum sample can sound quite different when you start playback after the initial attack.
LENGTH sets the sample length. Like the Start parameter, this can be useful for trimming noise or silence off the end of your sample. If you set your Play direction to reverse, Length will determine when your sample starts (since your sample will start playing back from the endpoint).
LOOP START sets a point that playback jumps back to, when in loop mode and the end is reached (or the length is used up). In reverse mode, playback jumps to this point when the beginning is reached.
DETUNE is a useful companion parameter to the Note you set in Phrase View. With Detune, you can adjust the pitch up or down and apply that change to all instances of your instrument. For example, if you create a melody with your sample using Notes in Phrase View, but later find it’s slightly out of tune with another element in your song, you could use Detune to nudge the pitch of your sample up or down while preserving the Notes that make up your melody. Detune allows fine changes (as little as 1/16th of a semitone) but as a consequence has limited range. It will also subtly affect the playback time.
DEGRADE is sample rate reduction. This effect can be pretty extreme and make your sample unrecognizable if turned up too high, but when applied more subtly, can add a nice layer of crunch that brings otherwise sterile samples to life.
The controls in the right column, for filter and effects, are the same as with the synth engines we’ve discussed. Finally, nestled in the upper right of the screen just below LOAD and SAVE is the all-important EQ effect, which we discussed briefly in chapter 4. Each instrument on the M8 includes a three-band parametric equalizer, which is extremely useful, especially when applied to samples, which may have quite a wide harmonic range. You can use this EQ in a variety of ways, either as a mixing tool or for sound design. For example, if you’re working with a sample of a full drum beat but only want to hear the cymbals, you could use the EQ to isolate the high frequencies (you could also use a high-pass Filter to do this — on the M8, there are often multiple ways to accomplish your goals).
To be more precise, the M8 does not strictly have an EQ setting per instrument, but instead has an EQ slot per instrument where you an assign any of 128 saved states. That means you can create EQ "templates" that can be saved and re-used across instruments. For instance, you might find it beneficial to create an EQ slot that simply rolls off some low frequencies, and use that as your starting point when working on any sounds that aren’t your kick or bass. That way you get a head start on keeping your mix clean in the low end and avoiding muddy bass buildup.
5.3 Slicing made easy
Let’s examine one more useful tool on the sampler’s Instrument View.
At the top of the left-side column is the SLICE parameter. This is a handy feature for quickly chopping your sample up into equal-sized slices. This is not the only way to slice samples on the M8 — in the more advanced Sample Editor, you can set up to 128 slice markers with extreme precision, and store these in the sample itself. Still, the Instrument View’s Slice parameter is a great way to quickly chop up a long sample, whether you use it with clear intention or as a way to stumble into happy accidents.
Let’s play with it. Create a new phrase and a new Sampler instrument. If you have a long sample at hand, you can use it, but we’ll provide one for you. One common use of slicing is to slice up drum breaks from old R&B, jazz, or funk records. This can be problematic, because in most cases the material is not in the public domain, and permission has not been obtained. There are drum breaks available that have been cleared, but they’re not as compelling and iconic. User Sacco Belmonte on the Dirtywave Discord comes to our rescue. Sacco has recreated some classic drum breaks using drum software on a computer, and made these "cover version" recordings available for free use. Here’s a break we can use (right-click or control-click on the player to download the WAV file). You may recognize it, or be able to guess its inspiration from the file name.
Put the file somewhere in the Samples folder on the M8’s SD card, and then load it into the Sampler instrument that you just created. While in Instrument view, hover your cursor over SLICE, then hold [EDIT] and tap [RIGHT] once. The first option you see is 01 FILE which allows you to play back your sample according to custom slice markers that you can set in the Sample Editor. We’re going to skip this option for now. (Sacco has actually already done this for us, because slice markers can be stored as metadata in a WAV file, but we’ll pretend this hasn’t happened for now.)
Keep holding [EDIT] and tap [RIGHT] again and you’ll start to see two sets of values appear. The left side shows the hex value for the SLICE parameter, and the right side (shown in parenthesis) is a translation of the hex value that indicates how many slices are created. While continuing to hold [EDIT], tap [RIGHT] until you reach "10 (016)", that is, hex value 10 or decimal value 16. At this setting, you’ve chopped your sample into 16 equal slices, which is a fairly common approach (think of the 16 pads on an MPC), especially when working with samples that have been trimmed to a musically-useful length. For instance, if your sample is exactly 2 bars long (as this one is), then slicing it into 16 equal parts will give you a slice at each eighth note.
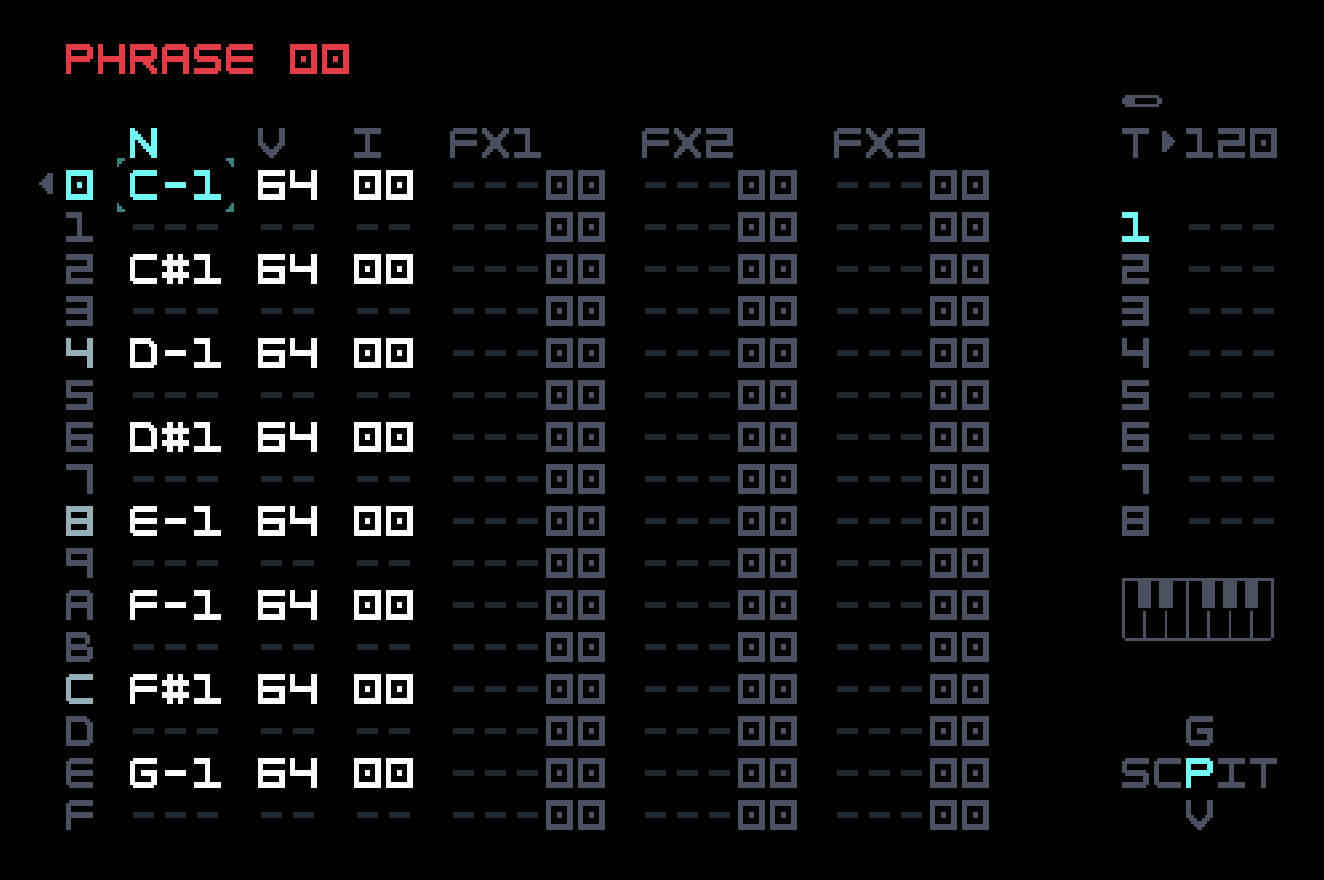
Now that you’ve sliced your sample, switch over to Phrase View. Navigate to the N column, and tap [EDIT] to insert a note in the first row. By default, the M8 will populate the note C-4 in the N column, as well as the default volume of 64 in the V column (while the I column displays the number of the instrument containing the sample we just sliced). If you tap [PLAY] at this point, you’ll notice that you don’t hear any audio playing back. What’s going on?
When you use the Slice parameter, your slices are mapped to notes starting at C-1. Since we sliced our sample into 16 parts, we’ll have slices available across 16 notes from C-1 to D#2, which is not enough to reach C-4. That’s why C-4 in the N column gives us no audio back. Using [EDIT]+[DOWN] will decrease this value by octaves, so three such taps gets it to C-1. Tapping [PLAY] now should let you hear the first slice play back in your phrase.
Put the eight notes from C-1 to G-1 on every other row in the phrase.
Tapping [PLAY] gives you a reasonable rendition of the first bar of the sample. It won’t sound quite right, because the BPM of your project (which is probably the default 120) won’t match the BPM of the sample. The REPITCH option for the PLAY parameter provides a way to adjust this, but we’ll just live with it. Since the second bar of the sample is very similar to the first, hearing just one bar is good enough for this brief example, but if you like, you can create a second phrase that uses the notes from G#-1 to D#-2 to play the whole sample. You then can proceed to rearrange the notes, duplicate some of them, move them to previously unused rows, and use retrigger (RET) and the other FX commands you’ve learned about, as well as the new ones for adjusting Sampler parameters. That’s the basic idea of chopping.
What if you want to change the pitch of your sample slices? You can’t use the N (note) column, since we’re already using that parameter to reference the slices themselves. Instead, you can use an FX command like PIT, which allows you to set a relative pitch change on a given step. You can also make use of the DETUNE parameter in Instrument View if you want to alter the pitch of all slices played back.
Modulation is what brings electronic music to life, and the M8 offers a variety of creative ways to get your parameters moving around in either predictable or chaotic ways. You’ve seen Instrument Modulation View in chapters 3 and 4, and all of the modulators we saw there are also useful with Sampler, even though the instrument-specific parameters are quite different.
A simple AHD (attack-hold-decay) envelope on volume can work wonders on a sample. For instance, if your sample has a harsh click or pop at the beginning, you might add a bit of ATK (attack time) to smooth it out. Or, if your sample is long but you want to carve out a short percussion hit from it, dial back the DEC (decay time) to isolate a very small portion of the sound. These parameters can be used in tandem with the Start and Length controls on the Instrument View screen to precisely trim and sculpt your samples into exactly what you want them to be. Slicing and looping can also introduce clicks and pops, if the transitions cause abrupt changes in waveform amplitude. Sometimes work in the Sample Editor is needed to fix these.
One frequently-used technique is to assign an LFO to a parameter, then set the OSC of the LFO to Random and TRIG to Hold. With this configuration, your LFO will generate a new random value every time a note is triggered, and will hold that value until the next note. In practice, this means that you can add a little (or a lot) of unpredictable variation every time your sound is played back, with the amount of variation determined by the AMT parameter. At low AMT levels, this can be an excellent way way to "humanize" the feel of one-shot drum samples. Suppose you’re working on a drum beat and you want to add some hi-hats. With a bit of Random LFO on something like Filter or Volume, each hit of the hi-hat will sound a little different, just like it does when playing a real drum kit.
5.4 The long and the short of samples
Combining the features of long sample capability and slices may have already given you an idea to overcome the limitation of one sample per instrument. Why not glue multiple samples into one long one, and then slice them up again inside M8 (or place slice markers as part of the glueing process)? In fact, we don’t even need slices for this technique, because we can reduce the LEN parameter and modulate START. But slices certainly make it easier. The long glued-together sample is called a sample chain. You can find sample chains of various sorts (drumkits, full ranges of acoustic instruments such as piano) in the same places you can find one-shot samples. User brian3kb on the Dirtywave Discord and the Elektronauts forum has created an excellent tool called Digichain that runs in the browser (even offline, once loaded) and constructs, deconstructs, or manipulates sample chains.
At the other end of the spectrum, very short samples can also be quite useful. Consider a sample that is just a single cycle of a repeating waveform, like one peak of a triangle wave, or one tooth of a saw wave. Looping that sample will create a sound like a triangle or saw oscillator.
A sample is not treated quite the same as an oscillator, though. When it is triggered, it plays from the start (or end, or a selected point). An analog oscillator is free-running, and the digital oscillators in M8 synth engines are designed to mimic that behavior. The OSC options for the PLAY direction in the Sampler instrument allow looped samples to be free-running as well. This means that our single-cycle waveform (SCW) sample will act like a digital triangle or saw wave. Of course, we already have these, but other SCWs can expand the sonic possibilities. If you don’t use the OSC options, retriggering might cause a pop or click.
We can combine the long and short ideas, building sample chains of SCWs. If the SCWs are related (for example, different pulse widths of a square wave), then manipulating slice choice is like manipulating that parameter on an oscillator. This resembles the use of wavetables (discussed more in Chapter 6). SCWs and sample chains of them are also available on the Internet.
5.5 A note on mixing
Once you have some samples playing across a few tracks, you may want to work on your mix. What’s the best way to balance your levels? How do you keep your mix clean when combining a variety of different sounds? We’ve already talked about using the EQ and Filter to carve out unwanted frequencies and avoid muddy bass buildup. Now let’s focus on volume.
There are several points along the signal chain where you can make decisions about volume, beginning at the Instrument level. This process is known as gain-staging, gain being a synonym for volume adjustment. We’ve discussed the AMP, LIM, and PAN parameters in Instrument View in earlier chapters. As you increase amplification, your sample will play back at a louder volume, but its timbre will also change according to the limiter setting you’ve selected. Play around with these settings until you’ve dialed in a tone that you like, and don’t worry too much at this point about whether your sound is too loud or soft — you’ll have more opportunities to control the volume as we continue down the signal path.
Although panning with PAN doesn’t directly impact volume, it can change the perceived loudness of a sound in the context of a mix. Keep this parameter in mind if your mix starts to get too crowded — sometimes a bit of separation across the stereo field makes a dramatic difference.
Under PAN is the dry signal level (DRY), followed by the three effect sends MFX, DEL, and REV. In the context of mixing, it’s important to remember that these parameters control the amount of signal sent to separate send tracks. In other words, as you turn up your delay send, you’re increasing the volume of your signal on another track elsewhere in your mix, so the overall result will be louder. Thankfully, the M8 provides a DRY parameter to keep things in balance. As you turn up your FX sends, you may want to dial back your DRY level accordingly. You can also use DRY to lower the volume while you’re experimenting with AMP and LIM, allowing you to focus more on the tone than managing the sound’s loudness.
If we navigate out of Instrument View and into Phrase View, we have another way to control volume that’s tied to the particular phrase we’re editing. The "V" column stands for Volume, and it can be changed on a per-step basis. We talked about using Volume as a sample-sculpting tool for creating dynamic phrases, but it’s just as relevant as part of the mixing process.
Finally, if you navigate to Mixer View, you have a dedicated volume control for each of your eight tracks. Changing a track’s volume at the Mixer level will affect all of the phrases it contains, so your use of this parameter will depend on how you’re using the M8’s eight tracks. For instance, if you’re writing a song where each track represents a specific instrument (drums on track 1, bass on track 2, synth pads on track 3, etc.) then you may find the Mixer useful as a final stage for balancing your levels and getting the mix just right. On the other hand, if you’re using your M8 project to build a live set where each track contains many different kinds of sounds or entire song stems, then you may want to balance your mix at the phrase level and treat the Mixer as a control surface for fading tracks in and out during your performance.
There are even more ways to control volume. You could return to the Instrument View and apply a filter to reduce a sound’s perceived loudness (as well as its timbre). You could animate any of the parameters we mentioned by adding modulators or FX commands throughout your phrases. If you’re using the master limiter or the OTT compressor, that will certainly have implications for your mix. You have no shortage of mixing tools on the M8, for both creative sound design and problem-solving.
Here’s a brief checklist you can use when you want to work on your mix:
Is one of your samples too loud or too quiet every time it plays? Go into the Instrument View and adjust the DRY level, or play with AMP and LIM settings to dial in the right combination of volume and tone.
Are you hearing volume issues on specific steps within a phrase? Go into Phrase View and adjust the "V" column values for any problematic notes.
Do you want to balance the levels between entire tracks? Or are you preparing a live set where you fade your tracks in and out of the mix as you perform? Drop down into the Mixer view and control your track levels from there.
5.6 Layering and resampling
One of the most effective ways to transform a sample into something else is to layer it with another sample.
Suppose you have a snare drum sample that sounds good but doesn’t cut through the mix the way you’d like — you could try layering it with another snare sample that has more punch, or perhaps mix in a clap or percussion hit. Maybe you’re working with a synth pad sample that gives you a nice chord but sounds kind of plain — you could liven it up by layering in a bit of noise or a field recording that adds texture. Sometimes the combination of two (or more) things results in a whole new thing that’s much more interesting.
So how do you layer samples on the M8? We’ve already touched on the fact that each track on the M8 is monophonic, so if you want to hear two or more sounds at the same time, you’ll need to use multiple tracks. And since the M8 only gives you eight tracks to work with, you need to manage your track usage wisely — if you’re trying to write a full song, you probably don’t want to spend multiple tracks dialing in the perfect snare drum sound. This may seem like a frustrating conundrum: How do you balance the desire to layer sounds with the practicality of track limits?
Fortunately, the M8 has the perfect solution. It’s a feature that allows you to combine many sounds into one, without losing your creative flow. The official manual calls it "Selection to Sample", but you could also think of it as resampling or performing a Quick Render.
Here’s how it works: While you’re in Song View, use [SHIFT]+[OPTION] to enter selection mode. Then navigate the cursor to highlight a selection of phrases that you want to combine into one sample — you could pick just a couple phrases, or an entire row, or multiple rows. Once you’ve made your selection, double-tap [EDIT]. Song View temporarily disappears from the screen, and you’ll see the "Record selection to sample?" dialog. There are three options: Quick Render, Real Time, and External Only. You want Quick Render, which will already have the cursor on it, so tap [EDIT] one more time to select it, and watch the bottom of the screen as the M8 works its magic.
When it’s finished, you’ll have a new Sampler instrument added to your Instrument Pool, with a new sample assigned that contains the mix of whatever you selected for Quick Render. If you selected a row of phrases that are all 16 steps long, then the resulting sample will be 16 steps long. If you selected multiple rows or phrases of different lengths, the resulting sample will be as long as it would take to play through the phrases in one full pass before they start repeating. In any case, you’ll have a perfectly mixed, perfectly trimmed sample that includes everything in your selection. Brilliant.
It’s hard to overstate just how convenient this feature is. The M8 includes a more robust Render process that has its own screen and additional options to tweak. It’s very useful, but requires you to stop your music-making and dive into the menu. With Quick Render, you never have to leave your song. All it takes is a few taps of [EDIT] to consolidate multiple tracks into a new sample — the M8 automatically names the file after your current project, and automatically assigns the sample to a new instrument, so you’re ready to start using it right away.
To start playing with the new sample, just go into a phrase, slide over to the Instrument column, and tap [EDIT]. The new Instrument containing your Quick Render sample should be the default Instrument that appears, but if there’s any doubt, check the name at the bottom of your screen to see if it matches your Project name.
Of course, since your Quick Render sample is now part of a Sampler instrument, it’s fair game for further manipulation. Let’s say you build up a layered percussion loop over five tracks, then select the phrases and create a Quick Render of the full ensemble. Great. Then you create a new phrase, drop in your new instrument, place a note in the sequence, and tap [PLAY]. There’s your percussion loop, just as you heard it before. But why stop there? Now you can move over to Instrument View and start playing with parameters. Maybe you decide to slice this new sample into 16 slices and rearrange them across your phrase. Maybe you add an LFO that randomly modulates DEGRADE. Maybe you spend some time manipulating the sound and building new phrases, only to execute another Quick Render and start the process all over again. Layers upon layers, uninterrupted sample-tweaking bliss. The M8 is truly special.
One thing to keep in mind: In order to use this workflow, you need to have at least one slot free in your Instrument Pool (since the result of the Quick Render process is the creation of a new Instrument). The M8 allows for 128 Instruments per project so you have plenty of space to work with, but if you’re doing a lot of layering and quick rendering, you may want to review your Instrument Pool from time to time and clear any slots you don’t need anymore.
If you have a few samples on the M8 that you want to quickly make into a sample chain, you can use Quick Render for this. Just set up a phrase that plays each of them, suitably spaced. Of course, you will want to use an external tool like Digichain for more complicated situations.
Most samplers are equipped with some version of resampling capabilities, but for us, the M8’s Quick Render feature is by far the best in class. It’s fast and easy, but more importantly, it’s totally seamless as part of a music-making workflow. It’s something you can do without thinking, yet it dramatically expands the capabilities of the M8 and the potential for where your musical ideas might go. And, again, it’s as simple as: Select your phrases, double-tap [EDIT] to open the dialog, tap [EDIT] to Quick Render, done.
The existence of Quick Render implies something a bit slower, and the reason for this is to allow more control and customization. Render View can be reached from Project View, and lets you select tracks to render that don’t happen to be adjacent, decide for each send effect whether it is used or not, and other useful options. This is more suited for export from M8.
We’ve talked about resampling, but what about sampling itself? We can record samples on the M8, from the analog audio or USB audio inputs, or from the microphone on the M:02. Chapter 8 goes into more detail on using M8 with external instruments or sounds, and the topic is best handled there. If you can’t wait, here’s a nice 11-minute video from Jay Maculate that covers the process well. We’ll link the video in chapter 8 also to remind you, if you have the patience to wait.
Jay Maculate – How to Record Samples on the Dirtywave M8
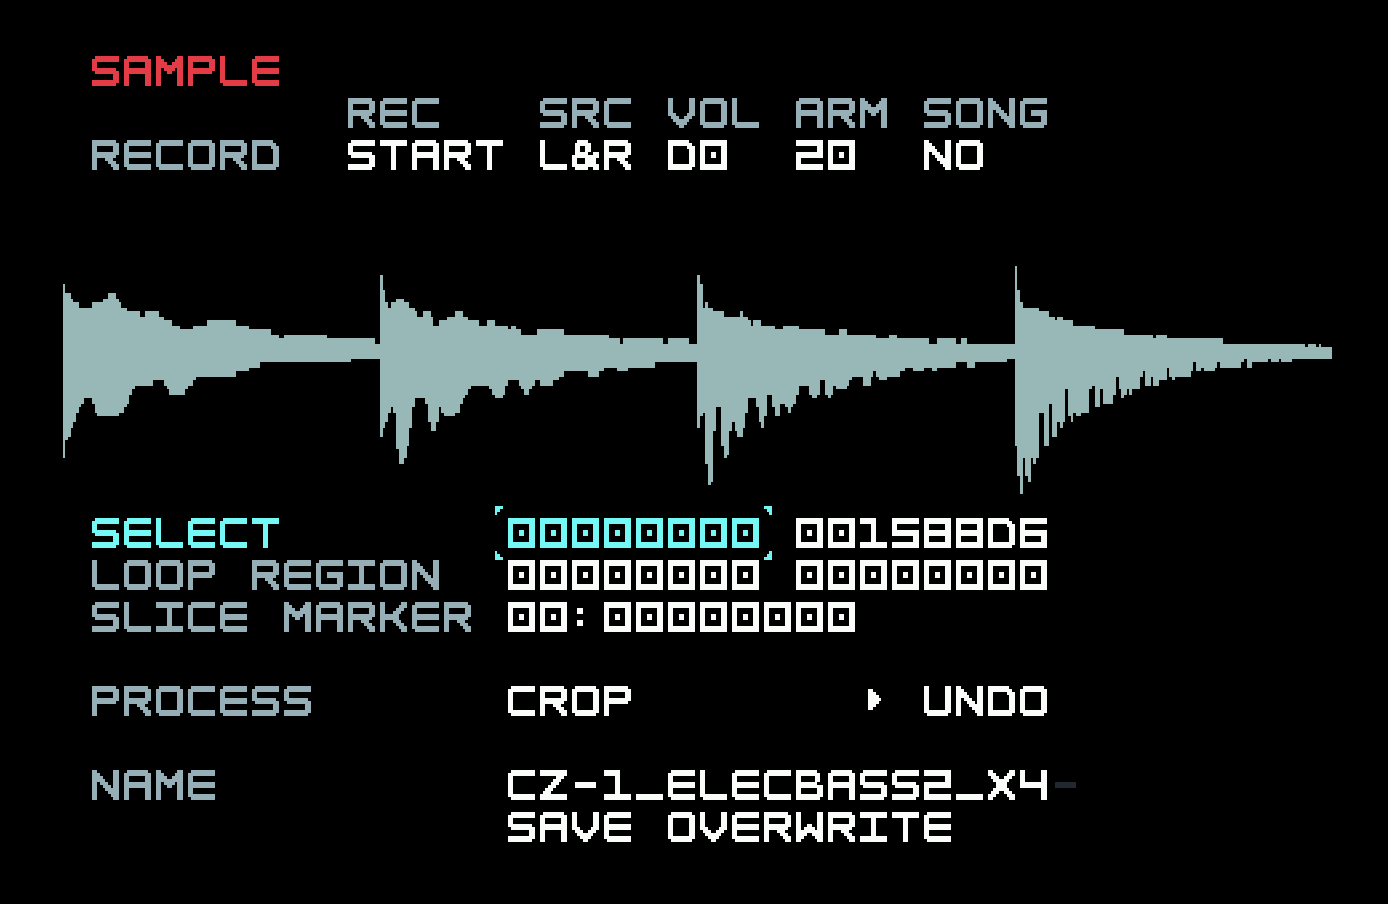
The recording options live at the top of the Sample Editor screen.
5.7 The Sample Editor
Editing a sample in the Sample Editor is a bit more intricate than the techniques we’ve been describing so far in this tutorial. It’s about manipulating a lot of information (the entire waveform, and more) in a dynamic fashion. Jay Maculate also has a good video of about the same length as the one linked above, but covering the use of the Sample Editor. We’re not going to be able to improve on the combination of this video and the pages on the Sample Editor in the M8 manual, using just static text and screenshots. So we’ll content ourselves with some commentary on the uses of the tool.
Jay Maculate – How to Edit Samples on the Dirtywave M8
If you’ve used an audio editor on a computer before, perhaps Audacity, or the ones built into DAWs (digital audio workstations) like Ableton or Logic Pro, you’ll be familiar with the basic idea, which is to define a time-based region of the waveform and then perform some action on it. But M8’s Sample Editor is not nearly as full-featured as those. M8 has a small screen and only eight buttons for manipulation. Consequently, it doesn’t try to do too much, and tries to do what it does well.
On a computer, you would define the region by clicking in the waveform display and dragging. You can actually do something similar using the touchscreen on M8 (we’ll explain how below) but the screen is small, so it’s really only good for getting in the approximate vicinity and not for fine work. In the Sample Editor, the region is defined precisely by the two fields in the row labelled SELECT. These show the start and end position of the selected region in number of little samples, where the little sample numbered 0 (displayed as 00000000) is the very first one, displayed at far left.
With your cursor in one of these fields, you can change the value it contains with the usual key combinations, [EDIT]+[LEFT] and [EDIT]+[RIGHT] for small increments, and [EDIT]+[UP] and [EDIT]+[DOWN] for large increments. When you are making small increments, the screen zooms in to show more detail. There is only one level of zoom, and this is the only way to get it. You can hold your chosen key combo and it will repeat, so you don’t have to tap constantly. There is one more level of increment available, which is tempo-based. [OPTION]+[LEFT] and [OPTION]+[RIGHT] will move by one step (in a phrase); [OPTION]+[UP] and [OPTION]+[DOWN] will move by four steps. You can also hold [EDIT] and tap or drag on the touchscreen to change the value under the cursor (try it and see if it suits you).
We talked about how slice markers can be stored as metadata in a WAV file. It’s possible to define and store a loop region in the same way. This can be much more precise than using the LOOP START and LENGTH parameters in the Sampler instrument, but it can’t be modulated on the fly. If you have having trouble with pops or clicks while looping, you can use this precision to choose start and end points with zero or very low amplitude. When a loop region is defined, it will override LOOP START and LENGTH (once a looping play mode is chosen).
There are also two fields for slice markers, one for the slice number (starting at zero, displayed as 00), and one for the start position. The slice markers are displayed on the waveform (if you open up the sample we provided above, you’ll see the slice markers that Sacco put in). The end position is the start of the next slice, or the end of the sample. Among the processes that can be applied to a region, there are some quick slicing options. You can apply even slicing into a given number of slices, as you can in the Sample instrument, but you can also slice by transients (rapid increases in amplitude, like at the beginning of drum hits) or by silence. The slice markers obtained in these ways can be adjusted manually.
Most of the processes that can be applied are straightforward. You’ll notice there is an UNDO option, which is rare on the M8, but it is only one level, so don’t be hasty. At any point, you can preview the sample, selected region, or slice that you are working on by holding down [PLAY]. Fade in and fade out are good for taming pops or clicks at the beginning or end of a sample, and loop crossfade (XFADE) can soften the transition from the end of a loop to the beginning (which can be jarring even if no pop or click is created).
Finally, at the bottom there are options to save (a new sample, whose name you will be prompted for) or overwrite (the sample you loaded). It’s usually best to create a new sample; you might change your mind about an edit, and you can clean up unused samples later.
5.8 Bundling
Project files do not contain samples. For archiving, or for sharing a song with others, it is best to create a bundle. Project View has a line labelled Export/Share which has an option to do this, and the new bundle will be a folder in the Bundles folder of the SD card. That folder will contain the project file as well as two subfolders, one called Samples and one called Instruments.
There is one significant difference between a bundle and the project files we have created so far. The Sampler instruments we built use what are called absolute references to samples, that is, a description of where to find the sample that starts from the very top of the filesystem tree. These references can become obsolete if we move samples around or rename them, and we would have reload the sample into the instrument.
In a bundle, the Sampler instruments use relative references, assuming there is a subfolder called Samples in the same folder as the project file, and pointing into that. This means that a bundle can be moved anywhere on your M8 and it will still work. More importantly, it can be zipped up and sent to someone else, and they can put it anywhere on their M8, and it will work. They don’t have to put the samples into their main Samples folder, and possibly deal with name clashes or organizational issues. You should keep in mind, though, that a bundle is a complete, self-contained copy of a song, and if you make any subsequent changes to the song, they will not be reflected in the bundle.
Many M8 users who share audio of songs on the Internet (some on the Dirtywave Discord, some on streaming services) include the bundles, and you can load them into your M8 and learn from them.