4 Dub techno with the FM Synth
The FM Synth is the deepest synthesis engine on the M8. It is possible to use it just with preset instruments, from the factory content or the user community. One can also tweak these experimentally, changing parameters to see what effect they have on the sound. At the opposite extreme, one can learn enough of the theory of how FM works in general to be able to hear a sound and have a sense of what configuration would at least get into the vicinity. We’re going to steer between these two extremes. A little bit of demystification can help to guide preset tweaking or experimentation.
FM stands for "frequency modulation". Most people have seen or heard examples of this, though they may not realize it. When a violinist enriches their tone by a careful, rhythmic wiggling of the left-hand finger holding a string to the fretless fingerboard, it changes the length of the string and thus the pitch being played, slightly. This is known as vibrato. When an electric guitarist wiggles their "whammy bar" with their right hand, it changes the tension of the strings and again the pitch. Speeding this up past the ability of humans is essentially what the FM Synth does, with surprisingly complex results.
Both the left-hand wiggling of the violinist and the vibration of the string caused by the movement of the bow in their right hand are examples of physical oscillation. The string vibration causes, by means of waves of air pressure, a similar vibration in our eardrums, which our ears interpret as sound. The faster the vibration, the higher the perceived pitch. The frequency of the vibration is measured in cycles per second, a unit known as Hertz (Hz) after the German scientist. For example, an A-6 note is 440 Hz on the M8. We won’t need to use this precision very often, but you may also see this terminology used elsewhere. Note names, in particular octave numberings, are not standardized across devices. In scientific pitch notation, 440 Hz is A4.
FM, then, is the use of (usually rapid) changes in pitch, for sonic effect. Its use in electronic music was popularized by the analog modular synthesizers of Robert Moog and Don Buchla in the 1960’s, and in the digital realm by the work of John Chowning (at Stanford) in the 1970’s, licensed to Yamaha for use in the DX7 and its successors. The patents granted to Chowning and Yamaha ensured a period of market dominance, but following their expiry, many other manufacturers incorporated these ideas into their devices, because a lot of successful performers had also taken to them.
We haven’t mentioned it yet, but you’ve probably noticed a visual waveform display or oscilloscope at the top of some views, notably when previewing an instrument or playing a song. This is more than eye candy; it can be useful in sound design, and we’ll use it right now as we reproduce the vibrato effect using the FM Synth.
4.1 A first look at the FM Synth
Create a new project, add a new chain in Song View, a new phrase in that chain, and a single C-4 note in that phrase, then navigate to Instrument View and choose FM Synth as the type.
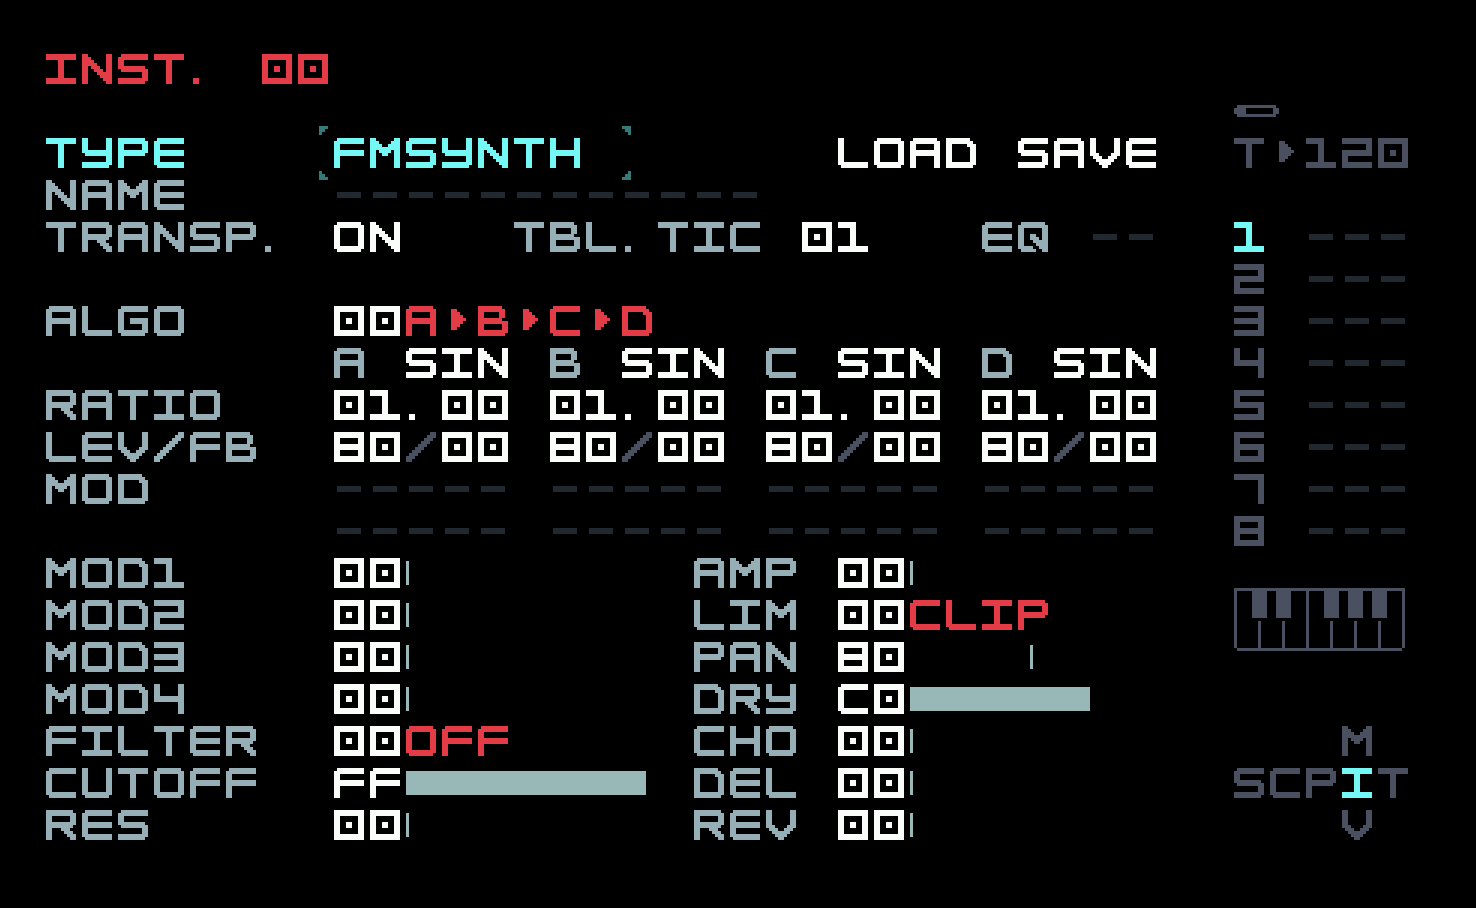
Digital FM synthesizers can be quite complicated. Tim has made a number of ingenious choices to respect the physical and computational limits of the M8. There are still a lot of parameters, and we’ll approach them slowly. An oscillator is often called an operator in FM synthesis. It can be further characterized as a carrier (the oscillator being modulated) or a modulator (which modulates the frequency of a carrier). Going back to the analogy of the violinist, the string is the carrier and the wiggling left-hand finger is the modulator.
FM Synth has four operators, called A, B, C, and D (4-op FM). This is relatively modest; the DX7 offered 6-op FM, and some of its successors even more. But it’s not a deficiency. The Yamaha DX11 used 4-op FM also, as does the currently-available Yamaha Reface DX, and the Elektron Digitone (both models). One can do quite a lot with four operators.
To cut down on configuration complexity, most digital FM synths have a set number of operator arrangements, known as algorithms. There are twelve on the M8 (compare with eight on the Digitone and DX11, and thirty-two on the DX7). These are quite similar to the twelve on the Yamaha Reface DX, though the operator implementation there is a bit different. The algorithms are described with a brief linear text string on the M8, and with two-dimensional diagrams in the M8 manual. Because all these machines differ in the set of algorithms, the set of modulators, and the ways they can be applied, it is generally not possible to directly port a patch from one to another. One can often trim and adjust and get close, though.
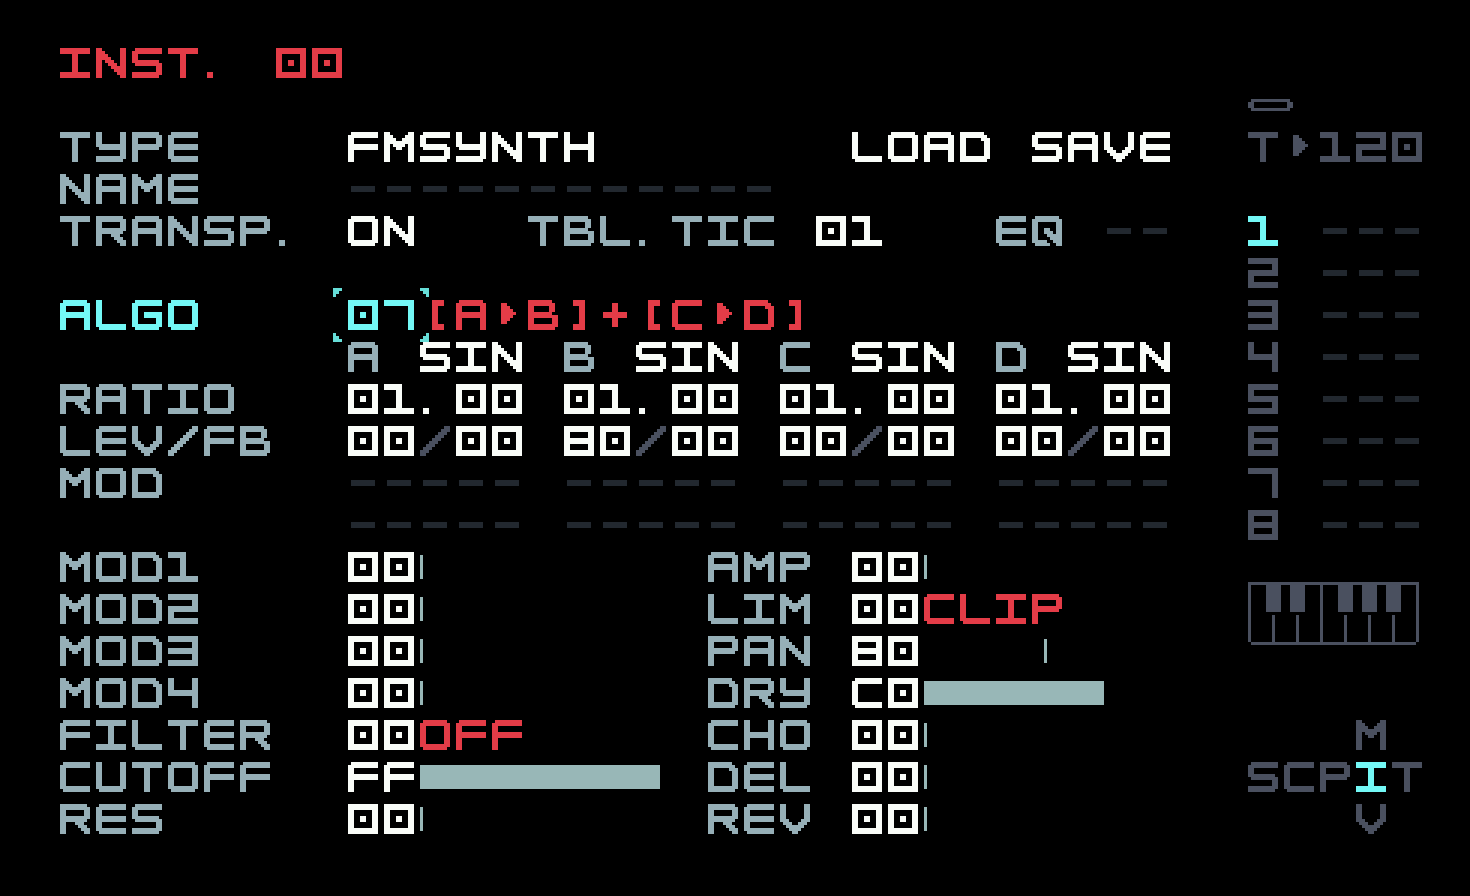
The default algorithm 00 is described as A>B>C>D. What this means is that operator D is the carrier, and C modulates D. But B in turn modulates C, so C is in a sense both modulator and carrier. It’s as if B were someone grabbing the left wrist of a violinist and shaking it. (Please don’t try this at home!) Finally, A modulates B. This algorithm is not what we want to start with, so change it to algorithm 07, described as [A>B]+[C>D]. This means that B and D are carriers, and their sounds are mixed together. A modulates B and C modulates D, respectively.
The row after the algorithm choice and description sets the waveforms for the individual operators, and the row after that is labelled Ratio. We’ll get to these in a moment. The next row is labelled LVL/FB. LVL means "level" and FB means "feedback". The level is simply the amplitude or volume of the operator. We only want to hear operator B at first, so set the levels of the others to 00. The screen should look like this.
Now you’re ready to listen to the result, either by holding [EDIT]+[PLAY] or by tapping [PLAY] and letting the note you put in the phrase play continuously with periodic retriggering. You should hear a low, simple sound, and see a simple waveform on the oscilloscope at the top.
The waveform is a sine wave. You may remember sines from high-school trigonometry; they are useful in computations involving angles and distance. Mathematically, any periodic waveform (repeating exactly) can be represented as the sum of sine waves of different frequencies. This makes them useful in discussing complex sounds; we can talk about the frequency spectrum of a sound, the set of frequencies and levels of the sine components of that sound. Practically, FM is easiest to control when the operators are sines, though the other waveforms are there because they have their purposes.
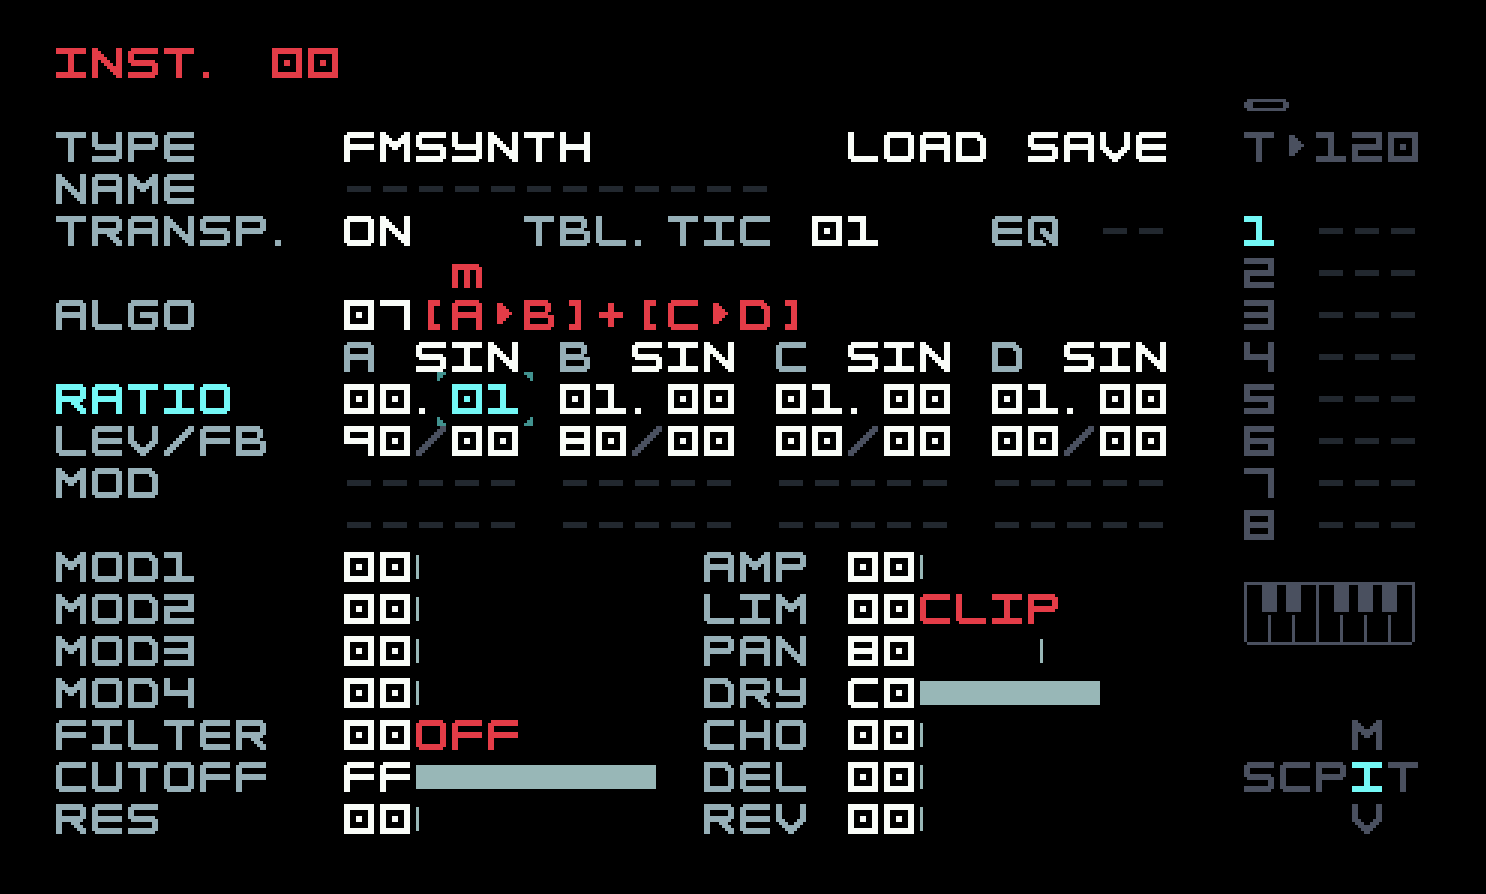
The row labelled Ratio contains four numbers, one for each operator, though each number has separate two-digit fields before and after the decimal point. Ratios are expressed in regular decimal, not hexadecimal. A ratio is just a multiplier of the note frequency. An operator with ratio 1.0 has the same frequency as the note; a ratio of 2.0 means twice the frequency of the note. We want the modulator to be really slow. So take the left field of A’s ratio down to 00 (with [EDIT]+[DOWN]) and the right field up to 01 (with [EDIT]+[RIGHT]). You’ll notice, as you do this, that the M8 adds a m/c annotation above the algorithm description, to help you see what you’re changing. A ratio of 0.01 is a frequency of only a few cycles per second, like that wiggling finger of the violinist. Your screen should look like this:
Now listen to the result. It won’t sound any different. But the waveform will be rocking back and forth slowly. That might make you frown. Surely if the frequency were being changed, the waveform should become narrower, then wider. But its shape is constant, with only its position changing. This setting of parameters reveals a core truth about the FM Synth: it does not implement frequency modulation, but phase modulation. This is a good thing, as it turns out, and the DX7 and Digitone work the same way. You can skip over the explanation that follows without any real effect on your use of the M8, but you might find it interesting.
You may have worked a lot of problems in high-school calculus that involved cars or rockets. There, you would have learned that speed is the derivative (instantaneous rate of change) of position, and acceleration is the derivative of speed. Going the other way, position is the integral (continuous sum) of speed and speed is the integral of acceleration. Analogously, frequency is the derivative of phase (position in the waveform), and phase is the integral of frequency.
Quantities tend to be continuous in the analog realm, but discrete in the digital realm, so integrals become sums and derivatives become differences. Phase modulation is computationally simple and efficient digitally. It is also gentler. Phase modulation is like pushing and pulling on the bumper of a moving car, while frequency modulation is like tapping rhythmically on the accelerator or brake. (Definitely don’t try this at home!) Ultimately what matters is what is musically useful and diverse, and phase modulation definitely has those qualities. Because of the relationship between phase and frequency, anything that can be done with phase modulation can be done with frequency modulation, and vice versa, but the modulator for one might be relatively simple compared to the modulator for the other, in order to achieve the same effect. End of digressionary explanation.
We can get closer to the vibrato effect by increasing the speed of the modulation. Take the right field of the A ratio from 01 to 05, and increase the B ratio to 02.00 to raise the note an octave and make it easier to hear.
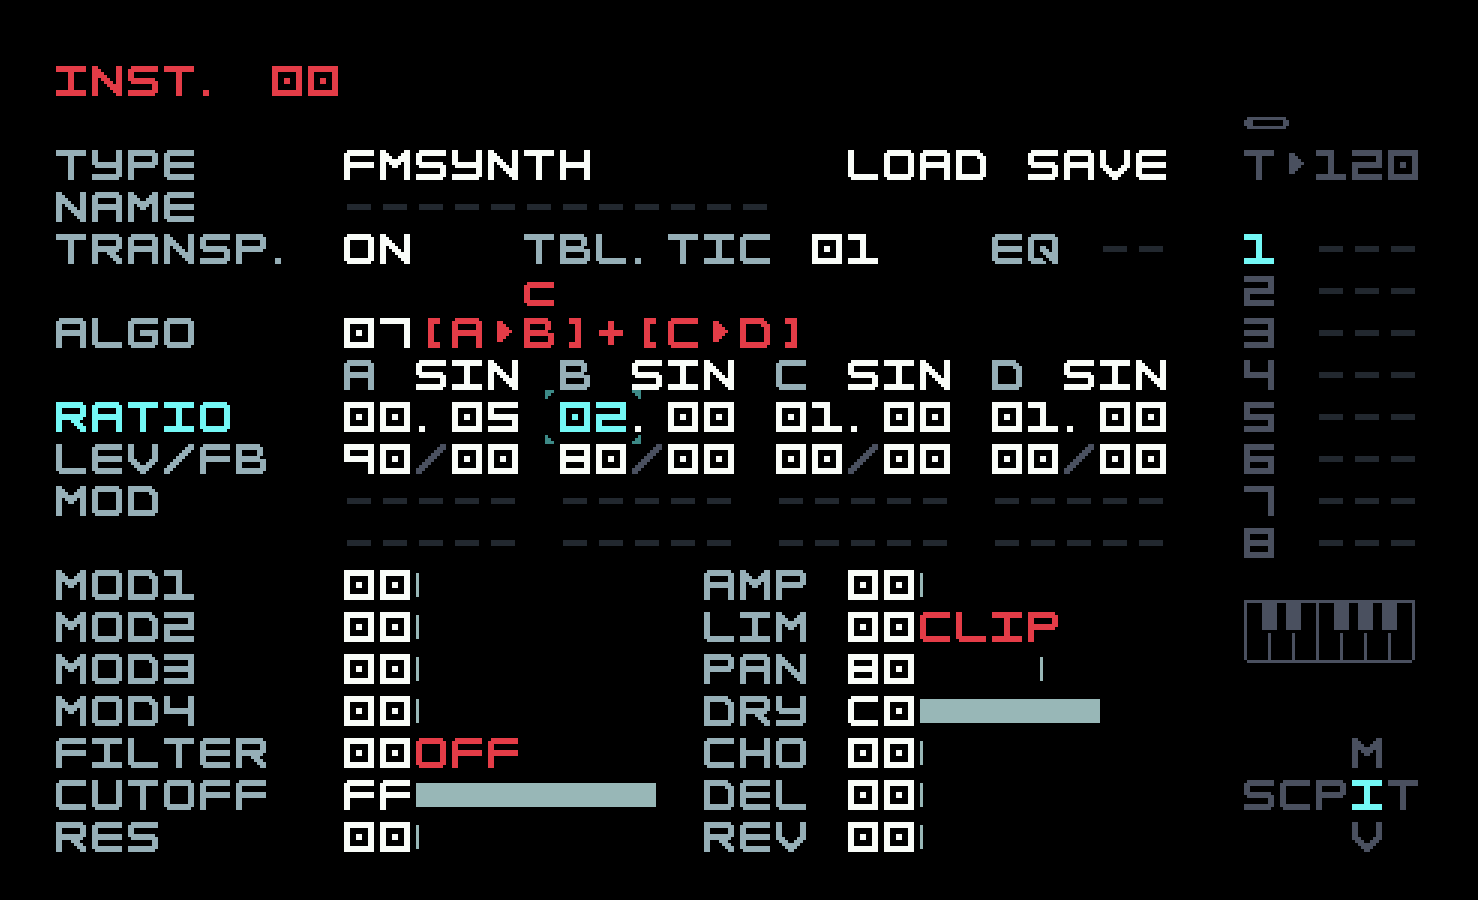
This isn’t actually the best way to add vibrato. You can put an LFO on pitch, and there’s also a specific FX command, PVB (pitch vibrato). We used the idea more as a gateway into FM synthesis. Remember we said that FM was vibrato sped up past human ability? You can do that now, by taking the left field of the A ratio from 00 to 01, and taking the right field down from 05 to 00, so the A ratio is 01.00.
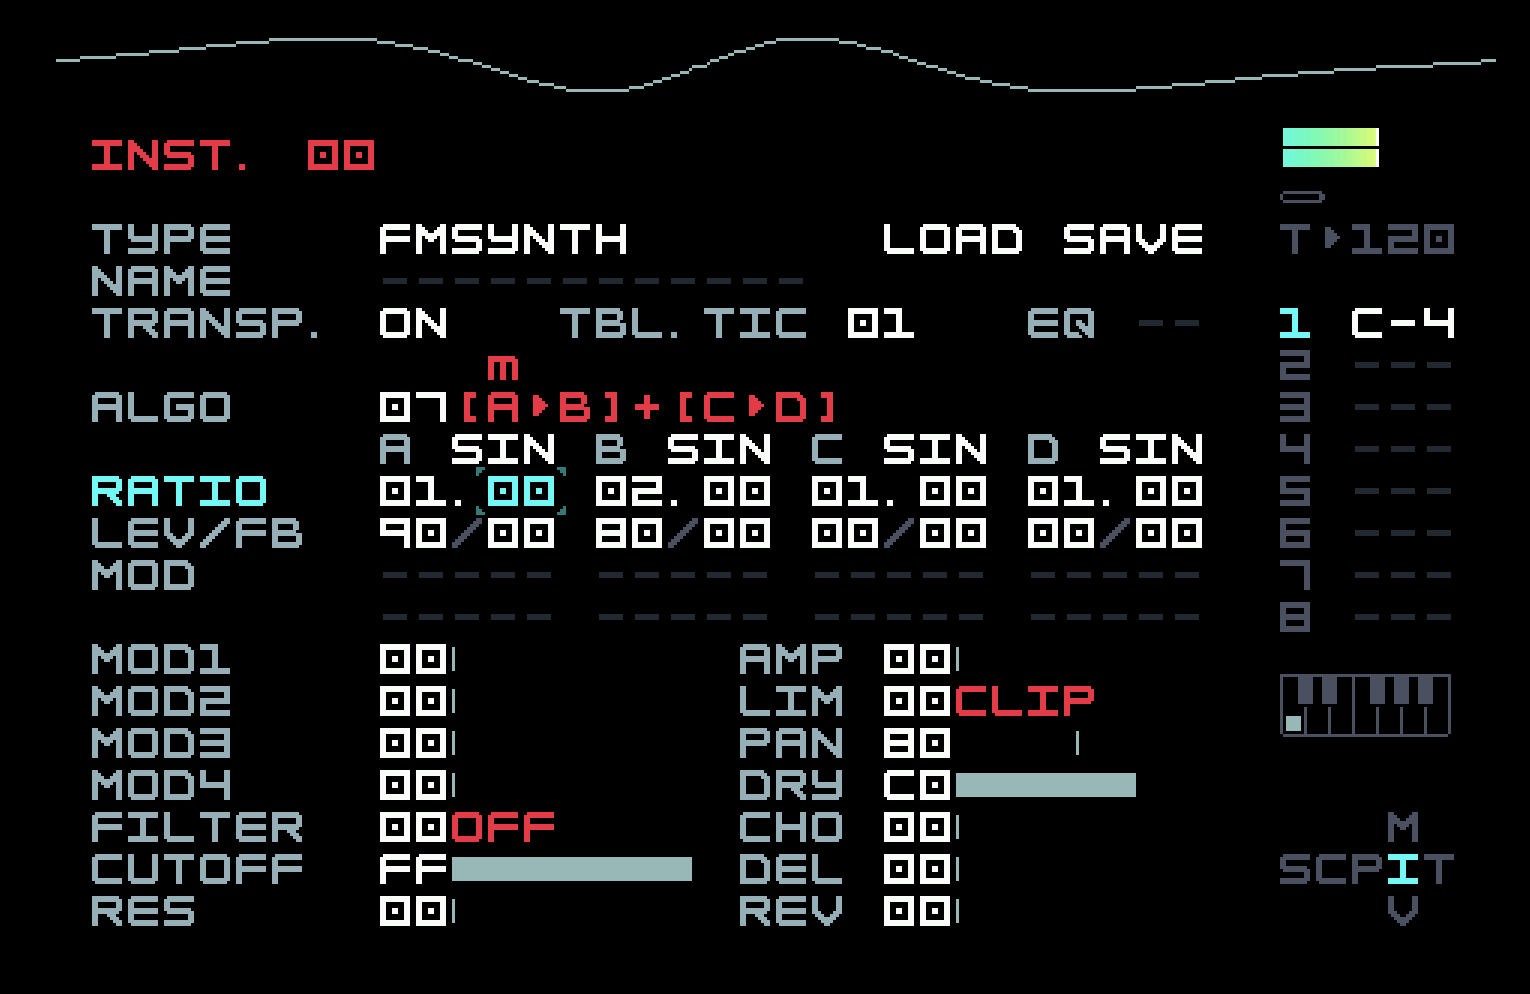
Previewing this, you will hear and see a waveform slightly more complex than a sine. You now have a 2-op FM implementation to play with, and you can do quite a lot with just that (as we will see). Try various ratios and levels for the A operator. Stick to whole-number ratios at first (change only the left field), but then try a small change in the right field, by .01 or .02. Many FM synths have a "detune" parameter to achieve the latter effect. Then try some fractional ratios. You’ll find that the "big jump" edit operations make a change of .25 in the right field of a ratio. Those sounds are still more complex but fairly tonal. Moving away from whole numbers can result in sounds that are wooden, metallic, or just noisy (possibly with more modulation involved). Raising the level of the A operator from zero makes the sound more complex, but not in a linear fashion like turning up a volume knob. You can get a grasp on these phenomena with the help of a little more musical math.
We already mentioned that doubling the frequency of a sine wave increases its perceived pitch by an octave. A-6 is 440 Hz, and A-7 is 880 Hz. These sound good together; they are harmonious. Doubling the frequency of A-7 twice (multiplying it by four) gets us to A-8 at 1760 Hz. What if we triple the frequency of A-6?
The perceived pitch of this is pretty close to E-7, which is seven semitones or a fifth above A-6. The reason it isn’t exact is due to a musical compromise called equal temperament, which lets musical pieces move through more than one key without requiring musicians to retune on the fly. The point is that it still sounds good. In fact, all the multiples of 440 Hz sound good with that A-6. The sine waves with those frequencies are known as harmonics of the fundamental frequency (the smallest one). Adding these sine waves together at various levels will result in different waveforms with different timbres (this word refers to the qualities of the sound other than pitch and volume). For example, a sawtooth wave has all harmonics, dropping off in level proportional to the inverse of the multiplier.
The final piece of the puzzle is the mathematical analysis of FM with pure sine carrier and modulator. This shows that if the carrier frequency is C and the modulator is M, then harmonics are added at C+M, C+2M, C+3M... but also at C-M, C-2M, C-3M, and so on. For example, if we have a carrier at 440Hz and a modulator at 220Hz, harmonics will be added at 660Hz, 880Hz, and so on, but also at 220Hz (C-M). Generally speaking, as the level of modulation is raised above zero, the level of the added harmonics goes up, and closer ones go up more than ones further away. But it’s not always that simple. Sometimes raising a level can make a particular harmonic decrease. The mathematics is well-understood by experts, but it doesn’t lead to simple rules of thumb or guidelines. A certain amount of experimentation is inevitable. The level of the fundamental frequency can also be reduced, and it’s good to be aware of this possibility, so you can compensate if necessary. (This can happen because negative values of the C-kM frequencies show up as positive values but phase-inverted, so they will cancel out harmonics that they overlay.)
The math in the previous paragraph explains why the user interface of the FM synth steers you towards whole numbers or nice fractions. That makes it more likely that the sound is harmonious and responds well to note pitch information, though sometimes you want to dive into those in-between regions for particular kinds of sounds.
There are lots of parameters on the FM Synth that one might like to modulate. Desktop synths often handle this with a two-dimensional "modulation matrix" to select multiple destinations for each modulation source. Tim has squeezed a limited version of this into the FM Synth. As you know, there are four modulators available in Instrument Modulation View, which can be various types of envelopes or LFOs. Instead of sending a modulator directly to an FM operator parameter, there is another level of indirection, which we’ll call "operator modulators" or just op-mods (in the M8 manual or on the screen, they are called just "mod", a potential source of confusion). This will let one instrument modulator control several FM operator parameters.
In addition to the destination choices for the instrument modulators that we’ve already seen, such as volume and filter cutoff, the instrument modulator can be chosen to be the source of one of the four op-mods. Then, in Instrument View, in the two rows labelled MOD, just below LEV/FB, each of the four operators has two op-mod slots (again, our invented terminology) available for our use. One op-mod slot can direct any of the four op-mods to four FM-specific destinations on the operator: level, feedback, ratio, and pitch (altered by semitones). The instrument-specific left side below has four controls for the base amount of each op-mod that is applied (the same amount for any op-mod slot that uses that op-mod). An instrument modulator assigned to an op-mod then has the same effect on it as if it were assigned to the parameters we’ve already used instrument modulators on. We’ll make use of these op-mods in what follows.
4.2 Percussive elements
Dub techno is a genre that brings together elements of classic techno, notably the speed and repetitive nature of the rhythm and melodies, and elements of classic dub, with its heavier bass and use of delay and reverb. We’ve chosen it for two reasons. First of all, it uses a diverse array of sounds, letting us discuss various aspects of the FM Synth, but none of the types of sound we need are so complicated or specific as to create difficulties for us. It also takes from dub an emphasis on slower, more minimal changes over time, often improvised by the performer. That makes it easier to perform on the M8, since no rapid knob twists or flicking of faders is needed.
In contrast to the previous chapter, we won’t design a full song, only a basic groove consisting of one four-bar chain per track. Track 1 will use chain 01, and so on up to track 8 using chain 08. You could fill this out into a song with a proper beginning and ending, using ideas from the previous chapter and ones you’ll learn in this one, and include all the automation for slow changes so all you need to do is tap [PLAY]. But this lets us discuss, in a later section, how we might instead set things up for more of an improvised performance.
Here’s audio of the groove repeated four times, with just an abrupt beginning and ending. The repetitions are not identical due to the use of FX commands on some tracks, which will be explained in due course. Listening to it at length using the bundle will make the variations more clear.
Audio download link: FM.mp3
Project bundle link: FM.m8s
You don’t have to stick to this groove at all. We will explain how we created it, but along the way, there will be plenty of opportunity to vary the sounds and the rhythms. You can do that the first time through, if you’re eager, or you can build it as we did and then tweak it afterwards to make it more interesting or diverse.
There are many factory instruments on the M8, including some using FM Synth, and more available through the user community. One can also try, after a bit of experience, to adapt presets from other musical devices that use FM. In doing this, you might find that the presets are not necessarily implemented in the simplest fashion. The designer hit upon something that sounded good and saved it. There might be parameters or even whole operators that look like they are doing something, but which have no significant effect on the final sound. In what follows, we have tried to remove these extraneous elements that can creep in through experimentation, and present simple, clean implementations.
Create a new project, and in it make an empty chain 00 with four empty phrases 00. This is for possible future use; our instructions won’t use this chain. Then, in track 1, put a reference to new chain 01, add a single phrase 01, move to the phrase, add a single note, set its instrument to 00, and its type to FM Synth. We’ve slowed the tempo to 110 bpm (in Project View), which is slower than most techno but faster than most dub.
The first four tracks contain percussive elements: a kick drum, a snare, a hi-hat, and a bell. The kick drum is the simplest of the sounds. One can make a kick drum out of just about any sound source with the right kinds of modulation. There are three important elements: a low sound, a volume envelope with a short attack and modest decay, and a pitch envelope with short attack and short decay.
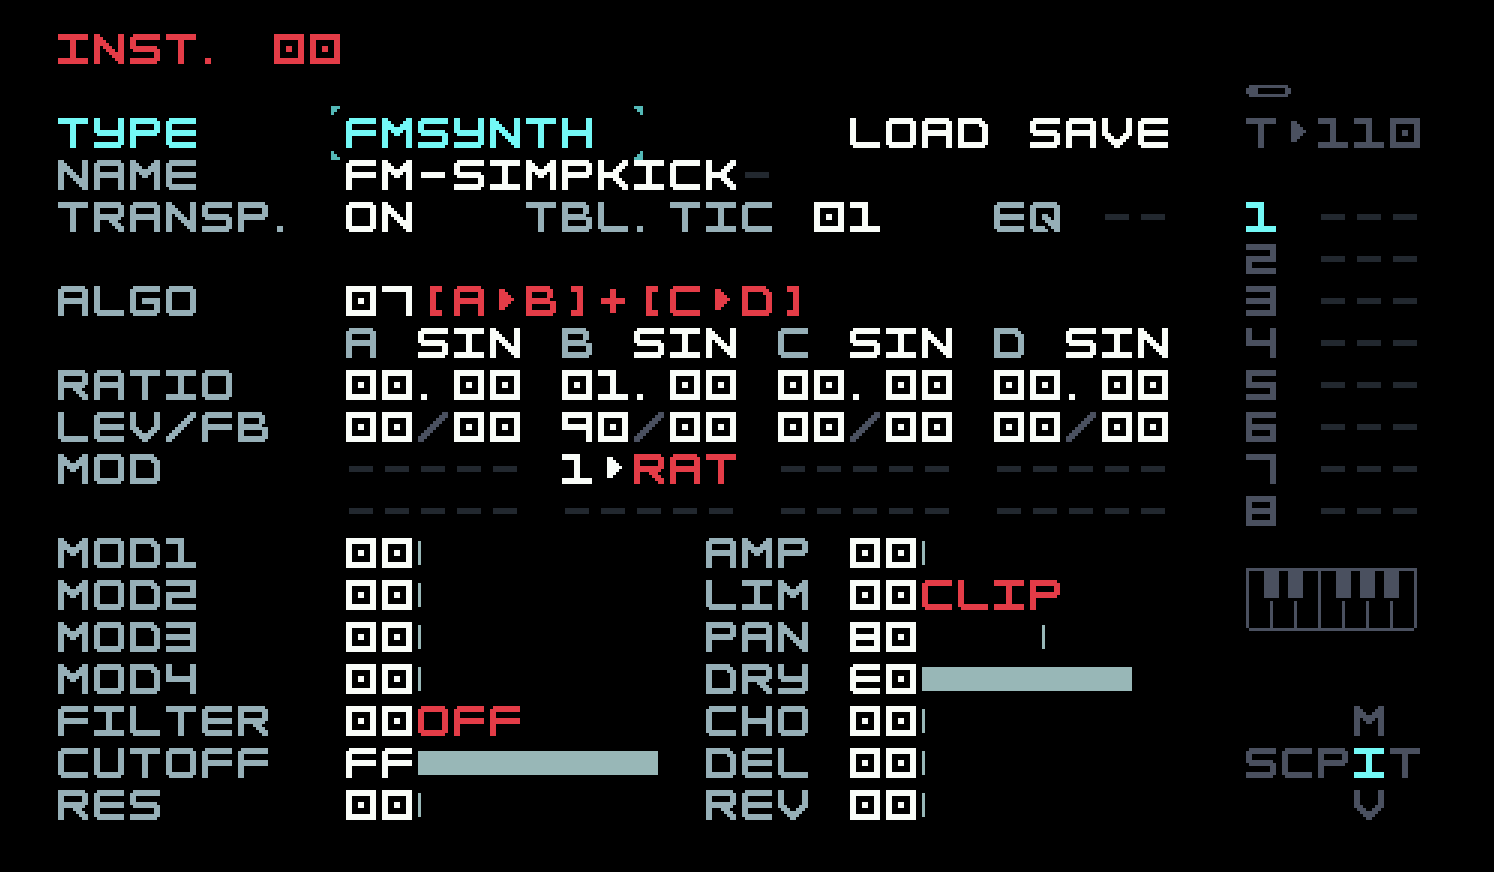
You can see that we’re using the 2-op setup from the previous section, but the modulator A has been turned off. So we are only using the single carrier B as a sine wave! The volume envelope is handled as we’ve seen in the previous chapter, but the pitch envelope uses an op-mod on operator B’s ratio, mostly to illustrate the use of op-mods. Here’s the instrument modulation page.
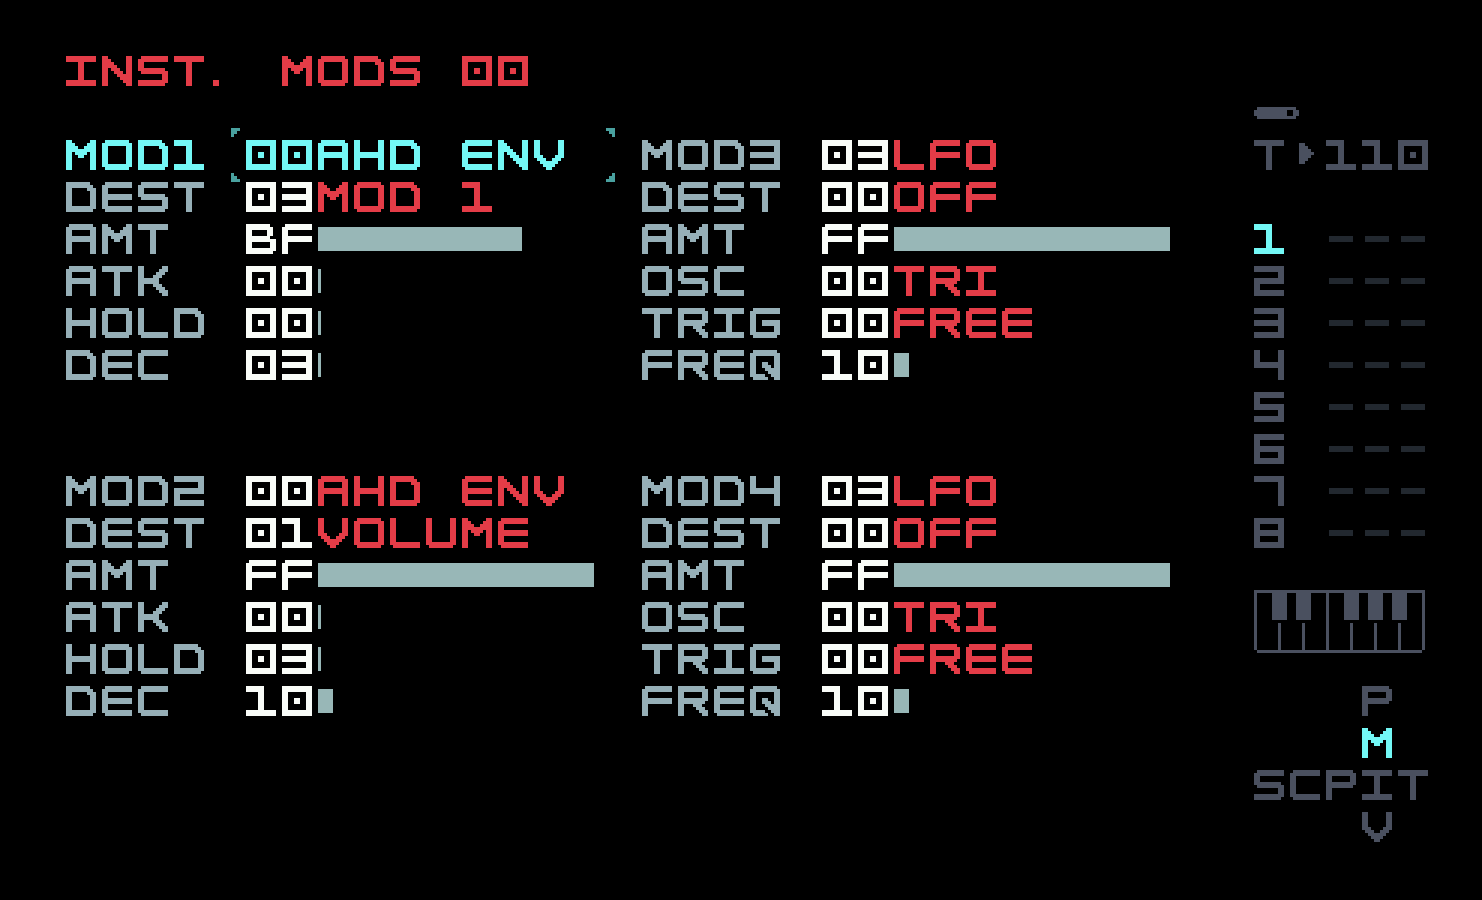
Instrument mod 1 is assigned to op-mod 1 for the ratio envelope, and its AHD envelope has a shorter decay than instrument mod 2, which implements the volume envelope. Go back to phrase 01 and put in the standard "four on the floor" techno beat, and then back to chain 01 to add three more references to phrase 01 to make up the four bars. You will see an X appear after the title of Phrase 01 in Phrase View. That means that this phrase is used more than once in the current chain. A caret (^) means that this phrase is used in a different chain. These little visual indications help remind you that an edit done here will have effects elsewhere.
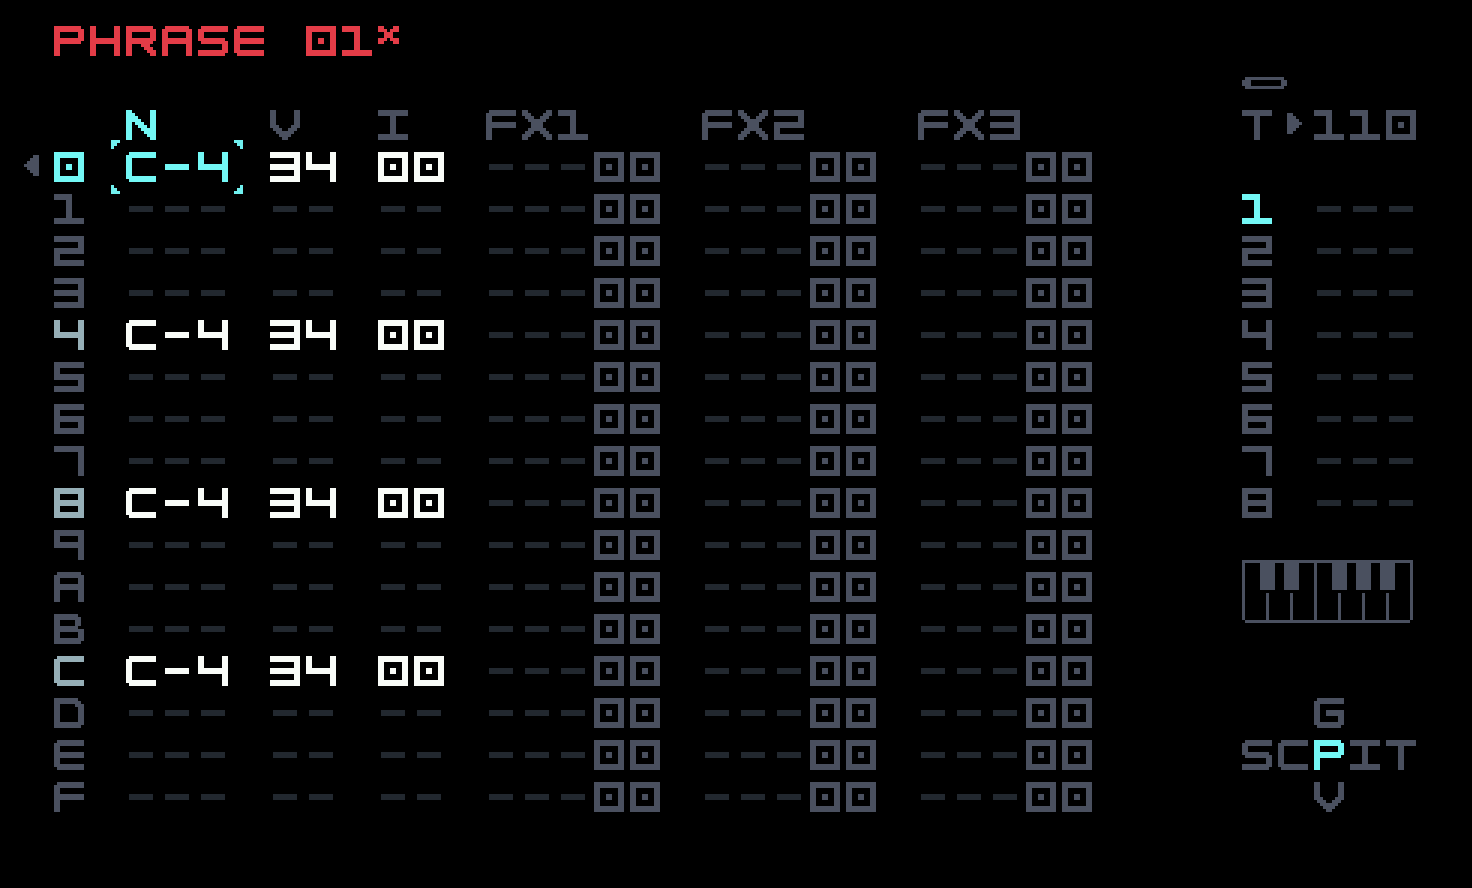
Even with this simple an instrument, there are a number of parameters that you can use to affect the sound. Reducing the amount of the pitch envelope as set in Instrument Modulation View will make it sound more like a dull thump. Experiment with the two decay times. You could turn modulator A on (that is, actually use FM), or even use the other 2-op stack of operators C and D to layer another sound in, with the help of the two remaining instrument modulators. You may also be tempted to vary the beat a little with an alternate phrase in the chain.
You will often see a kick drum enhanced by using a highpass filter with resonance turned up, and the cutoff frequency tuned to the oscillator frequency. Because we wanted a more muted kick, we have not done this. Some people insist that a kick drum should be tuned to the key a song is in; others think this is far too fussy. Ours is in tune, but only because we’re being lazy and going back to our old favourite C minor (signalled by our use of D# and A#, really E♭ and B♭).
For the snare drum, set up a single chain 02 on track 2, with a single phrase 02 containing a single note using instrument 01. (This initial setup will be the same for all tracks, with only the numbers changing in parallel, so we’ll stop repeating this.)
The snare uses a parameter that we haven’t discussed: the feedback (FB). This is a computationally simple idea originally investigated in this context by Norio Tomisawa, the Yamaha engineer who authored several patents extending John Chowning’s ideas for use in the DX7. A controlled amount of the oscillator’s output is fed back into its own modulation. We can see the practical effect of this with the help of M8’s oscilloscope.
Set up the 2-op FM stack using just operators A and B on algorithm 7 as in the previous section, with both operators at ratio 1.0, but turn modulator A off, and set the level of carrier B to 50. Then start auditioning the sound while turning up the feedback of carrier B in larger steps, 00 to 10 to 20 and so on. You will see and hear that higher harmonics are added in, and the waveform starts looking like a saw wave. Take the feedback of carrier B back down to 00. Next, set the level of modulator A to A0, and repeat the process, but this time add feedback to the modulator. You will hear something similar at first, but partway through a bit of instability will develop along the slope of the displayed waveform, and then as you continue, the sound becomes noise, whose character alters somewhat with further increments.
In a nutshell, this is the use of feedback: to morph from harmonically simple sine to harmonically rich saw, and also as a source of noise. Unlike the DX7, the M8 offers several choices of operator waveform, including saw and various types of noise (several of which remain undocumented in the current manual). But it can be useful to use feedback in a subtle fashion.
There is nothing subtle about the way we use it in the snare instrument, though.
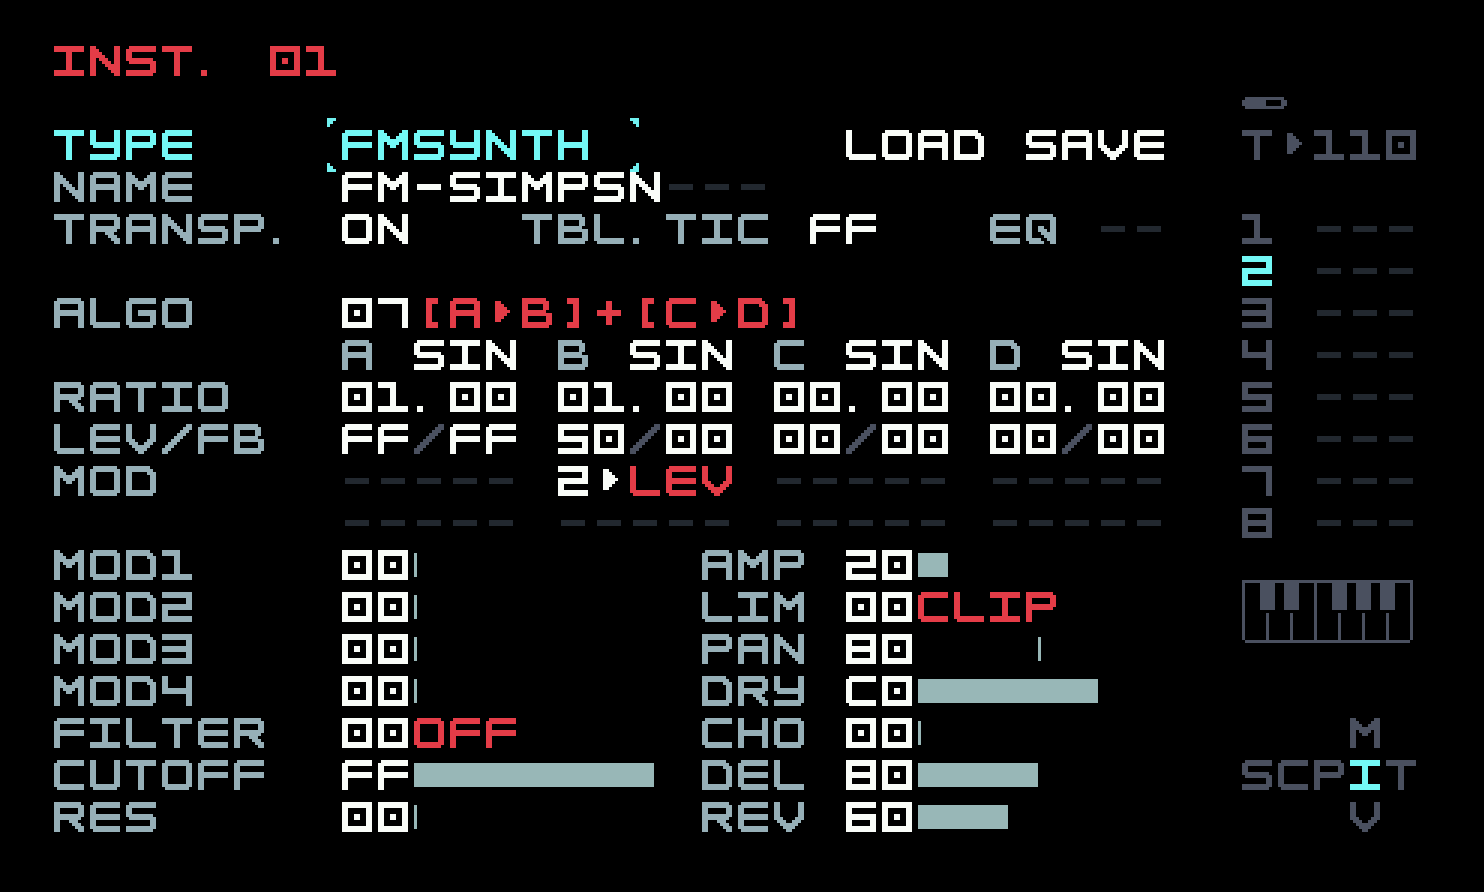
The feedback and level are at the maximum value of FF on modulator A, so it is producing a lot of noise, and that in turn makes carrier B noisy. On a real snare drum, the noisy tail of the sound is produced by wires running across the bottom drum membrane, which is not struck directly, but set into motion by air moving within the body of the drum when the top membrane is struck with a drumstick.
There is a volume envelope as with the kick drum, but this time we have used an op-mod to carrier B’s level to achieve a similar effect, just to demonstrate that there are often several ways to do something on the M8. We used op-mod 2 just to emphasize that there is no direct connection between the numbering of instrument mods and op-mods, except for the connections that we specifically set up.
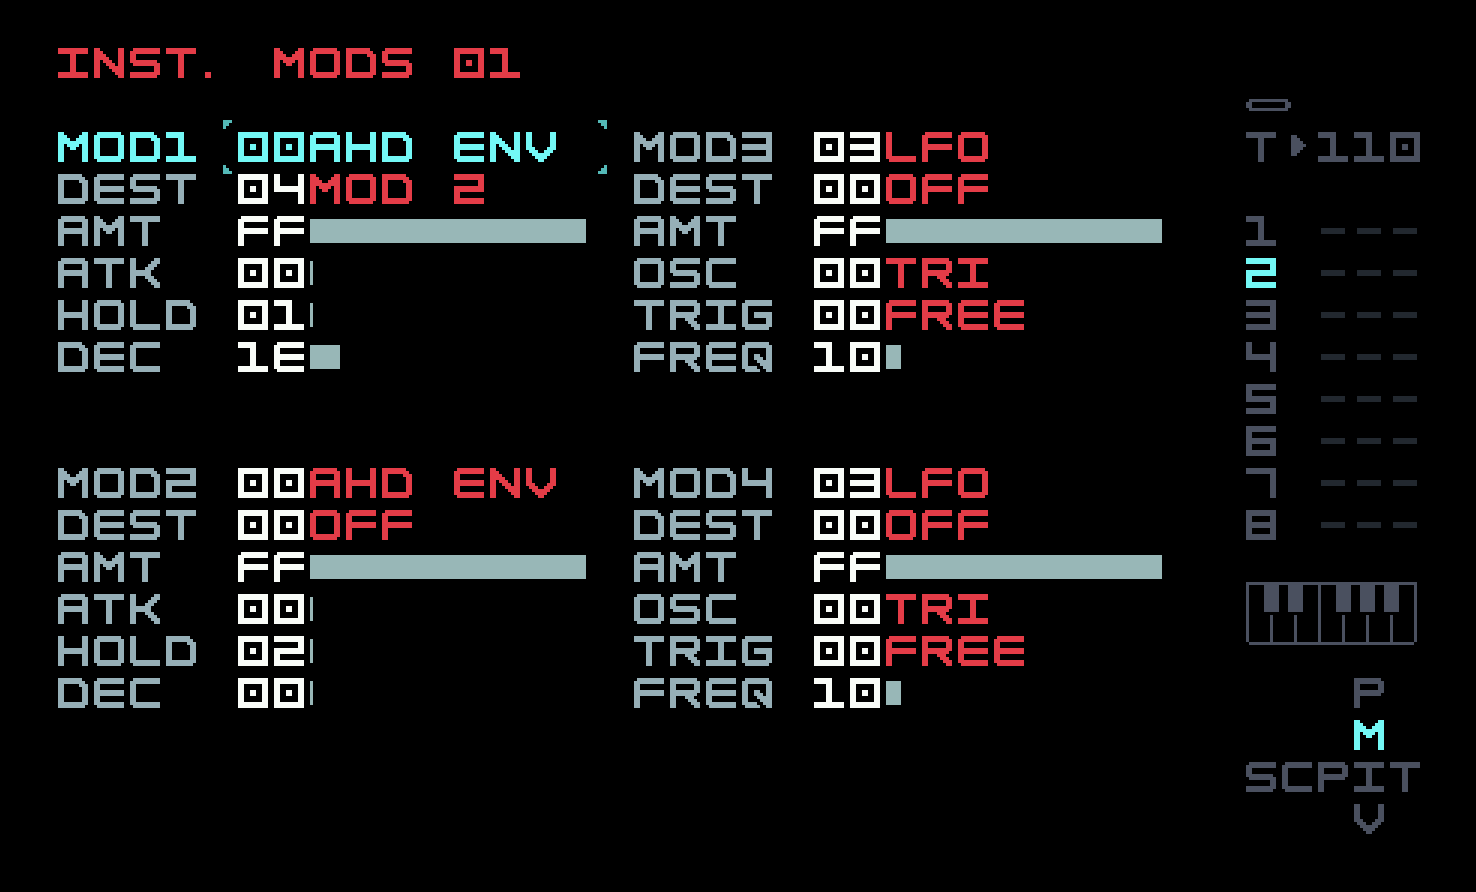
The sharp transient simulating the initial impact of the drumstick is achieved here by clipping. If you turn down the level of carrier B, it will go away. We’ve chosen to accentuate it a bit by increasing the AMP setting in the right effects column to 20. You can experiment with changing this value, and also by choosing a different limiter from the several choices available. We’ve also added some reverb and, for the first time, delay.
You might choose to design your own transient using the idle C-D stack, add a pitch envelope as with the kick drum (more subtle, though), or do something more sophisticated with the noise tail.
The snare in our groove is not as rhythmically insistent as in the song from the previous chapter, or the kick drum here. We’ve used sparser hits, with some velocity variation, over the last three bars of the chain (the first one is empty). Here’s the second bar.

The third bar has a V-34 hit on row 3 and a V-24 hit on row B; the fourth bar has a V-34 hit on row 6 and a V-24 hit on row 9. These were chosen by ear, somewhat arbitrarily; feel free to vary them to taste.
Set up the instrument for the hi-hat on track 3. A closed hi-hat is a simple variation on the snare: a higher noise (shaped by filtering) and a short volume envelope. Lengthening the decay a bit gets one an open hi-hat. Again, there’s not much use of FM, though we’ll use feedback to make the noise. A real hi-hat is more sophisticated, but this gets close enough for much electronic music.
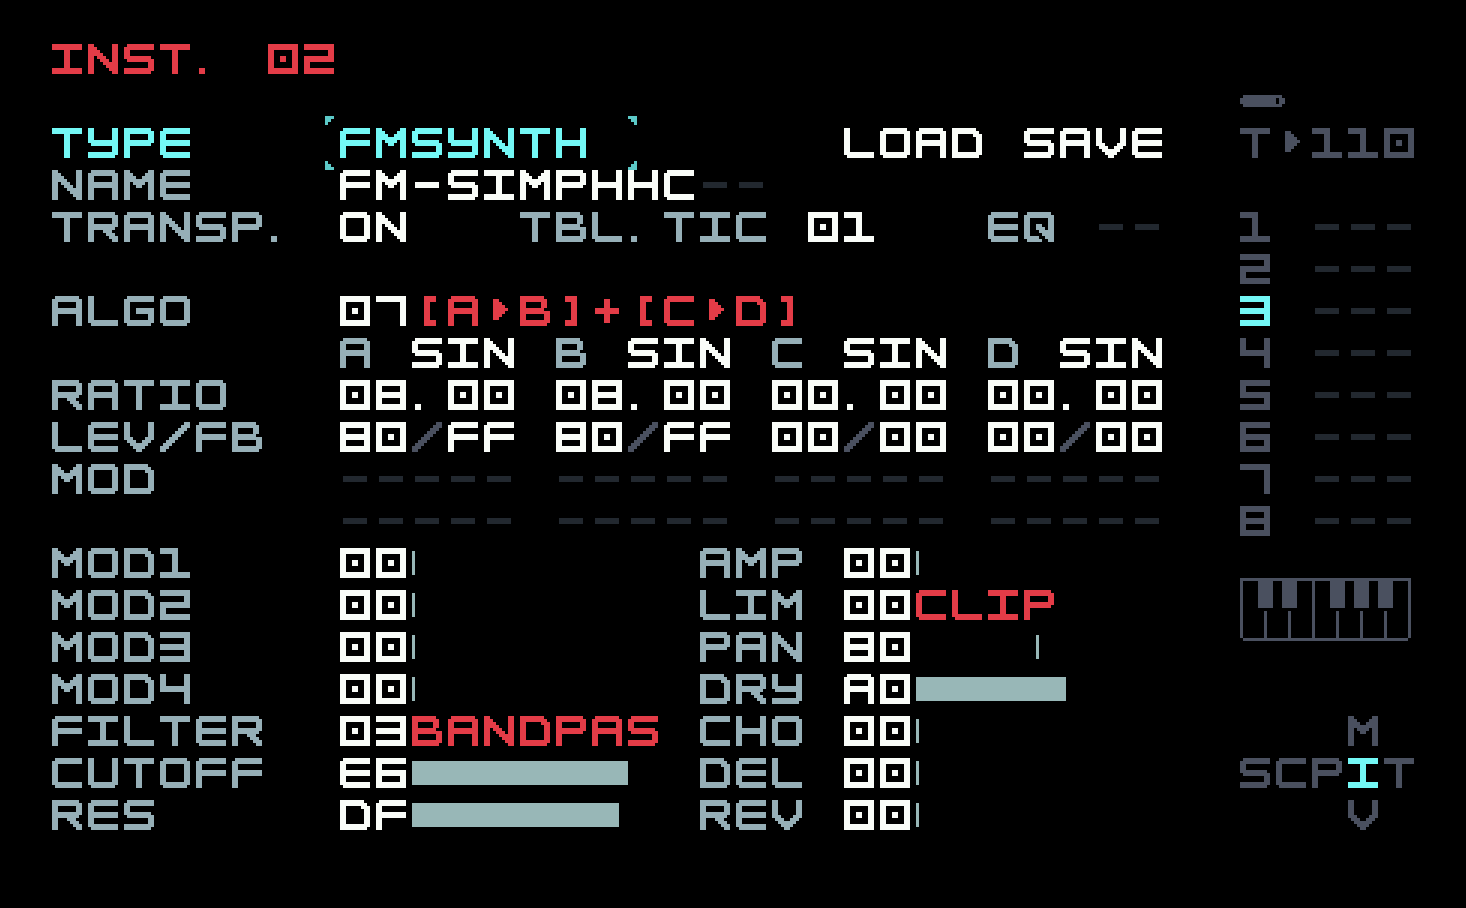
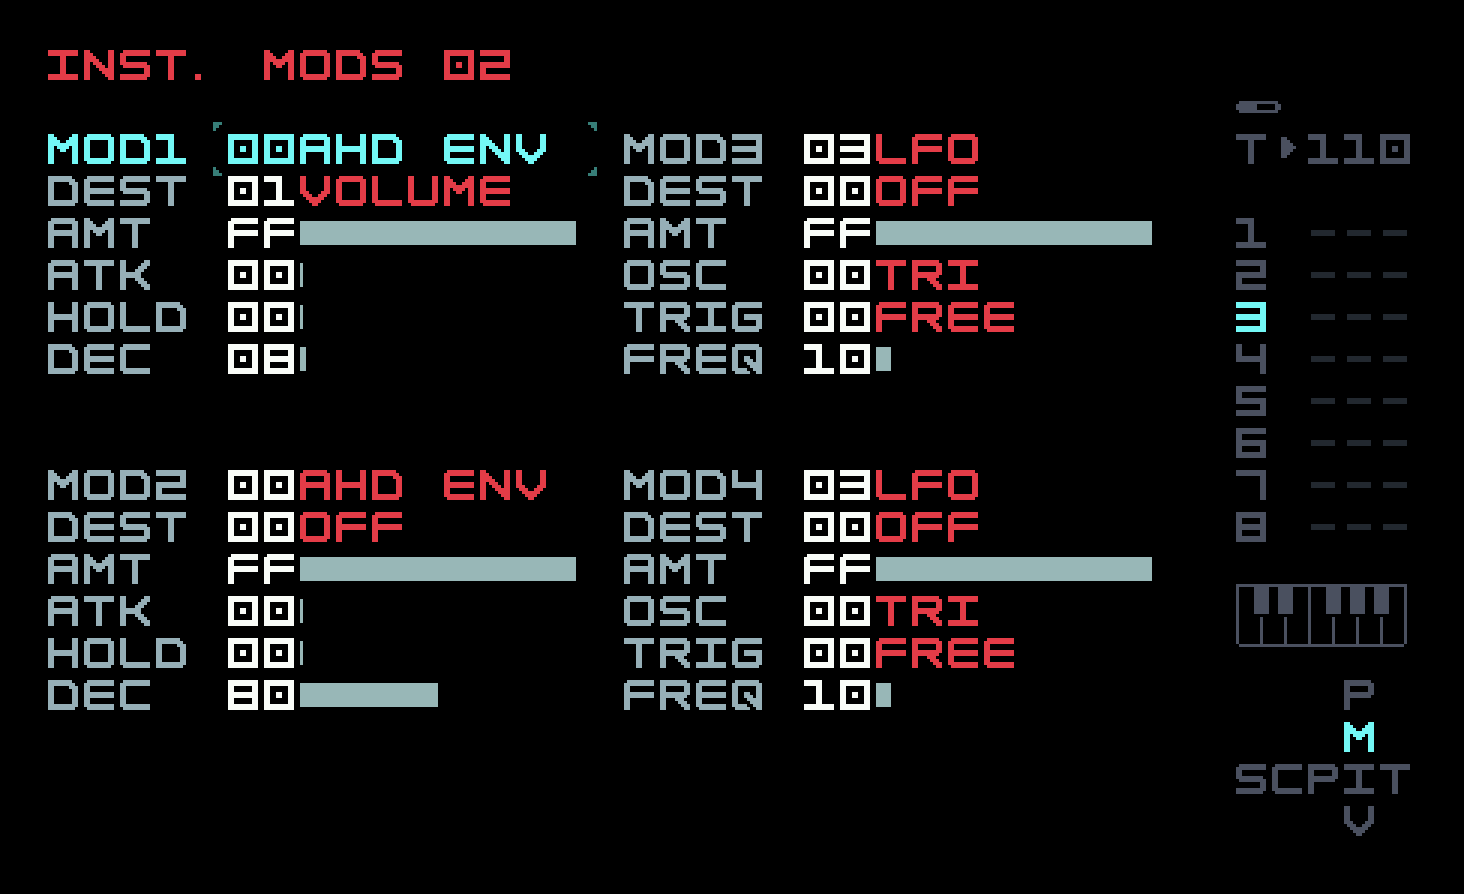
Note the use of a bandpass filter to focus the noise in a narrow high range. We’ve gone back to having the instrument modulator affect volume directly, rather than using an op-mod on carrier level. You can play with the parameters, but there is nothing much going on here. The technique used for making more metallic sounds on the next track can be brought back here if you want a more realistic cymbal sound.
In our first song, we just put a hi-hat hit on each note of a phrase. Here, the phrase is slightly more sophisticated, with some rhythmic and velocity variations, but it’s still just one phrase repeated four times in a single chain. You might choose to vary it more, or wait until we cover some probabilistic techniques in the next section, and bring those back for some random variation in velocity and timing.
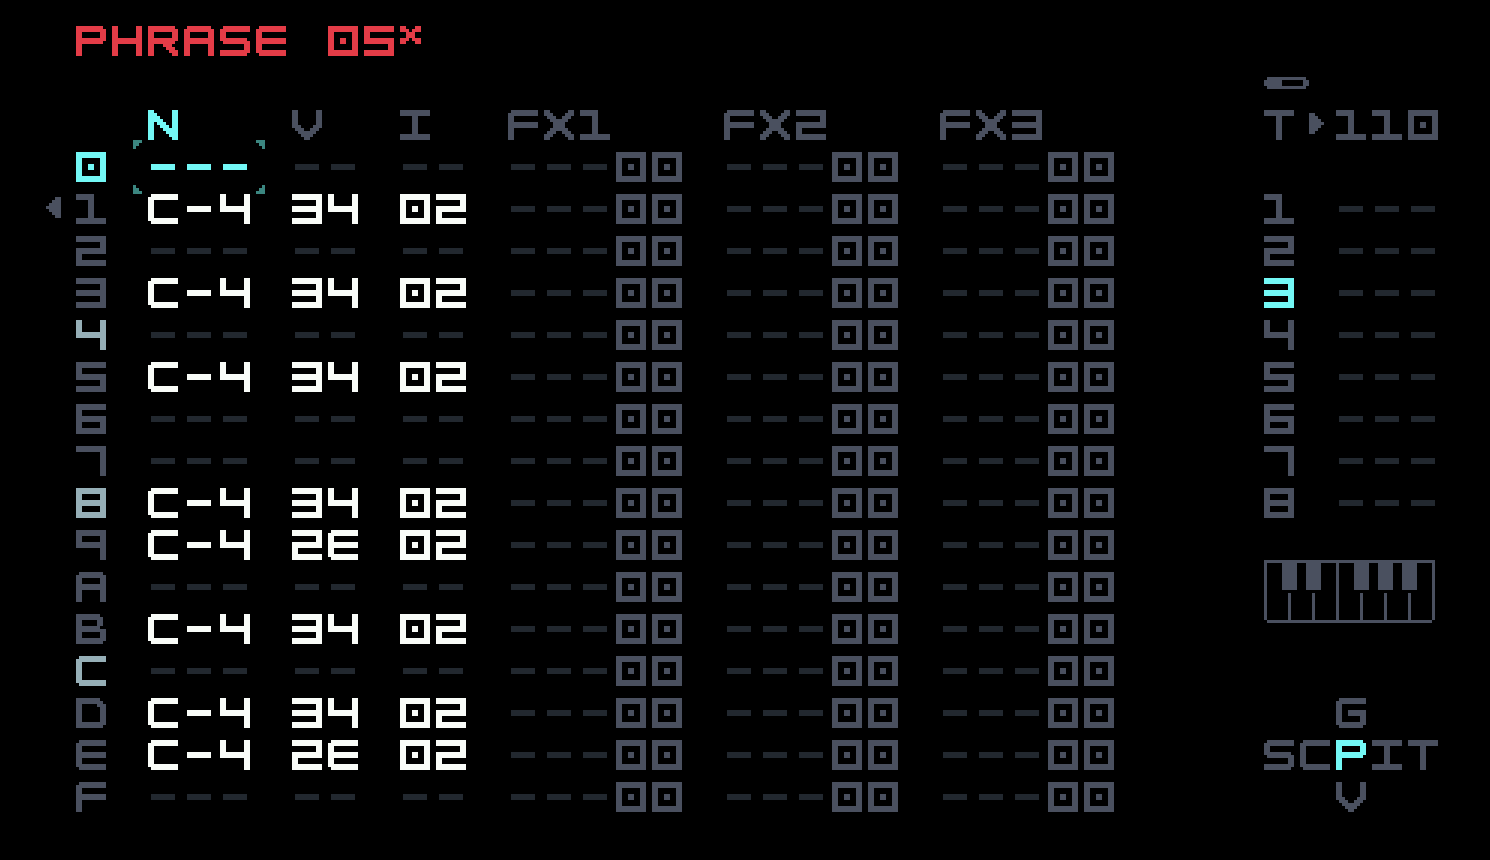
The bell on track 4 finally demonstrates one of FM’s advantages. This sound, as well as many metallic, woody, and percussive sounds, has an inharmonic frequency spectrum, which FM can produce with ratios that are not nicely related. Academic papers are usually written in bloodless prose, but it is hard not to hear the glee in Chowning’s voice from this single sentence in his original 1973 paper: "Bell-like sounds can be produced by making the change of the index directly proportional to the amplitude envelope." Index is Chowning’s term for the ratio of the modulator level to the modulator frequency (this plays a role in the mathematical analysis). So we can take the snare drum, turn down the feedback, set the modulator ratio to something that isn’t a whole number or small-denominator fraction, and send the op-mod to modulator level as well as carrier level.
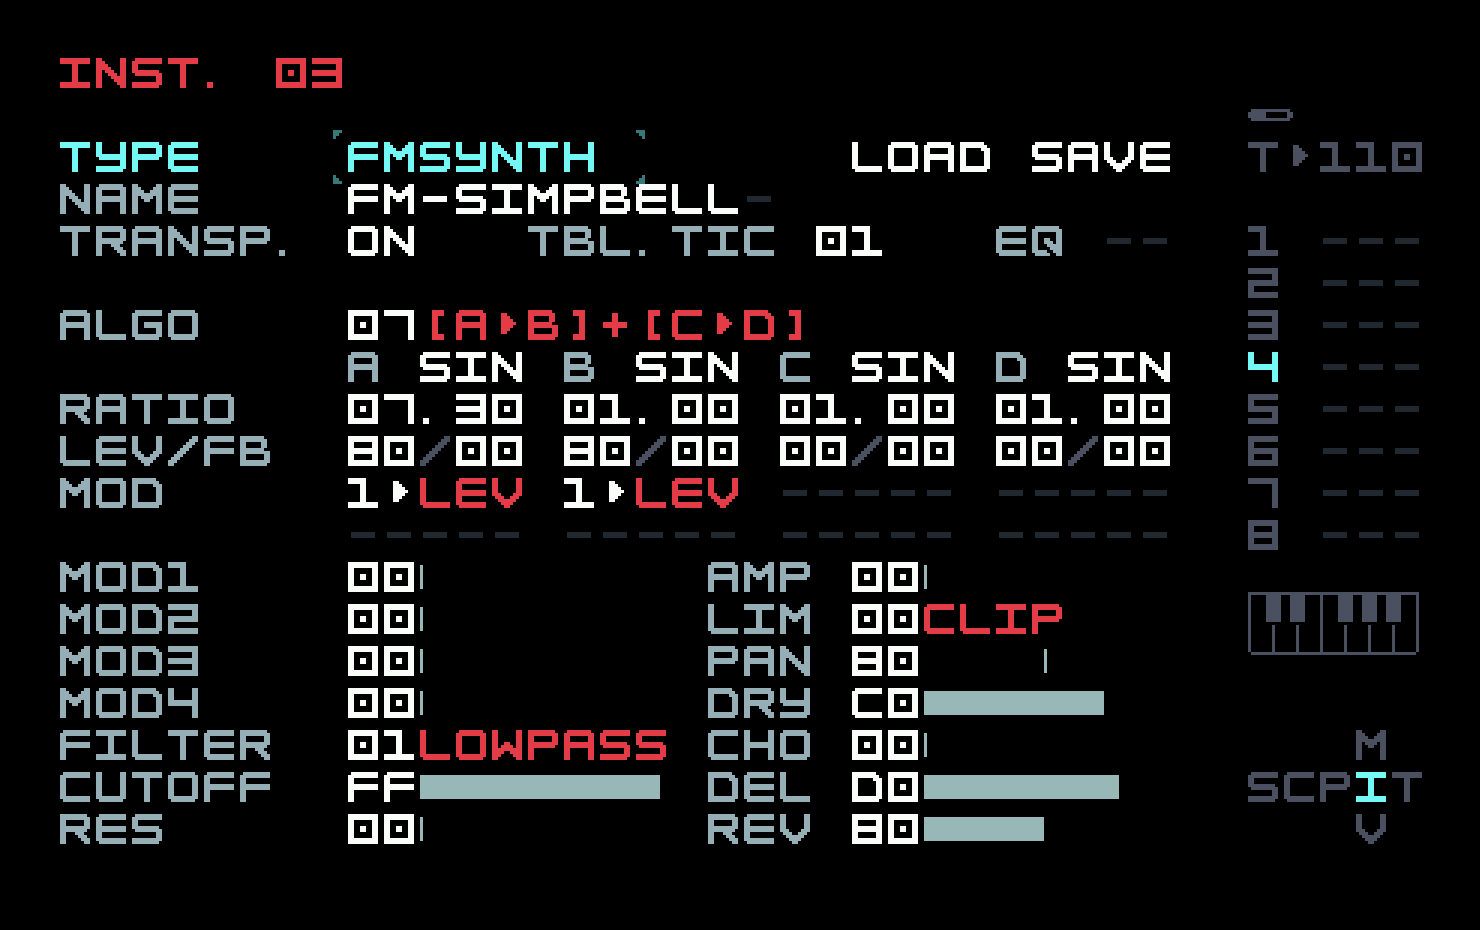
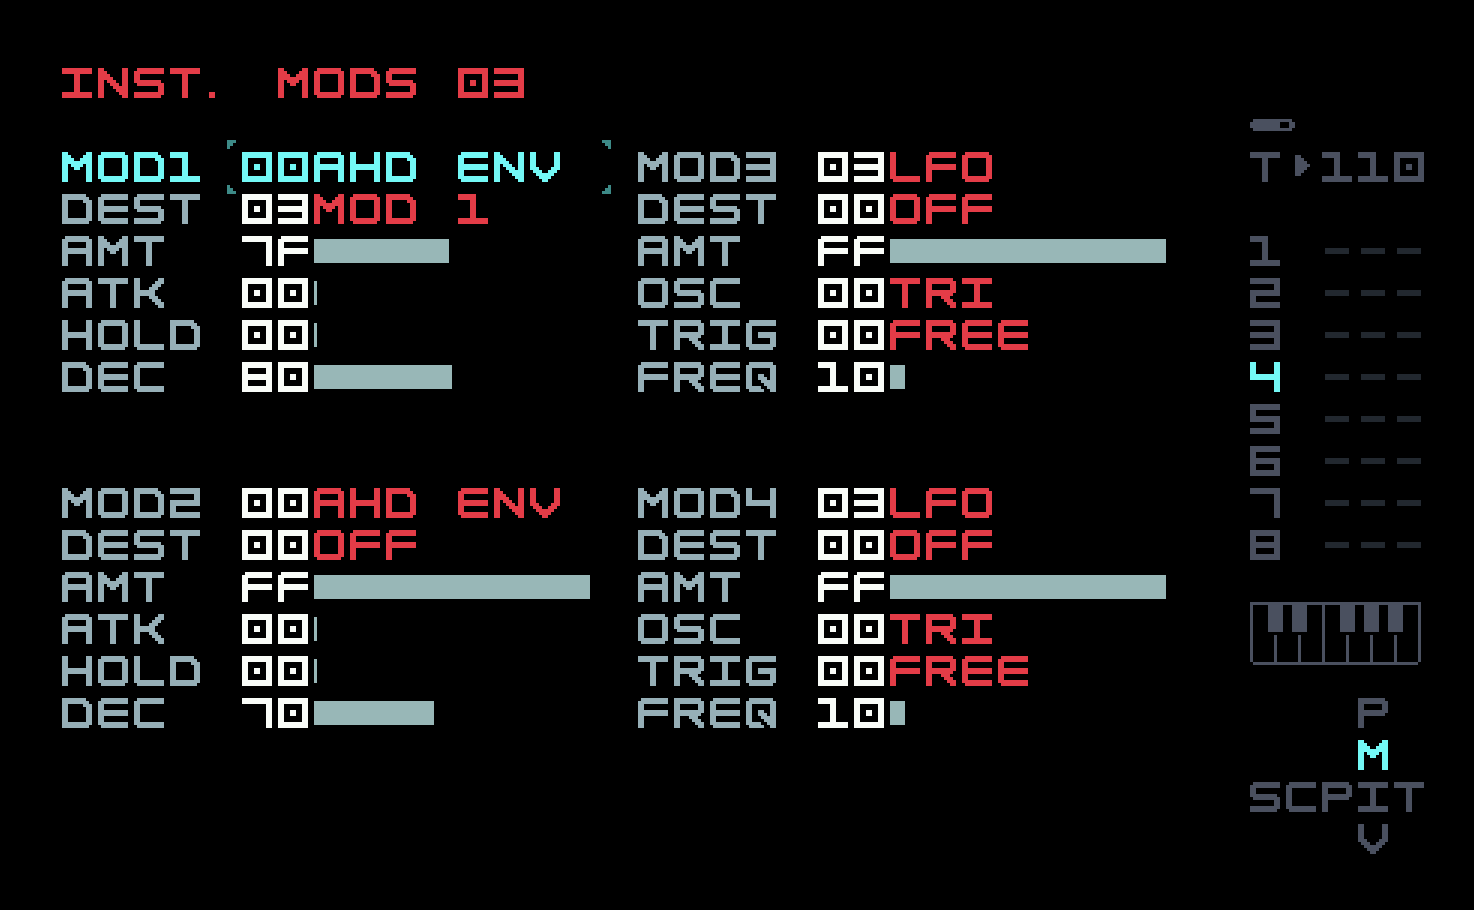
Here we see the advantage of using the op-mod as a volume envelope; we can reuse it as the modulator level envelope, leaving three instrument modulators free for other uses.
The phrases in the single chain on track 4 are quite simple. There are nonzero phrases on bars 3 and 4. Bar 3 has a single C-4 note, with velocity 44, on row 8. Bar 4 has a single G-4 note, with velocity 4B, on row 6.
We could write a whole chapter on inharmonic FM sounds, but there are lots of tutorials on this available on the Internet, so let’s move on.
4.3 Melodic elements
The four melodic sounds in tracks 5 through 8 are bass, dub stab, pad, texture. The adjectives used here are not all that accurate; arguably the bass is more rhythmic than melodic, and the bell from the previous section can probably be tuned better than the texture. We just needed to break up the development a bit.
In the analog world, bass is often enhanced with a "sub" that can be inexpensively generated as a square wave with half or quarter frequency of the main oscillator (one octave or two octaves down). The FM equivalent is a modulator with ratio 0.50 or 0.25, which adds in harmonics like a sub, but of course with sine waves. This works well, and FM basses are highly regarded. Ours is fairly simple, once again only using two operators.
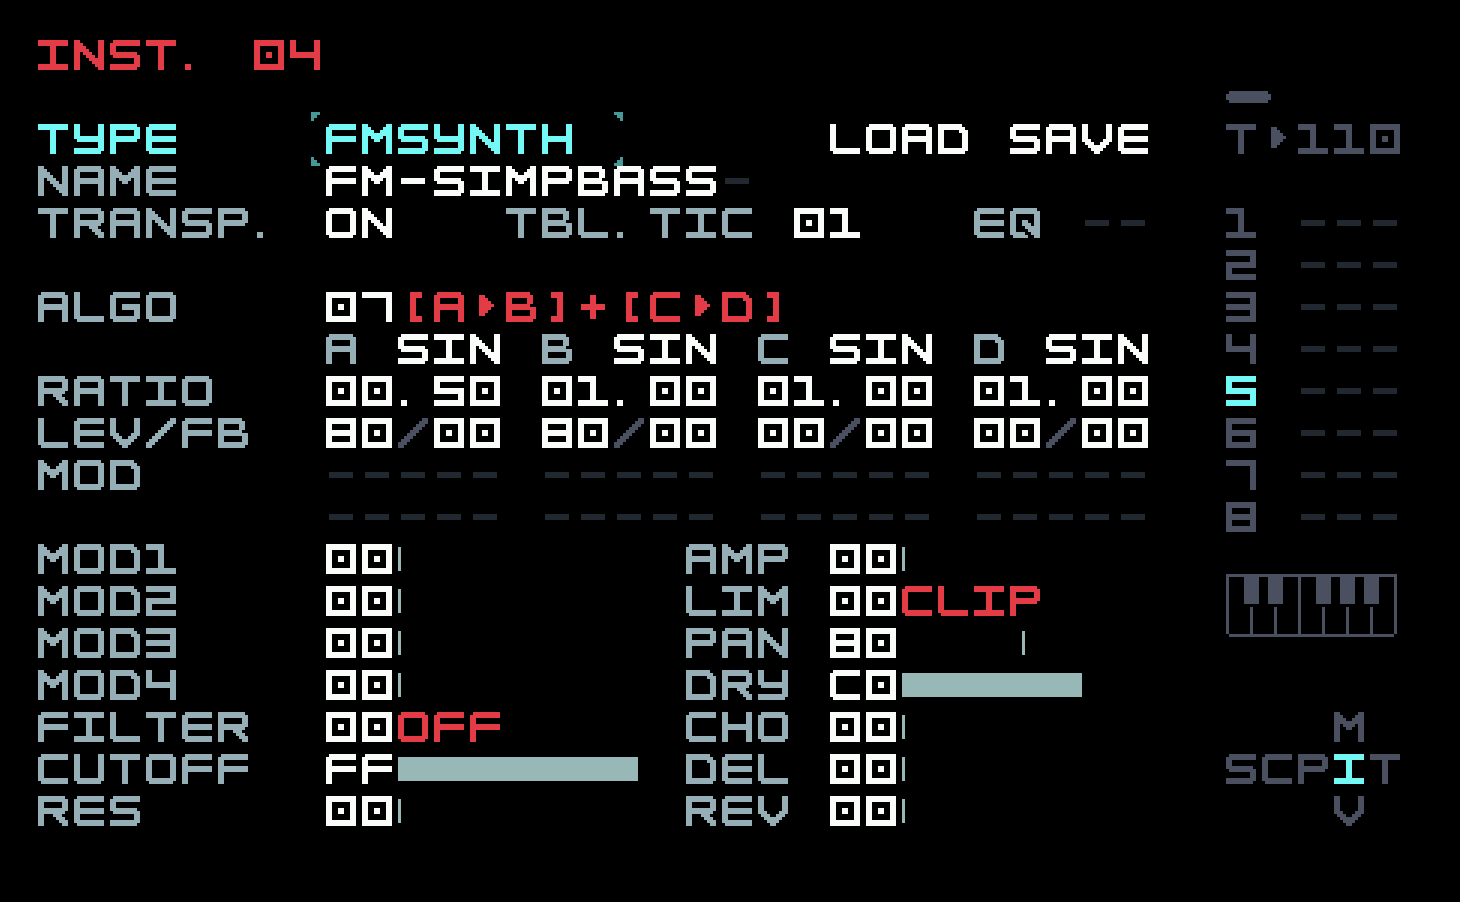
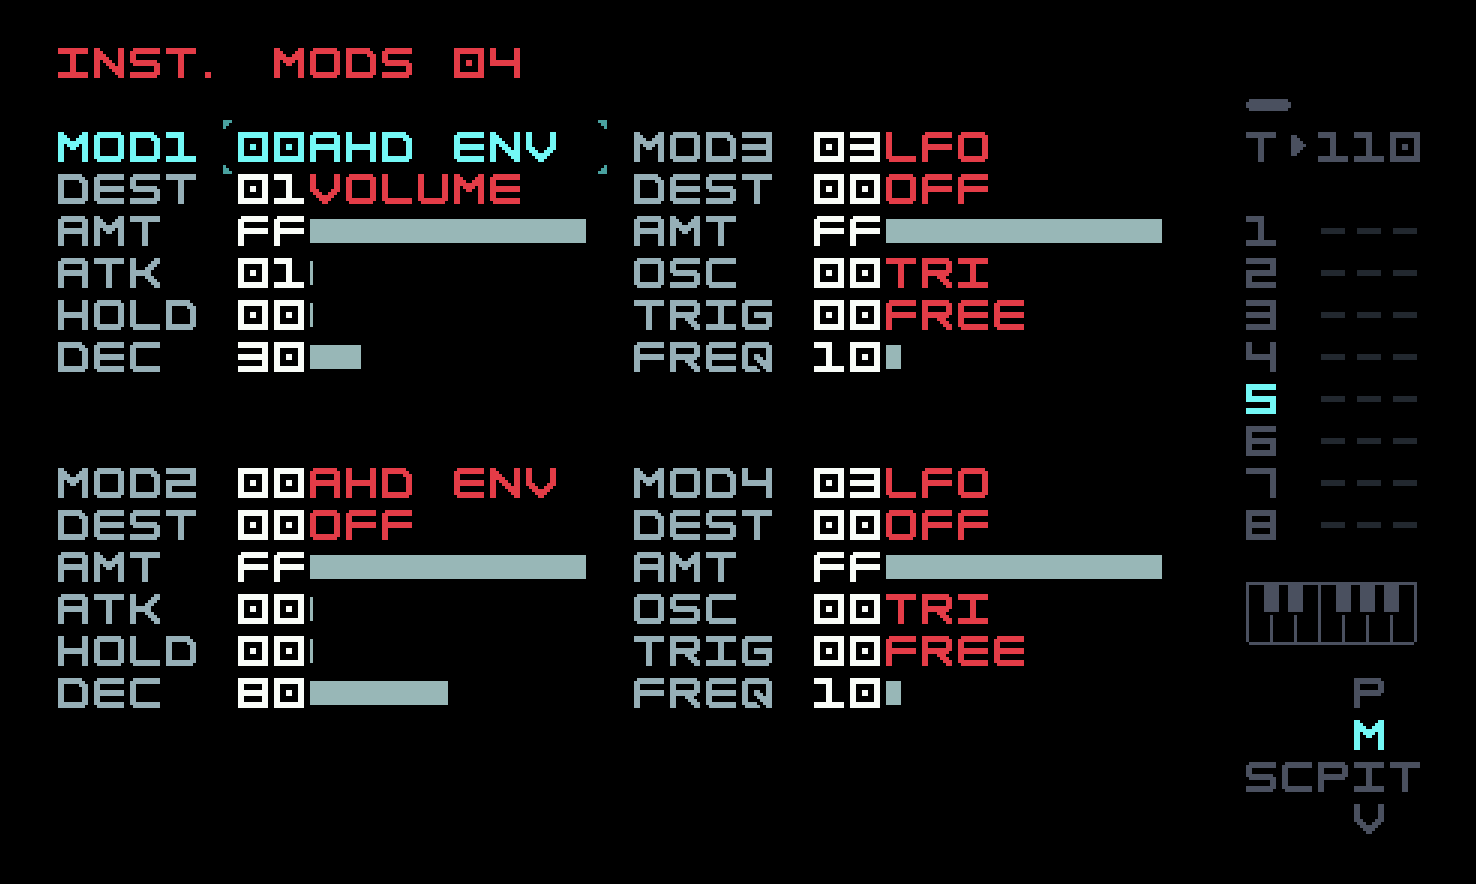
The chain contains a single phrase repeated four times.
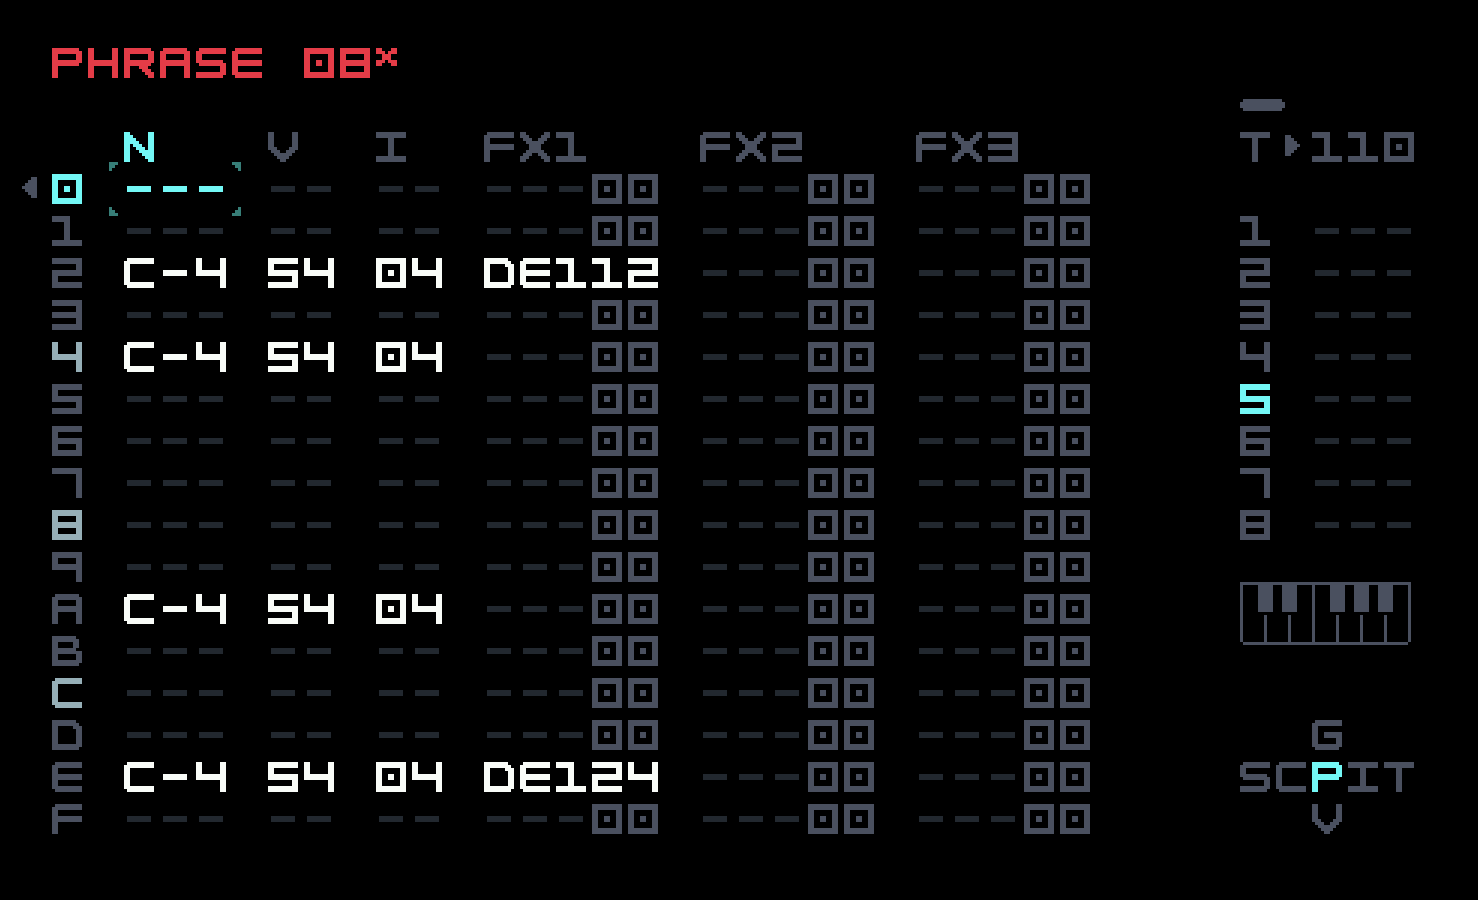
In listening to this, we noticed some periodic clicking. This was caused by the relatively long decay envelope. Sometimes a note following too closely would retrigger the envelope, causing a discontinuity that was audible as a click. Our solution was to use an FX command to shorten some of the delay envelopes enough to eliminate the clicking. You can hear the effect we strove to eliminate by deleting the DE1 commands.
Another source of clicking is an out-of-phase carrier (so it is at a nonzero value when a note is triggered) that is quickly activated by an envelope with attack 00. If you can’t eliminate the click with a softer attack, or you don’t want to use a softer attack (you are designing a percussive sound, for example), the FMP ("FM phase") FX command can help. This is really the only FX command specific to the FM Synth that isn’t connected to an obvious parameter. Setting this to zero could eliminate a click. Conversely, you might want to use it with a nonzero value to introduce a click, to accentuate the transient of a drum sound.
A dub techno stab is a short chord, usually minor, that is processed through filters, delay, and reverb. This is a fairly specific sound, but the techniques introduced here have more general applicability. We use algorithm 0B, described as A+B+C+D. In other words, we have four carriers, none of which can be modulators. Once again, there is no actual FM involved. We set the waveforms to SAW, since we’re going to filter the result anyway, and this gives us harmonic richness. The bass design in the previous chapter used a similar technique. We used a pulse wave, which is harmonically rich in a different way, and passed it through a modulated filter to sculpt those harmonics over time. This is known as subtractive synthesis, and it’s what we’re doing here as well, only with four simultaneous notes instead of just one. The DX7 famously had no filter; harmonics were added by FM, not taken away. But M8, by offering the same filter options in every sound engine, and a choice of waveforms in the FM Synth, blurs the line between subtractive synthesis and FM synthesis (as does the Digitone in a similar fashion).
But how do we set the pitches of the four notes of the chord? The base note will come from the phrase. We could look up the ratios for the others on the Internet. We already know, for example, that 1.5 will work for a fifth. There’s an easier way, though, which is to use an op-mod aimed at PIT (pitch), measured in semitones. We could use op-mod slots for each carrier, like this:
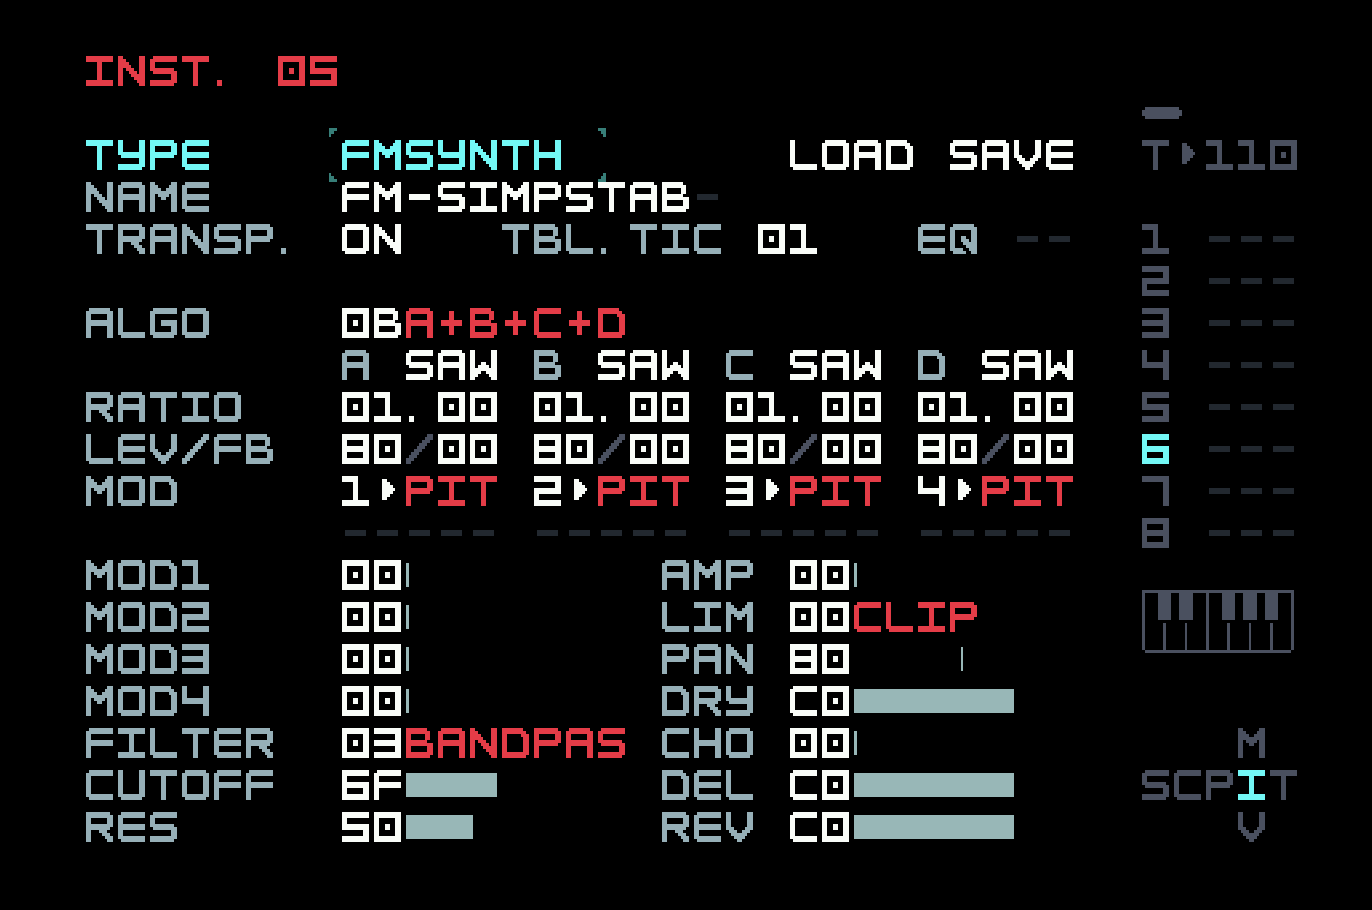
With this setup, changing the MOD2 amount to 03 will make the interval between carriers A and B three semitones, or a minor third. Similarly, MOD3 at 07 is a fifth, completing a minor triad. Since we have one more note to use, let’s be bold and add a ninth by setting MOD4 to 0D (14 semitones).
But if we do this, the instrument will always play a minor ninth chord. That could be fine, but it would be nice to have more flexibility. We can specify these settings using FX commands in the phrase, so if we wanted, this chord instrument can be used for any four-note chord. And that’s what we’ll do. However, there’s an additional complication. Three FX commands use up the whole row, and we want to make the stabs not trigger at times, randomly. We don’t have the command space to do that.
We’ll solve this problem in a moment, but first, let’s take a look at the instrument modulators.
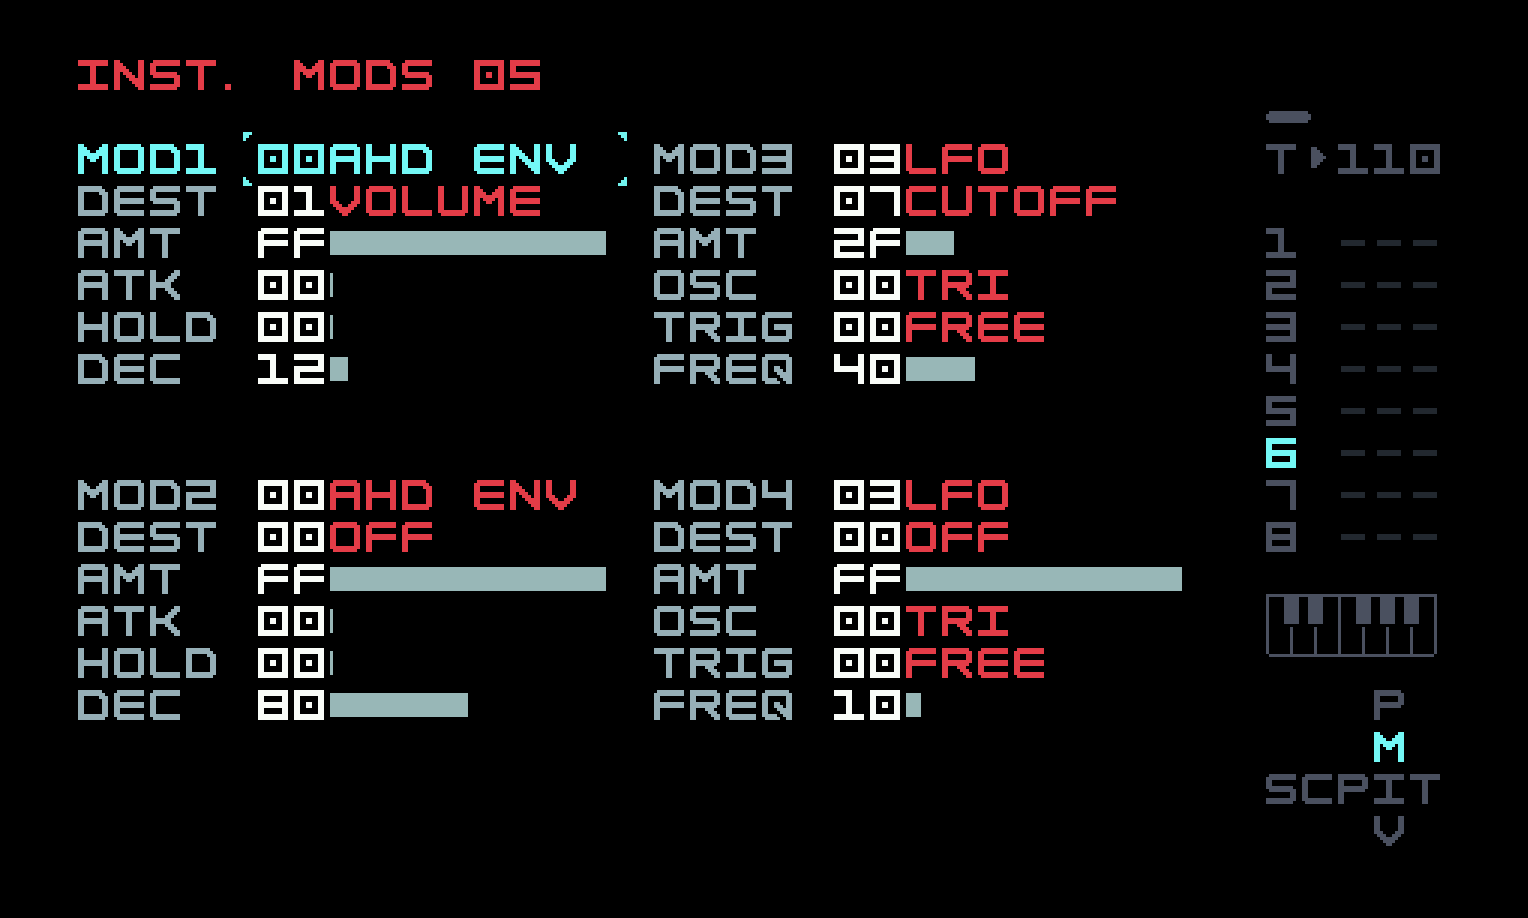
Besides the unsurprising volume envelope, there is a slow LFO on filter cutoff. Since we are using a bandpass filter, this will considerably alter the sound of stabs over time.
Now, about that squeeze on FX command space. Since we only need one more command for the randomness, one solution would be to nail the fifth down in the instrument, freeing up one slot. We wouldn’t have a general chord instrument, but it could do major and minor chords, with an added seventh, ninth, or whatever. But it couldn’t do diminished chords, which lower the fifth by a semitone, without using up that third FX command slot.
The more general solution is to use a table, which extends the use of FX commands. A table can be thought of as a parallel sequencer running at tick speed (remember the default is six ticks to one step in a phrase). Each instrument has an associated table which starts running with each note, but there are 128 instruments and 256 tables, so tables 80 through FF are not associated with any instrument and can be used with a TBX (auxiliary table) command, allowing for selective use of a table, or use of different tables with the same instrument. We’ll put the chord specification into the first unassociated table, leaving two slots free in the note’s row in the phrase, for further modification there.
The table associated with an instrument is at the end of the minimap, in Table View, and you have probably accidentally encountered it by now. It’s a little trickier to get to the unassociated tables. You have to put a reference to the table in a TBX command, and then, with your cursor on that value, use [SHIFT]+[RIGHT] to move to Table View for that table.
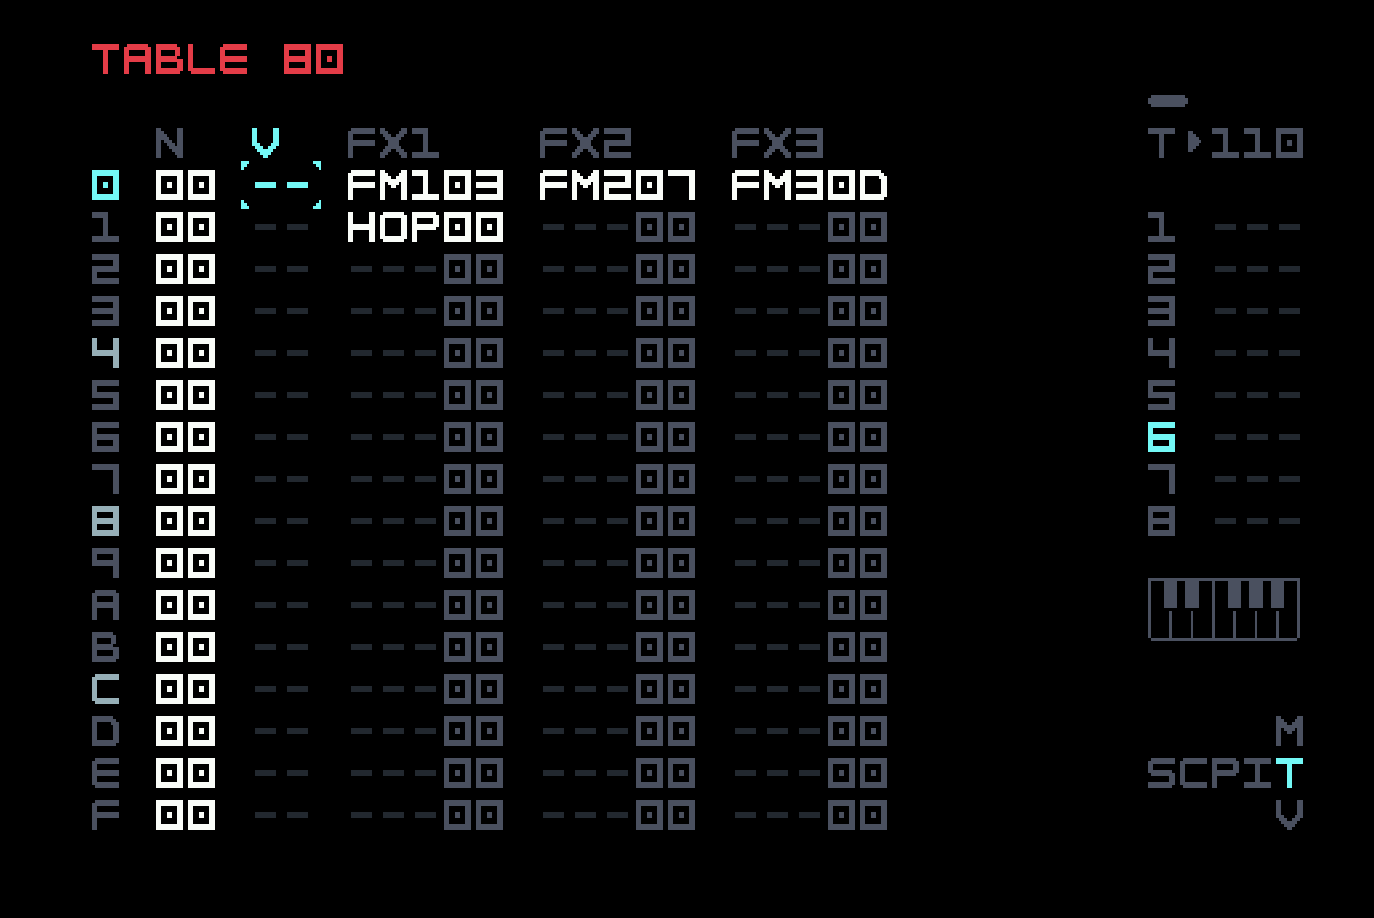
The THO01 (table hop to line 01) in line 01 of the table has the effect of stopping the table, so the FM commands remain in force for the duration of the note. In other words, we’re not really using the sequencing capability of this table. It’s just a place to put more FX commands to take effect as the note is triggered. In a later chapter, we’ll go into more detail on various uses of tables.
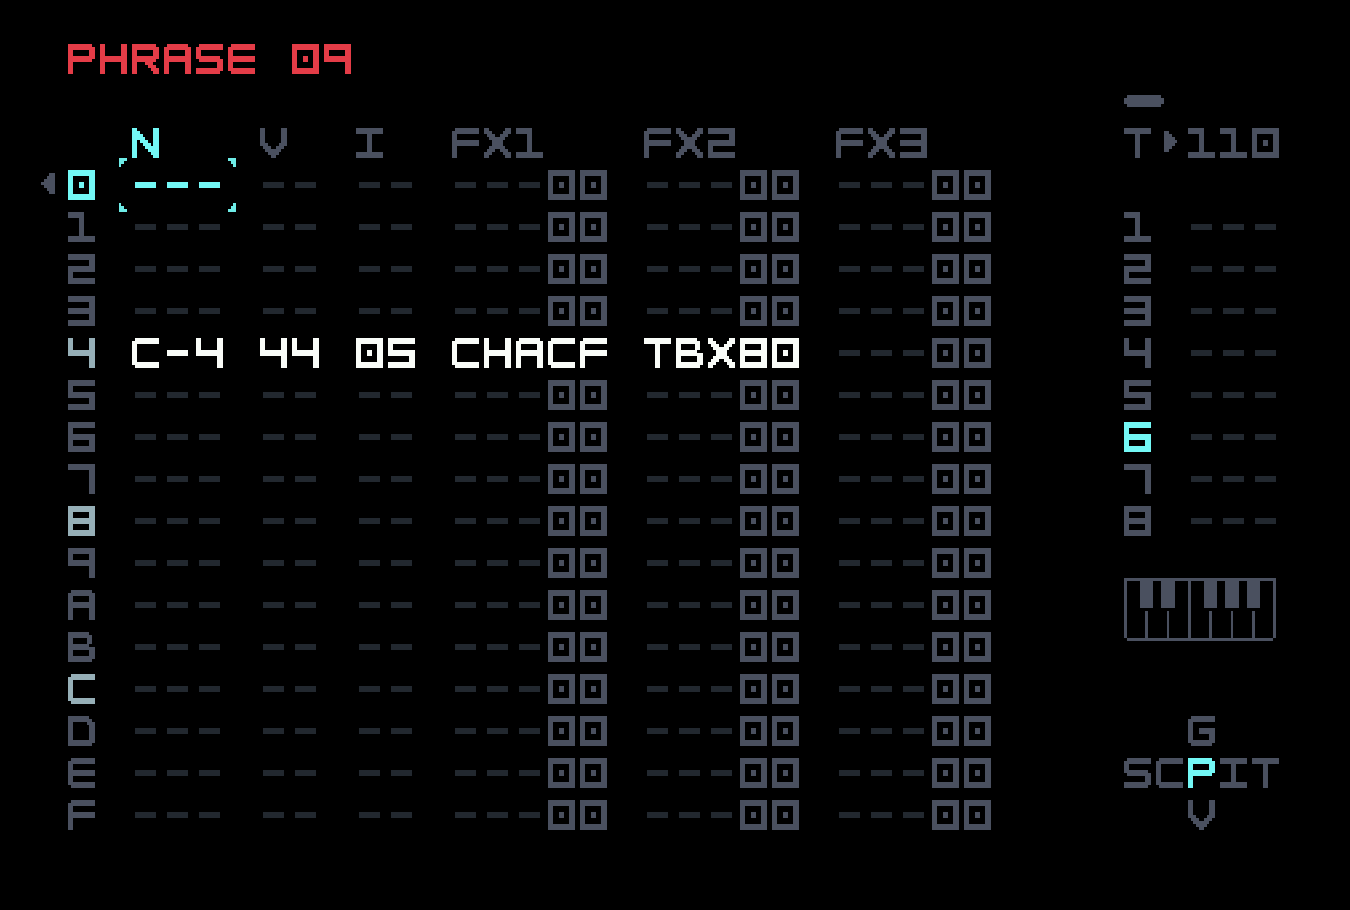
In the first phrase of the chain, we’ve used TBX to run the auxiliary table, but also CHA CF for the randomness. The CHA command has separate measures of randomness that apply to the left and to the right of the command, specified by the left and right digits of the value. F means that the TBX command is always run but C means that the note to the left will trigger on average 80% of the time. The help text at the bottom explains the effects of the chosen digits when you edit the value.
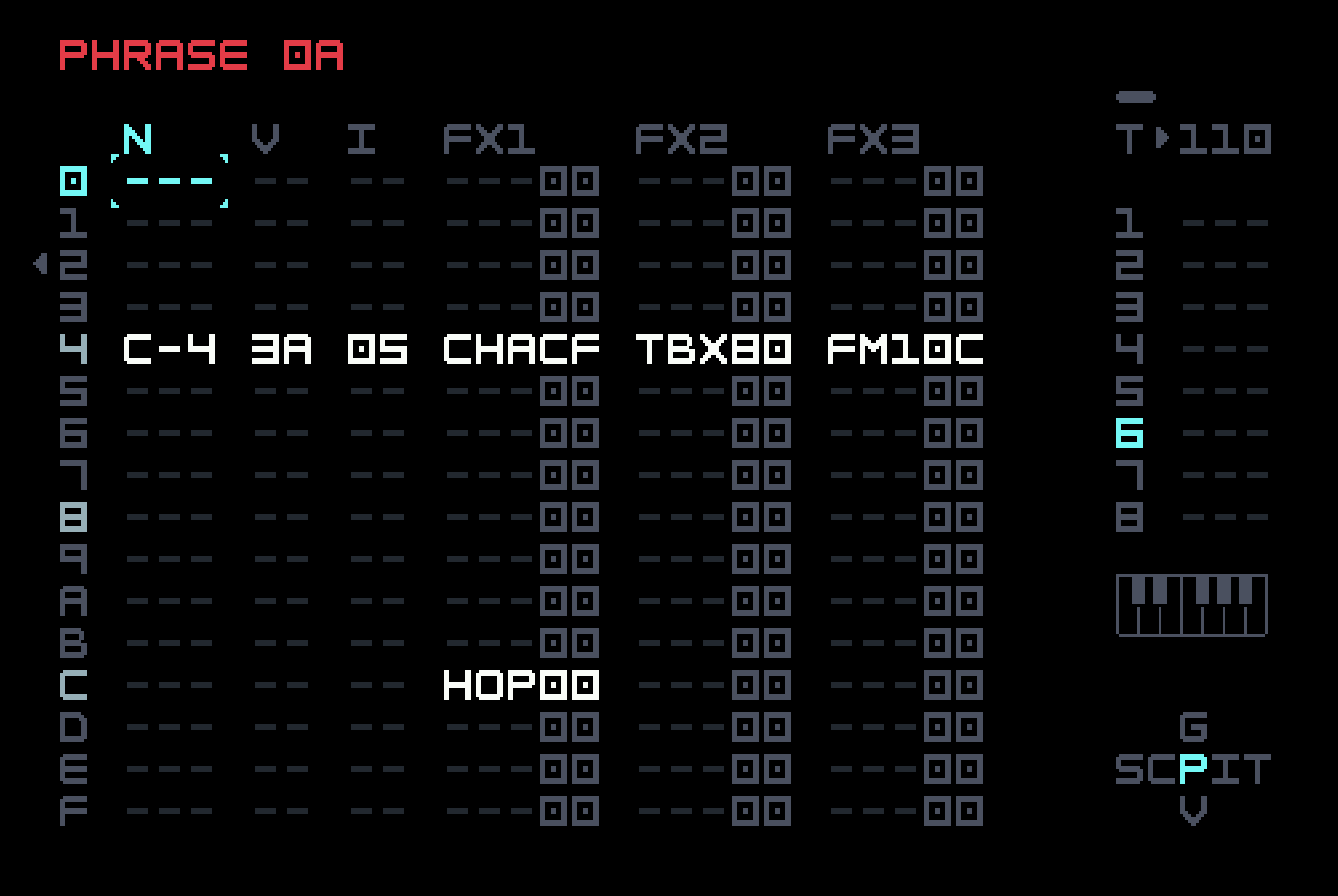
The third phrase of the chain (the second and fourth are empty phrases) looks similar, but has two additional commands. One, on the same row as the note, raises the root note of the chord by an octave (12 semitones), in effect playing the first inversion of the chord. This is not as noticeable as the LFO on the bandpass filter; we just did it for demonstration purposes.
The other addition is a HOP 00 command on row C. HOP in a phrase will jump on the next step to the specified row of the next phrase in the chain, or, if the first digit is nonzero and the second specifies a position above the command, it will loop that many times. We’ve used it here to cut the chain short by one beat, so the dub stabs won’t show up at the same point in each four-bar chunk. This is a general way to implement polymeters, or loops of different length playing in parallel, which can be very effective in increasing the sense of variation. The downside is that if we extend the song with multiple rows, this track will no longer have its playhead synchronized to the others. If you do this extension, you might want to reconsider this choice. We tried this with the bell, but it didn’t work as well. The bell sounds better in lockstep with the other elements.
While we are in Phrase View, this might be a good time to mention that we have added swing. Musically, this consists of slightly lengthening some notes, or delaying the following notes. If you imagine a piano playing a steady stream of eighth notes, and then you slightly lengthen every other one but shorten the following note so the tempo does not change, you will have swing.
The implementation in most electronic music devices is somewhat curious. Because they are based on sixteen steps in a bar, the swing setting will lengthen steps 0, 2, 4, and so on, while shortening steps 1, 3, 5, and so on. They are swung sixteenths. But if you work in eighth notes, as we have mostly been doing, this will have no real effect. Rather than a single setting like this, M8 provides the more general mechanism of groove tables, which can be used for other purposes as well.
The default groove table is 00, and you can get to it from Phrase View by navigating upward (you can see the G in the mini-map).
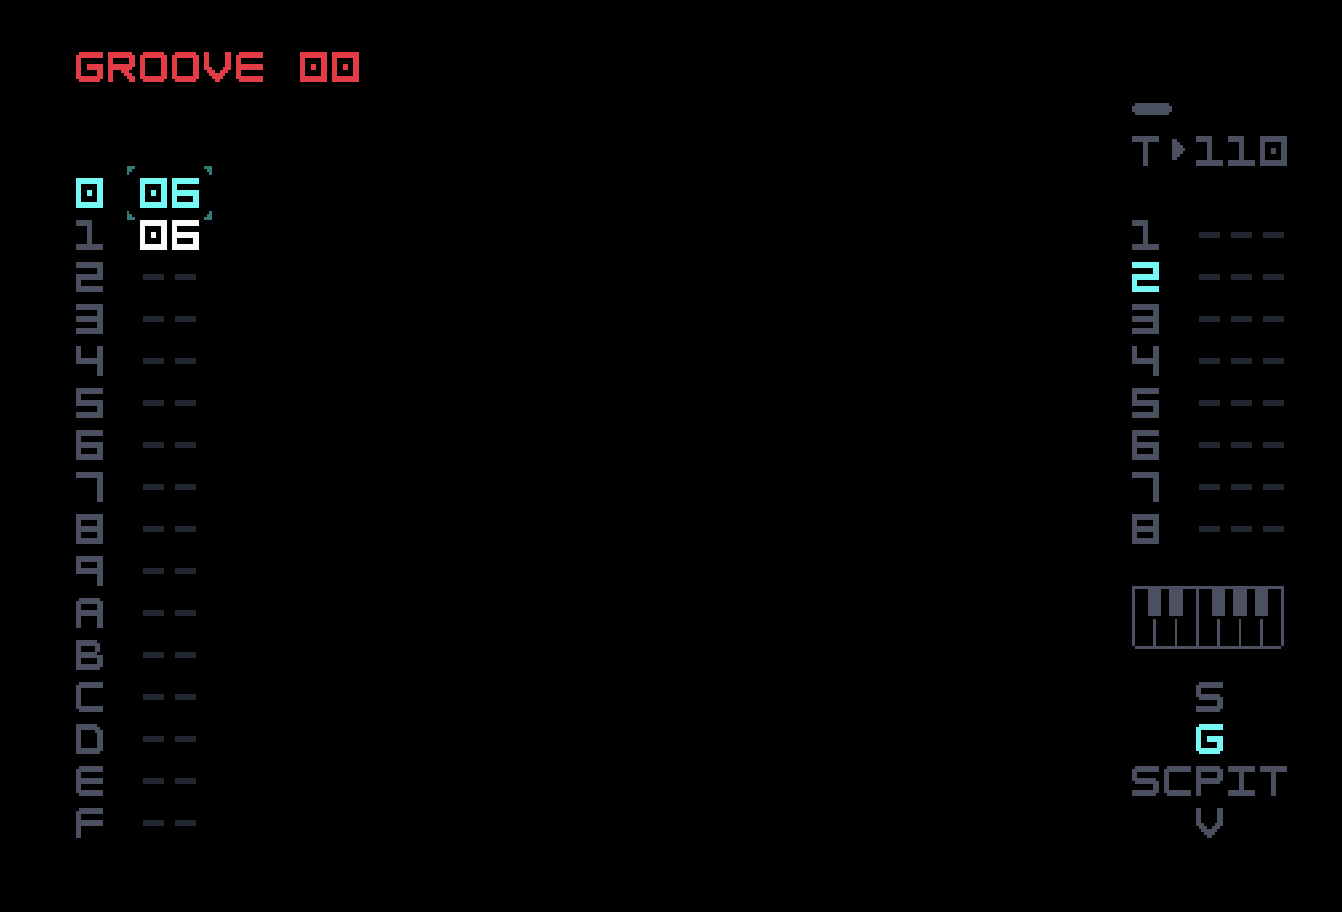
Each row in the groove table represents a number of ticks in a step at the default PPQ setting of 24. This setting (and the computation of swing percentage) was added in firmware 6.5; PPQ is short for PPQN (pulses per quarter note), a standard unit of measure of time relative to a tempo. We’ll keep it at 24 for now, and discuss other options soon. The sequencer progresses through the table, one row for each step, and loops back to the beginning on encountering an empty row.
The reason there are two 06 entries instead of just one for the default six ticks per step is to facilitate a quick application of the kind of swing discussed just above. With the cursor on the first row, [EDIT]+[UP] will increase the first row to 07. To keep the groove table aligned with the phrase, we use [EDIT]+[DOWN] to decrease the second row to 05. With each of these edit steps, a calculation of total ticks per phrase flashes at the bottom of the screen, to help you with the math. This results in swung sixteenths, within the tick resolution of the M8, with a swing percentage of 58.8%. (Many other devices, lacking a general mechanism like groove tables, set swing by altering the percentage directly.) You could make it more extreme with an 08/04 setting.
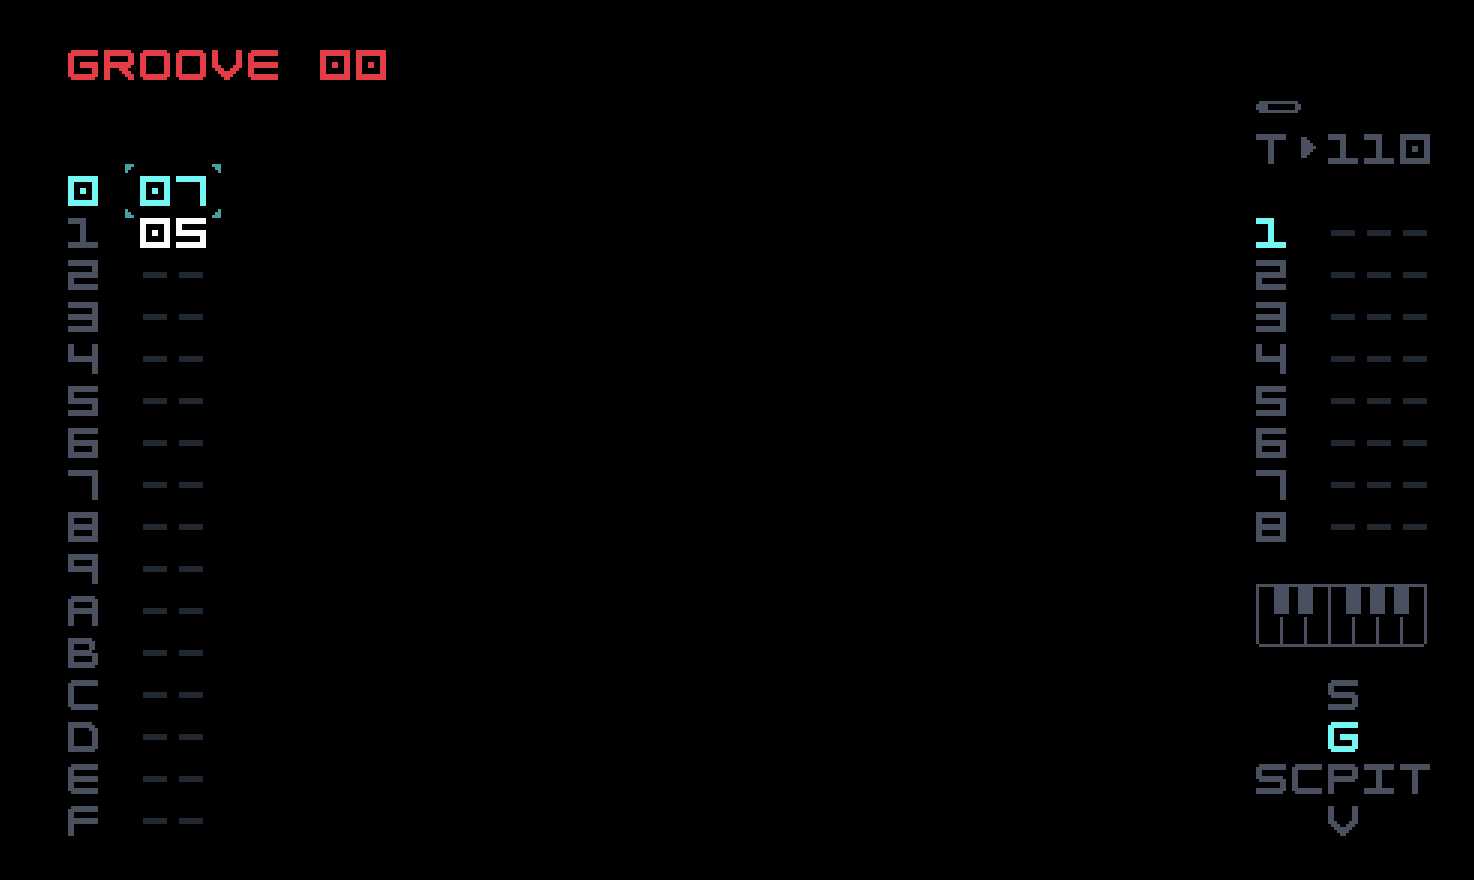
This won’t do much to our sounds so far. To get swung eighths (with a noticeable effect on the bass), we used the following groove table.

Each track can have its own groove table, set with the GRV FX command. A groove table with a single row containing 03 will play at twice the speed set by the BPM; similarly, 0C will play at half speed. The M8 manual has an appendix with some other groove examples. This is the way to get out of 4/4 time, if you want that.
The change between the first two groove tables above is fairly noticeable, and one might want to be even more subtle. This is where the PPQ parameter comes in. The other settings keep doubling the resolution, from 24 PPQN to 48, 96, and 192. This allows more fine adjustments. For example, with PPQ at 48, we could even out the treatment of sixteenth notes within the swung eighths above, if we wanted. 07 and 06 in the first two rows (at PPQ 24) correspond to 14 and 12 at PPQ 48. These could be replaced by 13 and 13, if we wanted, and a similar adjustment made (or not) to the third and fourth rows. The computed swing percentages reduce the amount of mental math required.
Don’t forget that the DEL command will delay any individual note by some number of ticks. The microtiming MTT command (introduced in firmware 6.5) allows fine adjustment of timing both backwards and forwards, with a resolution of 1/48 step (192 PPQN, regardless of groove table setting) and a maximum change of one step.
This non-FM use of algorithm 0B (A+B+C+D) is the easiest and most flexible way to get four-voice polyphony on the M8. This capability was expanded considerably in firmware 5.0.0 (released February 2025), which permits operator waveforms to be chosen from the wavetables added to Wavsynth in firmware 4.0.0. Wavsynth has a SCAN parameter which scans through the wavetables; in FM Synth, the FB (feedback) parameter is repurposed to do this. Firmware 5.0.0 also lets the width of the IMP ("impulse") waveform be varied by the FB parameter, permitting the classic and attractive technique known as pulse width modulation (which is also available in Wavsynth and Macrosynth).
Track 7 has a pad. We used Hypersynth for this in the previous chapter, and we could do something similar with algorithm 0B, using finer detuning rather than spreading the carriers out into a chord. You might find yourself using this instead of Hypersynth on occasion, since FM Synth has more control over waveforms. But we’re supposed to be demonstrating uses of frequency modulation, so let’s go with algorithm 08, which has one modulator in common for three carriers.
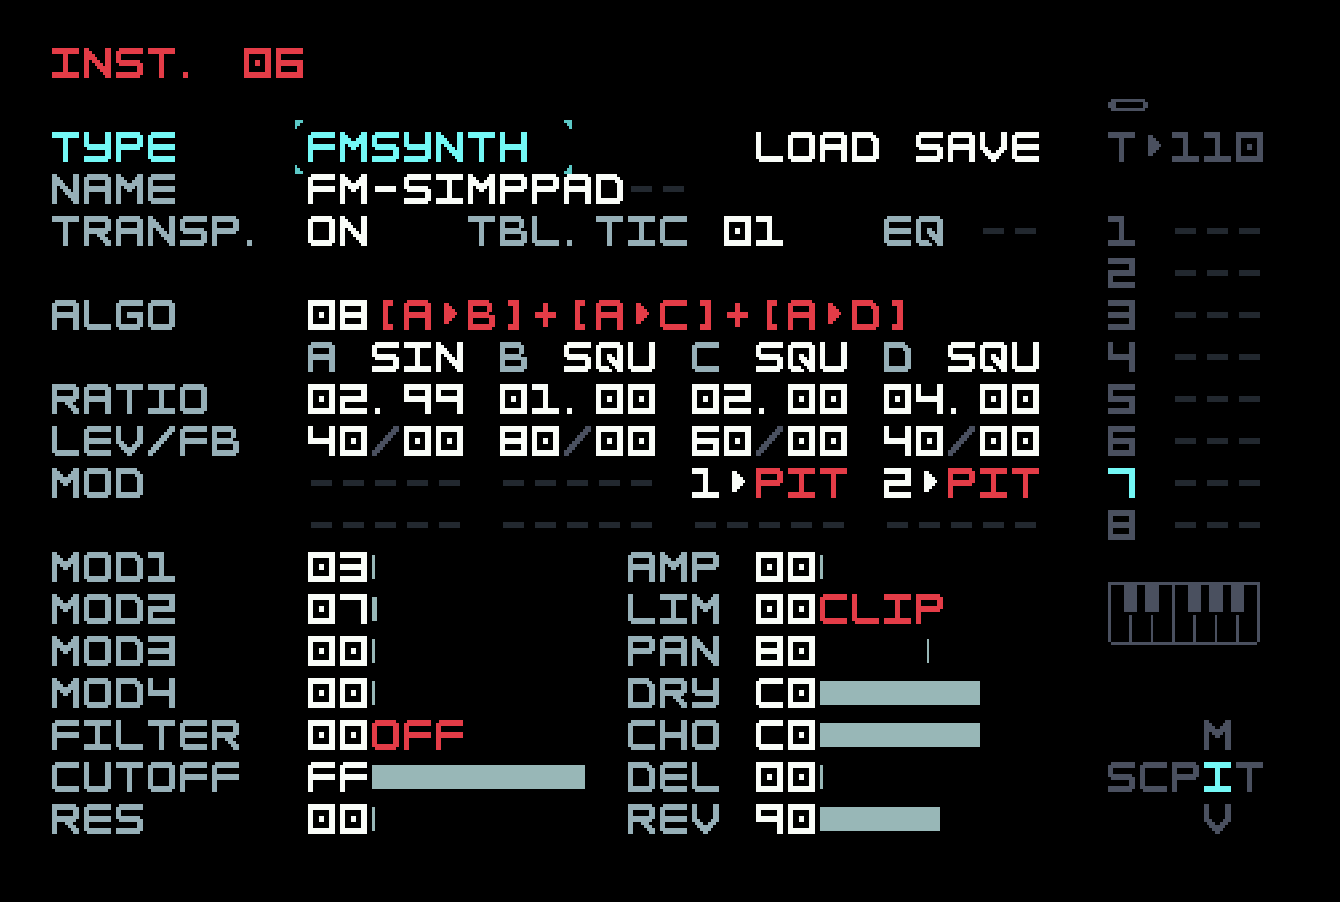
The carriers are tuned to a minor chord and then spread across three octaves, and the modulator is slightly detuned. Detuning the carriers didn’t seem to work as well, but you may find a setting more to your taste. The sound is thickened a bit with the chorus effect, and of course reverb is added.
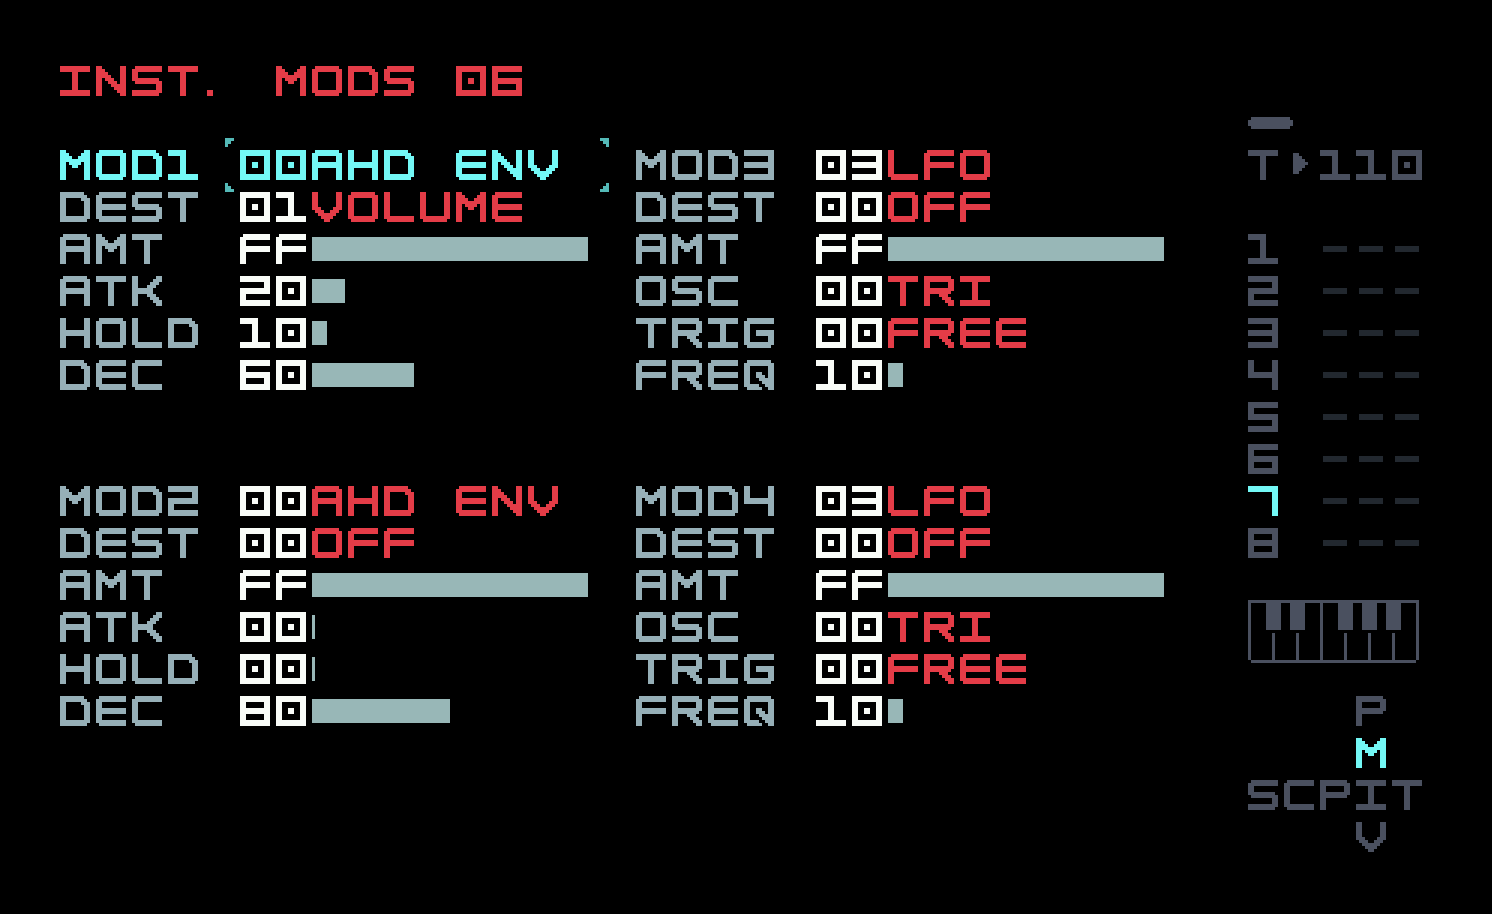
Our previous pad played continuously, with a slow volume rise and plateau created by FX commands. Here we use a slow AHD envelope. There is only one triggering note, in the fourth bar of the chain, a C-5 in the first row with velocity 18 and a CHA 80 command in the FX1 column, so the pad sounds with 53% probability.
This pad sound is the first one we have designed with both FM and a non-sine carrier (three squares in this case). Generally speaking, the more complex the carrier waveform (even with 2-op FM), the noisier the result, and this is even more the case with non-sine modulators. One interesting use of a non-sine carrier arises by setting its ratio to 0. This means that the carrier does not oscillate at all on its own; any change in it is due to the phase modulation from the modulator. If we view the waveform as the graph of a function, this applies that function to the modulator, and the result is what we hear as the carrier’s voice. For example, if the carrier is a saw wave, it is the graph of the function y = x, so the modulator is passed through unchanged. But choosing another waveform for the carrier will have an effect. Setting the carrier ratio to 0 makes it into a waveshaper. Using some of the wavetable options introduced in firmware 5.0.0 can be quite effective.
Finally, on track 8, we have a texture, which would fit into the factory content in the folder labelled FX, in this case meaning sound effects that don’t fit neatly into the other more musical categories. We have a free hand to design this, and since it’s supposed to be something unusual, let’s go for algorithm 02, which has two parallel modulators (one a stack of two operators) and only one carrier. We just changed values until it sounded interesting, like an insect flying by on a peaceful summer day.
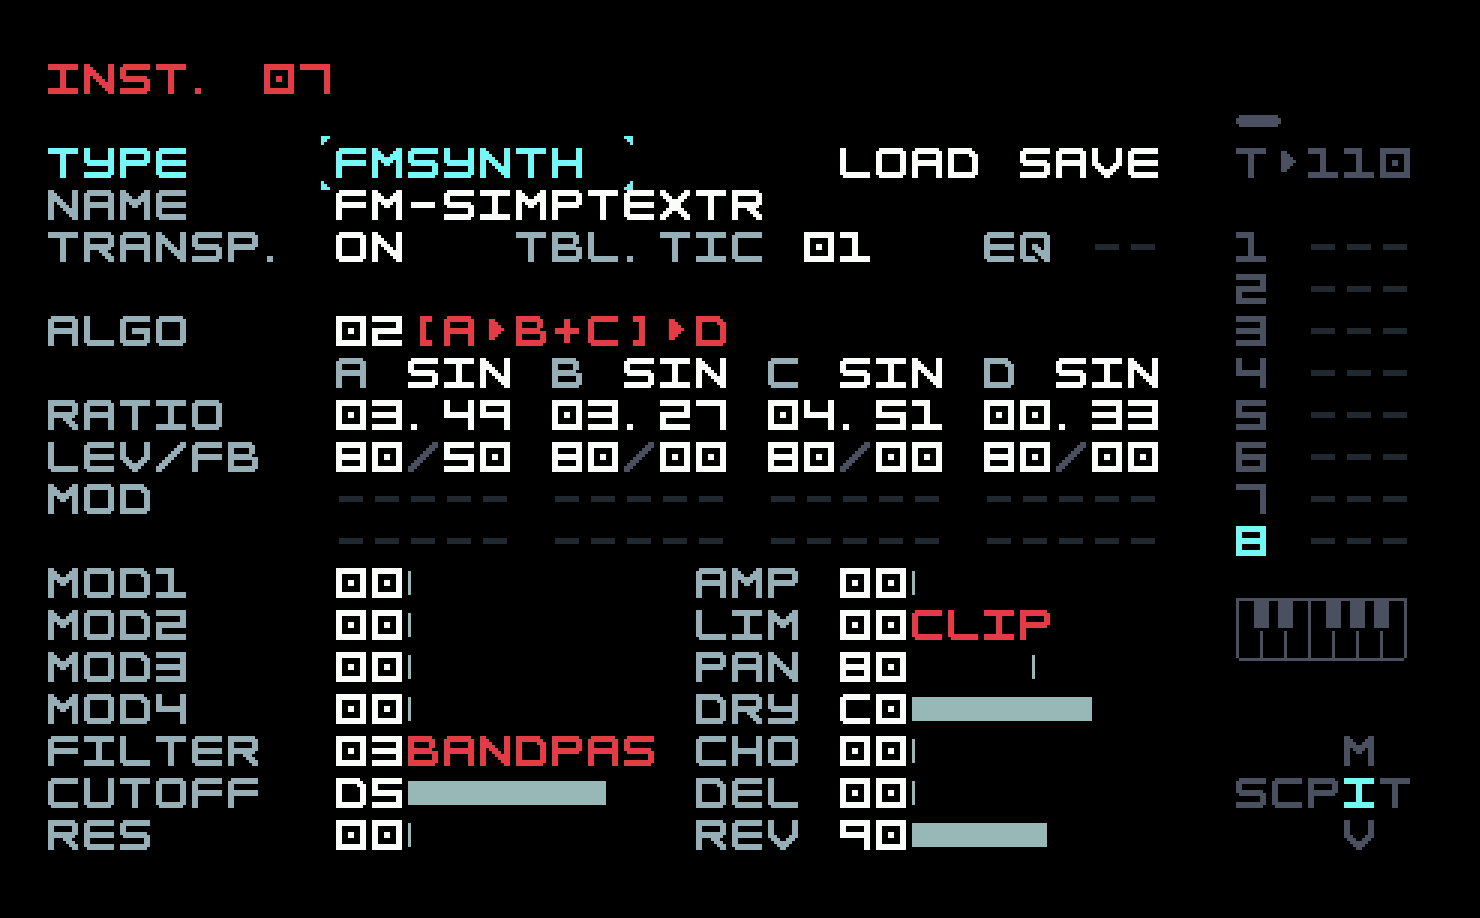
Besides the usual volume envelope, there is an LFO on pan (left-right position in the stereo field), with the LFO type set to random. We haven’t done anything with panning so far; our instruments have been in the centre, with some stereo imaging provided by the ping-pong delay and the reverb. We could go back to the other tracks and reposition or automate panning for some of them. Generally, bass and kick should be centred. Similarly, we could use a random LFO in some other places, for example, on the filter cutoff for the stabs.
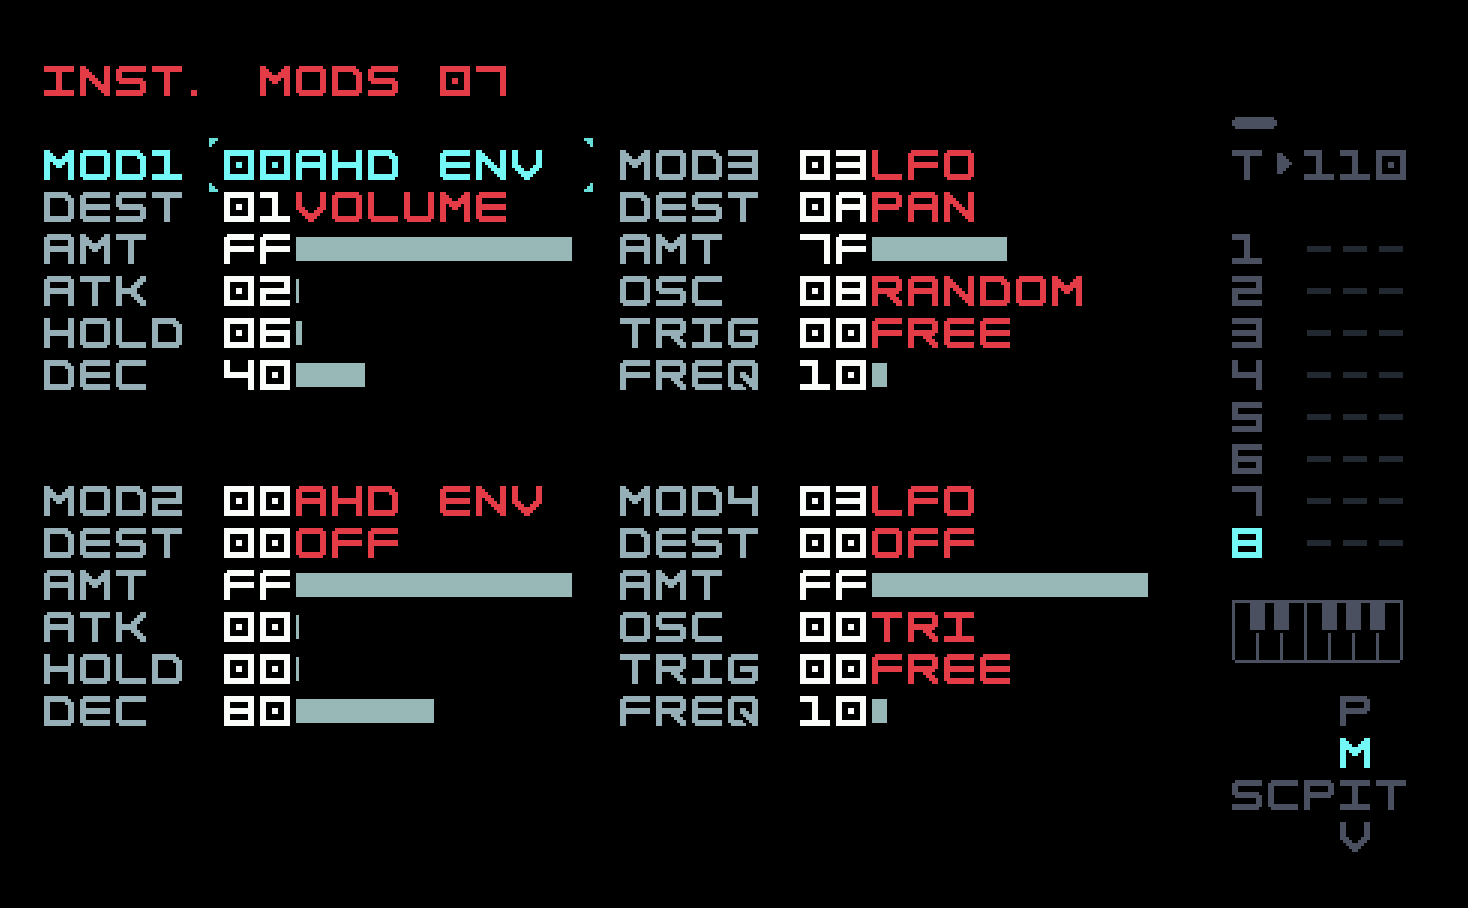
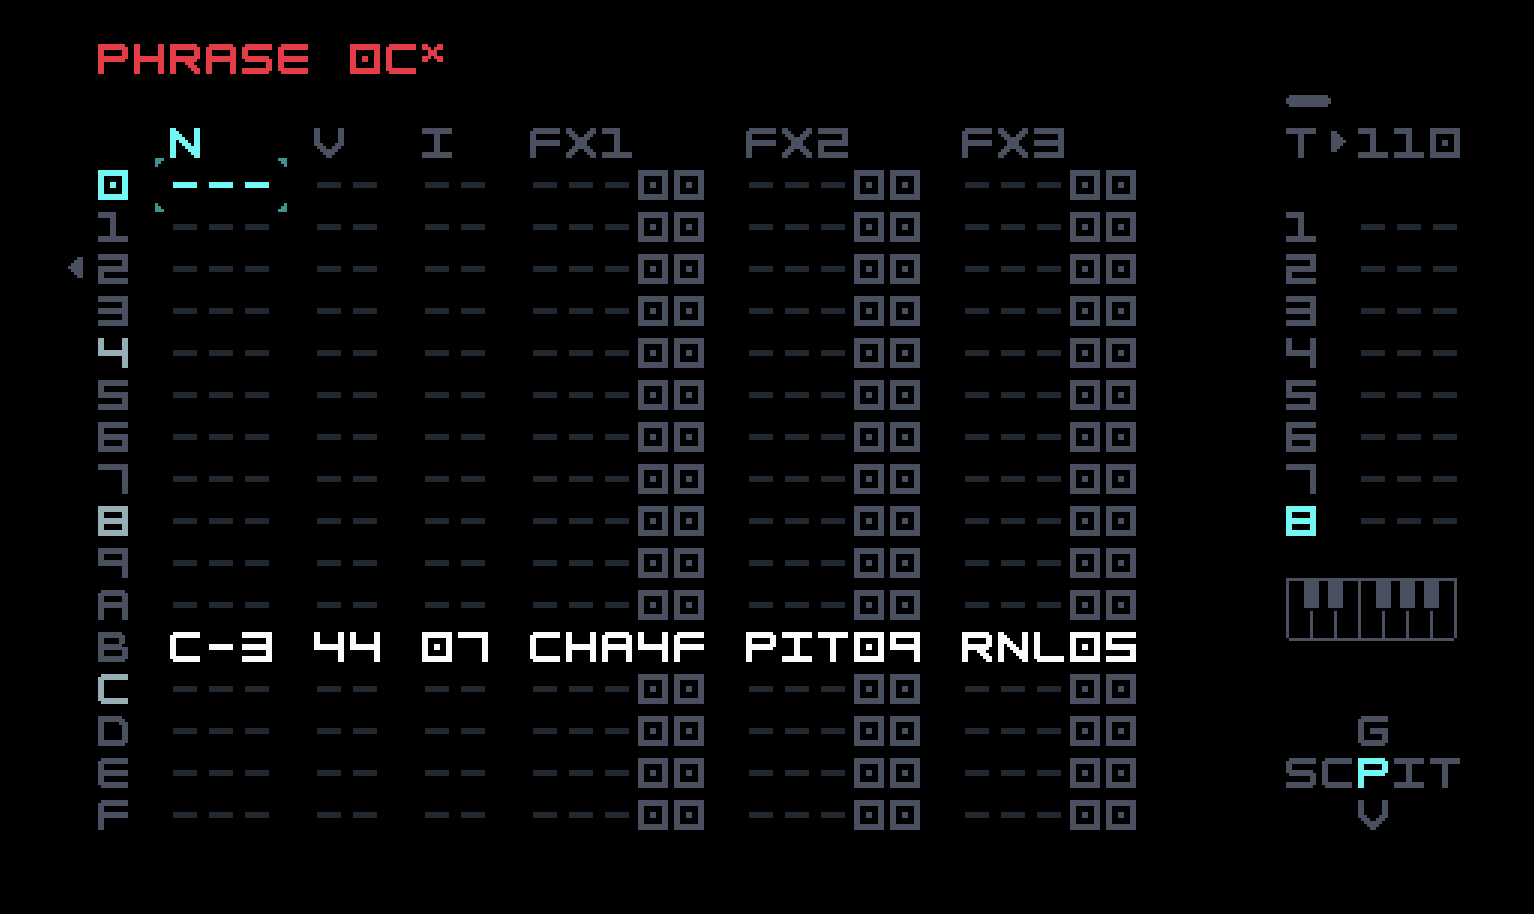
The chain for this last track has one phrase repeated four times. The single entry uses a CHA command to have the note trigger with 25% probability, as well as a combination of a PIT command (changing pitch in semitones) and a RNL (randomize to left) to vary the pitch with each trigger, so the sound is not identical each time.
That wraps up our sound design for our dub techno groove! There’s a lot more that could be done to it, but we’ll confine ourselves to some brief remarks in the next section on how one might improvise using what we have, or something only slightly more elaborate. As a bonus, since we now have eight full tracks, hit [PLAY] in Song Mode, then press all four direction buttons simultaneously. You will see oscilloscope displays for all tracks! This is an "Easter egg", an undocumented feature (though it might show up in the next revision of the manual). Press the four buttons again to get back to the usual Song View.
As for the FM Synth, we’ve only scratched the surface, rarely using more than one modulator or two instrument modulators. There are more algorithms to explore, more operator waveforms, and more LFO and envelope instrument modulators to be applied to parameters. You have a solid basis for experimentation, and hopefully some ways of understanding the effects of what you are doing, so you can vary them sensibly. You can now start to deconstruct FM Synth instruments from the factory content or community sources. Be sure to try to simplify them; you might be surprised at how far you can go. A bigger challenge, but one that might be within your grasp, is to translate recipes for other FM devices for use on the M8.
4.4 Performance options
Everything in this section applies to the M8 in general, not just the FM Synth, and by "performance" we don’t mean that you have to have an audience, only that you’ve pressed [PLAY] or are about to. You can start the groove going and then navigate to places where you can make real-time changes that affect the sound (filter cutoff for an instrument, for example). If you want to navigate during performance, you’ll need to do it quickly. We’ve been stressing navigation along the mini-map because it’s conceptually easy and usually visible, but there are shortcuts. For example, in Instrument View, there are key combos to move to the next instrument (next highest number) or the previous one. In Phrase View, there are key combos to move to the next or previous phrase in the chain. These are documented in the manual and you should start learning them, if you haven’t already, because they will save you time even while composing.
There are some places where more global change is possible. One useful view is Mixer View, which is a V at the bottom of the mini-map and accessible from the main spine. At the top is a global volume setting (we mentioned this very early on) and below it an animation of the levels of each track, with a master stereo animation to the right. Below each track animation is an individual volume setting for each track (defaulting to E0).
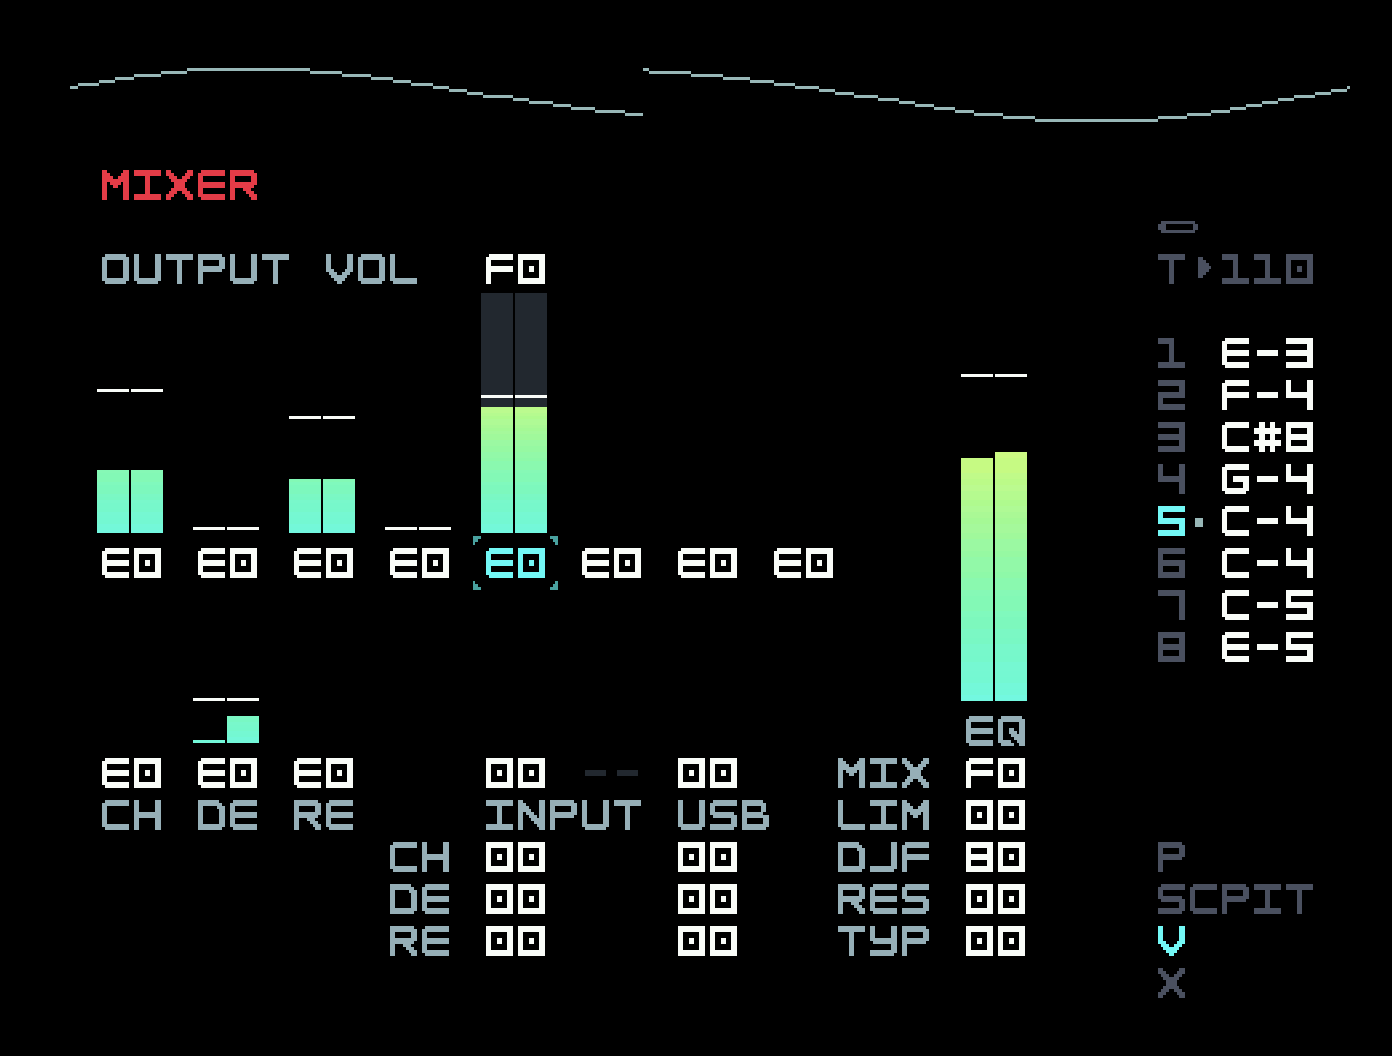
At bottom centre are controls for input level and effect sends for the physical jack and USB audio. There is a master animation to the right. Below it, the first setting is for mix volume (used for renders). But above that, you see EQ, for equalizer. Putting the cursor on that and navigating right brings one to the mix equalizer.
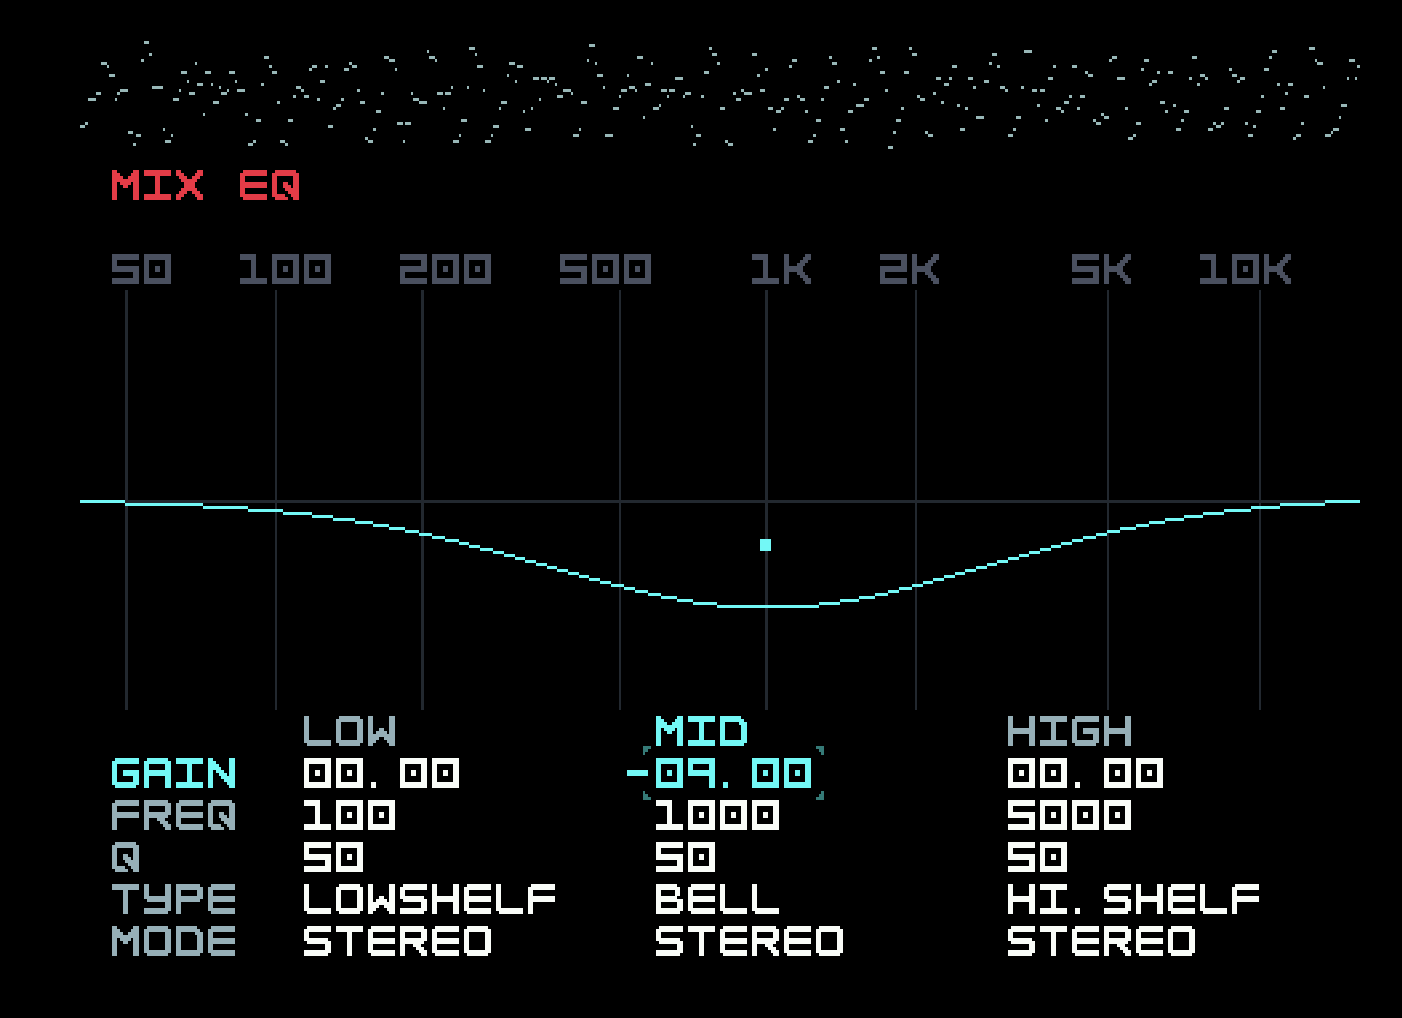
This is a three-band parametric equalizer, added in firmware 4.0.0, with a lot of configuration options. You should consult the manual for details. We’ll discuss the general use of EQs in the Sampler chapter, but they allow one to emphasize or reduce various parts of the frequency spectrum. A similar equalizer is available for each instrument (as of firmware 5.0.0), though several instruments can share one if desired. These can be used to fit instruments into the mix without clashing.
Returning to the mixer view, the next setting is for a mix limiter. The limiter available for each instrument is primarily used for adding various flavours of distortion, but this one functions more like an end-of-chain compressor, reducing the dynamic range of the mix by automatically adjusting the volume. If you’re familiar with compressors, this one lacks a ratio parameter and a sidechain input. The effect can be subtle or pronounced, and it is worth investigating with the aid of the manual.
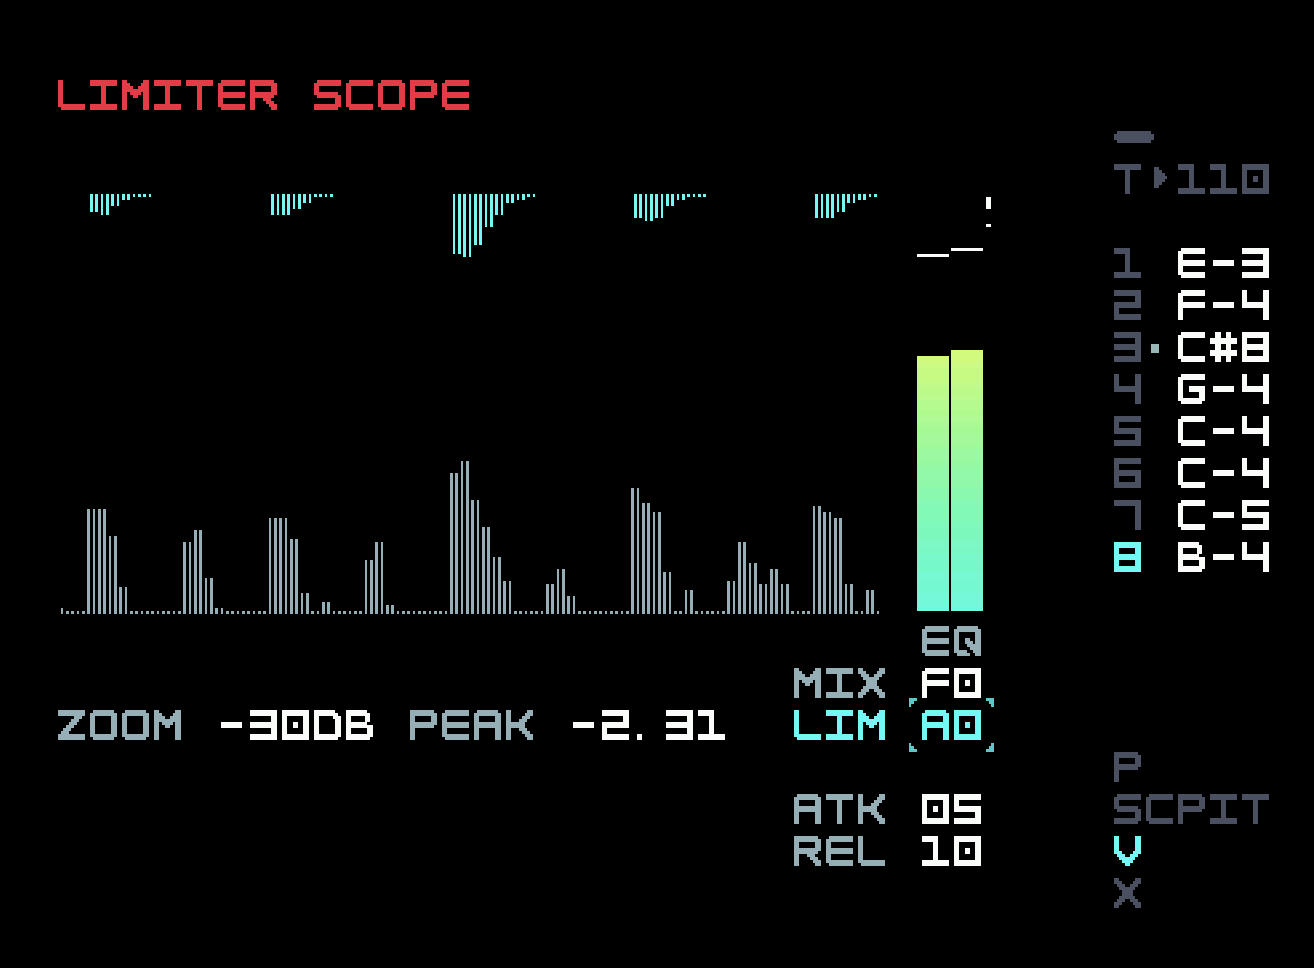
Next in the bottom right column of Mixer View is the setting for a master DJ filter. A DJ filter typically moves from lowpass to highpass, though here several options are possible. 80, the middle setting, has no effect. This filter can be used to good effect with our groove.
While the cursor is on an individual track volume, there are key combos to mute or solo that track, or to clear all mutes and solos (once again we refer you to the manual for details). These key combos work on the single track implicitly selected in Phrase and Chain View, and again on the track the cursor is on in Song View and Live Mode, so it is a good idea to memorize them if you plan to do this sort of thing. Soloing can be useful even during composition, to quickly add and remove context while working on a track.
Below Mixer View in the minimap (but only visible from it) is Effect Setting View (an X on the mini-map).
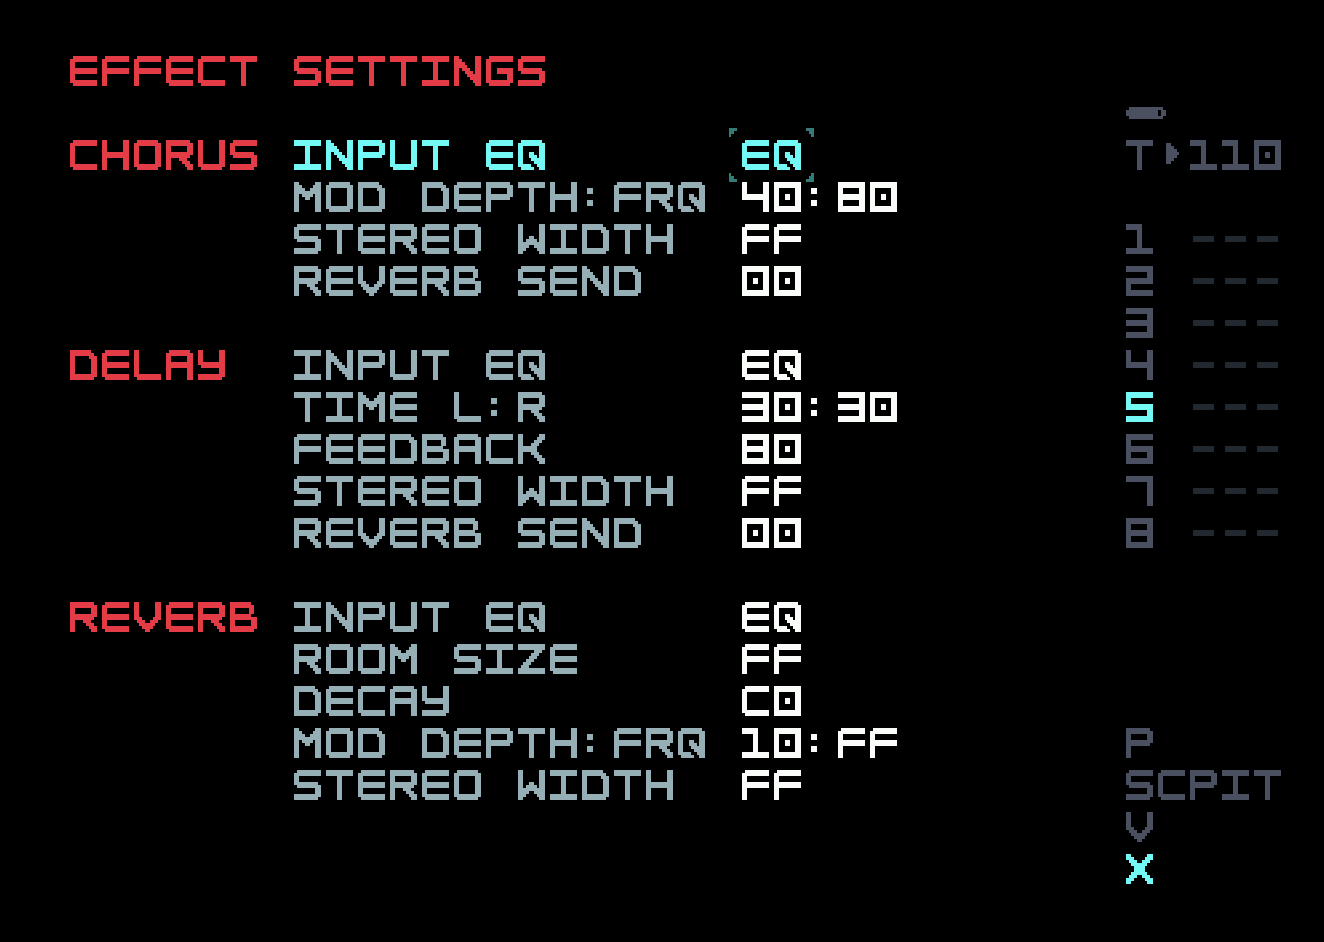
You can look up what all of these settings are in the M8 manual. The EQ for each effect is a more recent addition. Here, for example, one can keep low frequency sounds from reaching the reverb, which can cause muddiness in the final output.
These settings can be automated, but we’re not sure how effectively they can be manipulated in real time on the M8. The delay feedback cannot be taken above 100% to grow and threaten to swamp the sound before it is dialed back, and there is no playable filter in the feedback loop to alter the character of the repeats. These classic dub sounds (maybe less important in dub techno) are not easy to achieve on the M8. (We won’t say it’s impossible; there are some very clever users in the community.)
We’ve already discussed how, in Song View, one can start the song playing on any row. There’s also a key combo to cue another row, which will start it when the current row has finished playing. This becomes more interesting when we consider the role of empty rows. Previously, we’ve thought of an empty row as causing the song to start again at the beginning. But if there are non-empty rows below an empty row forming an "island", the island will loop in the same way. So one can create isolated regions and then jump from one to another by a planned action in real time. This is useful not only in performance, but in development, where one can work on a multi-row chunk of a song in isolation from the rest.
Live Mode, which you’ve probably accidentally invoked also, goes even further, allowing each individual track to be cued for performance on any nonempty row, independently from the other tracks. Even with our little one-row groove, we could create an additional one-row island of variations of each track, and then mix and match top and bottom versions at will.
In the next chapter, we’ll shift gears to examine sample creation, manipulation, and playback. There is some overlap with synthesis, but also new challenges and possibilities. We’ll also continue to introduce techniques applicable in more general contexts.