-- MikeGore - 05 Oct 2005
V40Z Service Processor Setup
- V40Z Service Processor Setup
- References
- Initial Setup
- Attaching Networking
- Create the initial Manager Account
- Creating accounts
- Defining a Name for the Server
- Install Server Management and Platform Software on a SMB network share
- Event monitoring
- Inventory
- Controlling the system
- Updating the SP Firmware
- Debugging on the service processor
- Reseting the service processor settings to factory defaults
References
- 817-5246-16 Installation Guide
- 817-5249-15 Server Management Guide
- 817-7184-12 Diagnostic Guide
- 819-2714-12 ServersSP and BIOS Update ReadMe
- Memory Comfiguration Reporting Tool

Initial Setup
- See Manual section: Defining SP Network Settings
- Front Panel:
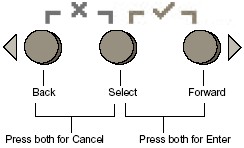
- With the front panel keypad enter the IP,MASK and gateway of the SP
Attaching Networking
- Primary Network and Management Ports - marked with BOLD line
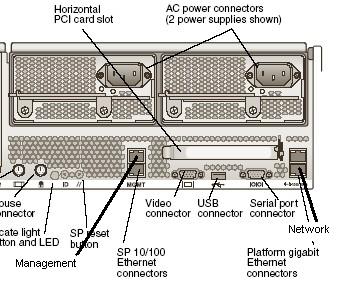
- Note: the ports NOT mark with the BOLD line are secondary connections
Create the initial Manager Account
- See Manual section: Creating the Initial Manager Account
- ssh IP_ADDRESS -l setup follow the prompts to create an account for cscf-adm
Creating accounts
- See Server Management Guide , Service Processor Commands
- access add user -g GROUP -u USERID -p PASSWD
     GROUP  = users group
     USERID = pick a name for your service user
     PASSWD = pick a password
Changing Passwords
- access update password -u USERID
Creating a Service Account
- access add user -g service -u s -p xxxx
- where s is the username and xxxx is the password - Enable root access for your new service account called s
- su s
- sp set root on
Prompts you for your password and ask to create a root password - su -
Become root
Changing the root password
- Log into the service account: su s
- disable access to root: sp set root off
- enable root account (forces password change): sp set root on
- It will ask for the s account password - then the new root password
List existing Users
- access get users
Group   User
monitor
admin
manager cscf-adm
service s
Defining a Name for the Server
- See Server Management Guide , SP Set Hostname Subcommand
- sp set hostname HOSTNAME
HOSTNAME is the Service Processor Host Name you chose
Install Server Management and Platform Software on a SMB network share
- Download the Sun Fire V20z / V40z NSV Bundles 2.3.0.11 (or lastest) files from Sun http://www.sun.com/download/products.xml Note: You will have to create an account first (free registration) You will need these files
- Libraries for Diagnostics (nsv_V2_3_0_11.zip)
- V40z BIOS and SP Firmware (nsv-v40z-bios-fw_V2.3.0.11c.zip)
- Drivers source Suse (nsv-suse_V2_3_0_11.zip)
- Drivers source Solaris (nsv-solaris_V2_3_0_11.zip)
- Drivers source Redhat (nsv-redhat_V2_3_0_11.zip)
- Unzip the files into your SMB network share point
- You should end up with the following directories
Network Share Volume Structure
Directory Name   Description
diags            Offline location of the server diagnostics.
logs            Offline location of the log files for the SP.
Scripts        Sample scripts that can be used for scripting commands.
snmp            SNMP MIBS.
               Refer to Chapter 3 in the Sun Fire V20z and Sun Fire
               V40z   ServersServer Management Guide (817-5249)
               for details.
update_server  Application for updating the SP software and BIOS.
               Refer to to Chapter 1 in the Sun Fire V20z and Sun
               Fire V40z ServersServer Management Guide (817-5249)
               for details.
sw_images      Contains a directory hierarchy of platform and SP
               components, including subdirectories for each version.
Mounting/Unmounting the share on the Service Processor
- sp add mount -r //129.97.15.251/SUNDIAGS -l /mnt -u cscf-adm
- sp delete mount /mnt ( you may have to use the -f option to unmount)
Note: mounts will persist across reboots
Event monitoring
- sp get events - get system events (ie. power off, thermal trip, errors)
- sp get status - get operational status
- sensor get status -verbose (get all of the sensor thresholds)
- sensor get -t temp -v
- sensor get -t fan -v
- sensor get -t voltage -v
Inventory
- inventory get all - list all of the hardware and software information
Controlling the system
- su s (s is the service user used in this document)
- sp reboot -f - reboot the service processor
- power state
Usage: platform get power state [{-h|--help}]
{-h|--help}         Print the usage message.

Usage: platform set power state [{-W|--nowait}] [{-f|--forced}] [{-h|--help}]
         [{-q|--quiet}] [{-t|--timeout} time] {off|on|cycle}

eg:
localhost $ platform set power state on
This command may take several minutes.  Please be patient.
- os state
Usage: platform get os state [{-h|--help}]
{-h|--help}         Print the usage message.

Usage: platform set os state boot {-h|--help}
       platform set os state reboot {-h|--help}
       platform set os state shutdown {-h|--help}
       platform set os state update-bios {-h|--help}
       Most options take -f for FORCED
- Note
- If the Host OS does not have the required kernel modules you may have to reboot the SP before it will accept a shutdown/power off
Updating the SP Firmware
- See ServersSP and BIOS Update ReadMe Guide, Section Performing the Server Update from a Linux-based Client (we used smbfs here)
- Note: For the following we assume that
- ) Make sure you have java installed (java -version)
- ) server management software has been already installed.
- ) servers sharded partition is called /sundiags and its SMB name is SUNDIAGS
- ) SERVER_IP is is IP address of the server hosting the SUNDIAGS SMB share
- ) Make sure there is NO FIREWALL between the SP and the SERVER!
- ) Use the command: platform set power state off -f (to ensure the platform is powered down)
- On the server run this command
#!/bin/bash
#
SRV=/sundiags
java -jar $SRV/update_server/V2.2.0.6/updateServer.jar -f $SRV/sw_images/sp/spba
se/V2.3.0.15/install.image -p 50000
- Next, on the SP run this command
sp update flash all -i SERVER_IP -p 50000
- Notes: The SP will reboot shortly after running the sp update flash all command. It will take several minutes for the SP to restart.
- On the server you will get a message saying that the SP software has updated sucessfully.
- The manual states there are seven reports from the java application - this is WRONG.
- You will only see a single report - if it works.
- The entire process should only take a few minutes.
Updating the BIOS
- See ServersSP and BIOS Update ReadMe Guide, Sebsection: Perform the BIOS Update
- We use the same assumptions as for the previous SP update are true
- run the command
platform set os state update-bios /mnt/sw_images/platform/firmware/bios/V2.33.7.2/bios.sp
- You should see
This command may take several minutes.  Please be patient.
Bios started
Bios Flash Transmit Started
Bios Flash Transmit Complete
Bios Flash update Progress: 7
Bios Flash update Progress: 6
Bios Flash update Progress: 5
Bios Flash update Progress: 4
Bios Flash update Progress: 3
Bios Flash update Progress: 2
Bios Flash update Progress: 1
Bios Flash update complete
(SP will reboot)
Verify that the updates worked
- use the command inventory get software
inventory get software
Name           Revision  Install Date             Description
Diagnostics    V2.3.0.9  Tue Jun 11 21:17:47 2019 Server Diagnostics
BIOS-V40z      V2.33.7.2 Tue Oct  4 13:01:37 2005 Platform BIOS for V40z servers
Operator Panel X1.0.1.0  Tue Mar  1 11:02:36 2005 Operator Panel Firmware
PPCBoot        V2.1.0.16 Tue Oct  4 12:14:08 2005 PPCBoot Software
SP Value-Add   V2.3.0.15 Tue Oct  4 12:14:42 2005 SP Value-Add Software
SP Base        V2.3.0.15 Tue Oct  4 12:14:42 2005 SP Base Software
- Note: the revisions in this list may not update until a platform power cycle. They may be updated even if this report is wrong - try a power cycle and run the inventory command again before assuming failure.
Debugging on the service processor
- We used the following script running on the service processor on the network volume /mnt
- The scripts writes reports to the network share every 10min based on the sleep shell command
#!/bin/sh
#

trap 'cleanup' 0 1 2 3 15

cleanup() {
        exit 1
}


while true
do
        echo ================================ >>temp.log
        date >>temp.log
        sp get status >>temp.log
        sensor get -t temp -v >>temp.log
        sensor get -t fan -v >>temp.log
        sensor get -t voltage -v >>temp.log
        sleep 600
done
Reseting the service processor settings to factory defaults
- Navigate to the SP menu on the operator panel
- Use defaults option to reset the setting to factory defaults
Information in this area is meant for use by CSCF staff and is not official documentation, but anybody who is interested is welcome to use it if they find it useful.
- CF Web
- CF Web Home
- Changes
- Index
- Search
- Administration
- Communication
- Hardware
- HelpDeskGuide
- Infrastructure
- InternalProjects
- Linux
- MachineNotes
- Macintosh
- Management
- Networking
- Printing
- Research
- Security
- Software
- Solaris
- StaffStuff
- TaskGroups
- TermGoals
- Teaching
- UserSupport
- Vendors
- Windows
- XHier
- Other Webs
- My links
 |
|
Ideas, requests, problems regarding TWiki? Send feedback