Salt Windows PC and Laptop Install
Table of Contents
- Salt Windows PC and Laptop Install
- Table of Contents
- Project Objective: Purpose
- Project Scope/Deliverables
- Scope
- Constraints
- Assumptions and Risks
- Project Members
- Project Stakeholders
- Project Sponsor
- CSCF Salt
- SaltStack Windows
- The Process
- Required software
- Step by step
- Salt Master Status checks
- Troubleshoot
- The Batch File
- The State File
- Supporting Files
- Other Stanzas and supporting files
- Using Chocolatey
Project Objective: Purpose
Have Salt provision Windows desktop and laptop machines with site license, accounts, applications, etc. Further use Salt to maintain machines e.g. update cscf-adm and cscf-op passwords annuallyProject Scope/Deliverables
Possible outcomes and results of this project are as follows:- New machines named and installed with required software
- Current machines could be added as minions and updated via Salt
- Salt will maintain various formulas depending on the desired install outcome
- Inventory a new machine (see the Inventory Salt Integration twiki)
- Assign the new machine to a user via Salt
- Document the process
Scope
- New Windows machines:
- Prior to OOBE install the salt minion from USB key and provide the machine name as the minion name
- Connection to Salt master
- Execute the salt formula (state file)
- Select the state file or edit an existing state file to meet the required install needs
- Current Windows machines:
- Add to the Salt master
- Maintain account passwords, new application installs, etc.
Constraints
- Testing required
Assumptions and Risks
- Risk: Microsoft changes its methods occasionally requiring maintenance of the salt formulas
Project Members
anyone interestedProject Stakeholders
anyone interestedProject Sponsor
CSCF Management maybeCSCF Salt
https://cs.uwaterloo.ca/twiki/view/CF/SaltStackCSCFSaltStack Windows
SaltStack has package management for the MS Windows OS, much like the package maintenance for Linux machines. Execution modules, state functions, pillars, grains, etc. operate the same as in Linux. A repository of available state files for the installation of Windows software is maintained at: https://github.com/saltstack/salt-winrepo-ngroot@salt-rsg-2004:/etc/salt/master.d# cat winrepo.conf winrepo_dir: /srv/saltstack/win/repo winrepo_dir_ng: /srv/saltstack/win/repo-ngInstall the repository on the master with command "salt-run winrepo.update_git_repos":
root@master:/srv/salt/win/repo-ng/salt-winrepo-ng# salt-run winrepo.update_git_repos https://github.com/saltstack/salt-winrepo-ng.git: /srv/saltstack/win/repo-ng/salt-winrepo-ng https://github.com/saltstack/salt-winrepo.git: /srv/saltstack/win/repo/salt-winrepoTwo repositories are installed: salt-winrepo-ng and salt-winrepo. They differ in that the -ng version is newer and includes pillar and grains during compilation. The salt-winrepo-ng repository is the preferred repository for new packages. Update each minion with the latest repository with this command. Minions should query the master for this information, but it is easy to update them with this command:
root@master:/srv/saltstack/win# salt -G 'os:windows' pkg.refresh_dbIn the command the -G 'os:windows' targets all Windows minions. To target specific minions replace with the minion name. E.g. salt minion-name pkg.refresh_db Viewing a short list of the directory /srv/salt/win/repo-ng/salt-winrepo-ng:
root@master:/srv/salt/win/repo-ng/salt-winrepo-ng# ls 7zip.sls git-extensions.sls ms-vcpp-2013-redist_x86.sls slack.sls activeperl_x64.sls git.sls ms-vcpp-2015-build-tools.sls slack-user-msi.sls activeperl_x86.sls glarysoft-absolute-uninstaller.sls ms-vcpp-2015-redist_x64.sls smartmontools.sls adobeair.sls gnucash.sls ms-vcpp-2015-redist_x86.sls snmptools.sls adobereader-dc-classic.sls golang.sls ms-vcpp-2017-redist_x64.sls soapui.sls adobereader.sls goodsync.sls ms-vcpp-2017-redist_x86.sls software-informer.sls adobereader-xi.sls gow.sls mucommander.sls sourcetree.sls adobeshockwaveplayer.sls gpg4win mysql-essential.sls spybot-anti-beacon.sls advancedlogging.sls gpg4win-light.sls mysql-installer-community.sls spybot.sls ...Each one of these packages is a state file that can be included in our master state file. It can be helpful to view the package state file when encountering an install error.
An example is version control. Viewing the nextcloud-client.sls file we see version numbers. It is possible to get behind in version numbers. Executing this state file will cause the minion to reach out to the nextcloud web site to download any one of the versions. If the salt master's repository falls behind it may not find a version of nextcloud-client on the web site. For example the nextcloud-client download web site may be at version 4.0.0 and not include any of the older versions.
root@master:/srv/salt/win/repo-ng/salt-winrepo-ng# cat nextcloud-client.sls
nextcloud-client:
{% for version in ['3.0.3', '3.0.2', '3.0.1', '3.0.0', '2.6.5', '2.6.4', '2.6.3', '2.6.2', '2.6.1', '2.6.0', '2.5.3', '2.5.2', '2.5.1', '2.5.0', '2.3.3.1', '2.3.2.1', '2.3.1.8', '2.2.4.2', '2.2.3.4'] %}
'{{ version }}':
full_name: 'Nextcloud'
installer: 'https://download.nextcloud.com/desktop/releases/Windows/Nextcloud-{{ version }}-setup.exe'
install_flags: '/S'
uninstaller: 'https://download.nextcloud.com/desktop/releases/Windows/Nextcloud-{{ version }}-setup.exe'
uninstall_flags: '/S'
locale: en_US
reboot: False
{% endfor %}
The Process
Use Salt to install our standard Windows 10 system on new Windows PC or laptops. The Salt state file will upgrade the license to the University site license, create accounts and install applications.Required software
Get the salt minion installer: https://docs.saltstack.com/en/latest/topics/installation/windows.htmlUSB flash drive with the Windows Salt minion installer and our batch file: - Salt-Minion-3002.6-AMD64-Setup.exe - WindowsMinionInstall.bat Salt master at version 3002.6 or higher. Ensure the salt master is at the same or a newer version than the minion version. Salt master Windows repository directories: - ../win/repo/salt-winrepo - ../win/repo-ng/salt-winrepo-ng Salt master state file for installation (as described at heading The State File. Set root file data:
root@salt-rsg-2004:/etc/salt/master.d# cat winrepo.conf
winrepo_dir: /srv/saltstack/win/repo
winrepo_dir_ng: /srv/saltstack/win/repo-ng
Step by step
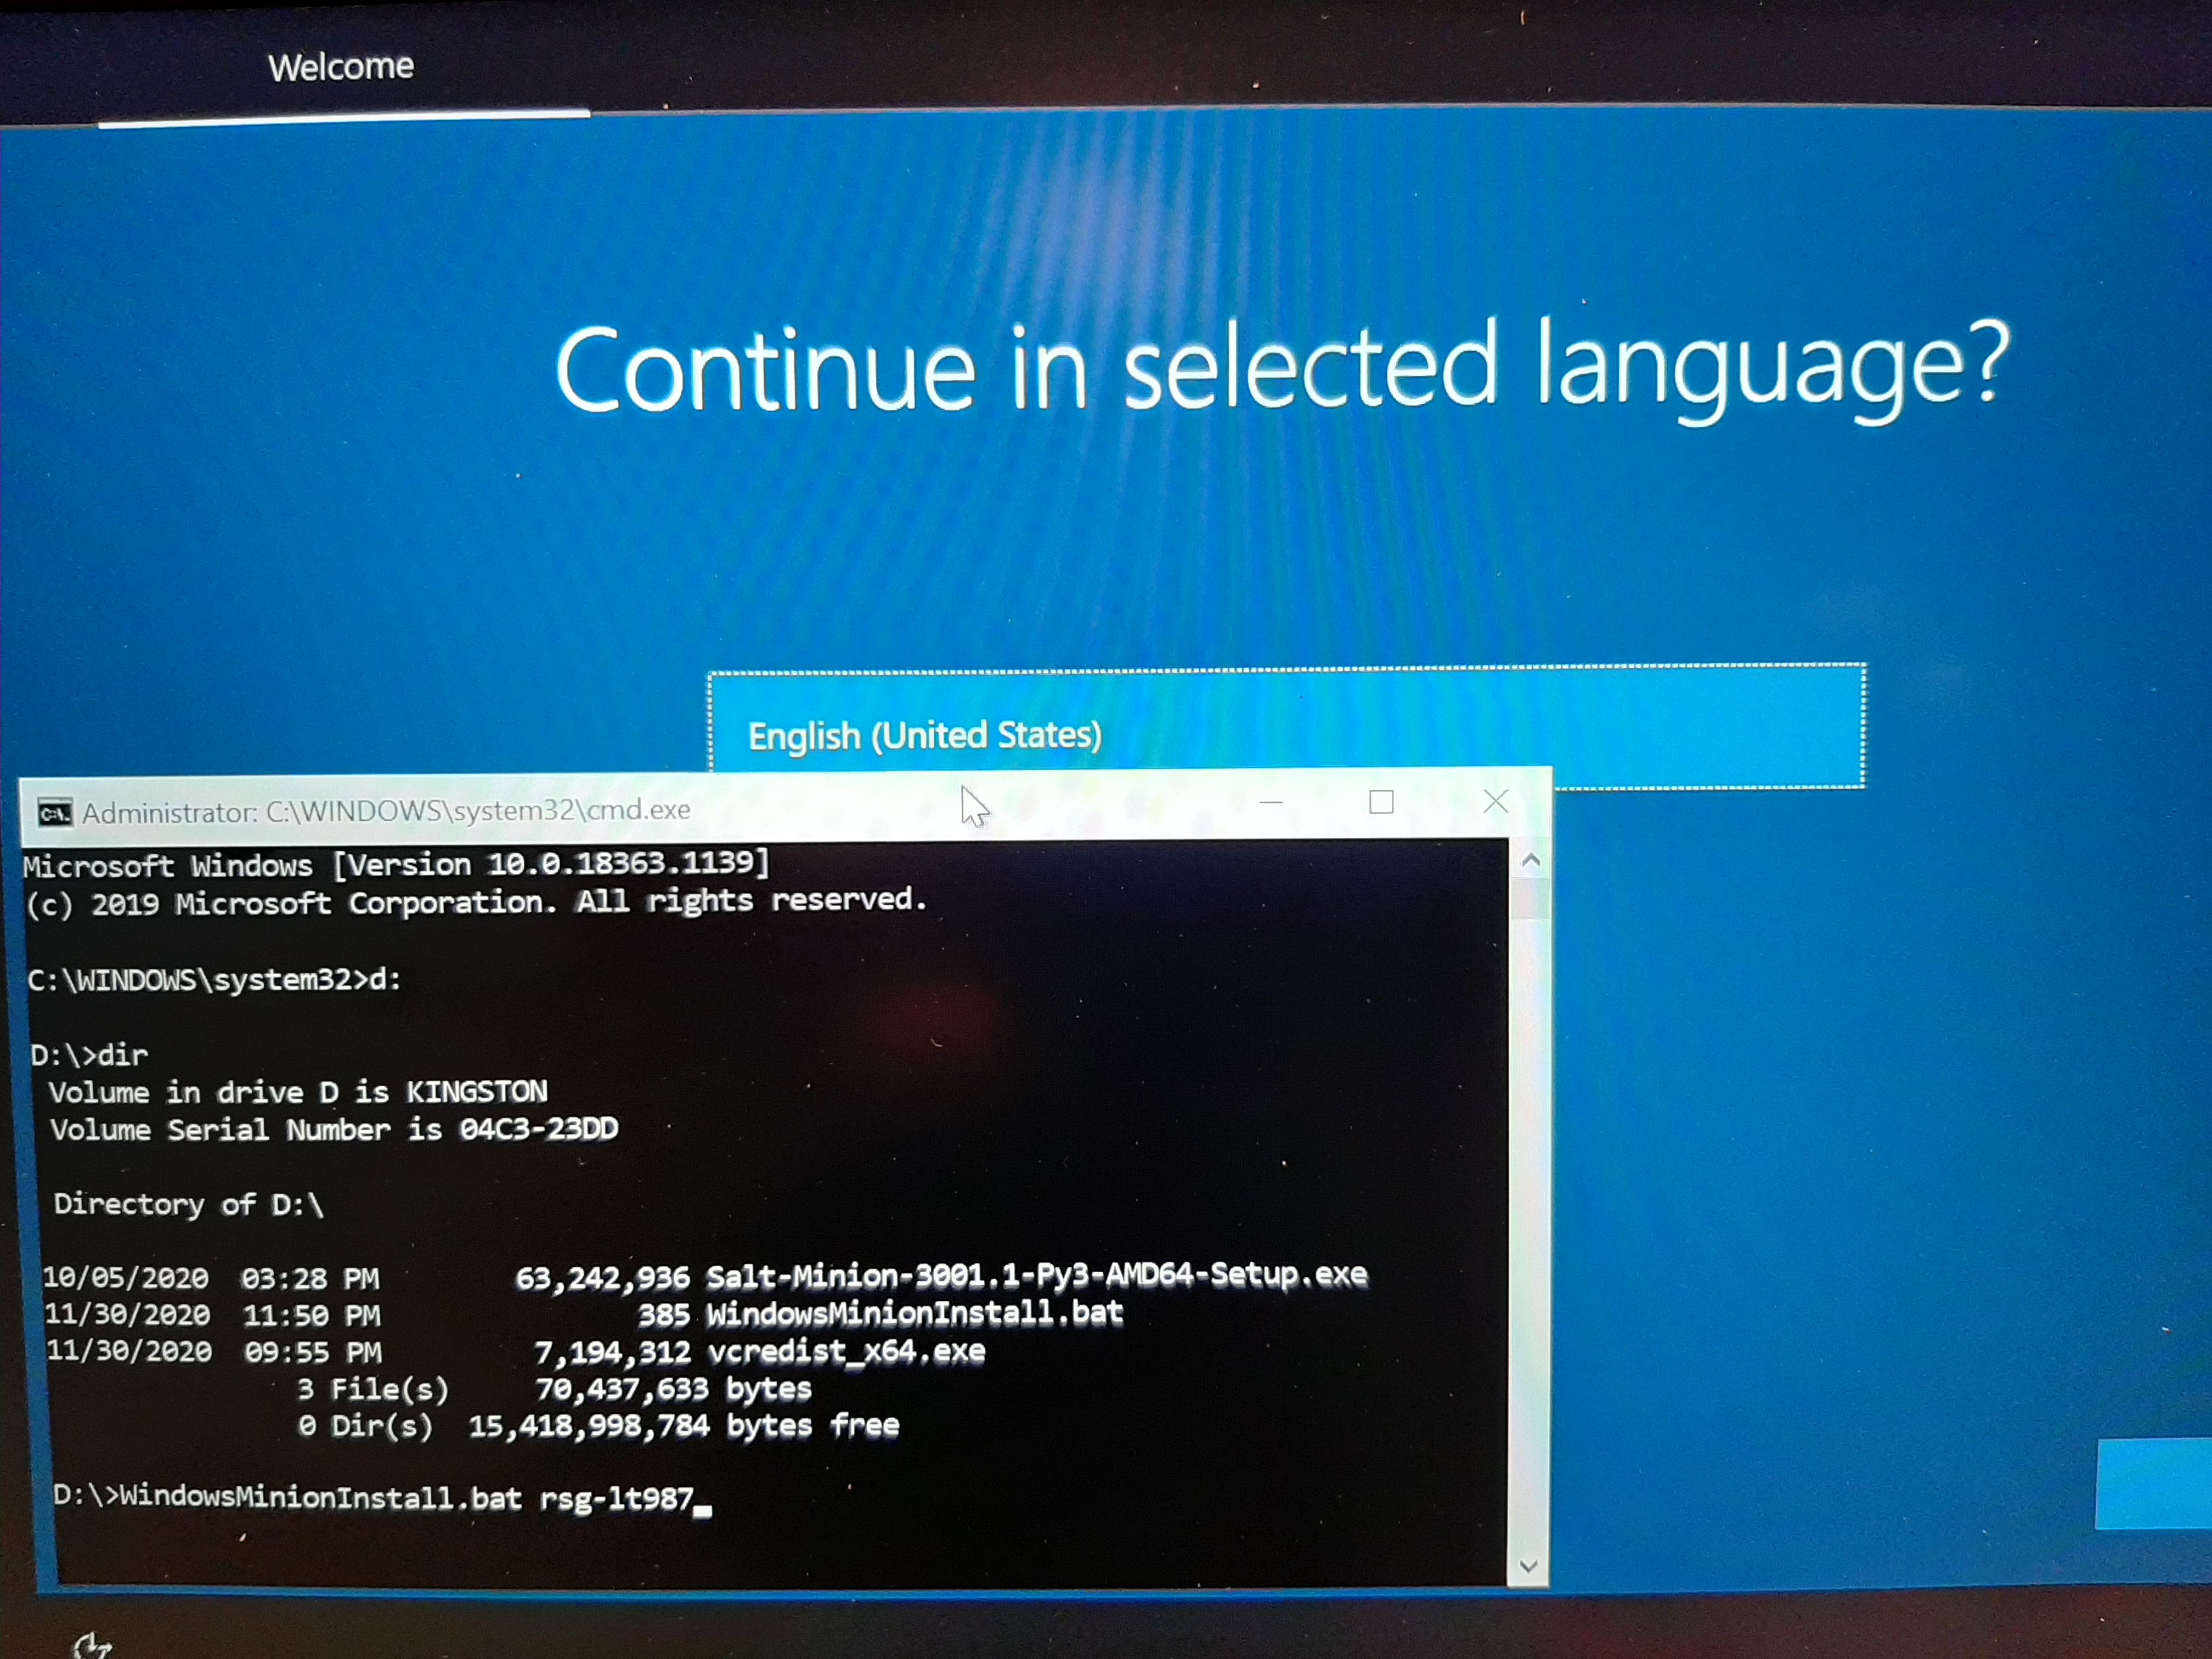
1) Connect the computer to the private network to allow communication with the master Salt machine. 2) Turn on the computer. At the Welcome screen insert the Minion USB flash drive. 3) Open a command prompt window. This is usually done be pressing the function Fn + F10 keys -or- Fn + F10 + Shift keys, simultaneously.- In the command prompt window enter D: to switch to the D: drive which should be the USB flash drive.
- Enter this command at the D: drive - WindowsMinionInstall.bat new-machine-name.
- Replace the "new-machine-name" with the network/inventory name of the computer e.g. rsg-lt987
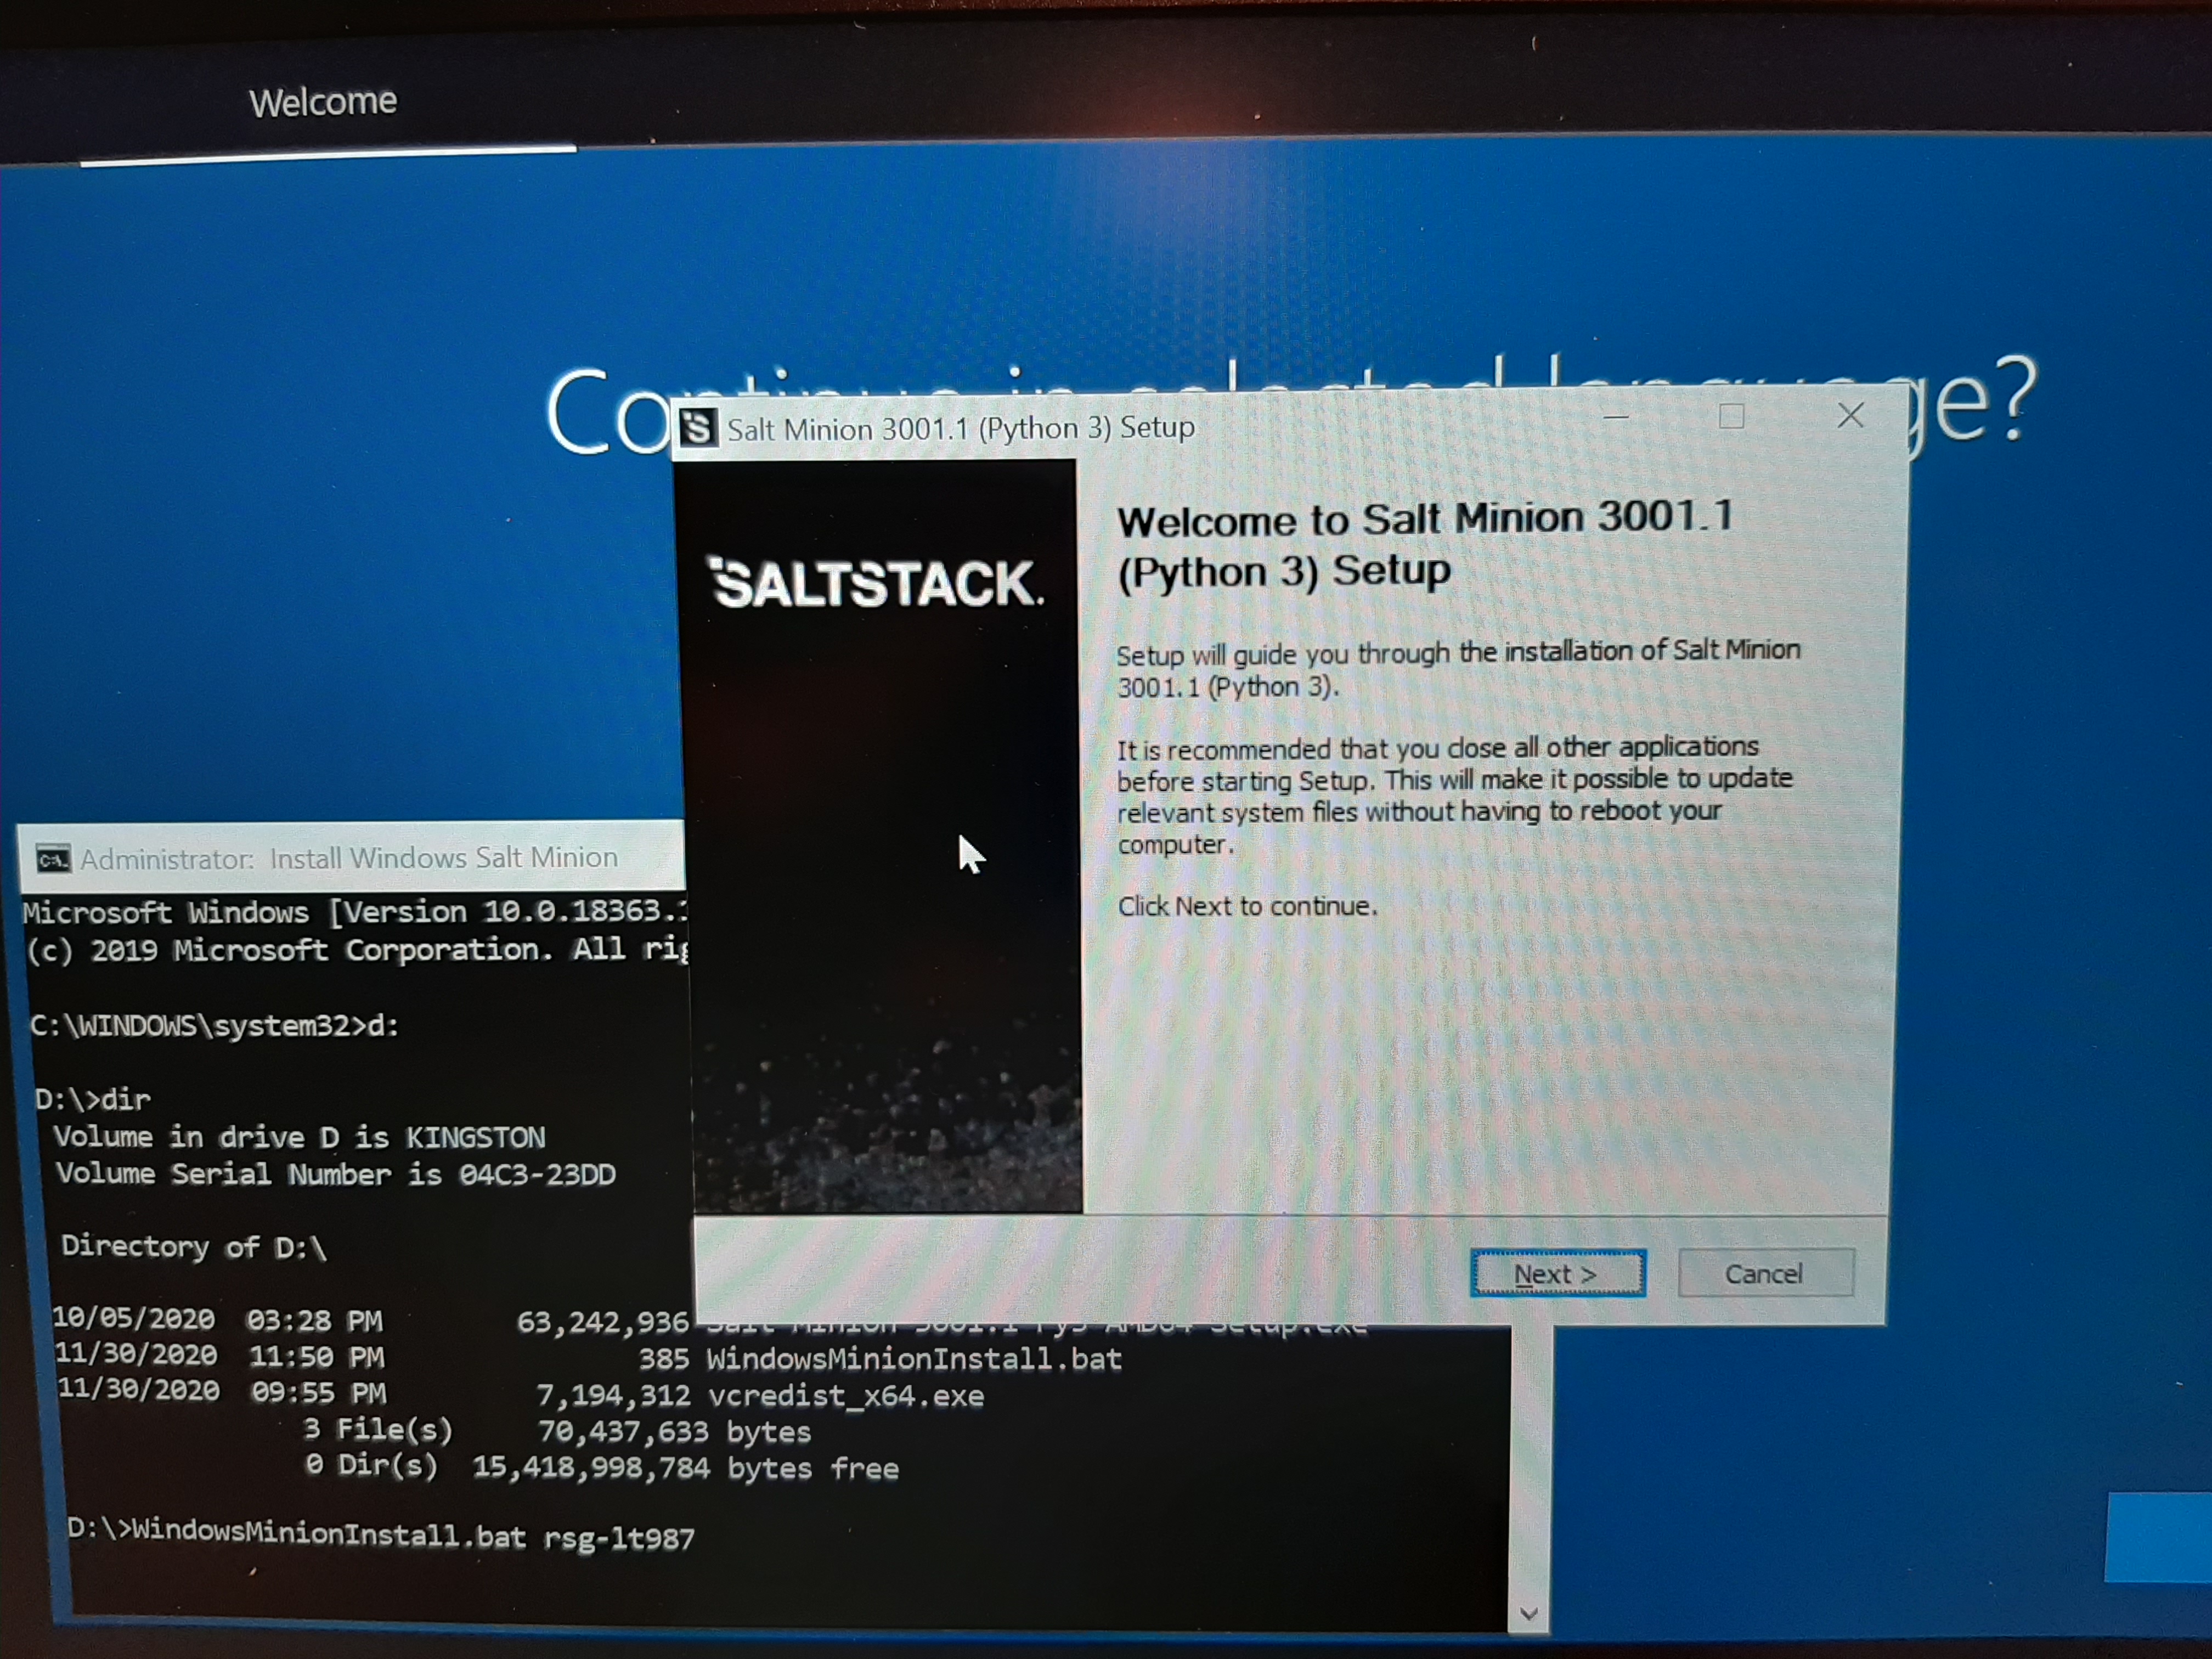
 4) Continue with the Salt installation on the minion.
 5) Accept the terms of agreement.
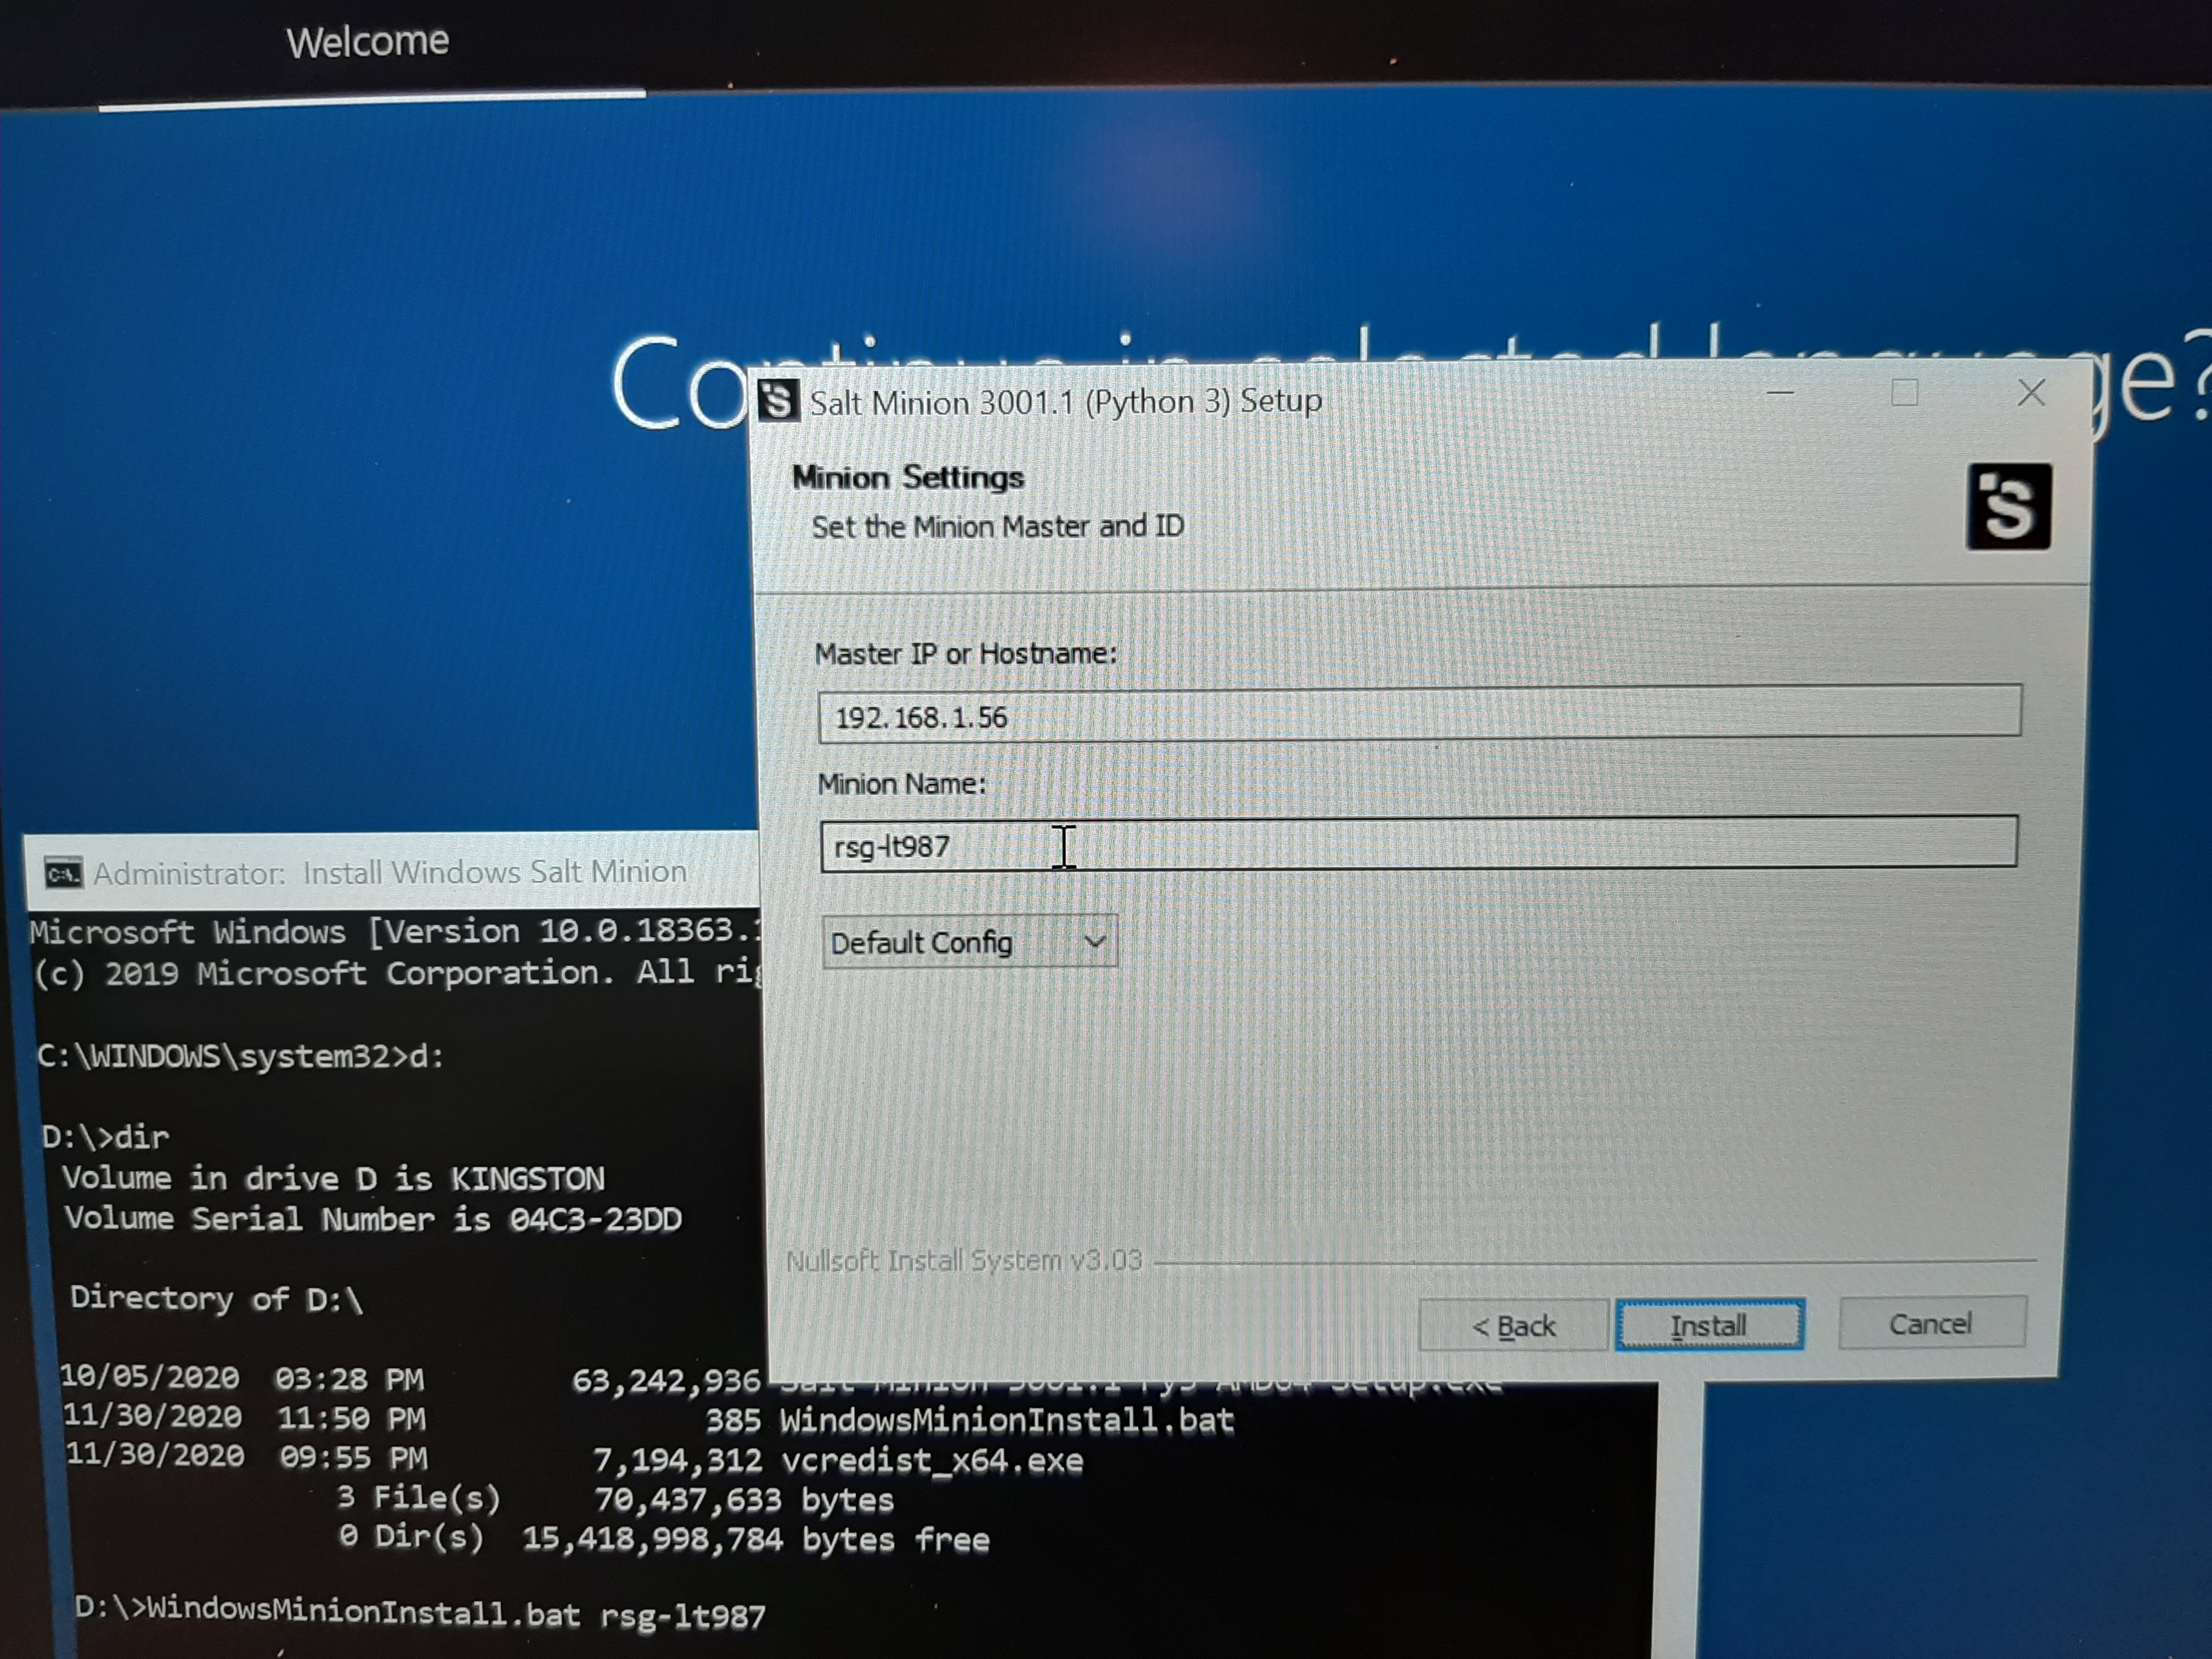
 6) Install
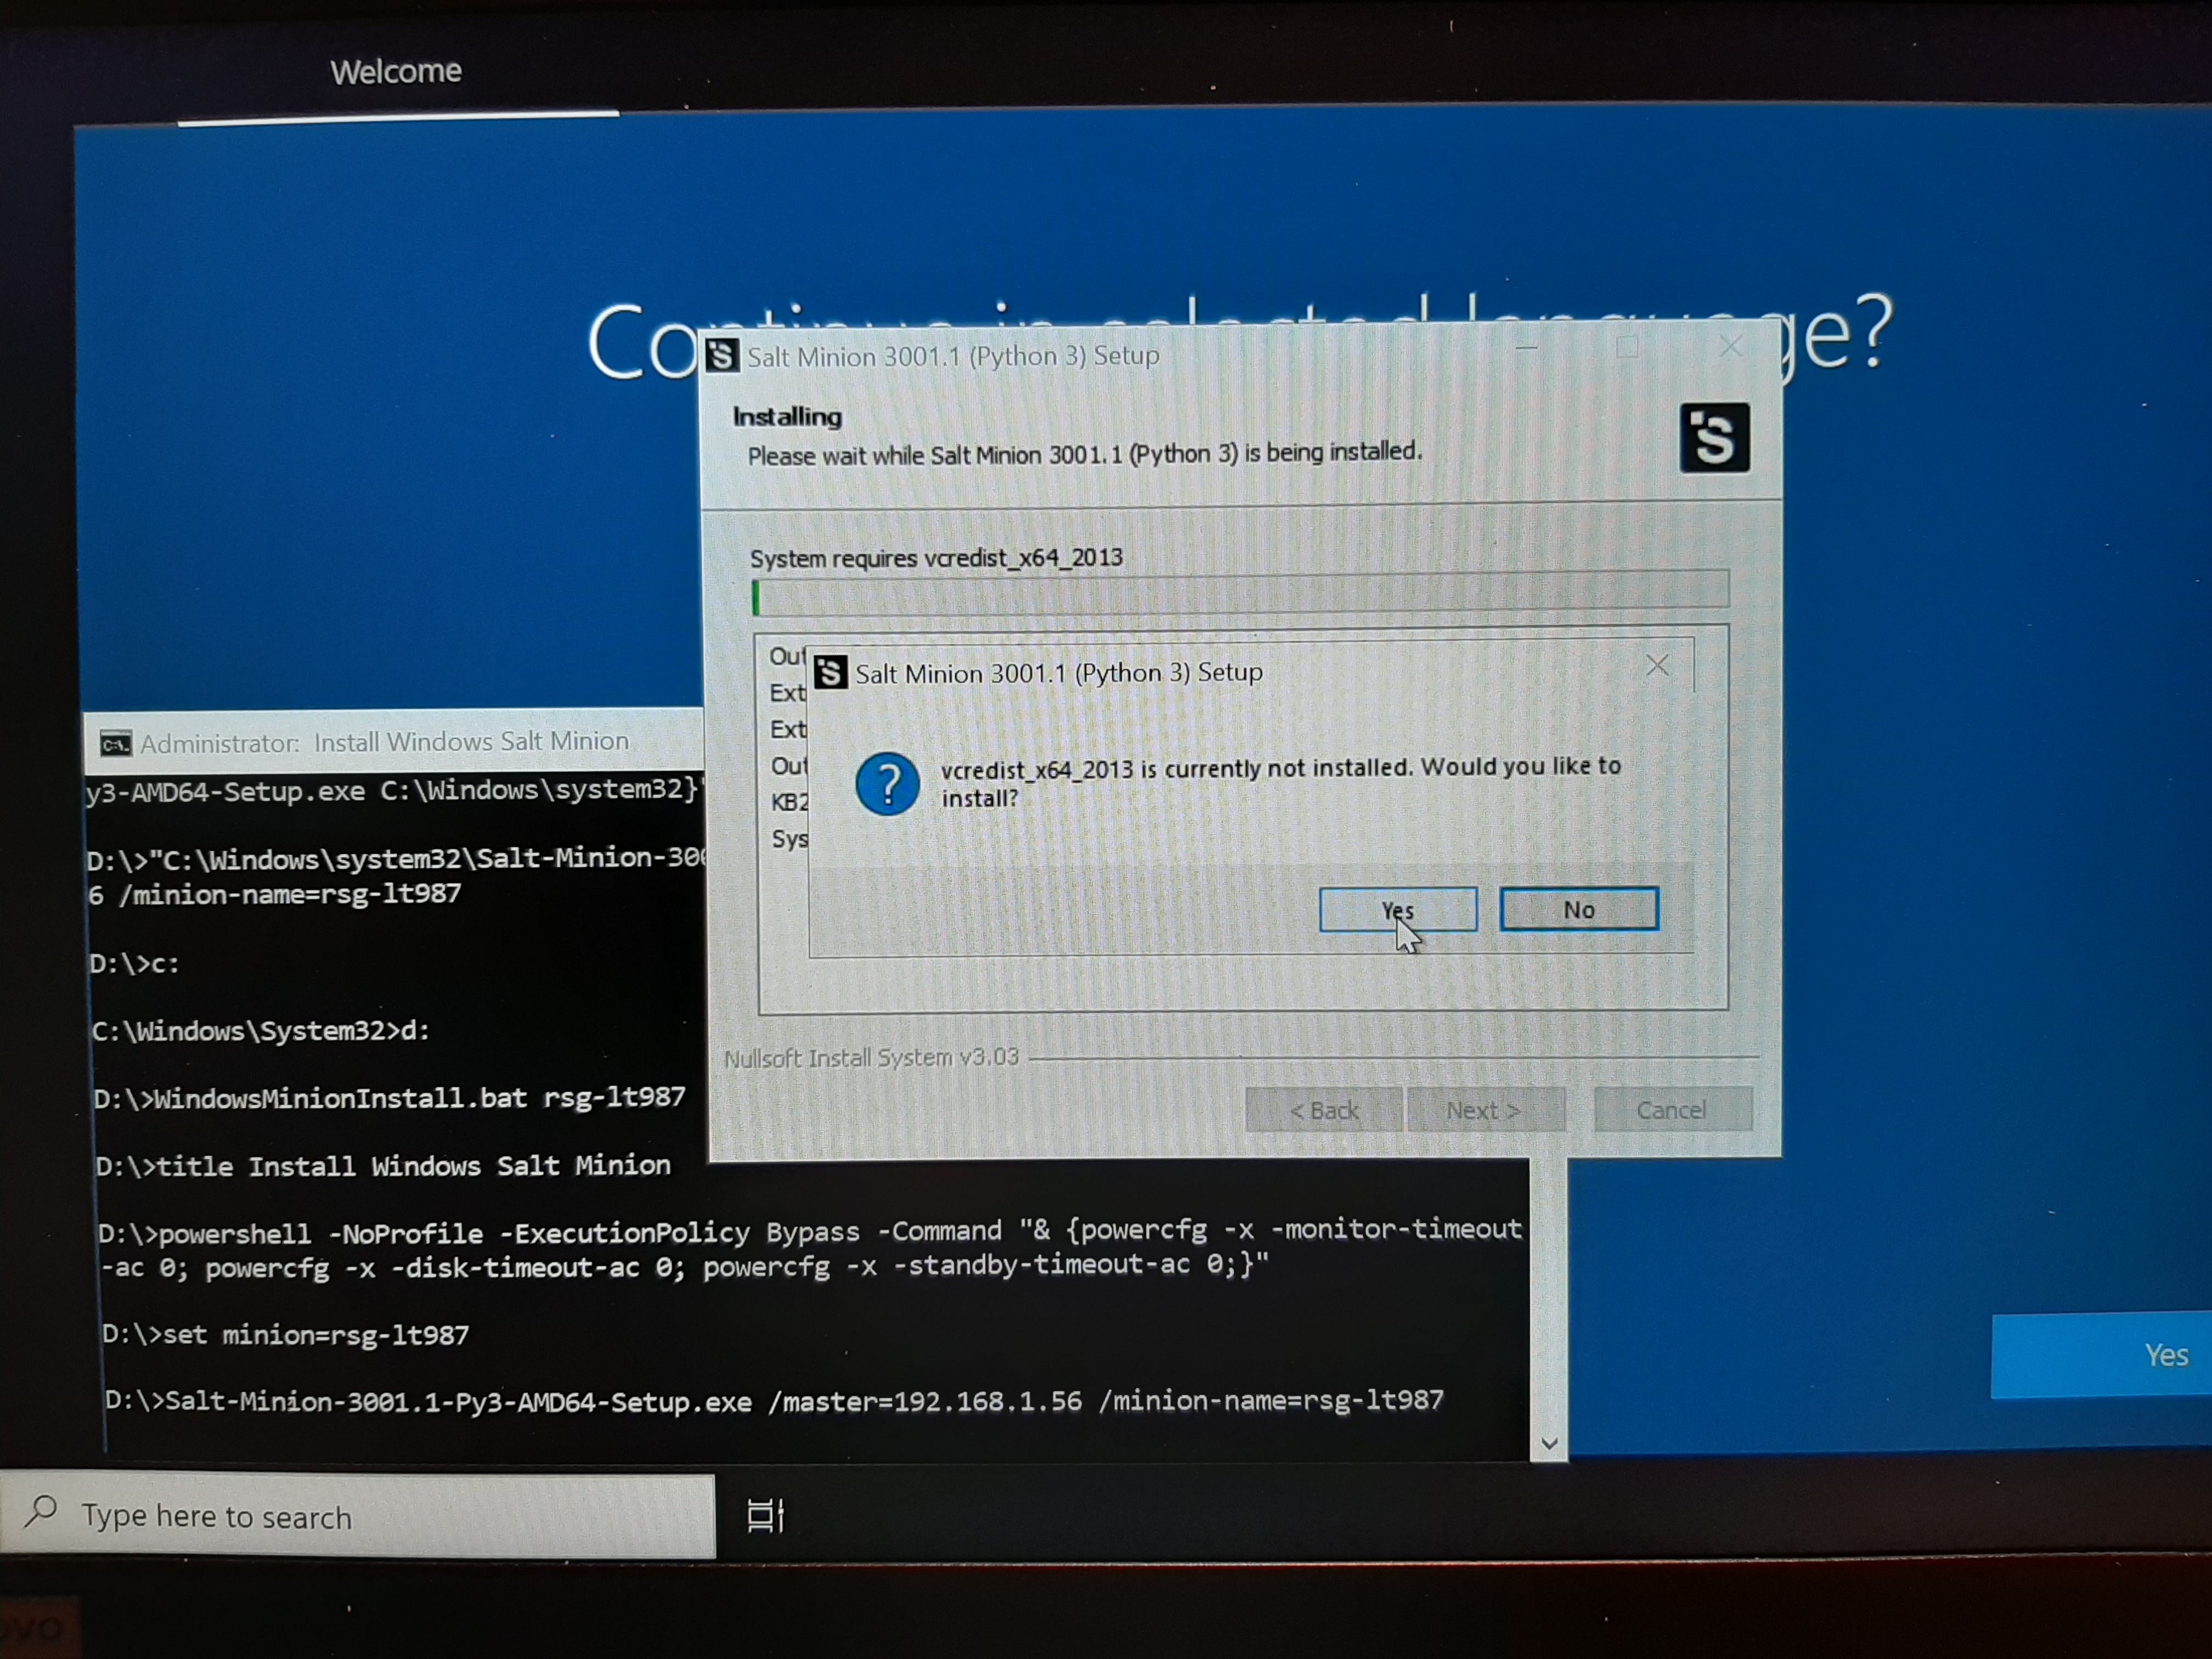
 7) Install the vcredist package.
 8) Finish and start the minion
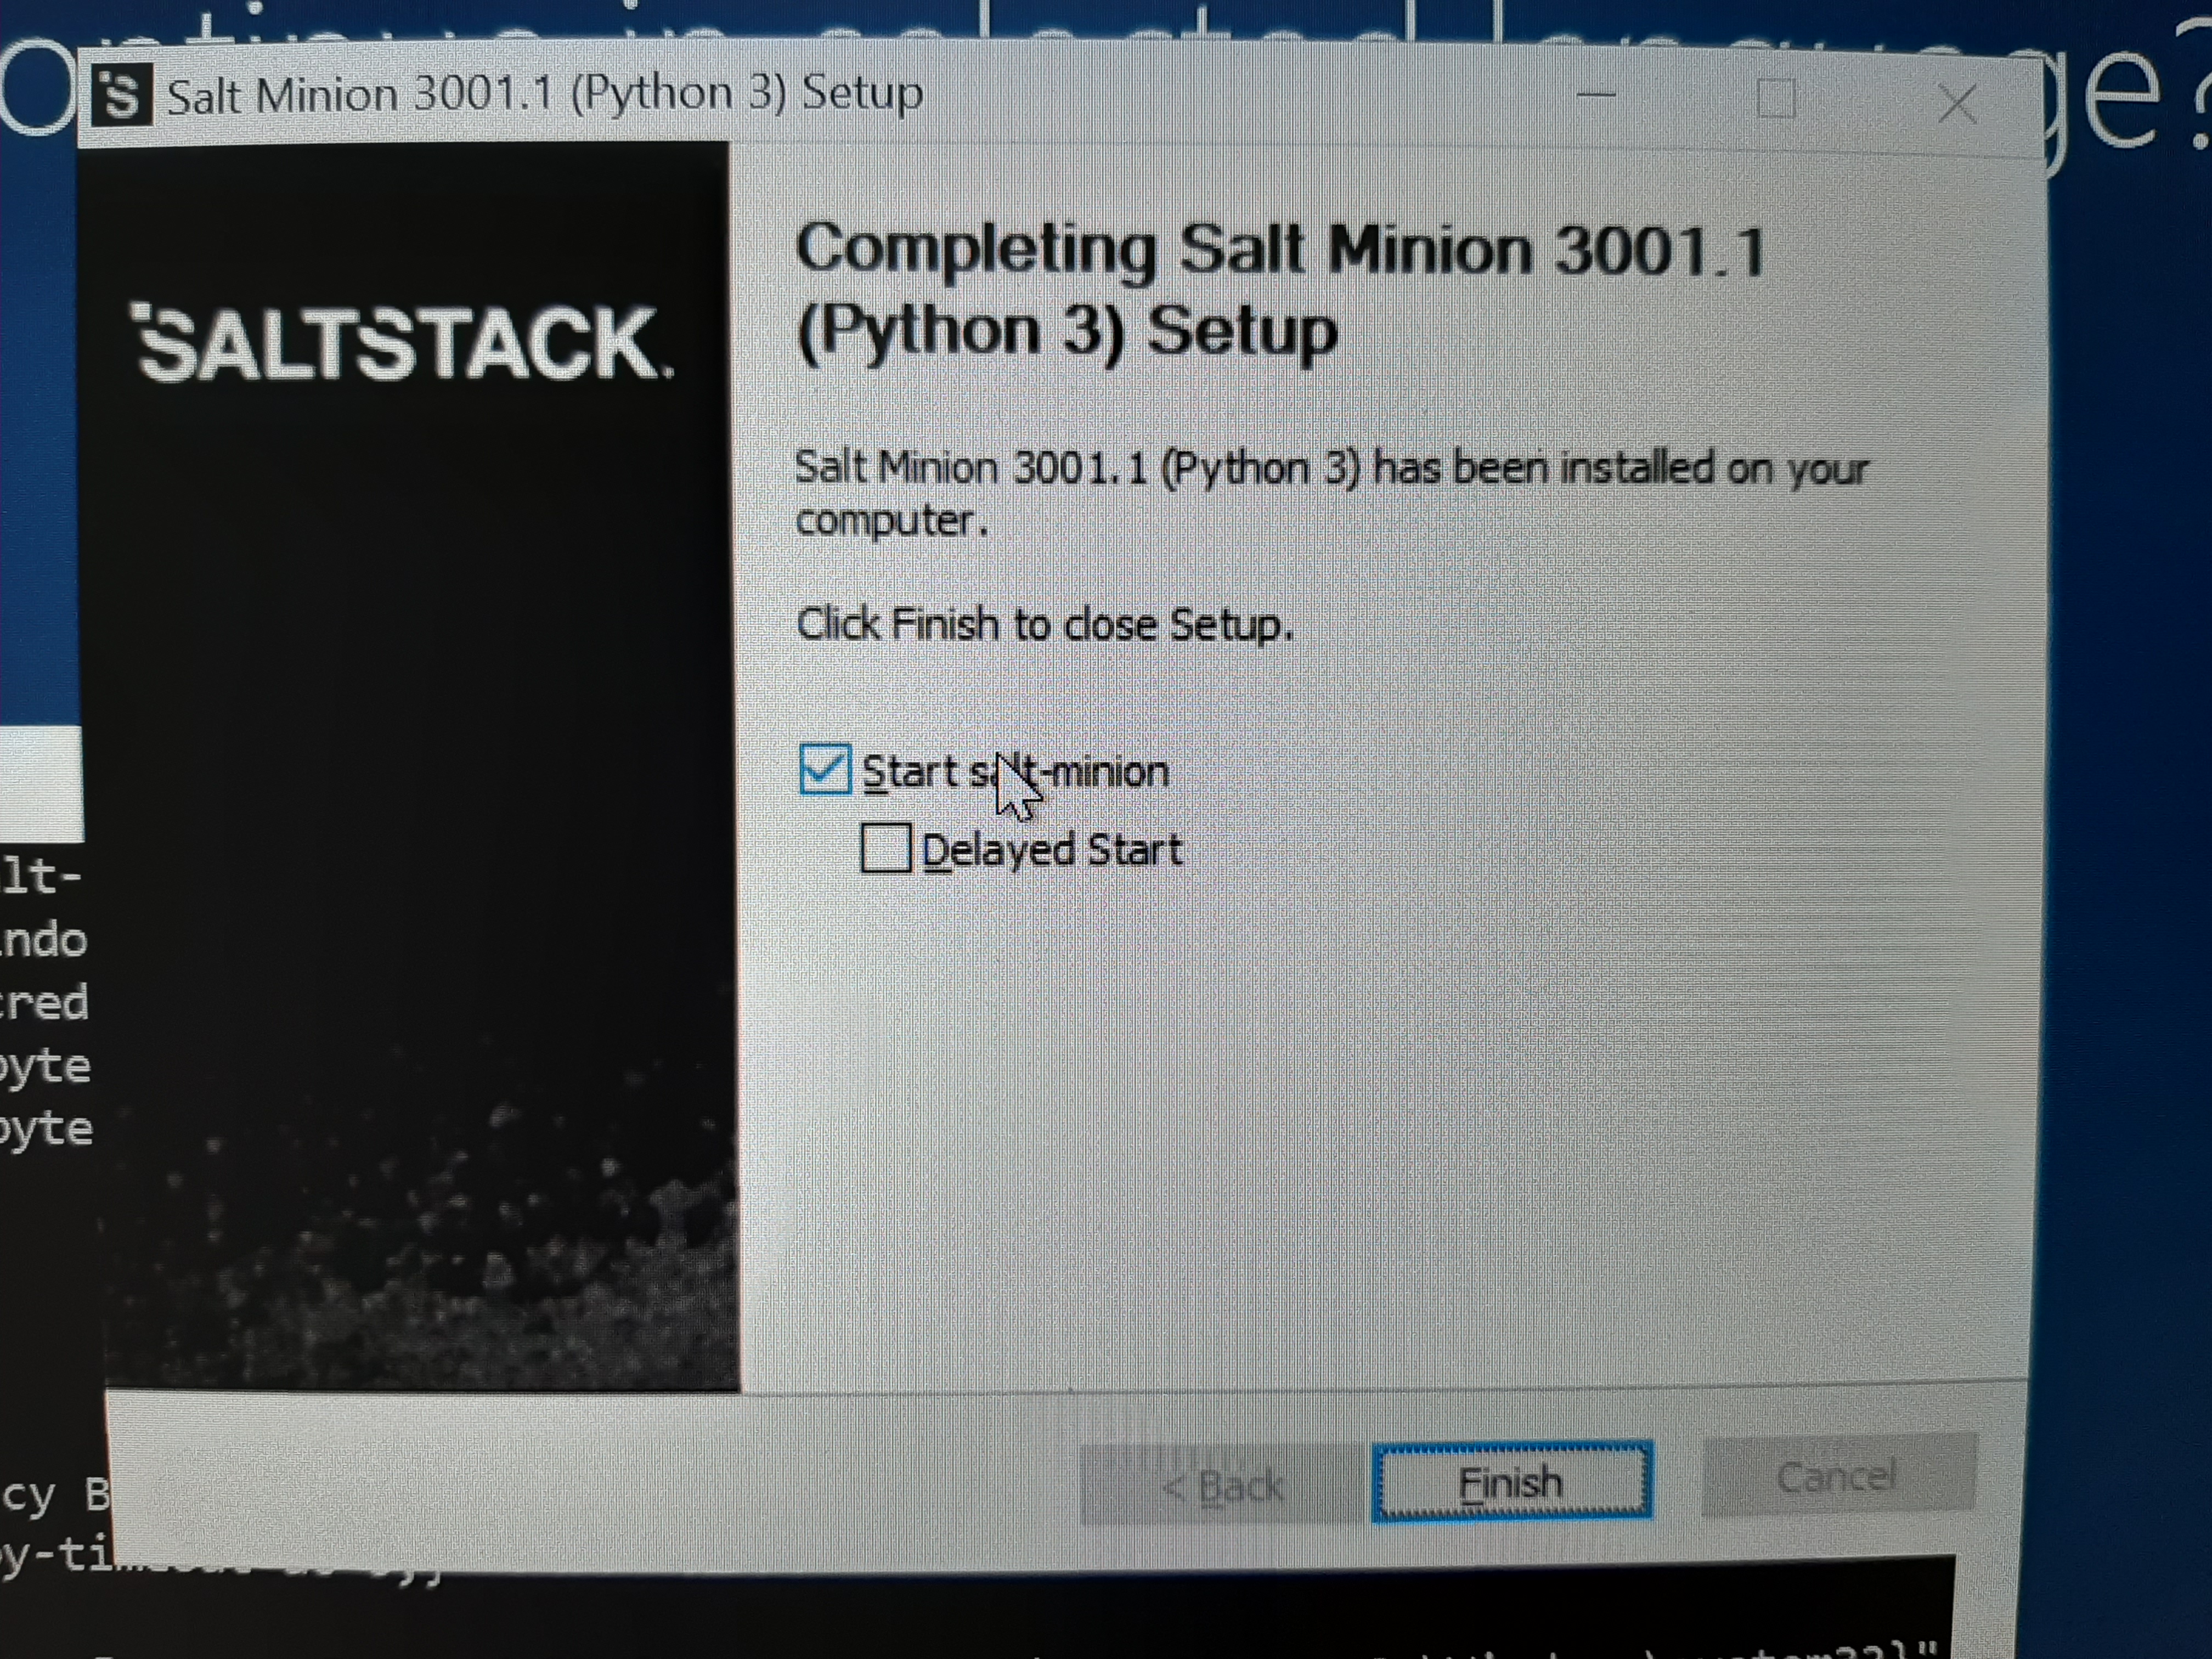 The salt minion application is now installed on the computer and ready to communicate with the master. Note it will begin logging attempts to access the master, so to avoid creating a very large log file continue to accept the new minion key on the master. Otherwise in the last screen do not start the minion or at the command prompt enter:
C:\sc stop salt-minion9) After the minion is installed go to the master and accept the new minion key.
root@master:/etc/salt/pki/master# salt-key
Accepted Keys:
Denied Keys:
Unaccepted Keys:
rsg-lt987
Rejected Keys:

root@master:/etc/salt/pki/master# salt-key -a rsg-lt987
The following keys are going to be accepted:
Unaccepted Keys:
rsg-lt987
Proceed? [n/Y]
Key for minion rsg-lt987 accepted.
10) Change to the directory where the state file is located. root@master:/etc/salt/pki/master# cd /srv/salt root@master:/srv/salt# 11) Update package cache on the minion:
root@master:/srv/saltstack/win# salt rsg-lt987 pkg.refresh_dbThis should take some time and report back with several hundred successes. 12) Execute the win10-setup-new.sls state. Note that the "-t600" is a 10 minute wait for the state to finish. If installing many packages increase this time. If time runs out the master will not display the return value of the execution, although the state execution may have successfully completed. root@master:/srv/salt# salt -t600 state.sls win10-setup-new If it all passes the machine will reboot to a short OOBE. After answering the OOBE questions it will display the accounts login screen. The accounts created will only require the initial security preferences OOBE page to be configured on the initial login attempt.
Salt Master Status checks
- See summary sheet https://sites.google.com/site/mrxpalmeiras/saltstack/salt-cheat-sheet

- List active salt jobs
- salt-run jobs.active
- List packages on minion
- salt hostname pkg.list_pkgs
- List minion clients that are up
- salt-run manage.up
- List minion status
- salt-run manage.status
- List minions that are down
- salt-run manage.down
Troubleshoot
The state file execution may fail for any number or reasons:A package failed to install
Determine if the package is up to date in the /srv/salt/win/repo-ng/salt-winrepo-ng A package can't be installed, e.g. CUDA won't be installed if there is no GPUCan't access minion after state execution
The minion is turned off on the target machine. To access it again turn it on in Services on the Windows machine or in a Command Prompt window enter "\sc start salt-minion"The Batch File
Note: verify the Salt-Minion is update to date and matches the script - see https://docs.saltproject.io/en/latest/topics/installation/windows.htmlOn the USB flash drive will be two files: WindowsMinionInstall.bat -and- Salt-Minion-3002.6-AMD64-Setup.exe Note the line - master=192.168.1.56 - is the IP of your salt master. Change this to the actual IP of your master. Also, use the Salt-Minion-NNNN.N version to match your master version.
WindowsMinionInstall.bat:
@ECHO OFF
title Install Windows Salt Minion
powershell -NoProfile -ExecutionPolicy Bypass -Command "& {powercfg -x -monitor-timeout-ac 0; powercfg -x -disk-timeout-ac 0; powercfg -x -standby-timeout-ac 0;}"
set minion=%1
 Salt-Minion-3002.6-AMD64-Setup.exe /master=192.168.1.56 /minion-name=%minion%
The State File
In this state file the WSL stanzas are commented. Not all Windows 10 builds can run WSL. Check the latest release information https://docs.microsoft.com/en-us/windows/wsl/install-win10
root@master:/srv/salt# cat win10-setup-new.sls
install_site_key:
  cmd.run:
    - name: powershell "changepk.exe /ProductKey xxxxx-xxxxx-xxxxx-xxxxx-xxxxx"

create_cscf-admin_account:
  user.present:
    - name: cscf-adm
    - groups:
      - Users
      - Administrators
      - Remote Desktop Users
    - home: C:\Users\cscf-adm
    - fullname: cscf-adm
    - password: CsAd2020

create_cscf-op_account:
  user.present:
    - name: cscf-op
    - groups:
      - Users
      - Administrators
      - Remote Desktop Users
    - home: C:\Users\cscf-op
    - fullname: cscf-op
    - password: CsOp2020

# Removes most of the OOBE for user accounts except for the Privacy Settings.
stop_oobe_for_users:
  reg.present:
    - name: HKEY_LOCAL_MACHINE\SOFTWARE\Microsoft\Windows\CurrentVersion\Setup\OOBE
    - vname: UnattendCreatedUser
    - vdata: 1
    - vtype: REG_DWORD

stop_oobe_animation_for_users:
  reg.present:
    - name: HKEY_LOCAL_MACHINE\SOFTWARE\Microsoft\Windows\CurrentVersion\Policies\System
    - vname: EnableFirstLogonAnimation
    - vdata: 0
    - vtype: REG_DWORD

get_o365:
  file.managed:
    - name: C:\Users\Public\Desktop\OfficeSetup.exe
    - source: salt://OfficeSetup.exe

get_vpn:
  file.managed:
    - name: C:\Users\Public\Desktop\anyconnect-win-4.9.04043-core-vpn-webdeploy-k9.exe
    - source: salt://anyconnect-win-4.9.04043-core-vpn-webdeploy-k9.exe

get_cuda:
  file.managed:
    - name: C:\Users\Public\Desktop\cuda_11.1.0_456.43_win10.exe
    - source: salt://cuda_11.1.0_456.43_win10.exe

install_cuda:
  cmd.run:
    - name: powershell "C:\Users\Public\Desktop\cuda_11.1.0_456.43_win10.exe -s"
    - requires:
      - get_cuda
      - turn_off_ps_security

install_pkgs:
  pkg.installed:
    - pkgs:
      - 7zip
      - gimp
#      - jdk8
      - firefox_x64
      - thunderbird
      - nextcloud-client
#      - owncloud
      - smartmontools
      - vlc
      - zoom
      - adobereader-xi
      - git
      - chrome
      - gvim
      - putty
      - teamviewer
      - texworks
      - virtualbox

disable_NLA:
  reg.present:
    - name: HKEY_LOCAL_MACHINE\SYSTEM\CurrentControlSet\Control\Terminal Server\WinStations\RDP-TCP
    - vname: UserAuthentication
    - vdata: 0
    - vtype: REG_DWORD

allow_rdp:
  module.run:
    - name: rdp.enable

#install_wsl:
#  cmd.run:
#    - name: powershell "dism.exe /online /enable-feature /featurename:Microsoft-Windows-Subsystem-Linux /all /norestart"

#install_wsl2:
#  cmd.run:
#    - name: powershell "dism.exe /online /enable-feature /featurename:VirtualMachinePlatform /all /norestart"

#set_wsl2_default:
#  cmd.run:
#    - name: powershell 'wsl --set-default-version 2'

txfr_set_name.ps1:
  file.managed:
    - name: C:\salt\conf\set_name.ps1
    - source: salt://set_name.ps1

turn_off_ps_security:
  cmd.run:
    - name: Set-ExecutionPolicy Unrestricted
    - shell: powershell

set_machine_name:
  cmd.run:
    - name: C:\salt\conf\set_name.ps1
    - shell: powershell
    - requires:
      - txfr_set_name.ps1
      - turn_off_ps_security

enable_display_sleep:
  cmd.run:
    - name: powershell "powercfg -x -monitor-timeout-ac 5"

enable_system_sleep:
  cmd.run:
    - name: powershell "powercfg -x -standby-timeout-ac 6"

enable_disk_sleep:
  cmd.run:
    - name: powershell "powercfg -x -disk-timeout-ac 10"

disable_minion_on_boot:
  cmd.run:
    - name: 'sc config "salt-minion" start= disabled'

reboot_machine:
  cmd.run:
    - name: Restart-Computer -Force
    - shell: powershell
    - requires:
      - set_machine_name
#      - get_wsl_ubuntu
#      - set_wsl2_default
#      - install_wsl2
#      - install_wsl
      - allow_rdp
      - disable_NLA
      - install_pkgs
      - install_cuda
      - get_vpn
      - get_o365
      - create_cscf-op_account
      - create_cscf-admin_account
      - install_site_key
Supporting Files
OfficeSetup.exe, anyconnect-win-4.9.04043-core-vpn-webdeploy-k9.exe, cuda_11.1.0_456.43_win10.exe To change the name of the computer to match the minion name required a PowerShell script. This file needs to be in the same directory as the state file.root@master:/srv/salt# cat set_name.ps1 $var1=Select-String -Path C:\salt\conf\minion -Pattern 'id:' $null,$name = $var1 -split 'id: ' Rename-Computer -NewName $name -Force
Other Stanzas and supporting files
To shrink a Windows volume use the command text file diskpart_shrink.txt and the following two stanzas:
get_diskpart:
  file.managed:
    - name: C:\WINDOWS\system32\diskpart_shrink.txt
    - source: salt://diskpart_shrink.txt

shrink_drive:
  cmd.run:
    - name: powershell "diskpart /s C:\WINDOWS\system32\diskpart_shrink.txt"
    - stateful: False
    - requires:
      - get_diskpart

root@master:/srv/salt# cat diskpart_shrink.txt
list volume
select volume 2
shrink desired=30000
list volume
exit
Using Chocolatey
Chocolatey is a community vetted public repository for Windows applications: https://chocolatey.org/packagesroot@master:/srv/salt/win# salt -t 300 * pkg.install chocolateyCheck the installation:
root@master:/srv/salt/win# salt -t 100 myMinion chocolatey.bootstrap
myMinion:
    Chocolatey found at C:\ProgramData\Chocolatey\bin\chocolatey.exe
Install a package via Chocolatey:
root@master:/etc/salt# salt -t 100 myMinion chocolatey.install sysinternals--
- RunBatchFile.jpg:
- WelcomToSaltStack.jpg:
- TermsOfAgreement.jpg:
- Install.jpg:
- Install-vcredist.jpg:
- Finish.jpg:


| I | Attachment | History | Action | Size | Date | Who | Comment |
|---|---|---|---|---|---|---|---|
| |
Finish.jpg | r1 | manage | 4154.7 K | 2020-12-04 - 13:45 | GordBoerke | |
| |
Install-vcredist.jpg | r1 | manage | 2524.4 K | 2020-12-04 - 13:45 | GordBoerke | |
| |
Install.jpg | r1 | manage | 3035.7 K | 2020-12-04 - 13:45 | GordBoerke | |
| |
RunBatchFile.jpg | r1 | manage | 3092.6 K | 2020-12-04 - 11:23 | GordBoerke | |
| |
TermsOfAgreement.jpg | r1 | manage | 2638.5 K | 2020-12-04 - 13:45 | GordBoerke | |
| |
WelcomToSaltStack.jpg | r1 | manage | 2634.7 K | 2020-12-04 - 13:22 | GordBoerke |
Topic revision: r22 - 2021-05-28 - LoriPaniak
Information in this area is meant for use by CSCF staff and is not official documentation, but anybody who is interested is welcome to use it if they find it useful.
- CF Web
- CF Web Home
- Changes
- Index
- Search
- Administration
- Communication
- Hardware
- HelpDeskGuide
- Infrastructure
- InternalProjects
- Linux
- MachineNotes
- Macintosh
- Management
- Networking
- Printing
- Research
- Security
- Software
- Solaris
- StaffStuff
- TaskGroups
- TermGoals
- Teaching
- UserSupport
- Vendors
- Windows
- XHier
- Other Webs
- My links
 |
|
Ideas, requests, problems regarding TWiki? Send feedback