The hard-disk drive bays provide space for up to six 1.6-inch or eight 1-inch SCSI
hard-disk drives. (See "Installing Drives in the External Bays"
for information on installing SCSI CD-ROM drives and SCSI tape drives in the external
drive bays.)
SCSI Hard-Disk Drive Configuration
The SCSI drives must be configured as follows:
- Disable termination on the drives. The SCSI backplane board provides termination for the
SCSI bus.
- Set the SCSI ID on all drives to 0. All SCSI ID numbers for the drives
are set by the SCSI backplane board (the rightmost drive is set to SCSI ID 0).
- Configure the drives so that the drive motor waits for a Start Unit command from the
SCSI host adapter before spinning.
Partitioning and Formatting SCSI Hard-Disk Drives
You may need to use different programs than those provided with the operating system to
partition and format SCSI hard-disk drives. See "Installing and Configuring SCSI
Drivers" in the User's Guide for information and instructions.
NOTICE: Do not turn off or reboot your system while the drive is being
formatted. Turning off or rebooting your system while the drive is being formatted can
cause a drive failure.
When you format a high-capacity SCSI hard-disk drive, be sure to allow enough time for
the formatting to complete. Long formatting times for these drives are normal. A
9-gigabyte (GB) hard-disk drive, for example, can take up to 2.5 hours to format.
SCSI hard-disk drives are supplied by Dell in special drive carriers that fit in the
hard-disk drive bays. To install a SCSI hard-disk drive, perform the following steps.
NOTICE: Hot-plug drive installation is not supported for systems without a Dell PERC
2 host adapter card.
- If the system does not have a redundant arrays of independent disks (RAID) controller
installed, shut down the system.
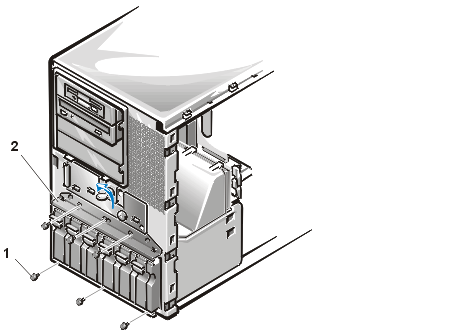
- Open the front bezel and unlock the hard-disk drive keylock (see Figure 2).
Figure 2. Installing a SCSI Hard-Disk Drive Carrier
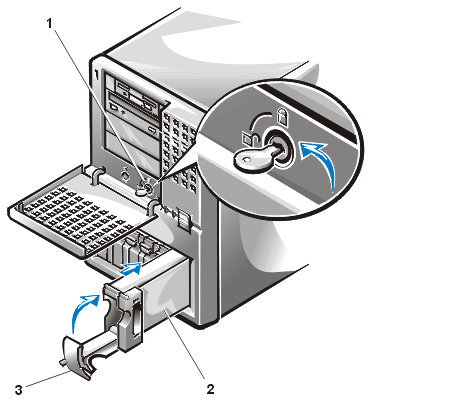 |
1 |
Hard-disk drive keylock |
| 2 |
Hard-disk drive carrier |
3 |
Hard-disk drive carrier
handle |
|
- For systems with RAID controllers, power down the hard-disk drive bay. If a
hard-disk drive is currently installed in the bay, wait until all three SCSI hard-disk drive indicators
on the hard-disk drive carrier handle are turned off before proceeding.
- Open the drive carrier handle and slide the carrier toward you until it is free of the
drive bay.
- Open the handle on the new hard-disk drive carrier.
- Align the edge of the carrier with the notches in the hard-disk drive bay keys and
insert the carrier into the drive bay (see Figure 2).
- Close the drive carrier handle to lock the new drive carrier in place.
- Lock the hard-disk drive keylock (see Figure 2).
- Close the front bezel.
- For systems with RAID controllers, restore power to the drive bay.
- If the hard-disk drive is a new drive, run the Dell Diagnostics
to test the new drive.
Follow these general guidelines when you install a Dell host adapter card. For specific
instructions, refer to the documentation supplied with the PERC host adapter card.
 |
WARNING: Before you install the host
adapter card, you must turn off the computer and disconnect it from the electrical outlet.
For more information, see "Safety First—For
You and Your Computer." |
NOTICE: See "Protecting Against
Electrostatic Discharge."
- Unpack the host adapter card and prepare it for installation.
Refer to the documentation accompanying the host adapter card.
- Remove the computer cover.
- Install the host adapter card.
- Detach the SCSI interface cable from the primary SCSI host-adapter connector on the
system board (see Figure 1 in
"Installing System Board Options" for the location of the SCSI host adapter
connector).
- Connect the end of the SCSI interface cable to the connector on the host adapter card.
To identify the correct connector, refer to documentation for the host adapter card.
 |
NOTE: If you will be attaching
external SCSI devices using the external SCSI connection slots on the computer's back
panel, perform steps 6 through 8; otherwise, go to step 9. |
- Connect the SCSI external access cable from the host adapter kit to one of the Ultra3
SCSI host adapter connectors (labeled "PRIMARY SCSI A" and "PRIMARY SCSI
B") on the system board.
- Attach the other end of the SCSI external access cable to the computer's back panel.
- If you are attaching multiple external SCSI devices, daisy-chain the devices to each
other using the cables shipped with each device.
See each device's documentation for information on cabling that device as part of a daisy
chain.
- Replace the computer cover, and
then reconnect the computer and peripherals to their AC power sources.
- Connect the external SCSI device(s) to electrical outlet(s).
For each external device, plug the socket end of the power cable into the power receptacle
on the back of the device. Plug the other end of the power cable into an electrical
outlet.
- Install any required SCSI device drivers.
See "Installing and Configuring SCSI Drivers" in the User's Guide for
information and instructions.
- Test the SCSI devices.
Test a SCSI hard-disk drive by running the Dell Diagnostics. To
test a SCSI tape drive, also refer to the documentation for the tape drive software to
perform a tape drive backup and verification test.
To replace a SCSI backplane board with a different backplane board, perform the
following steps.
NOTICE: See "Protecting Against
Electrostatic Discharge."
- Unpack the SCSI backplane board upgrade kit.
- Remove the computer cover and front bezel.
NOTICE: You must remove all hard-disk drives to avoid damaging the SCSI
backplane board when you remove it later in this procedure.
- Remove the hard-disk drives from the system.
- Slide the system board tray to
its service position.
- Disconnect the SCSI cable from the SCSI backplane board.
To avoid damage to the cable, use the strain-relief loop to disconnect the cable.
- Disconnect the flat data cable from the locking connector on the backplane board.
- Disconnect the power cable labeled "HD-B/P" from the power
connector on the backplane board.
To release the connector, press the latch on the side of the connector.
- Disconnect the fan power cable from the power connector labeled "FAN" on the
backplane board.
To release the connector, press the latch on the side of the connector.
- Loosen the captive thumbscrew on the backplane board.
- Slide the SCSI backplane board away from the chassis inner wall approximately 1
centimeter (cm) (a quarter inch), and then lift the board off of the L-shaped mounting
tabs and away from the chassis (see Figure 3).
Figure 3. Removing a SCSI Backplane Board
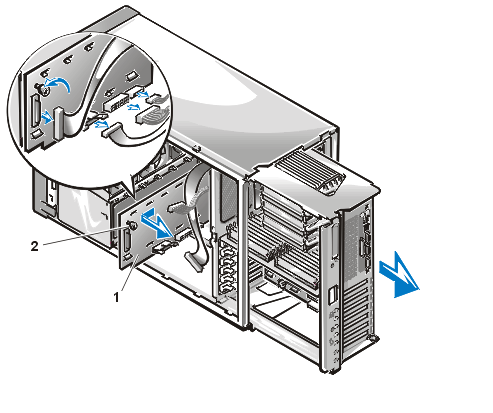 |
1 |
SCSI backplane board |
2 |
Thumbscrew |
|
- Install the new backplane board:
- While holding the backplane board by its edges, position the board so that the tabs on
the computer chassis wall fit through the corresponding slots in the backplane board.
- Slide the backplane board toward the power supply paralleling board.
- Secure the backplane board by tightening the captive thumbscrew.
- Connect the 20-pin data cable leading from the system board to the connector labeled
"PLANAR" on the backplane board (see Figure 4 or Figure 5).
Figure 4. Back of 1 x 8 or 1 x
6 SCSI Backplane Board
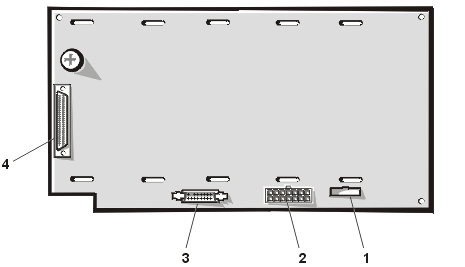 |
1
|
Cooling fan power cable
connector (FAN) |
2
|
Power connector (POWER) |
| 3 |
System-board data cable
connector (PLANAR) |
| 4 |
Ultra3 SCSI cable connector
(SCSIA) |
|
Figure 5. Back of 2 x 4 SCSI Backplane Board
 |
1 |
Ultra3 SCSI cable connector
(SCSIA) |
2 |
Ultra3 SCSI cable connector
(SCSIB) |
| 3 |
Cooling fan power cable
connector (FAN) |
| 4 |
Power connector (POWER) |
| 5 |
System-board data cable
connector (PLANAR) |
|
- Connect the power cable labeled "HD-B/P" to the connector labeled
"POWER" on the backplane board.
- Connect the SCSI cable leading from the connector labeled "PRIMARY SCSI A" on
the system board to the connector labeled "SCSIA" on the backplane board.
- If you are installing a 2 x 4 SCSI backplane and want to operate the backplane in a
split 2 x 4 configuration, connect the connector labeled "SCSIB" on the
backplane board to the second Ultra3 connector on the system board, or to a SCSI host
adapter card.
|
NOTE: You can configure the 2 x 4
SCSI backplane as a 1 x 8 backplane by connecting only the connector labeled
"SCSIA" on the backplane board to a SCSI controller. |
- Slide the system board tray back into the system chassis.
Does the new SCSI backplane board have a different number of drive bays?
Yes. You must change the orientation of the two drive bay keys
to match the new backplane. Go to step 16.
No. Go to step 22.
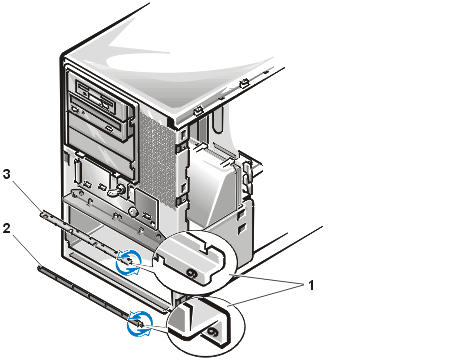
- Turn the key in the keylock to lock the drive-locking flange (see Figure 6).
With the flange in the locked position, you have easier access to the upper drive bay key.
Figure 6. Removing the Drive Bay Keys
 |
1 |
Screws (6) |
2 |
Drive-locking flange |
|
- To remove the upper drive bay key, remove the three screws.
- To remove the lower drive key, remove the three screws securing the key to the chassis.
- Rotate each drive bay key so that the "6" or "8" stamped on the end
of each key faces forward and matches the drive capacity of the new backplane (see Figure
7).
Figure 7. Reinstalling the Drive Bay Keys
 |
1 |
Key stamp |
2 |
Lower drive bay key |
3 |
Upper drive bay key |
|
- Reinstall the lower drive key using the three screws.
- To reinstall the upper drive key, lock the drive-locking flange and reinstall the three
screws through the flange cutouts.
- Replace the front bezel and computer
cover.
- Reinstall the hard-disk drives in the computer.
|
NOTE: You can use only 1-inch
hard-disk drives with an 8-bay backplane—you cannot use 1.6-inch hard-disk drives. (A
6-bay backplane can accommodate 1.6-inch or 1-inch drives.) If you install an
8-bay backplane, you need to convert the drive carriers to the 1-inch width by
removing the spacer insert that fastens to each carrier adjacent to the carrier release
handle. |
- Reconnect the computer and peripherals to their AC power sources.
If you plan to boot the system from a hard-disk drive, the drive must be attached to
the primary (or boot) controller or SCSI host adapter card. You can select the primary
controller using the System Setup program. See "Using the System Setup Program"
in the User's Guide for instructions.
Back to Contents Page