Back to Contents Page
Installing Drives in the External Bays: Dell™ PowerEdge™
6400 Systems Installation and Troubleshooting Guide
Overview
The external drive bays at the front of your system hold up to three user-accessible,
half-height 5.25-inch devices (typically CD-ROM or tape drives). A small computer system
interface (SCSI) CD-ROM drive is standard in the first external drive bay, while two
additional devices of your choice can be installed in the next two external drive bays.
SCSI devices in the external drive bays may be connected to the Ultra/Narrow or Ultra3
(Ultra160) SCSI controller on the system board, or a SCSI controller on an expansion card.
A fourth drive bay accommodates a standard 3.5-inch diskette drive, which is controlled by
the diskette drive controller on the system board. See Figure 1 for a general view of the
various drives, connector cables, and power cables in the external drive bays.
Figure 1. External Drive Bay Hardware
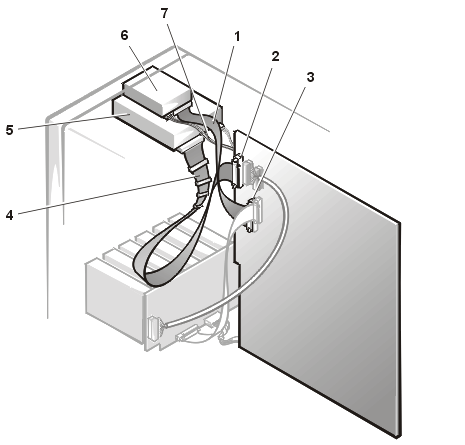 |
1 |
Diskette drive interface
cable |
2 |
Ultra/Narrow SCSI interface
connector (SECONDARY SCSI) |
| 3 |
Diskette drive interface
connector (FLOPPY) |
| 4 |
Ultra/Narrow SCSI cable |
| 5 |
SCSI CD-ROM drive |
| 6 |
Diskette drive |
| 7 |
Power cable |
|
Before You Begin
This section describes how to install the following options:
- Drives that use the computer's integrated diskette drive controller
- Drives that use the computer's integrated Ultra/Narrow SCSI
controller
- Tape drives that use a controller card
To remove or install drives in the external bays, you must remove
the computer covers.
 |
WARNING: Before you perform the procedures in this section, you
must turn off the computer and disconnect it from its AC power source. For more
information, see "Safety First—For You and
Your Computer." |
Removing Front-Panel Inserts
To protect the inside of the computer from foreign particles, a plastic insert covers
each empty external drive bay. Additionally, each empty external drive bay is covered by a
metal insert to maintain the necessary electromagnetic interference (EMI) shielding for
the chassis. Before you install a drive in an empty bay, you must first remove the plastic
and metal inserts. Whenever you remove a drive, be sure to replace the metal insert on the
chassis and then replace the plastic insert in the front bezel to cover the empty bay.
Removing a Plastic Insert
To remove the plastic insert for a drive bay that you intend to use, perform the
following steps:
- Remove the front bezel.
- Facing the inside of the front bezel, press against the center of the insert with your
thumbs until the insert bows sufficiently to loosen the tabs on the sides of the insert.
- Pull the insert out of the bezel.
Removing a Metal Insert
To remove the metal insert from a drive bay, perform the following steps:
- Remove the front bezel.
- Use your thumb to press in the tab on the right edge of the metal
insert to release the insert.
- Pivot the insert away from the chassis and disengage the tab on the
insert's left edge.
Connecting the Drive
This section describes the interface cables and power cables used with the drives in
your system.
Interface Cables
Most interface connectors are keyed for correct insertion; that is, a notch or a raised
tab on one connector matches a tab or a notch on the other connector. Keying ensures that
the pin-1 wire in the cable goes to the pin-1 ends of the connectors on both ends.
When you
disconnect an interface cable, take care to grasp the cable connector, rather than the
cable itself, to avoid stress on the cable.
DC Power Cables
Each drive in the external drive bays must connect to a four-wire DC power cable from
the system power supply. The connectors on these cables are labeled "FD1,"
"FD2," "FD3," "FD4," and "FD5." Connectors FD1
through FD4 are used for 5.25-inch devices; connector FD5 is used for the 3.5-inch
diskette drive.
SCSI Configuration
Information
Although SCSI devices are installed essentially the same way as other devices, their
configuration requirements are different. To configure SCSI devices installed in the
external bays, follow the guidelines in the following subsections.
SCSI ID Numbers
Each device attached to the Ultra/Narrow SCSI host adapter must have a unique SCSI ID
number from 0 to 7.
When SCSI
devices are shipped from Dell, the default SCSI ID numbers are assigned as follows:
- The integrated Ultra/Narrow SCSI host adapter is configured through
the basic input/output system (BIOS) as SCSI ID 7.
- A SCSI tape drive is configured as SCSI ID 6 (the default ID number
for a tape drive).
- A SCSI CD-ROM drive is usually configured as SCSI ID 5.
 |
NOTE: There is no requirement that SCSI ID
numbers be assigned sequentially or that devices be attached to the cable in order by ID
number. |
Device Termination
SCSI logic requires that the two devices at opposite ends of the SCSI chain be
terminated and that all devices in between be unterminated. The SCSI cable included in
your system has an active terminator installed at the end of the cable. Therefore, you
should disable the termination on all SCSI devices you attach to this cable.
Installing a SCSI Device
To install a SCSI device in the external drive bays that uses the integrated
Ultra/Narrow SCSI controller, perform the following steps:
- Prepare the drive for installation.
NOTICE: See "Protecting Against
Electrostatic Discharge."
Ground yourself by touching an unpainted metal surface on the back of the
computer, unpack the drive, and compare the jumper and switch settings with those in the
drive documentation. (See "SCSI
Configuration Information" for information on setting the drive's SCSI ID number
and enabling termination [if required].) Change any settings necessary for this system's
configuration.
If the drive does not already have drive rails attached,
attach a drive rail to each side of the drive and secure each drive rail to the drive with
a screw in each of the lower slotted screw holes on the drive rail.
- Remove the computer cover
and front bezel.
- Slide the new drive into its bay until it snaps securely into place.
If necessary, you can adjust drive alignment by repositioning one or both rails.
- Slide the system board tray to
its service position.
- If other installed drives interfere with access to the back of the tape drive, disengage
them by pressing in on the plastic drive rails at the front of the bay, and slide them
slightly toward the front of the chassis.
- Plug the DC power cable connector into the 4-pin power input connector on the back of
the drive.
- Select the connector on the Ultra/Narrow SCSI cable that most easily reaches the new
SCSI device, and press the interface cable connector firmly onto the drive's interface
connector.
- If you moved other drives in step 5, snap them back into place.
- Check all cable connections that may have been loosened during this procedure. Arrange
cables so that they will not catch on the computer covers or block the airflow of the fans
or cooling vents.
- Slide the system board tray back into the system chassis.
- If a front-panel insert on the front bezel blocks the bay in which you installed the
drive, remove the insert.
- Remove the computer cover
and front bezel.
- Reconnect the computer and peripherals to their AC power sources, and turn them on.
- Test the SCSI devices.
To test a SCSI tape drive, refer to the documentation for the tape drive software to
perform a tape drive backup and verification test.
Tape drives, autoloaders, and other SCSI devices that require their own separate
controller cards are shipped with the controller card and an interface cable.
To install the tape drive or other device in an external drive bay, perform the
following steps:
- Configure the controller card if necessary.
- Refer to the documentation that came with the device and the card. If the card
incorporates jumpers or switches that must be set to work with the system, verify or
change the settings as necessary.
NOTICE: See "Protecting Against
Electrostatic Discharge."
- Remove the computer cover
and front bezel.
- Slide the new drive into its bay until it snaps securely into place.
If necessary, you can adjust drive alignment by repositioning one or both rails.
- Install the controller card in an expansion
slot.
- Slide the system board tray to
its service position.
- If other installed drives interfere with access to the back of the tape drive, disengage
them by pressing in on the plastic drive rails at the front of the bay, and slide them
slightly toward the front of the chassis.
- Determine which DC power cable connector to use, and then
plug the DC power cable connector into the 4-pin power input connector on the back of the
drive.
- Attach the interface cable that came with the drive kit to the interface connector on
the back of the drive.
- Connect the interface cable to the controller connector on the controller card.
- Refer to the controller card's documentation to identify the controller connector on the
card.
- If you moved other drives in step 7, snap them back into place.
- Check all cable connections that may have been loosened during this procedure. Arrange
cables so that they will not catch on the computer covers or block the airflow of the fans
or cooling vents.
- Slide the system board tray back into the system chassis.
- If a front-panel insert on the front bezel blocks the bay in which you installed the
drive, remove the insert.
- Replace the front bezel
and computer cover.
- Reconnect the computer and peripherals to their AC power sources, and turn them on.
- Perform a tape backup and verification test with the drive as instructed in the
tape-drive software documentation that came with the drive.
To connect a stand-alone tape drive that connects to the computer using a controller
card and shielded interface/power cable, perform the following steps:
- Prepare the tape drive and controller card for installation.
Ground yourself by touching an unpainted metal surface on the back of the computer. Unpack
the tape drive and controller card, and configure them for the system according to the
instructions in the documentation that came with the tape drive.
NOTICE: See "Protecting Against
Electrostatic Discharge."
- Remove the computer cover.
- Install the controller card in an expansion
slot.
- Replace the computer cover.
- Connect the tape drive's interface/power cable to the external connector on the
controller card; secure the connection by tightening the screws on the connector.
- Reconnect the computer and peripherals to their power sources, and turn them on.
- Perform a tape backup and verification test with the drive as instructed in the software
documentation that came with the drive.
Back to Contents Page