Back to IT Assistant Interface
Dell OpenManage™ IT Assistant User's Guide
| New event, severity unknown | |
| New event, severity normal | |
| New event, severity warning | |
| New event, severity critical |
| Acknowledged event, severity unknown | |
| Acknowledged event, severity normal | |
| Acknowledged event, severity warning | |
| Acknowledged event, severity critical |
If you configure a user to be a DRAC II user, a telephone icon ( ![]() ) appears to the left of the user name on the Users tab of the systems window.
) appears to the left of the user name on the Users tab of the systems window.
See "User Setup for Systems and RACs" for more information on DRAC II users.
If you configure a user to be a DRAC III user, a peripheral
card icon ( ![]() ) appears to the left of
the user name on the Users tab of the systems
window.
) appears to the left of
the user name on the Users tab of the systems
window.
See "User Setup for Systems and RACs" for more information on DRAC III users.
If you configure a user to be a DRAC III user outside of IT Assistant, such
as by using Server Administrator or the racadm utility, a "no-edit" icon (
![]() ) appears to the left of
the user name on the Users tab of the systems
window. This indicates that the user was not created in IT Assistant and
cannot be edited using IT Assistant.
) appears to the left of
the user name on the Users tab of the systems
window. This indicates that the user was not created in IT Assistant and
cannot be edited using IT Assistant.
See "User Setup for Systems and RACs" for more information on DRAC III users.
See your Dell Remote Access Controller (RAC) Installation and Setup Guide for information on the racadm utility. See the Server Administrator User's Guide for information on creating DRAC III users in Server Administrator.
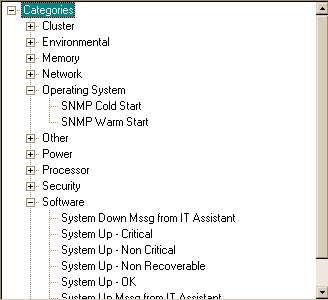
The IT Assistant event tree displays event categories and event types. Event categories are organizational levels of the event tree. Event types are the lowest-level "leaves" of the event tree and define the specifics about one or more Simple Network Management Protocol (SNMP) or Desktop Management Interface (DMI) event sources that you want to monitor. To monitor the event sources defined in an event type, you must apply a filter to the event type or its parent category.
To view the event tree, expand the Configuration branch of the IT Assistant navigation tree and click Event Categories. To expand a branch of the event tree, click the + (plus) sign to the left of a category, or double-click the category. A - (minus) sign indicates an expanded category that cannot be further expanded. Entries without + or - signs are event types. To view the event sources defined in an event type, select the event type and click Edit in the Event Categories dialog box.
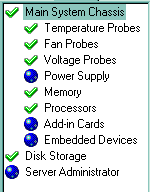
When you click a temperature probe, fan probe, or voltage probe in the status tree, gauge indicators appear on the Status tab of the system window indicating the minimum and maximum warning thresholds for the probe. Gauges may not appear if a probe has only one threshold.
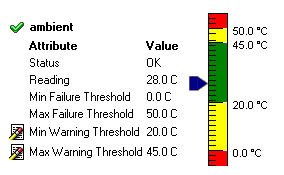
| NOTE: The gauges on the Status tab may show a complete green bar if the minimum warning threshold and the maximum warning threshold are both set to the exact center point of the gauge's range. To correct this display problem, change one of the threshold values so that the minimum and maximum threshold values are not the same. |
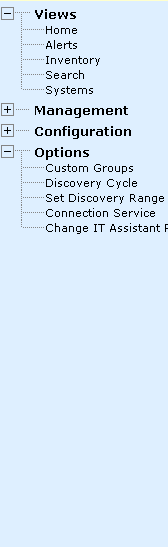
The IT Assistant navigation tree lists the names of the windows in the IT Assistant application. The tree is organized into four expandable branches that represent the following functional categories: Views, Management, Configuration, and Options. Table 1 shows the navigation tree as it appears when you first start IT Assistant.
To expand a branch of the navigation tree, click the + (plus) sign to the left of the branch; the + sign changes to a - (minus) sign and the windows under that functional category appear below the branch. The Views and Options branches are expanded by default when you start IT Assistant. Clicking the - sign collapses a branch.
To navigate to a particular window, expand the branch that contains that window (if not already expanded) and then click the window name.
Table 1 lists all the windows you can navigate to in IT Assistant. Click the links to learn about the functions you can perform in each window.
Table 1. The IT Assistant Navigation Tree
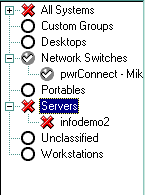
The following indicators display to the left of groups and systems in the system tree and to the left of groups in the home window.
| Group is empty. | |
| Group contains only noninstrumented, healthy systems. | |
| Group contains only healthy systems. | |
| Group contains at least one system with a warning condition. | |
| Group contains at least one system with a critical condition. | |
| Group contains only healthy systems and at least one system that is powered down. | |
| Group contains at least one system with a warning condition and at least one system that is powered down. | |
| Group contains at least one system with a critical condition and at least one system that is powered down. |
| System is noninstrumented and healthy. | |
| System has an unknown health condition. | |
| System or component is healthy. | |
| System or component has a warning condition. | |
| System or component has a critical condition. | |
| Component has a null condition; management instrumentation does not report status for this component. | |
| System is powered down, last known condition was noninstrumented and healthy. | |
| System is powered down, last known condition was unknown. | |
| System is powered down, last known condition was healthy. | |
| System is powered down, last known condition was warning. | |
| System is powered down, last known condition was critical. |
The status tree displays discovered components within or attached to a discovered system. (The system tree displays discovered systems; the status tree displays components discovered within a system).
The status tree has two levels; main system components are listed at the branch (first) level, and components contained within a main component are listed at the leaf (second) level. Click a branch- or leaf-level component to view the status of that component; the status information appears to the right of the status tree.
Main System Chassis always appears at the branch level, with components contained within it listed on the leaf level. Other branch-level entries you may see are DRACII, DRAC III, ERA, Disk Storage, and Server Administrator, depending on the system configuration.
To collapse or expand a branch of the tree, double-click the status indicator to the left of a branch-level component, or double-click the component name.
The system tree displays all discovered systems on the network, which comprises systems that have been discovered on all currently registered discovery ranges since the last discovery cycle. To expand a branch of the tree, click the + (plus) sign to the left of an entry, or double-click the entry. A - (minus) sign indicates an expanded entry that cannot be further expanded.
| NOTE: A version of the system tree appears in the Filter Configuration dialog box under Select Source Nodes, but without the system status indicators. |