RST/BitterSuite Testing Using Arbitrary Scripts
RST/BitterSuite is a software testing framework which can use scripts that you write for testing. This allows for a lot of flexibility. It can be used by running the scripts /u/isg/bin/rst or /u/isg/bin/distrst (More details on it here https://cs.uwaterloo.ca/twiki/view/ISG/RST). These scripts use a certain test setup/suite which you make for assignments. Once the test setup is made, these scripts can be run to use the setup to test student submissions. We will now explain how the setup should be made. The test setup explained here is the test suite that is referred to by the link above which explains how to run RST
To start with, you will need a directory called marking in your course account. It should already be there if your course has been using RST. Otherwise you can make one: mkdir /u/csXXX/marking . marking will contain all your automated tests (public and private) for each of your assignments. In marking you will need to make a directory for each assignment. If you are using RST, then most likely you are using MarkUS for submissions for your course as well. In this case the directory name for each assignment must be the same as the assignment repository name on MarkUS so that it knows where the tests are and RST can relay the public test information to MarkUS upon student submission. Say for example we are setting up RST for Assignment 1. Then if the MarkUS repository is named A1 then we will create the directory marking/A1 . In marking/A1 we will have two directories: test.pt for public tests and test.1 for private tests. These directories are structured pretty much the same.The difference is that the tests in test.pt are run automatically upon student submission to MarkUS so that the students can view their public test results when they submit, and the tests in test.1 are run after the due date of the assignment for testing student submission on secret tests. Note that it is important for the public test suite to be names test.pt as it needs to be run automatically upon student submission. For the private tests we usually use test.1 for consistency, and test.2 if ever a secondary test suite is needed, but it doesn't really matter as long as it is test.x where 'x' is anything but 'pt' as that is reserved for public tests.
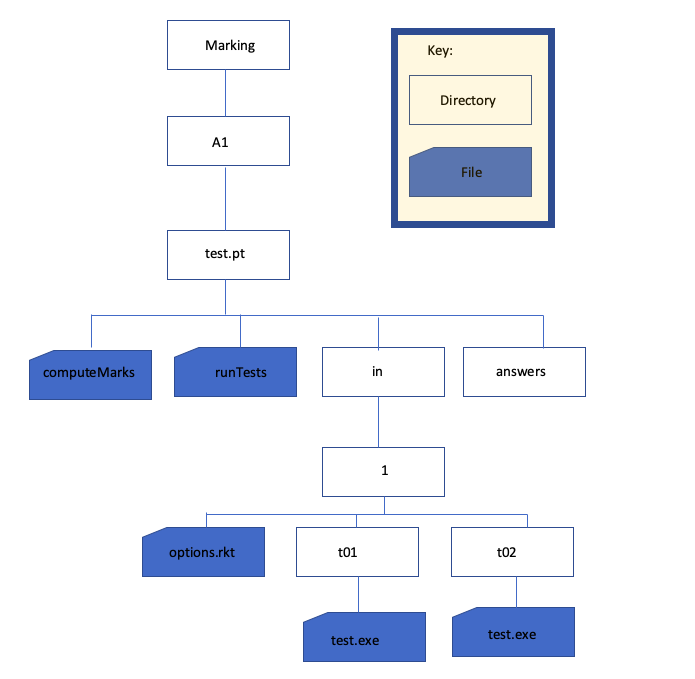
Below is an example of how a setup would look like. Don't worry! We'll go through all the things below step by step.
runTests, computeMarks, options.rkt and the test.exe files are all scripts. There is also another script that we can have: computeMarks-postprocess which we will talk more about later. RST will run these scripts in this order:
-
test.pt/runTests- If
test.pt/runTestsdoesn't exist, thedefault_runTestsdefined in/u/csNNN/.rstrcwill be run. Thedefault_runTestsfor most courses is/u/isg/bittersuite3/runTests.
- If
-
test.pt/computeMarks- If
test.pt/computeMarksdoesn't exist, thedefault_computeMarksdefined in/u/csNNN/.rstrcwill be run. Thedefault_computeMarksfor most courses is/u/isg/bittersuite3/computeMarks. - If you want to run a custom computeMarks and the default one, you can put
exec /u/isg/bittersuite3/computeMarks -qat the end oftest.pt/computeMarks
- If
- If
/u/isg/bittersuite3/computeMarksis run, then any test scripts in thetest.pt/in/folder will be run. - If
/u/isg/bittersuite3/computeMarksis run, thentest.pt/computeMarks-postprocesswill be run.
Running tests from =runTests
The runTests script is run in a testing account named csNNNt with a 't' at the end. This is safer than running the test script in the course account ( csNNN). After you create the runTests script, make sure it is executable using the chmod command. Since this script is run on a different account, you cannot directly access student submissions and your test setup. These are some of the many useful variables RST defines which you can use in runTests and your test.exe scripts:
-
testdir: This is a path to the test setup, i.e.test.pt. This is useful if you have some course provided files you need to use for testing student submissions. In that case you can make aprovided_filesdirectory with those files intest.ptand you can access them fromrunTestsandtest.exewith the path$testdir/provided_files -
submitdir: This is the folder that contains the student submission that you would want to test. For example if the students have submitted a file calledmain.cpp, you can access it with the path$submitdir/main.cpp. -
marksheet: The contents of this file are displayed to the students. So whatever you print to this file, students will be able to see in their test results. In the example below,runTestsprints to the fileresults, and then the contents ofresultsare printed to the filemarksheetincomputeMarks. By default this file is not saved, which for public tests it isn't usually an issue since it's automatically displayed to students once they submit on MarkUS, but it is possible to save it as discussed later in this document.
main.c.
-
test.pt/-
answers/(empty folder) - runTests
- computeMarks
-
As you might have noticed above, we didn’t need the in directory and the computeMarks-postprocess in the test.pt directory at all for the public test! In fact most of the time just runTests and computeMarks suffice since public tests are not that complicated. However, if you do have multiple public tests and/or you want to assign marks to them, then we will need the in directory, which we will talk about more below.
Note: The empty answers folder does not really do anything. You just need it there because RST complains otherwise.
Running tests from =computeMarks
After RST runs runTests, it will run computeMarks. The computeMarks script is run in the course account. This lets computeMarks access files in the course account, but it can also be dangerous (ex. if a student submits code that deletes files, and you run the student's code, it can delete files in the course account).
Examples where you can use computeMarks for testing are:
- You want to check if the students have registered their clicker ID on the course website
- You want to check if the students have completed tracing exercises on the course website
marksheet.
Running tests from =test.pt/in/ folder
After RST runs computeMarks, it will run your tests in the in folder. You can use the "External" language to make RST run scripts in the in folder. Name your scripts test.exe. The test.exe scripts will run as csNNNt testing account.
If you have a test.pt/computeMarks script, you need to run /u/isg/bittersuite3/computeMarks to process the in/ folder. Do this by putting exec /u/isg/bittersuite3/computeMarks -q at the end of your test.pt/computeMarks script.
The config.ss file is optional. You might not want it. It is useful in the case you want to use the https://cs.uwaterloo.ca/twiki/view/ISG/MarkUsScripts#set_marks_rst_sub_command script to upload marks to MarkUS as it helps print out test output in a way the script can recognise. However, there are other ways to upload marks to MarkUS if you want (Check https://cs.uwaterloo.ca/twiki/view/ISG/MarkUsScripts#MarkUs_Scripts . This is a very useful set of scripts and an essential read if you're using MarkUS).
Example: The following test suite checks that students submitted a C program that counts characters read in from the keyboard.
-
test.pt/-
answers/(empty folder) -
runTests -
computeMarks -
config.ss -
in/-
1/-
options.rkt -
t01/ -
t02/
-
-
-
Clean Up Work in =test.pt/computeMarks-postprocess
If there's anything you need to do before RST finishes, you can create a script called computeMarks-postprocess and RST will run it at the end before quitting. The computeMarks-postprocess script is run by /u/isg/bittersuite3/computeMarks.
Environment Variables
The runTests, computeMarks, and test.exe scripts receive information from RST through environment variables.
Here are some of the more useful environment variables (Here the course is cs115ae, assignment is a02 , and the question is 1):
| Variable Name | Available In | Description | Example |
|---|---|---|---|
| testdir | runTests computeMarks test.exe |
Path to the test suite in the course account | /u1/cs115ae/marking/a02/test.pt |
| submitdir | runTests computeMarks test.exe |
Path to folder containing the student's submitted files | /tmp/.cs115ae.a02.t.pt.ubuntu1804-00243.0829164511/20143lrssb6/20271FL4oip |
| student_questid | runTests computeMarks test.exe |
Student's Quest ID | yc2lee |
| assign | runTests computeMarks test.exe |
Assignment number | a02 |
| course | runTests computeMarks test.exe |
Course account name | cs115ae |
| test_summary | computeMarks | Stuff written to this file will be displayed in MarkUs is the submissions table | /tmp/tmp.jwmZERUzom |
| marksheet | computeMarks | Stuff written to this file will be included in the test results (OUTPUT.txt) | /tmp/.cs115ae.a02.t.pt.t01/19833kIwjHU/19988jpgyog/marksheet |
| external_test_path | test.exe | Path to the test.exe | /u1/cs115ae/marking/a02/test.ext/in/1/t01/test.exe |
| internal_test_id | test.exe | The test ID (question_testname) | 1_t01 |
| tmpdir | runTests computeMarks test.exe |
Path to a temporary directory that RST creates, and which test scripts are run from | /tmp/.cs115ae.a02.t.pt.t01/yc2lee/7664OTxI8A |
Saving Output
Output and files created by test scripts usually are not saved. One way to get around this is to use the -t c option when running rst, for example:
rst -t c -s yc2lee a02 pt
This will save all the files that RST creates while running tests.
From runTests
Standard output from runTests is not saved in the test results, but can be useful for debugging.
To save output or files created by runTests: In computeMarks, use the keepFile command to include the file in the test results folder. For example, if your runTests creates a file called "runTests_output.txt", in your computeMarks script, do:
keepFile runTests_output.txt -o
From computeMarks
Same thing as runTests.
From test.exe
Standard output from test.exe is automatically saved in the test results folder.
To save files created by test.exe, use the keepFile command.
 |
|
Ideas, requests, problems regarding TWiki? Send feedback