Back to Contents Page
Installing System Options: Dell™ PowerEdge™ 8450 Systems
Installation and Troubleshooting Guide
Overview • Expansion
Cards • PCI Hot Plug Utility • Removing an Expansion Card • Installing an Expansion Card • Adding Memory • Upgrading
the Microprocessors or Installing an Additional Microprocessor • Upgrading or Adding Cache Coherency
Filters • Replacing the Battery
Overview
This section describes how to install the following system options:
- Peripheral Component Interconnect (PCI) expansion cards
- Memory upgrades
- Cache coherency filters
- Microprocessor upgrades
This section also includes instructions for replacing the system
battery.
 |
WARNING: The power supplies in this
computer system produce high voltages and energy hazards, which can cause bodily harm.
Only trained service technicians are authorized to remove the computer cover and access
any of the components inside the computer. |
|
WARNING: To reduce the risk of
electrical shock, a trained service technician must disconnect the power supply cable
before servicing the system. For more information, refer to Safety First—For You and Your
Computer. |
Use Figure 1 to locate the
input/output (I/O) board features mentioned in this section and elsewhere.
Figure 1. I/O Board Features
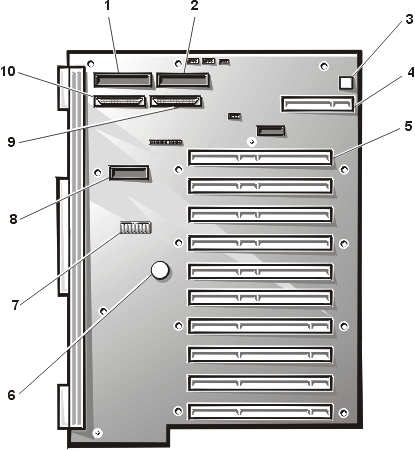
1 |
IDE controller connector |
2 |
Diskette-drive controller connector |
3 |
USB cable connector |
4 |
I/O riser-board cable connector |
5 |
PCI expansion-card connectors (10) |
6 |
System battery |
7 |
System configuration switches |
8
|
Server management feature connector |
9 |
External Ultra2/LVD SCSI connector |
10 |
Internal Ultra2/LVD SCSI connector |
Expansion Cards
The I/O board's expansion-card slots can accommodate up to ten 64-bit PCI cards. The
connectors are designated as shown in Figure 2.
Figure 2. PCI Expansion-Card Connectors
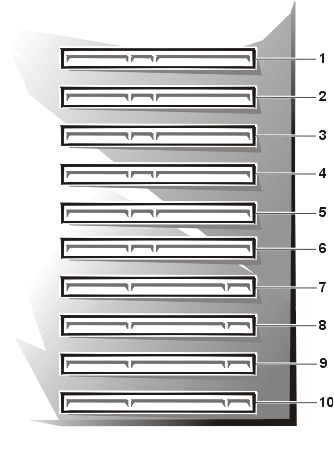
1
|
PCI expansion-card connector 1 |
2 |
PCI expansion-card connector 2 |
3 |
PCI expansion-card connector 3 |
4 |
PCI expansion-card connector 4 |
5 |
PCI expansion-card connector 5 |
6 |
PCI expansion-card connector 6 |
7 |
PCI expansion-card connector 7 |
8 |
PCI expansion-card connector 8 |
9 |
PCI expansion-card connector 9 |
10 |
PCI expansion-card connector 10 |
Choosing an Expansion Card
Connector
The system incorporates four separate PCI buses:
- Bus A (connectors 1 and 2) and bus B (connectors 3 through 6) operate
at a bus speed of 33 megahertz (MHz).
- Bus C (connectors 7 and 8) and bus D (connectors 9 and 10) operate at
a bus speed of 66 MHz or 33 MHz.
Refer to the following guidelines when adding an expansion card:
- If your system contains a combination of 33-MHz and 66-MHz expansion
cards, install the 33-MHz cards in connectors 1 through 6 and the 66-MHz cards in
connectors 7 through 10. (Installing a 33-MHz card in one of the 66-MHz–capable bus
connectors will cause both connectors on that bus to operate at 33 MHz.)
- If your system only contains 33-MHz expansion cards, distribute the
cards across all four PCI buses.
- Install a Dell PowerEdge Expandable RAID Controller 2 SCSI host
adapter card in connector 1.
- Install a Dell Remote Assistant Card (DRAC), version 2.0, in
connector 2.
- Install a 66-MHz QLogic host bus adapter card in connectors 7 through
10.
PCI Hot Plug Utility
Before replacing a PCI expansion card in your system, you must use
the PCI Hot Plug Utility to power down the expansion-card connector used by the expansion
card. This subsection describes how to install and run the utility.
 |
CAUTION: This utility supports hot
replacement of expansion cards only. To avoid damaging the system or the expansion card,
do not attempt to add a new expansion card using the PCI Hot Plug Utility. |
Installing the
PCI Hot Plug Utility
 |
NOTE: Before installing the utility,
make sure that you have installed Microsoft® Windows NT® Server 4.0 and Windows NT
Service Pack 3.0 or later. |
To install the PCI Hot Plug Utility, perform the following steps:
- Click the Start button and click Run.
- The PCI Hot Plug Utility may be located on the Dell Server Assistant
CD or on a separate diskette provided with the system. Insert the CD or diskette.
- Type the appropriate drive letter of the CD-ROM drive or diskette
drive, followed by setup.exe,
and press <Enter>.
- When the setup program dialog box appears, press <Enter> to run
the installation program.
Running the PCI Hot
Plug Utility
To run the PCI Hot Plug Utility, perform the following steps:
- Click the Start button, point to Programs, and select
the PCI Hot Plug Utility.
- The utility displays data for each of the PCI expansion slots in the
system, including the status of the expansion slots and the expansion cards installed.
- To add or restore power to a particular expansion slot, highlight the
appropriate slot and click Power.
PCI Expansion-Slot
Indicators
A pair of green and amber indicator lights is located above each of the ten PCI
hot-plug expansion slots in the system. Viewed from inside the system, the left-most
indicator in each pair is green. From the back of the system, the left-most indicator of
each pair is amber. Table 1 lists the possible patterns for these indicators.
Table 1. PCI Expansion-Slot Indicator
Patterns
| Green Indicator |
Amber Indicator |
Condition |
| Off |
Off |
Expansion slot power is off.
No error. |
| On |
Off |
Expansion slot power is on.
No error. |
| Off |
On |
Expansion slot power is off.
Power-related expansion-card connector error. |
| On |
On |
Expansion slot power is on.
Expansion card or software driver fault. |
Removing an Expansion Card
To remove an expansion card, perform the following steps:
- Remove
the PCI-card access door.
|
CAUTION: To avoid damaging the system
or the expansion card, you must power down the expansion slot by using the PCI Hot Plug
Utility (hot replacement only), or by shutting down the system, before you remove the
expansion card. |
- If you are replacing an existing expansion card, power down the
expansion slot by running the PCI Hot Plug
Utility.
When the green indicator light adjacent to
the expansion slot is off, the card may be safely removed.
- Disconnect any cables attached to the expansion card you want to
remove.
Be sure to record the location of each cable before you disconnect it.
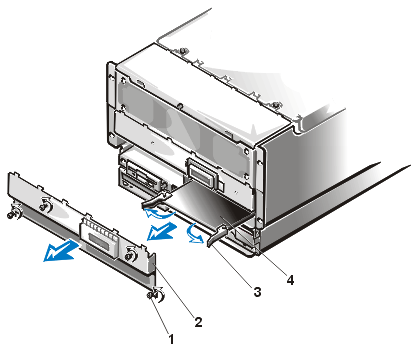
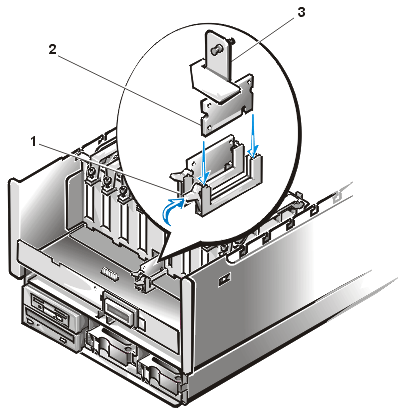
- The bracket on the expansion card is secured by a plastic latch (see Figure 3). Press and hold the clip on the back of the system
while pressing the release tab on the latch inside the system; then rotate the latch away
from the expansion-card bracket.
Figure 3. Expansion-Card Latches
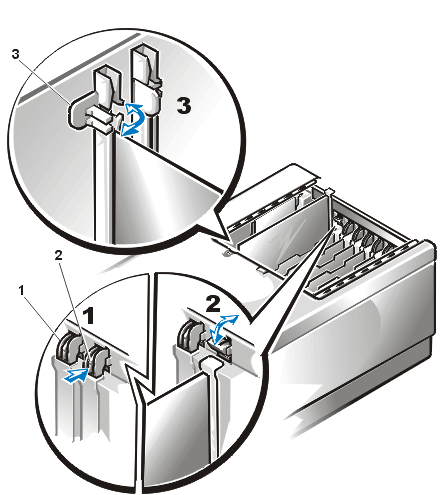
1 |
Expansion-card latch |
| 2 |
Release tab on expansion-card latch |
| 3 |
Plastic card guide |
- If the expansion card is a full-length card, release the card's inner
end by opening the tab on the plastic card guide (see Figure 3).
- Grasp the expansion card by its top corners, and carefully remove it
from the expansion-card connector.
- If you are removing the card permanently, install a metal filler
bracket over the empty card-slot opening.
|
NOTE: You must install a filler
bracket over an empty expansion slot to maintain Federal Communications Commission (FCC)
certification of the system. The brackets also keep dust and dirt out of the computer and
help to maintain proper cooling and airflow inside the computer. |
- Replace the PCI-card access door.
Installing an Expansion
Card
To install an expansion card, perform the following steps.
|
CAUTION: To avoid damaging the system
or the expansion card, you must power down the expansion slot by using the PCI Hot Plug
Utility (hot replacement only), or by shutting down the system, before you install the
expansion card. |
|
CAUTION: This utility supports hot
replacement of expansion cards only. Hot addition of new expansion cards is not currently
supported. |
- If you are adding a new expansion card (rather than replacing a
previously-installed card), shut down the system, including any
attached peripherals, and disconnect the system from its electrical outlet.
- Prepare the expansion card for installation, and remove the PCI-card
access door.
See the documentation that came with the expansion card for information on configuring the
card, making internal connections, or otherwise customizing the card for the system.
- Select an expansion slot.
- If you are replacing an existing expansion card with an identical
card, power down the expansion slot by running the PCI Hot Plug Utility.
When the green power indicator light adjacent to the expansion slot is off, the card may
be safely installed.
- Open the plastic expansion-card latch and remove the expansion-slot
filler bracket:
- Press and hold the plastic tab on the outside of the system chassis.
- Press the release tab on the latch inside the system chassis (step 1
in Figure 3).
- Open the expansion-card latch (step 2 in Figure
3) and remove the filler bracket.
- Insert the card-edge connector firmly into the expansion-card
connector on the chassis.
- When the card is firmly seated in the connector and the card-mounting
bracket is aligned with the brackets on either side of it, close the expansion-card latch.
- If the expansion card is a full-length card, secure the inner end of
the card by closing the plastic latch on the card guide over the top edge of the card (see
step 3 in Figure 3).
- Connect any cables that should be attached to the card.
See the documentation that came with the card for information about cable connections.
- If you have replaced a PCI expansion card, run the PCI Hot Plug Utility to restore power to the
expansion slot.
- Replace the PCI-card access door.
- If you have installed a new PCI expansion card, reconnect the
computer and peripherals to electrical outlets, and turn them on.
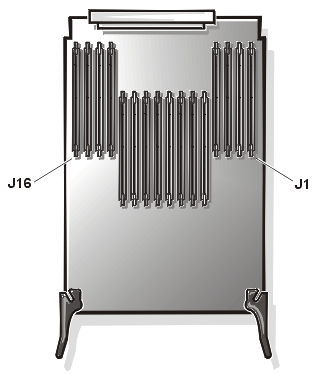
Adding Memory
The system supports one or two memory boards (see Figure 4). The
16 dual in-line memory module (DIMM) sockets on each of the system's two memory boards can
accommodate up to 16 gigabytes (GB) (when supported) of synchronous dynamic random-access
memory (SDRAM). Dell PowerEdge 8450 systems use PC100 registered DIMMs in these 168-pin
sockets.
Figure 4. Memory Board
Memory Upgrade Kits
You can upgrade system memory to 32 GB by installing combinations of
128-, 256-, and 512-megabyte (MB) registered SDRAM DIMMs or, when available, 1-GB
registered DIMMs. Memory upgrade kits can be purchased from Dell as needed.
|
NOTE: The DIMMs must be rated to run
at 100 megahertz (MHz) or faster. |
DIMM Installation Guidelines
The DIMM sockets are labeled "J1" through "J16." When you install
DIMMs, refer to the following guidelines:
- To support 2:1 interleaving, you must configure the
system with two memory boards containing identical DIMM configurations.
- You must install DIMMs in pairs—one DIMM per
memory board.
- You may mix different sizes of DIMMs within a memory board.
- For best performance, install DIMMs sequentially beginning with DIMM
socket "J1."
Performing a Memory
Upgrade
To upgrade the system memory, perform the following steps.
- Shut down the system, including any attached peripherals, and
disconnect the system from its electrical outlet.
- Remove the front bezel.
- To remove the memory board cover,
loosen the four captive thumbscrews securing the memory board cover to the front of the
system chassis, then pull the cover directly away from the system. (See Figure 5).
Figure 5. Removing the Memory Board
1 |
Memory-board cover retention screws (4) |
2 |
Memory board cover |
3 |
Memory-board retention levers (2) |
4 |
Memory board |
- Rotate the two memory-board retention levers outward about 90 degrees
to release the memory board (see Figure 5). Supporting the board by its edges, slide the
memory board out from the system, and place it component-side up on an antistatic surface.
- Locate the DIMM sockets into which you want to install or replace
DIMMs.
Figure 4 shows the location of the DIMM sockets on the
memory board.
- Install or replace the remaining DIMMs to reach the desired memory
total.
Follow the instructions in Installing DIMMs or Removing DIMMs, as appropriate.
- Align the left and right edges of the memory board with the guides in
the system and slide the memory board back into the system until the retention levers on
the board contact the chassis.
- Lock the memory board into place by rotating the retention levers
inward until the levers are parallel with the outer edge of the memory board.
- Replace the memory board cover and secure it with the four screws.
- Replace the front bezel.
- Reconnect the computer and peripherals to electrical outlets, and
turn them on.
- Run the System Memory
test in the Dell Diagnostics.
Installing DIMMs
To install a DIMM, perform the following steps:
- Press the ejectors on the DIMM socket down and outward, as shown in
Figure 6, to allow the DIMM to be inserted into the socket.
Figure 6. Installing a DIMM
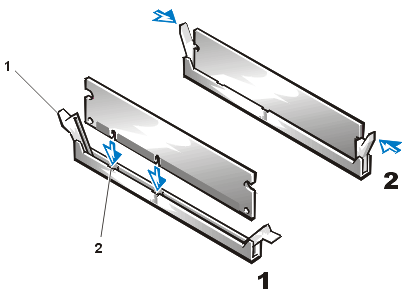
1 |
DIMM socket ejectors (2) |
2 |
Alignment keys (2) |
- Align the DIMM's edge connector with the slot in the center of the
DIMM socket, and insert the DIMM in the socket (see step 1 in Figure 6 ).
The DIMM socket has two alignment keys that allow the DIMM to be installed in the socket
in only one way.
- Press down on the DIMM with your thumbs while pulling up on the
ejectors with your index fingers to lock the DIMM into the socket (see step 2 in Figure 6
). When the DIMM is properly seated in the socket, the ejectors on the DIMM socket should
align with the ejectors on the other sockets with DIMMs installed.
- Repeat steps 1 through 3 to install the remaining DIMMs.
- Continue with step 6 of Performing
a Memory Upgrade.
Removing DIMMs
To remove a DIMM, press down and outward on the ejectors on each end of the socket
until the DIMM pops out of the socket (see Figure 7).
Figure 7. Removing a DIMM
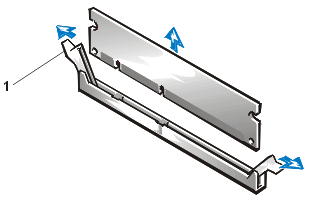
1 |
DIMM socket ejectors (2) |
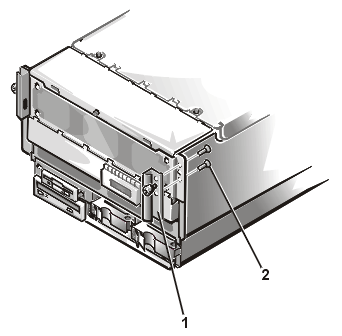
Upgrading the Microprocessors or Installing an Additional Microprocessor
|
CAUTION: If you are adding a
microprocessor to your system, you must order an upgrade kit from Dell. The upgrade kit
contains the correct version of microprocessor for your system. |
Each microprocessor is contained within a single-edge contact (SEC)
cartridge and heat sink assembly. The microprocessor assemblies are installed on two
microprocessor boards which accommodate four microprocessors each. Any unused
microprocessor connectors must contain a terminator card.
Microprocessor Installation Guidelines
When you install additional microprocessors, refer to the following guidelines:
- If you are adding an additional microprocessor, it must have the same
operating frequency and cache size as the previously installed microprocessors.
- Install additional microprocessors in sequential order, beginning
with socket PROC1 on the left microprocessor board.
- For best performance, install microprocessors in all four sockets on
the left microprocessor board before adding microprocessors to the right microprocessor
board.
- If you upgrade the system with a faster set of microprocessors, you must change
the microprocessor speed jumpers. See Microprocessor
Speed Jumpers in Jumpers, Switches, and Connectors.
Removing a Terminator Card
To remove a terminator card, perform the following steps.
- Shut down the system, including any attached peripherals, and
disconnect the system from its electrical outlet.
- Remove
the computer cover.
- Loosen the retention screws and release the retaining clip from the
microprocessor cage (see steps 1 and 2 in Figure 8).
- Using your thumbs, lift the latches on each corner of the terminator
card bracket to release the card from the microprocessor socket on the microprocessor
board (see step 3 in Figure 8).
Figure 8. Removing a Terminator Card
| 1 |
Retaining clip |
| 2 |
Latches (2) |
| 3 |
Terminator card |
- Slide the terminator card up and out of the microprocessor cage.
Installing a Terminator
Card
To install a terminator card, perform the following steps:
- Align the notch on the terminator card with the socket on the
microprocessor board (see Figure 8).
- Guide the card into the microprocessor cage and close the two latches
to lock the terminator card in place.
- Secure the retaining clip to the microprocessor cage.
- Replace the computer cover and reconnect the computer and peripherals
to electrical outlets.
Removing
an SEC Cartridge and Heat Sink Assembly
To remove an SEC cartridge and heat sink, perform the following steps.
|
WARNING: The SEC cartridge and heat
sink assembly can get extremely hot during system operation. Be sure the assembly has had
sufficient time to cool before you touch it. |
|
WARNING: When handling the SEC
cartridge and heat sink assembly, take care to avoid any sharp edges on the heat sink. |
- Shut down the system, including any attached peripherals, and
disconnect the system from its electrical outlet.
- Remove
the computer cover.
- Loosen the retention screws and release the retaining clip from the
microprocessor cage (see steps 1 and 2 in Figure 9).
- Using your thumbs, lift the latches on each corner of the SEC
cartridge to release the cartridge from the microprocessor socket on the microprocessor
board (see step 3 in Figure 9).
Figure 9. Removing an SEC Cartridge and Heat Sink Assembly
1 |
Retaining clip |
2 |
Latches (2) |
3 |
SEC cartridge |
- Slide the SEC cartridge up and out of the microprocessor cage.
Replacing
the SEC Cartridge and Heat Sink Assembly
To install an SEC cartridge and heat sink assembly, perform the following steps:
- Shut down the system, including any attached peripherals, and
disconnect the system from its electrical outlet.
- Remove
the computer cover.
- Remove the terminator card
or SEC cartridge from the
guide bracket assembly.
- Guide the new SEC cartridge into the microprocessor cage and close
the two latches to lock the cartridge in place.
- Reinstall the retaining clip over the SEC cartridge.
- Replace the computer cover and reconnect the computer and peripherals
to electrical outlets.
Upgrading
the Cache Coherency Filters
Two cache coherency filters of identical capacity must be installed on the profusion
board. 256-kilobyte (KB) and 1-MB cache coherency filters are available from Dell.
To upgrade the cache coherency filters for your system, perform the
following steps:
- Shut down the system, including any attached peripherals, and
disconnect the system from its electrical outlet.
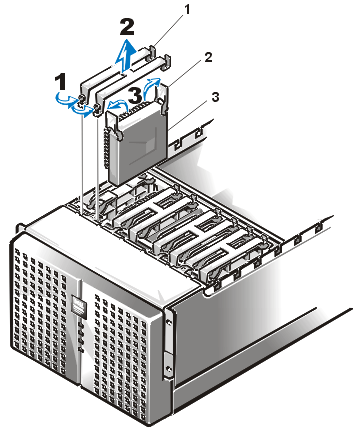
- Remove the front bezel.
- Remove the two rack-mounting brackets from the front of the system by
removing the two screws securing each bracket to the chassis (see Figure 10).
Figure 10. Removing the Rack-Mounting Brackets
1 |
Rack-mounting brackets (2) |
| 2 |
Screws (4) |
- Remove the memory board cover.
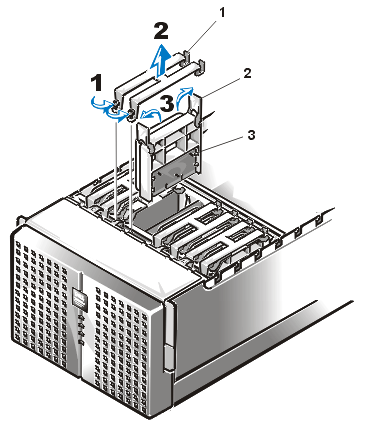
- Remove the fan bay cover's retention screw and remove the cover (see
steps 1 through 3 in Figure 11).
Figure 11. Removing the Fan Bay Cover
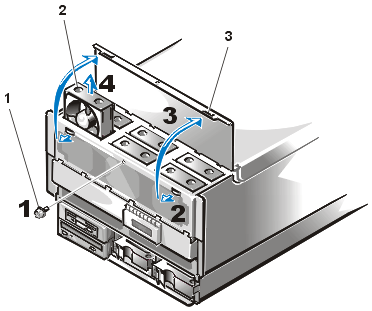
1 |
Fan-bay cover retention screw |
| 2 |
Cooling fan |
3 |
Fan bay cover |
- Remove the six fans (see step 4 in Figure 11).
- Remove the three screws securing the fan bay assembly to the system
chassis .
One screw is located on the front of the chassis. The other two screws are located at each
end of the fan bay assembly (see Figure 12).
Figure 12. Removing the Fan Bay Assembly
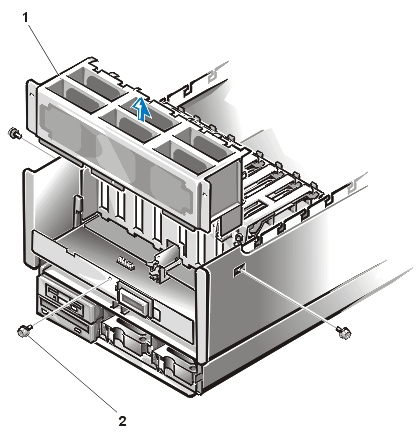
1 |
Fan bay assembly |
2 |
Screws (3) |
- Remove the fan bay assembly by lifting it straight up from the
chassis (see Figure 12).
- Remove the retention bracket from the chassis by releasing the
retention pin (see Figure 13).
Figure 13. Installing a Cache Coherency Filter
| 1 |
Socket ejector |
| 2 |
Cache coherency filter |
3 |
Retention bracket |
- To remove the existing filter from its socket, press the ejector at
the end of the socket (see Figure 13).
- Align the new cache coherency filter with the socket, and insert the edge connector on
the filter into the socket (see Figure 13).
- Press down on the upper edge of the cache coherency filter card with your thumbs until
the card's edge connector is fully seated into the socket and the ejector closes on the
end of the socket.
- To install the second cache coherency filter, repeat steps 10 through 12.
- Replace the retention bracket.
- Replace the fan bay assembly.
- Replace the fans.
- Replace the fan bay cover.
- Replace the memory board cover.
- Replace the front bezel.
- Replace the computer cover, reconnect the computer and peripherals to electrical
outlets, and turn them on.
Replacing the Battery
The system battery maintains system configuration, date, and time information in a
special section of memory when you turn off the system. The operating life of the battery
ranges from 2 to 5 years, depending on how you use the system (for example, if you keep
the system on most of the time, the battery gets little use and thus lasts longer). You
may need to replace the battery if an incorrect time or date is displayed during the boot
routine along with the following or similar message:
Time-of-day not set -- please run SETUP program
Strike the F1 key to continue, F2 to run the setup utility
or
System CMOS checksum bad -- Run SETUP
Strike the F1 key to continue, F2 to run the setup utility
or
Invalid configuration information -- please run SETUP program
Strike the F1 key to continue, F2 to run the setup utility
To determine if the battery needs replacing, reenter the time and
date through the system setup program. Turn off the system for a few hours, and then turn
it on again. Enter the system setup program. If the date and time are not correct in the
system setup program, replace the battery.
|
NOTES: Some software may cause the
system time to speed up or slow down. If the system seems to operate normally except for
the time kept in the system setup program, the problem may be caused by software rather
than by a defective battery. If the system is turned
off for long periods of time (for weeks or months), the nonvolatile random-access memory
(NVRAM) may lose its system configuration information. This situation is not caused by a
defective battery. |
You can operate the system without a battery; however, the system
configuration information maintained by the battery in NVRAM is erased each time you shut
down the computer. Therefore, you must reenter the system configuration information and
reset the options each time the system boots until you replace the battery.
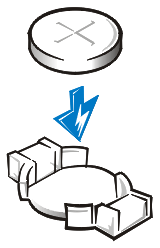
The battery is a 3.0-volt (V), coin-cell CR2032-type battery. To
remove the battery, perform the following steps.
|
WARNING: There is a danger of a new
battery exploding if it is incorrectly installed. Replace the battery only with the same
or equivalent type recommended by the manufacturer. Discard used batteries according to
the manufacturer's instructions. |
- Enter the system setup program and, if possible, make a printed copy
of the system setup screens.
See "Using the System Setup Program," in the User's Guide for
instructions.
- Shut down the system, including any attached peripherals, and
disconnect the system from the electrical outlet.
- Remove
the computer cover.
- Remove the expansion cards.
- Remove the ten vertical expansion-slot dividers by firmly pulling
them straight up from the I/O board.
- Remove the screws securing the plastic I/O board insulator to the
chassis.
- Remove the I/O board insulator.
- Remove the battery.
- Pry the battery out of its socket with your fingers or with a blunt,
nonconductive object such as a plastic screwdriver.
- Install the new battery with the "+" side facing up (see
Figure 14).
Figure 14. Installing the Battery
- Replace the I/O board insulator and secure it with the screws you
removed in step 6.
- Replace the expansion-slot dividers.
- Reinstall the expansion cards.
- Replace the computer cover, reconnect the computer and peripherals to
electrical outlets, and turn them on.
- Enter the system setup program to confirm that the battery is
operating properly
- Enter the correct time and date through the system setup program's Time
and Date settings. Also reenter any system configuration information that is no
longer displayed on the system setup screens, and then exit the system setup program.
- Turn the computer and peripherals off, and leave them off for at
least an hour.
- After an hour, turn on the system and enter the system setup program.
If the time and date are still incorrect, see Getting Help for
instructions on obtaining technical assistance.
Back to Contents Page