LaTeX Snippets
The fundamental benefit of using LaTeX is the ability to write your text once, and then trivially adapt it to different presentations by simply changing the document class. In theory. In practice, most of us routinely encounter obscure edge cases that require magical incantations in order to put the pixels in the correct places. This page is a collection of useful incantations. If you have any snippets that you believe would be useful to others, feel free to add it to this list. Please include the snippet and sample usage, and attach a minimal working example with an image.Table of contents:
Creative Commons Thesis Licensing

\usepackage[svgnames]{xcolor}
Modify the title page in uw-ethesis-frontpgs.tex to reduce the spacing and add the Creative Commons symbology (changes from the template are indicated by comments below):
\begin{titlepage}
        \begin{center}
        \vspace*{1.0cm}

        \Huge
        {\bf University of Waterloo E-Thesis Template for \LaTeX }

        \vspace*{1.0cm}

        \normalsize
        by \\

        \vspace*{1.0cm}

        \Large
        Pat Neugraad \\

        % Space shrunk from template to accommodate Creative Commons
        \vspace*{2.5cm}

        \normalsize
        A thesis \\
        presented to the University of Waterloo \\
        in fulfillment of the \\
        thesis requirement for the degree of \\
        Doctor of Philosophy \\
        in \\
        Zoology \\

        % Space shrunk from template to accommodate Creative Commons
        \vspace*{1.8cm}

        Waterloo, Ontario, Canada, 2017 \\

        \vspace*{1.0cm}

        \copyright\ Pat Neugraad 2017 \\

        % Creative Commons license

        \vspace*{0.5cm}

        \footnotesize{Some rights reserved.} \\

        \vspace*{0.6em}

        \begin{minipage}{\linewidth}
                \centering
                \begin{minipage}{3em}
                        \includegraphics[height=3em,width=3em]{license/cc.eps}
                \end{minipage}
                \begin{minipage}{2em}
                        \centering
                        \includegraphics[height=2em,width=2em]{license/by.eps}
                        \scriptsize
                        \textbf{\textcolor{Grey}{\fontfamily{qhv}\selectfont{}BY}}
                \end{minipage}
                \begin{minipage}{2em}
                        \centering
                        \includegraphics[height=2em,width=2em]{license/nc.eps}
                        \scriptsize
                        \textbf{\textcolor{Grey}{\fontfamily{qhv}\selectfont{}NC}}
                \end{minipage}
                \begin{minipage}{2em}
                        \centering
                        \includegraphics[height=2em,width=2em]{license/sa.eps}
                        \scriptsize
                        \textbf{\textcolor{Grey}{\fontfamily{qhv}\selectfont{}SA}}
                \end{minipage}
        \end{minipage}
        \end{center}
\end{titlepage}
Next, add the licence notice to the "declaration page", also part of uw-ethesis-frontpgs.tex:
  \noindent
I understand that my thesis may be made electronically available to the public.

\vfill

\begin{center}\textbf{Licence}\end{center}
\noindent
This work is licensed under the Creative Commons Attribution-NonCommercial-ShareAlike 4.0 International License.
To view a copy of this licence, visit \url{https://creativecommons.org/licenses/by-nc-sa/4.0/} or send a letter to Creative Commons, PO Box 1866, Mountain View, CA 94042, USA.

\cleardoublepage
Finally, extract the licence images into your build directory.
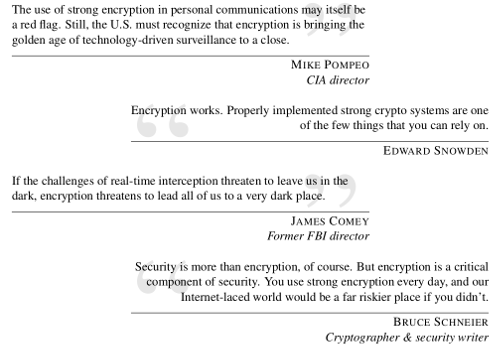
Fancy Epigraphs
% Fancy epigraphs
\usepackage{times}
\usepackage{xcolor}
\usepackage{epigraph}
\usepackage{tabto}
\usepackage{ifthen}
\setlength{\epigraphwidth}{0.75\linewidth}
\setlength{\afterepigraphskip}{\baselineskip}
\setlength{\beforeepigraphskip}{0.4\baselineskip}
\definecolor{faded}{RGB}{230,230,230}
\makeatletter
\newenvironment{@leftepigraph}{
   \setlength\topsep{0pt}
   \setlength\parskip{0pt}
   \renewcommand{\epigraphflush}{flushleft}
}{}
\newenvironment{@rightepigraph}{
   \setlength\topsep{0pt}
   \setlength\parskip{0pt}
   \renewcommand{\epigraphflush}{flushright}
   \renewcommand{\sourceflush}{flushright}
   \renewcommand{\textflush}{flushright}
}{}
\newcommand{\@bgquote}[2]{\tabto*{#1}{\fontsize{100pt}{0pt}\selectfont{}\color{faded}\smash{\raisebox{-60pt}{#2}}}\tabto*{0pt}}
\newcommand{\@generalquote}[6]{\begin{#6}\epigraph{\@bgquote{#5}{#4}#3}{\textsc{#2}\ifthenelse{\equal{#1}{}}{}{\\\textit{#1}}}\end{#6}}
\newcommand{\lquote}[3][]{\@generalquote{#1}{#2}{#3}{''}{\dimexpr(\epigraphwidth-50pt)}{@leftepigraph}}
\newcommand{\rquote}[3][]{\@generalquote{#1}{#2}{#3}{``}{0pt}{@rightepigraph}}
\makeatother
Sample use:
% Left aligned epigraph
\lquote{Rick Blaine}{Here's looking at you, kid.}

% Right aligned epigraph with a listed occupation
\rquote[The Narrator]{Tyler Durden}{The first rule of Fight Club is: You do not talk about Fight Club.}
Download minimal working example
Fixes for De Gruyter (PoPETs) Template
The snippets in this section are meant to correct several problems when using the PoPETs De Gruyter Open format"ngerman" Errors:
Are you getting errors like this?Package babel Error: You haven't defined the language ngerman yet. \iflanguage{ngerman}
You can fix it by installing German support for your LaTeX install. For Debian or Ubuntu systems:
apt-get install texlive-lang-germanDu sprichst nicht Deutsch? You can bypass the error without modifying the template or installing the German packages using the following preamble:
\documentclass[USenglish,oneside,twocolumn]{article}

\usepackage[utf8]{inputenc}
\usepackage[USenglish]{babel}
\makeatletter
\def\bbl@iflanguage#1{\@ifundefined{l@#1}{\@gobble}\@firstofone}
\makeatother
\usepackage[big]{dgruyter_NEW}

...
Multi-Paragraph Abstracts
The default template provides anabstract environment with several problems. Firstly, it will only display the first character of your abstract unless you surround the entire text in curly braces. Secondly, when using this workaround, adding paragraph breaks will cause errors like this:
Paragraph ended before \abstract was complete.Adding this snippet to your preamble will alllow you to use multiple paragraphs without surrounding your text in additional curly braces:
\usepackage{environ}
\makeatletter
\RenewEnviron{abstract}{\global\let\@abstract\BODY}
\makeatother
However, this may lead to problems if you have particularly complex code in your abstract text. The following snippet will let you use multiple paragraphs with a lower chance of problems, but will still require that you surround your abstract text in curly braces:
\makeatletter
\long\def\abstract#1{\gdef\@abstract{#1}}
\makeatother
Non-Standard Floats
If you plan to use captions with any float environments other thanfigure and table (e.g., algorithm or theorem), then you will need to define a new command for each type of float. If you don't, you'll get errors like this one with seemingly random line numbers (corresponding to the position where the float is inserted):
! Undefined control sequence.
<write> ...\protect \numberline {\plist@algorithm
                                                  1}{\ignorespaces ...
If you are using a custom float environment called xyz, then you will need to define \plist@xyz. The following example will make the style work with the algorithm environment:
\makeatletter
\def\plist@algorithm{Alg.\space}
\makeatother
This defines the text that appears at the start of float captions, so using the above code would result in captions for algorithm floats that looks something like "Alg. 1: My caption". You can replace the Alg. text in the definition to change the text at the start of the captions.
Miscellaneous Warnings
The template includes several mistakes that cause compilation warnings on modern LaTeX platforms. The following snippet shows some of the fixes:\makeatletter
% Don't use the obsolete fixltx2e package on newer systems (2015 or later).
\@namedef{ver@fixltx2e.sty}{2006/03/24}
\@namedef{opt@fixltx2e.sty}{}
% Don't use the multicol package (it raises a warning in twocolumn format).
\@namedef{ver@multicol.sty}{2016/04/07}
\@namedef{opt@multicol.sty}{}
% Footnote hyperlinks don't work due to a conflict between hyperref and footmisc.
% Turning them off prevents the warnings and broken links.
\PassOptionsToPackage{hyperfootnotes=false}{hyperref}
\usepackage[big]{dgruyter_NEW}
% Don't use non-existant fonts for labels in footnotes.
\def\@makefnmark{\hbox{\@textsuperscript{\normalfont\@thefnmark}}}
\makeatother
Fixes for USENIX Template
The USENIX usenix2019_v3.sty template will sometimes go into an infinite loop when running pdflatex (so that a single invocation of pdflatex will just stall and not terminate). The fault is the inclusion of the flushend package. If you run into this problem, try just commenting out the\usepackage{flushend} line in the sty file. When you have the version ready you want to submit, restore the line if possible, or manually balance the columns on the last page.
Pretty Margin Notes

\usepackage[usenames,svgnames,table]{xcolor}
\usepackage{xifthen}

\setlength{\marginparsep}{8pt}
\setlength{\marginparwidth}{40pt}
\setlength{\marginparpush}{5pt}
\newcommand{\superscript}[1]{\ensuremath{{}^{\textrm{\scriptsize #1}}}}
\newcommand{\roughtext}[1]{\begin{color}{SkyBlue}#1\end{color}}
\newcommand{\mntext}[1]{\colorbox{SkyBlue}{\begin{color}{black}#1\end{color}}}

\newcounter{mn}
\setcounter{mn}{1}
\newcommand{\mn}[2][]{{\tiny\superscript{\mntext{\arabic{mn}}}}\marginpar{\scriptsize{
  \ifthenelse{\isempty{#1}}
  {\mntext{\parbox{0.95\marginparwidth}{\superscript{\arabic{mn}}~\raggedright{#2}}}}
  {\mntext{\parbox{0.95\marginparwidth}{\superscript{\arabic{mn}}#1 says~:~\raggedright{#2}}}}
}}\stepcounter{mn}}
While the above works, it can be annoying to communicate with coauthors about specific notes as the enumeration and pagination changes with edits to each local copy. A three-character hash of the comment text can be used instead.
\usepackage[usenames,dvipsnames]{xcolor}
\usepackage{xifthen}

\setlength{\marginparsep}{8pt}
\setlength{\marginparwidth}{40pt}
\setlength{\marginparpush}{5pt}
\newcommand{\superscript}[1]{\ensuremath{{}^{\textrm{\scriptsize #1}}}}
\newcommand{\roughtext}[1]{\begin{color}{SkyBlue}#1\end{color}}
\newcommand{\mntext}[1]{\colorbox{SkyBlue}{\begin{color}{black}#1\end{color}}}

\makeatletter
\def\carthree#1#2#3#4\@nil{#1#2#3}
\newcommand{\firstthree}[1]{\expandafter\carthree#1\@nil}
\newcommand{\mn}[2][]{{\tiny\superscript{\mntext{\firstthree{\pdfmdfivesum{#1\detokenize{#2}}}}}}\marginpar{\scriptsize{
  \ifthenelse{\isempty{#1}}
  {\mntext{\parbox{0.95\marginparwidth}{\superscript{\firstthree{\pdfmdfivesum{\detokenize{#2}}}} \raggedright{#2}}}}
  {\mntext{\parbox{0.95\marginparwidth}{\superscript{\firstthree{\pdfmdfivesum{#1\detokenize{#2}}}}#1 says:~\raggedright{#2}}}}
}}}
\makeatother
Sample use:
\mn[JD]{Put a comment here. Use the optional argument for your initials.}
Download minimal working example
Placeholder Text

\usepackage[usenames,svgnames,table]{xcolor}

\newcommand{\placeholder}[1]{\noindent%
   \fcolorbox{LightBlue}{LightCyan}{%
      \begin{minipage}{0.9\columnwidth}%
         \color{DodgerBlue}\textbf{\tiny{TODO~~}}%
         \color{MidnightBlue}#1%
      \end{minipage}%
   }%
   \par%
}
\newcommand{\placeholderinl}[1]{\noindent%
   \fcolorbox{LightBlue}{LightCyan}{\color{DodgerBlue}!}%
   ~{\color{MidnightBlue}#1}~%
   \fcolorbox{LightBlue}{LightCyan}{\color{DodgerBlue}<}%
}
Sample use:
\placeholder{Write something useful here.}
Our system is secure because \placeholderinl{figure out why it's secure}.
Download minimal working example
Remove ACM Copyright Block
It is often useful to omit the copyright block from the sig-alternate\makeatletter
\def\@copyrightspace{}
\makeatother
Rotated Tables

\usepackage{lscape}
\usepackage{afterpage}
\newcommand{\rottable}[1]{%
   \afterpage{%
      \clearpage{}%
      \begin{landscape}%
         \begin{table*}%
            #1%
         \end{table*}%
      \end{landscape}%
   }%
}
For electronic documents:
\usepackage{pdflscape}
\usepackage{fancyhdr}
\usepackage{afterpage}
\fancypagestyle{mylandscape}{
   \fancyhf{}
   \fancyfoot{}
   \fancyfoot[R]{
      \makebox[\textwidth][r]{
         \rlap{
            \smash{
               \hspace{-\footskip}
               % Adjust the values to center the page number for your document class
               \raisebox{\dimexpr.5\baselineskip+2\footskip+.5\textheight}{
                  \rotatebox{90}{\thepage}
               }
            }
         }
      }
   }
   \renewcommand{\headrulewidth}{0pt}
   \renewcommand{\footrulewidth}{0pt}
}
\newcommand{\rottable}[1]{%
   \afterpage{%
      \clearpage{}%
      \begin{landscape}%
         \thispagestyle{mylandscape}%
         \begin{table*}%
            #1%
         \end{table*}%
      \end{landscape}%
   }%
}
For fixing page numbers for landscape images (adapted from https://tex.stackexchange.com/questions/278113/single-landscape-page-with-page-number-at-the-bottom/278169Sample use:
\rottable{
   \centering
   % Insert "tabular" environment here
   \caption{My amazing rotated table}
   \label{tab:table-label}
}
Download minimal working example
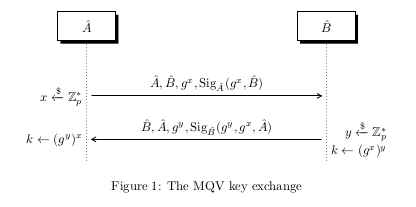
Sequence Diagrams
\usepackage[underline=false]{pgf-umlsd}
\usepackage{tikz}

% From http://tex.stackexchange.com/questions/164707/how-to-use-greek-letters-in-pgf-umlsd-or-generally-terms-starting-with
\renewcommand{\mess}[4][0]{
  \stepcounter{seqlevel}
  \path
  (#2)+(0,-\theseqlevel*\unitfactor-0.7*\unitfactor) node (mess from) {};
  \addtocounter{seqlevel}{#1}
  \path
  (#4)+(0,-\theseqlevel*\unitfactor-0.7*\unitfactor) node (mess to) {};
  \draw[->,>=angle 60] (mess from) -- (mess to) node[midway, above]
  {#3};
  \node (\detokenize{#3} from) at (mess from) {};
  \node (\detokenize{#3} to) at (mess to) {};
}
% From http://tex.stackexchange.com/questions/98525/pgf-umlsd-and-externalize
\newcommand{\sdinit}{%
   \pgfdeclarelayer{umlsd@background}%
   \pgfdeclarelayer{umlsd@threadlayer}%
   \pgfsetlayers{umlsd@background,umlsd@threadlayer,main}%
}
\newcommand{\sdbegin}{%
   \setlength{\unitlength}{1cm}%
   \tikzstyle{sequence}=[coordinate]%
   \tikzstyle{inststyle}=[rectangle, draw, anchor=west, minimum
   height=0.8cm, minimum width=1.6cm, fill=white,
   drop shadow={opacity=1,fill=black}]%
   \ifpgfumlsdroundedcorners%
      \tikzstyle{inststyle}+=[rounded corners=3mm]%
   \fi%
   \tikzstyle{blockstyle}=[anchor=north west]%
   \tikzstyle{blockcommentstyle}=[anchor=north west, font=\small]%
   \tikzstyle{dot}=[inner sep=0pt,fill=black,circle,minimum size=0.2pt]%
   \global\def\unitfactor{0.6}%
   \global\def\threadbias{center}%
   % reset counters
   \setcounter{preinst}{0}%
   \setcounter{instnum}{0}%
   \setcounter{threadnum}{0}%
   \setcounter{seqlevel}{0}%
   \setcounter{callevel}{0}%
   \setcounter{callselflevel}{0}%
   \setcounter{blocklevel}{0}%
   % origin
   \node[coordinate] (inst0) {};%
}
\newcommand{\sdend}{%
   \begin{pgfonlayer}{umlsd@background}%
      \ifnum\value{instnum}>0%
         \foreach \t [evaluate=\t] in {1,...,\theinstnum}{%
            \draw[dotted] (inst\t) -- ++(0,-\theseqlevel*\unitfactor-2.2*\unitfactor);%
         }%
      \fi%
      \ifnum\value{threadnum}>0%
         \foreach \t [evaluate=\t] in {1,...,\thethreadnum}{%
            \path (thread\t)+(0,-\theseqlevel*\unitfactor-0.1*\unitfactor) node (threadend) {};%
            \tikzstyle{threadstyle}+=[threadcolor\t]%
            \drawthread{thread\t}{threadend}%
         }%
      \fi%
   \end{pgfonlayer}%
}
Sample use:
\usepackage{amsmath}
\usepackage{amsfonts}

%...

\begin{figure}
   \centering
   \sdinit{}
   \begin{tikzpicture}
      % Define symbols and names for the parties
      \sdbegin{}
      \newinst{A}{$\hat{A}$}
      \newinst[5]{B}{$\hat{B}$} % Increase "5" to widen

      % Message from Alice to Bob, with precomputations
      \postlevel
      \mess{A}{$\hat{A}, \hat{B}, g^x, \text{Sig}_{\hat{A}}(g^x, \hat{B})$}{B}
      \node[anchor=east] at (mess from) {$x \xleftarrow{\$} \mathbb{Z}_p^*$};

      % Message from Bob to Alice, with computations by both sides
      \postlevel
      \mess{B}{$\hat{B}, \hat{A}, g^y, \text{Sig}_{\hat{B}}(g^y, g^x, \hat{A})$}{A}
      \node[anchor=west] at (mess from) {\shortstack[r]{
            $y \xleftarrow{\$} \mathbb{Z}_p^*$ \\
            $k \leftarrow (g^x)^y$}};
      \node[anchor=east] at (mess to) {$k \leftarrow (g^y)^x$};

      \sdend{}
   \end{tikzpicture}
   \caption{The MQV key exchange}
   \label{fig:mqv}
\end{figure}
Download minimal working example
Table Bubbles
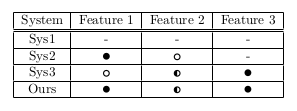
\kinda uses an empty circle, and \sorta uses a half-full circle. It's normally best to work with \kinda since it is more visually clear.
\usepackage{tikz}

\newlength\bubblesize
\setlength{\bubblesize}{0.6ex}
\newcommand{\yes}{
  \begin{tikzpicture}[baseline=0, line width=0.2ex]%
    \path[use as bounding box]  (\bubblesize,\bubblesize) circle (\bubblesize-.5\pgflinewidth);%
    \fill[black] (\bubblesize,\bubblesize) circle (\bubblesize);
  \end{tikzpicture}%
}
\newcommand{\no}{-}
\newcommand{\kinda}{%
  \begin{tikzpicture}[baseline=0.1ex, line width=0.2ex]%
    \path[use as bounding box]  (\bubblesize,\bubblesize) circle (\bubblesize-.5\pgflinewidth);%
    \draw[clip]  (\bubblesize,\bubblesize) circle (\bubblesize-.5\pgflinewidth);%
  \end{tikzpicture}%
}
\newcommand{\sorta}{%
  \begin{tikzpicture}[baseline=0.1ex, line width=0.2ex]%
    \path[use as bounding box]  (\bubblesize,\bubblesize) circle (\bubblesize-.5\pgflinewidth);%
    \draw[clip]  (\bubblesize,\bubblesize) circle (\bubblesize-.5\pgflinewidth);%
    \fill[black] (\bubblesize, 2\bubblesize) rectangle (0,0);%
  \end{tikzpicture}%
}
Sample use:
\begin{tabular}{|c|c|c|c|}
\hline
System & Feature 1 & Feature 2 & Feature 3 \\
\hline
\hline
Sys1 & \no{} & \no{} & \no{} \\
\hline
Sys2 & \yes{} & \kinda{} & \no{} \\
\hline
Sys3 & \kinda{} & \sorta{} & \yes{} \\
\hline
Ours & \yes{} & \sorta{} & \yes{} \\
\hline
\end{tabular}
Download minimal working example
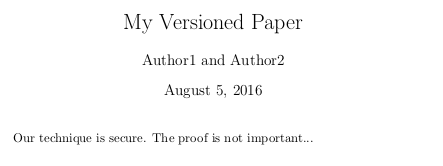
Versions
...
\usepackage{versions}
\includeversion{submission}
...
\maketitle

% Turn on page numbering for review versions of papers
\begin{submission}
\thispagestyle{plain}
\pagestyle{plain}
\end{submission}
...
It is possible to avoid these scoping rules by testing if the environment exists, rather than using the package as intended:
...
\ifdefined\submission{}\thispagestyle{plain}\pagestyle{plain}\fi
...
The technique below is more robust. However, both this technique and the previous approach (testing for the presence of environments) break tools like git-latexdiffdeversion. A good technique is to start with the versions package, and use this snippet if you encounter problems.
\usepackage{environ}

\ifdefined\conferenceCompile
   \newenvironment{conferenceVersion}{}{}
   \NewEnviron{extendedVersion}{}
   \newcommand{\conferencetext}[1]{#1}
   \newcommand{\extendedtext}[1]{}
\else
   \NewEnviron{conferenceVersion}{}
   \newenvironment{extendedVersion}{}{}
   \newcommand{\conferencetext}[1]{}
   \newcommand{\extendedtext}[1]{#1}
\fi

\ifdefined\anonymousCompile
   \newenvironment{anonymousVersion}{}{}
   \NewEnviron{attributedVersion}{}
   \newcommand{\anonymoustext}[1]{#1}
   \newcommand{\attributedtext}[1]{}
\else
   \NewEnviron{anonymousVersion}{}
   \newenvironment{attributedVersion}{}{}
   \newcommand{\anonymoustext}[1]{}
   \newcommand{\attributedtext}[1]{#1}
\fi
Sample use:
% Configure document version
\newcommand{\conferenceCompile}{}
%\newcommand{\anonymousCompile}{}

% ...

\begin{attributedVersion}
\hypersetup{pdfauthor = {Author1, Author2}}
\end{attributedVersion}

% ...

\begin{anonymousVersion}
\author{}
\end{anonymousVersion}
\begin{attributedVersion}
\author{Author1 and Author2}
\end{attributedVersion}

% ...

Our technique is secure. \extendedtext{See \ref{sec:proof} for the security proof.}\conferencetext{The proof is not important...}
Download minimal working example Topic revision: r13 - 2024-05-02 - JustinTracey
|
|
Ideas, requests, problems regarding TWiki? Send feedback