 Overview
Dell OpenManage™ Server Administrator Version 1.4 User's Guide
Installing/Upgrading/Uninstalling on Systems Running Supported Windows Operating Systems
Installing/Upgrading/Uninstalling on Systems Running Supported Red Hat Linux Operating Systems
Installing/Upgrading/Uninstalling on Systems Running Supported NetWare Operating Systems
You can install Server Administrator by using several methods. The Dell OpenManage Systems Management CD provides a setup program to install, upgrade, and uninstall Server Administrator and other managed system and management station software components on your managed system. Additionally, you can install Server Administrator on multiple systems through an unattended installation across a network. Lastly, if you have a modular system, or if your Microsoft® Windows® operating system was preinstalled and you have the OpenManage Installation icon on your desktop, you can install the preloaded managed system software by double-clicking the OpenManage Installation icon.
 |
NOTE: Always use the Systems Management CD to upgrade and uninstall Server Administrator. |
|
NOTE: Upgrading to the most recent version of Server Administrator does not require that you uninstall any previously installed software components. The setup program on the Systems Management CD automatically uninstalls, and then upgrades the managed system software components that are appropriate for your particular system's hardware configuration. |
The Dell OpenManage Systems Management CD provides a setup program to install, upgrade, and uninstall Server Administrator and other managed system and management station software components on your managed system. Additionally, you can install Server Administrator on multiple systems through an unattended installation across a network.
Using the setup program on the Systems Management CD, you can install and upgrade Server Administrator on systems running all supported operating systems. On systems running supported Microsoft Windows and Red Hat Linux operating systems, you can uninstall Server Administrator with the Systems Management CD or through the operating system. On systems running supported Novell® NetWare® operating systems, you can only uninstall Server Administrator through the operating system.
You can use the Systems Management CD to perform an unattended installation and uninstallation of Server Administrator on systems running supported Microsoft Windows and Red Hat Linux operating systems. Additionally, you can install and uninstall Server Administrator from the command line on systems running supported Red Hat Linux operating systems.
If you have a modular system, or if your Windows operating system was preinstalled and you have the OpenManage Installation icon on your desktop, the managed system software has been preloaded on your system and you do not need to use the Systems Management CD. When you double-click the OpenManage Installation icon on your system's desktop, you initiate the installation of the managed system software components that are appropriate for your particular system's hardware configuration.
|
NOTE: For modular systems, you must install Server Administrator on each server module installed in the chassis. |
The following sections describe the Server Administrator general requirements. Operating system–specific installation prerequisites are listed as part of the installation procedures.
Server Administrator supports each of the following operating systems:
|
NOTE: Support for updated kernels released by Red Hat and for later versions of Red Hat Linux may require the use of Dynamic Kernel Support (see "Dynamic Kernel Support" for an explanation of this feature). |
|
NOTE: See the Server Administrator readme file on the Systems Management CD for the latest detailed list of the Server Administrator Services that are supported on each supported operating system. |
Server Administrator must be installed on each system to be managed. You can then manage each system running Server Administrator locally or remotely through a supported Web browser.
|
NOTE: The RAC software is installed as part of the Express Setup and Custom Setup installation options when installing managed system software from the Systems Management CD, provided that the managed system meets all of the RAC installation prerequisites. See "Remote Access Service" and the Dell Remote Access Controller Installation and Setup Guide or the Dell Embedded Remote Access/MC Controller User's Guide for complete software and hardware requirements. |
|
NOTE: Array Manager is installed as part of the Express Setup and Custom Setup installation options when installing managed system software from the Systems Management CD, provided that the managed system meets all of the Array Manager installation prerequisites. The Storage Management Service requires that you install Array Manager as part of the Server Administrator installation from the Systems Management CD. See the Dell OpenManage Array Manager User's Guide for complete software and hardware requirements. |
A supported Web browser is required to manage a system locally from the Server Administrator home page.
A supported systems management protocol standard must be installed on the managed system before installing Server Administrator. On supported Microsoft Windows operating systems, Server Administrator supports these two systems management standards: Common Information Model (CIM) and Simple Network Management Protocol (SNMP). On supported Red Hat Linux and Novell NetWare operating systems, Server Administrator supports the SNMP systems management standard.
|
NOTE: For information about installing a supported system management protocol standard on your managed system, see your operating system documentation. |
Table 3-1 shows the availability of the systems management standards for each supported operating system:
Table 3-1. Availability of Systems Management Protocol by Operating Systems
|
Operating System |
SNMP |
CIM |
|---|---|---|
You must install the SNMP package provided with the operating system. | ||
The management information base (MIB) branch implemented by the Instrumentation Service is identified by the OID 1.3.6.1.4.1.674.10892.1. Management applications must have access to this branch of the MIB tree to manage systems running the Instrumentation Service.
For supported Red Hat Linux operating systems, the default SNMP configuration provides read-only access only to the MIB-II "system" branch (identified by the OID 1.3.6.1.2.1.1) of the MIB tree for the "public" community. This configuration does not allow management applications to retrieve or change Instrumentation Service information. If the Instrumentation Service detects this configuration during installation, it attempts to modify the SNMP configuration to provide read-only access to the entire MIB tree for the "public" community.
The following installation procedures provide step-by-step instructions for installing, upgrading, and uninstalling Server Administrator for each supported operating system.
This section explains how to install, upgrade, and uninstall Server Administrator on a system that is running a supported Windows operating system. This section includes the following topics:
This section explains how to install and upgrade the Server Administrator. There are three installation options:
|
NOTE: For modular systems, you must install Server Administrator on each server module installed in the chassis. |
|
NOTE: During a Custom or Express installation, individual Server Administrator services will not be installed on managed systems that do not meet the specific hardware and software "Installation Requirements" for that service. For example, the Server Administrator Remote Access Service software module will not be installed during an Express installation unless the managed system has an installed remote access controller. |
The Systems Management CD features an Express Setup option and a Custom Setup option for installing Server Administrator and other managed system software.
When you insert the Systems Management CD in your system's CD drive, the setup program uses your system's PCI bus to search for installed hardware such as controller cards.
When a user selects the Express Setup option, the setup program installs or upgrades all of the managed system software components that are appropriate for your particular system's hardware configuration. For more information on how to perform an express setup, see the Software Quick Installation Guide. You can access the Software Quick Installation Guide by clicking Info on the task bar within the setup program.
When a user selects the Custom Setup option, the user can deselect one or more software components that the setup program has identified as appropriate for the installed options on the system. During an express setup, you cannot add to the list of components to install because all the components that are appropriate for the hardware configuration are preselected.
When you double-click the OpenManage Installation icon on your system's desktop, you initiate the installation of the managed system software components that are appropriate for your particular system's hardware configuration. Select the Express Setup option to perform an express installation. For more information about how to perform an Express Setup, see the Software Quick Installation Guide. You can access the Software Quick Installation Guide by clicking Info on the task bar within the setup program.
The sections that follow show how to install and upgrade Server Administrator and other managed system software using the Custom Setup option.
|
NOTE: If you have a modular system, or if your operating system was preinstalled and you have the OpenManage Installation icon on your desktop, the managed system software has been preloaded on your system and you do not need to use the Systems Management CD. To complete the software installation, double-click the OpenManage Installation icon to launch setup, and then go to step 7. |
If the CD does not automatically start the setup program, go to your system's desktop, double-click My Computer, double-click the CD drive icon, and double-click the setup.exe file.
The Welcome to Dell OpenManage Systems Management Installation screen appears.
A software license agreement appears.
A message displays stating that a setup wizard is being prepared to lead you through the setup process.
The Select System Type screen appears.
The Select Setup Type screen appears.
The Select Destination screen appears.
The Managed System Software screen appears. Each managed system software application listed has a check box to the left of its name. A check in the check box indicates that the software is selected for installation. As a default, all available software components are selected.
A button appears to the right of each component name.
Buttons that appear in gray do not provide either information or configuration options.
|
NOTE: During a custom installation, if you select Storage Management and choose not to install the Storage Management Console, the Server Administrator installation program installs only the managed system component of Array Manager. Array Manager does not allow the Disk Management page to load unless the management system component is also installed. |
The Installation Summary screen appears, listing all the managed system software services you selected for installation.
A Confirm Install dialog box appears.
The Dell OpenManage Components screen appears. Messages appear, stating which software components are being installed. When the selected components are installed, the setup program asks if you want to reboot your system.
You must reboot your system to make the installed managed system software services available for use.
You must also reboot your system before changing your operating system disk. For example, when upgrading from a basic disk to a dynamic disk.
If prompted, click OK to confirm the reboot or Cancel to reboot later.
The Systems Management CD features an Express Upgrade option and a Custom Upgrade option for upgrading Server Administrator and other managed system software.
When you insert the Systems Management CD in your system's CD drive, the setup program uses your system's PCI bus to search for installed hardware such as controller cards.
When a user selects the Express Upgrade option, the setup program installs or upgrades all of the managed system software components that are appropriate for your particular system's hardware configuration. For more information on how to perform an express upgrade, see the Software Quick Installation Guide. You can access the Software Quick Installation Guide by clicking Info on the task bar within the setup program.
When a user selects the Custom Upgrade option, the user can deselect one or more components that the setup program has identified as appropriate for upgrade on your system. During an express upgrade, you cannot add to the list of managed system software components to install because all components appropriate for your system are preselected.
The following procedures show how to upgrade Server Administrator and other managed system software using the Custom Upgrade option.
If the CD does not automatically start the setup program, go to your system's desktop, double-click My Computer, double-click the CD drive icon, and double-click the setup.exe file.
The Welcome to Dell OpenManage Systems Management Installation screen appears.
A software license agreement appears.
A message displays stating that a setup wizard is being prepared to lead you through the setup process.
The Select System Type screen appears.
The Select Setup Type screen appears.
The Managed System Software screen appears. Each managed system software component listed has a check box to the left of its name. A check in the check box indicates that the software component is selected for upgrade. As a default, all outdated software components are selected.
A button to the right of each component name provides information about the component.
Buttons that appear in gray do not provide either information or configuration options.
The Installation Summary screen appears, listing all of the managed system software services you selected for upgrade.
A Confirm Install dialog box appears.
The Dell OpenManage Components screen appears. Messages appear, stating which components are being installed.
When the selected components are installed, the setup program asks if you want to reboot your system.
You must reboot your system to make the installed managed system software services available for use.
The Systems Management CD features an Express Setup option and a Custom Setup option for the unattended installation procedure.
Unattended installation allows you to install Server Administrator on multiple systems simultaneously. You can perform an unattended installation by creating an unattended installation package that contains all of the necessary managed system software files. The unattended installation option also provides several features that allow users to configure, verify, and view information about unattended installations.
The unattended installation package is distributed to the remote systems using a software distribution tool from an independent software vendor (ISV). When the package is distributed, the installation script executes to install the software.
The Express Setup unattended installation option uses the Systems Management CD as the unattended installation package. The setup.exe /i license=yes program accesses the Systems Management CD to accept the software license agreement and install all required Server Administrator components on selected remote systems. The setup.exe /i license=yes program installs Server Administrator components on each remote system based on the system's hardware configuration.
 |
NOTICE: The license=yes setting must be added to the setup.exe /i command for an Express Setup unattended installation to run. Adding the license=yes setting confirms that you accept the software license agreement for using the unattended installation program. See "Optional Command Line Settings" for more information. |
You can make the Systems Management CD image available to the remote system by either distributing the entire contents of the CD or by mapping a drive from the target system to the location of the CD image.
You can accomplish this task by directly sharing the CD or by copying the entire CD to a drive and sharing the copy.
The setup.exe /i license=yes program executes to install Server Administrator on each remote system.
The setup.exe /i license=yes program executes to install Server Administrator on each remote system.
The Custom Setup unattended installation option creates an unattended installation package in a directory on your system's hard drive. To create a custom unattended installation package, perform the following steps.
|
NOTE: The setup.exe program that is used for the Custom Setup unattended installation with the /p option is located at the root of the Systems Management CD. |
A software license agreement appears.
The Select Destination screen appears.
The Managed System Software screen appears.
If present, buttons to the right of a component name provide information or configuration options for the component.
The Dell OpenManage Components window appears.
While the package is being created, the following message is displayed:
Setup is creating an unattended installation package. Please wait...
When the script is complete, the Setup Complete window appears. The following message is displayed:
The unattended installation package was created successfully.
The directory that you selected in step 3 now contains the custom unattended installation package.
The custom unattended installation package is located in the directory you created in step 4 of the preceding procedure (for example, c:\temp\dell\openmanage). This directory contains all of the managed system software components you selected to distribute, along with all the necessary unattended installation program files.
|
NOTE: The setup.exe program that is used for the Custom Setup unattended installation with the /i option is located in the root directory of the Systems Management CD. |
The setup.exe /i program executes to install Server Administrator on each remote system.
Unattended installation provides the following features:
Table 3-2 shows the optional settings available for unattended installation. Type the optional settings on the command line after setup.exe /i with a space in between each setting.
|
NOTE: Running setup.exe /? or setup.exe /help displays a list of all available command line settings. |
Table 3-2. Command Line Settings
|
Setting |
Result |
|---|---|
NOTICE: If you set the amconsole option to no and the amldm option to yes, you lose hard-drive management capability on the local system and can only manage hard drives from a remote system. | |
Installs the Common Information Model (CIM) as part of the Server Administrator installation. | |
Installs software components that have warnings. NOTE: Warnings can affect the performance of the software. See "Dependency Check" for details about obtaining warning and dependency information. | |
NOTICE: The license=yes setting must be added to the command line for an express unattended installation to run. | |
Specifies a nondefault filename for the short format log file. For more information, see "Log Files." The full path including the name of the file must be specified in this option. If the path or the filename contains any spaces, then the location must be enclosed in double quotes. The location cannot contain any of the reserved words described in this section such as icon, web, reboot, and so on. | |
Automatically reboots the system after installation is complete. If the reboot option is set to no or the reboot option is not used, the system will not reboot. | |
Specifies a customization file. For more information about the customization file, see "Customization Files." The full path including the name of the file must be specified in this option. If the path or the filename contains any spaces, then the location must be enclosed in double quotes. The location cannot contain any of the reserved words described in this section such as icon, web, reboot, and so on. | |
Enables SNMP Set operations on the system running Server Administrator. | |
Automatically starts the Server Administrator secure port server after every system reboot. |
For example, running setup.exe /i password=ABC reboot=yes icon=no installs Server Administrator components on each remote system based on the system's hardware configuration, sets the password for SNMP Set operations to "ABC," reboots each system after installation is complete, and specifies that the Dell OpenManage icon is not placed on the desktop and the Start menu.
Customization files provide a way to customize the exact software components to install. With the customization file, users can selectively install software components for different systems using the same unattended installation package. For example, you can choose to install Server Administrator, but not Remote Access Service on a specific group of servers, and choose to install Server Administrator, but not Storage Management Service, on another group of servers. The customization file is formatted as a simple text file with a.sil filename suffix, in which each line contains one software component relationship. For example:
A designation of yes indicates that the component is installed. A designation of no indicates that the component is not installed. Table 3-3 shows the component IDs for each software component. The component ID is a 2- to 5-character designation.
Table 3-3. Software Component IDs
|
Component ID |
Software Component |
|---|---|
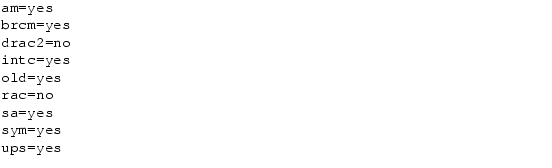
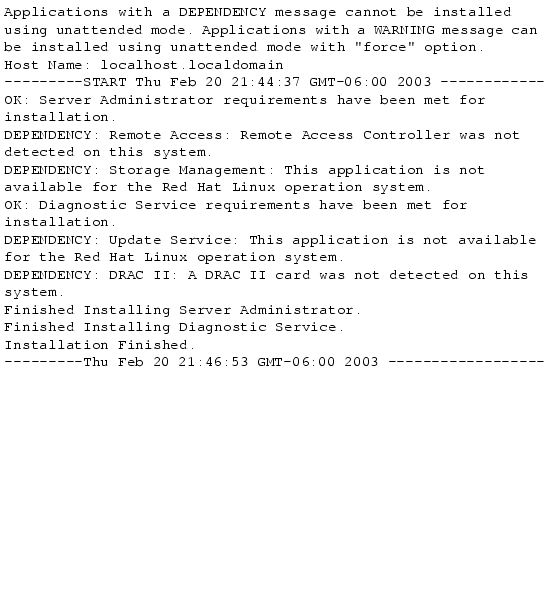
Figure 3-1 shows an example of a customization file, C:\temp\unattend\install.sil, in which all components except Remote Access Service and DRAC II are designated to be installed.
Figure 3-1. Sample Customization File
The setup.exe /i program returns a status code to indicate success or failure. The return codes are described in Table 3-4.
|
Return Code |
Status |
|---|---|
Setup did not run because one or more of the options were not input correctly. |
The unattended installation log files capture the installation status of each software component and the result of each unattended installation dependency check. For more information about log files generated by the dependency check, see "Dependency Check."
Two log files are generated in a temp folder during an unattended installation, ominstal.log and omstatus.log. The temp folder is typically located at c:\temp. Each log provides the installation status of each component, the host system name, and the start and end time of the installation. On a large-scale, unattended installation deployment of hundreds or thousands of servers, users can save the unattended installation log file for each server and easily isolate an installation problem on one or more servers with the host information in the log file.
The omstatus.log provides installation information in a shortened format that is designed to be easily read by scripts. You can use this information to write automatic script files to query the installation status and take remedy actions as needed. See Figure 3-2.
There is one line per software component. A value of "0" indicates that the installation of the component succeeded, a value of "-1" indicates that installation of the component failed, and a value of "1" indicates that the component did not install because a dependency was not met. See "Dependency Check" for information about identifying installation dependencies. The software component ID is the same 2- to 5-character designation described in the "Customization Files" section.
Figure 3-2. Example of a Short omstatus.log File

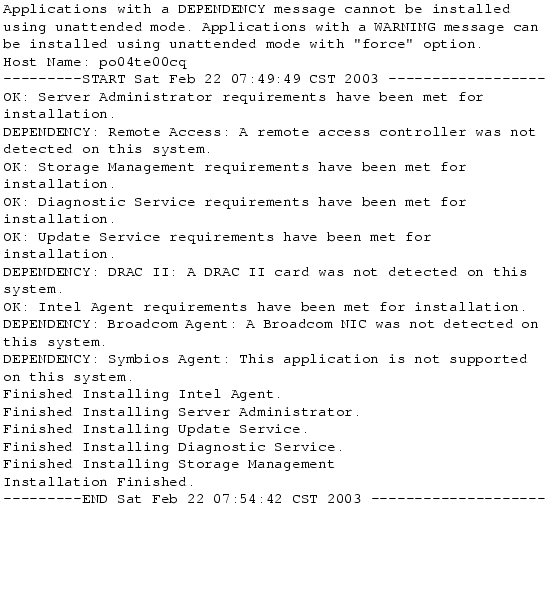
The ominstal.log provides full text installation information about the components. See Figure 3-3.
Figure 3-3. Example of a Full Text ominstal.log File
The setup.exe /c program provides the capability to examine the dependency status of software components without launching the actual installation. This program generates two log files in your system's temp folder: ominstal_check.log and omstatus_check.log.
The ominstal_check.log provides full text information about the dependency status of software components.
The omstatus_check.log provides dependency status information in a shortened format that is designed to be easily read by scripts. See Figure 3-2 for an example of a log file.
There is one line per software component. A value of "0" indicates that the installation is ready to proceed, a value of "1" indicates that one or more components has a warning, and a value of "2" indicates that one or more components has a dependency failure. The software component ID is the same 2- to 5- character designation described in the "Customization Files" section.
where "0" means OK to install, "1" means warning, and "2" means dependency failure. See the "Log Files" for more information.
The format is very similar to the.sil file format and the software component IDs are identical.
Use the following command line settings with the dependency check feature.
Table 3-5 shows the dependency check command line settings available for unattended installation. Type the optional settings on the command line after setup.exe /c with a space in between each setting.
|
NOTE: Running setup.exe /? or setup.exe /help displays a list of all available command line settings. |
Table 3-5. Dependency Check Command Line Settings
|
Setting |
Result |
|---|---|
Runs a dependency check on the components specified in the .sil file. For more information about the format of the .sil file, see "Customization Files." |
For example, running setup.exe /c sil=C:/temp/dep.sil showstatus=yes runs the dependency check for all components listed in the customization file (dep.sil), saves the dependency check log files (ominstal_check.log and omstatus_check.log) in the temp folder, and displays the dependency check status while the command is running.
The setup.exe /c program returns a status code to indicate success or failure. The return codes are described in Table 3-6.
|
NOTE: Components with a warning can be installed using the force option. Components with a dependency failure cannot be installed using unattended mode. |
Table 3-6. Dependency Check Return Codes
|
Return Code |
Status |
|---|---|
You can uninstall Server Administrator managed system software components by using the Systems Management CD or your operating system. Additionally, you can perform an unattended uninstallation on multiple systems simultaneously.
If the CD does not automatically start the setup program, go to your system's desktop, double-click My Computer, double-click the CD drive icon, and double-click the setup.exe file.
The Welcome to Dell OpenManage Systems Management Installation screen appears.
A software license agreement appears.
A message displays stating that a setup wizard is being prepared to lead you through the setup process.
The Select System Type screen appears.
The Uninstall Selection screen appears. Each managed system software component listed has a check box to the left of its name. A check in the check box indicates that the software component is selected for uninstallation. As a default, all installed managed system software components are selected.
The Uninstall Summary screen appears, listing all of the managed system software services you selected for uninstallation.
The Confirm Uninstall dialog box appears.
The Uninstall screen appears. Messages display, stating which components are being uninstalled. When the selected components are uninstalled, the setup program asks if you want to reboot your system.
You must reboot your system to complete the uninstallation process.
If prompted, click OK to confirm the reboot or Cancel to reboot later.
The Uninstall Selection screen appears.
Each managed system software component listed has a check box to the left of its name. A check in the check box indicates that the component is selected to be uninstalled. As a default, all installed components are selected.
The Uninstall Summary screen appears, listing all the managed system software components you selected to uninstall.
A Confirm Uninstall dialog box appears.
A screen appears on which messages are displayed, stating which components are being uninstalled. When the selected components are uninstalled, a dialog box asks if you want to reboot your system.
You must reboot your system to complete the uninstallation process.
If prompted, click OK to confirm the reboot or Cancel to reboot later.
The Systems Management CD features an unattended uninstallation procedure.
Unattended uninstallation allows you to uninstall Server Administrator from multiple systems simultaneously. The unattended uninstallation package is distributed to the remote systems using a software distribution tool from an ISV. When the package is distributed, the uninstallation script executes to uninstall the software.
The Systems Management CD is preconfigured to act as the unattended uninstallation package. To distribute the package to one or more systems, perform the following steps:
The setup.exe /u program executes to uninstall Server Administrator on each remote system.
Table 3-7 shows the unattended uninstall command line settings available for unattended un installation. Type the optional settings on the command line after setup.exe /u with a space in between each setting.
Table 3-7. Unattended Uninstall Command Line Settings
|
Setting |
Result |
|---|---|
Automatically reboots the system after uninstallation is complete. If the reboot option is set to no or the reboot option is not used, the system will not reboot. | |
For example, running setup.exe /u reboot=yes showstatus=yes runs the unattended uninstallation, displays the unattended installation status while it is running, and reboots the system after uninstallation.
This section explains how to install, upgrade, and uninstall Server Administrator on an ix86 system that is running a supported Red Hat Linux operating system. Server Administrator can be installed and upgraded from either the setup program on the Systems Management CD or from the Red Hat Linux command line.
Additionally, Server Administrator includes Dynamic Kernel Support, a feature that automatically builds a device driver for a running kernel if Server Administrator detects that none of its prebuilt device drivers support that kernel. This section includes the following topics:
Server Administrator provides prebuilt device drivers for the precompiled kernels listed in the Server Administrator readme file on the Systems Management CD. If the running kernel is not one of the precompiled kernels listed in the readme file, or if the running kernel is reconfigured and recompiled in such a way that none of the prebuilt Server Administrator device drivers support the recompiled kernel, Server Administrator must use its Dynamic Kernel Support feature to support the running kernel.
For example, if you see either of the following messages during Server Administrator installation or startup, Server Administrator attempted to use its Dynamic Kernel Support feature, but was unable to use the feature because certain prerequisites were not met:
Server Administrator is unable to build a device driver for the running kernel because the needed kernel source files are not installed.
Building device driver for running kernel... [FAILED]
Needed kernel source files are not installed.
|
NOTE: Server Administrator logs messages to the Red Hat Linux system log file, /var/log/messages. |
uname -r
The system displays a message about the running kernel.
|
NOTE: If the running kernel is not one of those listed in the Server Administrator readme file, Server Administrator must use Dynamic Kernel Support to support the running kernel. |
For Server Administrator to use its Dynamic Kernel Support feature, the following Dynamic Kernel Support prerequisites must be met before installing or restarting Server Administrator:
When these prerequisites have been met, Server Administrator's Dynamic Kernel Support automatically builds a device driver when needed during Server Administrator installation or startup. For example:
|
NOTE: Unsupported kernels are kernels that are not supported by a prebuilt device driver. You may proceed to the installation instructions if you are running a supported kernel. |
To install Server Administrator on a system running a kernel that is not supported by a prebuilt device driver, perform the following steps:
During installation, Server Administrator builds a device driver for the kernel running on the system.
To enable Server Administrator to support a kernel that is not supported by a prebuilt device driver and is loaded after Server Administrator has been installed, perform the following steps:
Server Administrator builds a device driver for the kernel running on the system the first time that Server Administrator starts after the kernel is loaded. By default, Server Administrator starts during system startup.
When Server Administrator dynamically builds a device driver for the running kernel, it installs the device driver into the directory /lib/modules/<kernel>/misc, where <kernel> is the kernel name returned by typing uname -r. If you have a system running the same kernel for which a device driver was built, you can copy the newly built device driver to the directory /var/omsa/dks/<kernel> on the other system for use by Server Administrator. This action allows Server Administrator to use its Dynamic Kernel Support feature on multiple systems without having to install the kernel source on every system.
For example: System A is running a kernel that is not supported by one of the Server Administrator prebuilt device drivers. System B is running the same kernel. Perform the following steps to build a device driver on system A and copy the device driver to system B for use by Server Administrator:
|
NOTE: You might have to create the directory /var/omsa/dks/<kernel> on system B. For example, if the kernel name is 1.2.3-4smp, you can create the directory by typing mkdir -p /var/omsa/dks/1.2.3-4smp. |
Server Administrator detects that the device driver you copied to the directory /var/omsa/dks/<kernel> supports the running kernel and uses that device driver.
|
NOTE: This procedure also can be used when upgrading Server Administrator if the new version of Server Administrator does not support the running kernel with a prebuilt device driver. |
|
NOTE: When Server Administrator is uninstalled from system B, the /var/omsa/dks/<kernel>/esm.o file that you copied to system B is not removed. You must remove the file if it is no longer needed. |
This section explains how to install and upgrade Server Administrator. There are three installation options:
|
NOTE: During a Custom or Express installation, individual Server Administrator services will not be installed on managed systems that do not meet the specific hardware and software installation requirements for that service. For example, the Server Administrator Remote Access Service software module will not be installed during an Express installation unless the managed system has an installed remote access controller. |
The Systems Management CD features an Express Setup option and a Custom Setup option for installing Server Administrator and other managed system software, and an Express Upgrade option and a Custom Upgrade option for upgrading Server Administrator and other managed system software.
When you load the Systems Management CD in your system's CD drive, the setup program uses your system's peripheral controller interconnect (PCI) bus to search for installed hardware such as controller cards.
When a user selects the Express Setup or Express Upgrade option, the user lets the setup program install or upgrade all the managed system software components that are appropriate for the hardware configuration of your particular system. For more information on how to perform an express setup or express upgrade, see the Software Quick Installation Guide. You can access the Software Quick Installation Guide by clicking Info on the task bar within the setup program.
When a user selects the Custom Setup or Custom Upgrade option, the user can deselect one or more components that the setup program has identified as appropriate for your system. During an express setup or express upgrade, you cannot add to the list of components to install because all the components that are appropriate for the hardware configuration are preselected.
|
NOTICE: The sections that follow show how to install and upgrade Server Administrator and other managed system software using the Custom Setup and Custom Upgrade options. |
|
NOTE: If you have a modular system, or if your operating system was preinstalled, the managed system software has been preloaded on your system and you do not need to use the Systems Management CD. To complete the software installation, run the installation script start.sh, located in the /dell/omsw directory. |
If the CD does not mount automatically, type mount /mnt/cdrom.
After the CD mounts, the File Manager should automatically start and display the contents of the root directory of the CD.
The Welcome to Dell OpenManage Systems Management Installation screen appears.
A software license agreement appears.
A message displays stating that a setup wizard is being prepared to lead you through the setup process.
The Select Setup Type screen appears.
The Managed System Software screen appears. Each managed system software application listed has a check box to the left of its name. A check in the check box indicates that the software is selected for installation. As a default, all available components are selected.
A button appears to the right of each component name.
The Settings button indicates that you can install and configure the component.
The More Info buttons are color coded:
Buttons that appear in gray do not provide either information or configuration options.
The Installation Summary screen appears, listing all of the managed system software services that you selected for installation.
A Confirm Install dialog box appears.
The Dell OpenManage Components screen appears. Messages are displayed, stating which components are being installed. When the selected components are installed, the Installation Complete screen appears.
If the CD does not automatically mount, type mount /mnt/cdrom.
After the CD mounts, the File Manager should automatically start and display the contents of the root directory of the CD.
The Welcome to Dell OpenManage Systems Management Installation screen appears.
A software license agreement appears.
A message displays stating that a setup wizard is being prepared to lead you through the setup process.
The Select Setup Type screen appears.
The Select Setup Type screen appears.
The Managed System Software screen appears. Each managed system software component listed has a check box to the left of its name. A check in the check box indicates that the component is selected for upgrade. As a default, all installed components are selected.
A button to the right of each component name provides information about the component.
The Settings button indicates that you can upgrade and configure the component.
The More Info buttons are color coded:
Buttons that appear in gray do not provide either information or configuration options.
The Installation Summary screen appears, listing all the managed system software services you selected for upgrade.
A Confirm Install dialog box appears.
The Dell OpenManage Components screen appears. Messages are displayed, stating which components are being installed. When the selected components are installed, the Installation Complete screen appears.
This section describes how to perform an Express installation or upgrade of Server Administrator from the Red Hat Linux command line.
Use the following procedure to install Server Administrator for the first time or to upgrade to a more recent version of Server Administrator.
|
NOTE: Do not start X Windows on your system. |
The -license setting confirms that you accept the software license agreement. The installation script starts Server Administrator when the installation is complete.
The Systems Management CD features an Express Setup option and a Custom Setup option for the unattended installation procedure.
Unattended installation allows you to install Server Administrator on multiple systems simultaneously. You can perform an unattended installation by creating an unattended installation package that contains all of the necessary managed system software files. The unattended installation option also provides several "Unattended Installation Features" that allow users to configure, verify, and view information about unattended installations.
The unattended installation package is distributed to the remote systems using a software distribution tool from an ISV. When the package is distributed, the installation script executes to install the software.
The Express Setup unattended installation option uses the Systems Management CD as the unattended installation package. The start.sh -license program accesses the Systems Management CD to accept the software license agreement and install all required Server Administrator components on selected remote systems. The start.sh -license program installs Server Administrator components on each remote system based on the system's hardware configuration.
|
NOTICE: The -license setting must be added to the start.sh command for an Express Setup unattended installation to run. Adding the -license setting confirms that you accept the software license agreement for using the unattended installation program. See "Optional Command Line Settings" for more information. |
You can make the Systems Management CD image available to the remote system by distributing the entire contents of the CD.
|
NOTE: Do not start an X Windows system. |
The Custom Setup unattended installation option creates an unattended installation package in a directory on your system's hard drive. To create an unattended installation package, perform the following steps:
|
NOTE: Do not start an X Windows system. |
The custom unattended installation package is located in the directory you created in the preceding step 1. This directory contains all of the managed system software components to distribute, along with all the necessary unattended installation program files.
The start.sh program executes to install Server Administrator on each remote system.
Unattended installation provides the following features:
Table 3-8 shows the optional command line settings and subcommands available for unattended installation. Type the settings on the command line after start.sh with a space in between each setting or subcommand. Subcommands must follow a setting.
Table 3-8. Command Line Settings
|
Setting |
Subcommand |
Result |
|---|---|---|
Specifies a nondefault filename for the short format dependency log file. The full path including the name of the file must be specified. If the path or the filename contains any spaces, then the location must be enclosed in double quotes. See "Dependency Check." | ||
Runs a dependency check on the components specified in the.sil file. For more information about the format of the.sil file, see "Customization Files." | ||
NOTICE: The -license setting must be added to the command line for an express unattended installation to run. | ||
NOTICE: The -license setting must be added to the command line for a silent unattended installation to run. | ||
Specifies a nondefault filename for the short format log file. For more information, see "Log Files." The full path including the name of the file must be specified in this option. If the path or the filename contains any spaces then the location must be enclosed in double quotes. The location cannot contain any of the reserved words described in this section such as icon, web, reboot, and so on. | ||
Disables SNMP Set operations on the Server Administrator system. If the -nosnmpsets option is not used, the system will allow SNMP Set operations. | ||
The Server Administrator secure port server will not automatically start. | ||
Specifies a customization file. For more information about the customization file, see "Customization Files." The full path including the name of the file must be specified in this option. If the path or the filename contains any spaces, then the location must be enclosed in double quotes. The location cannot contain any of the reserved words described in this section such as icon, web, reboot, and so on. |
For example, running start.sh -silent -license -noweb installs Server Administrator components on each remote system based on the system's hardware configuration, accepts the software license agreement, and does not automatically start the Server Administrator secure port server.
Customization files provide a way to customize the exact software components to install. With the customization file, users can selectively install software components for different systems using the same unattended installation package. For example, you can choose to install Server Administrator, but not the Remote Access Service, on a specific group of servers, and choose to install Server Administrator, but not the Diagnostic Service, on another group of servers. The customization file is formatted as a simple text file with a.sil filename suffix, in which each line contains one software component relationship. For example:
A designation of yes indicates that the component is installed. A designation of no indicates that the component is not installed. Table 3-9 shows the component IDs for each software component. The component ID is a 2- to 5- character designation.
Table 3-9. Software Component IDs
|
Component ID |
Software Component |
|---|---|
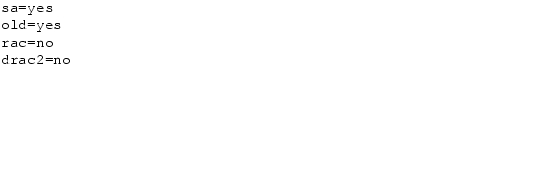
Figure 3-4 shows an example of a customization file, \tmp\install.sil, in which all available components except Remote Access Service and DRAC II are designated to be installed.
Figure 3-4. Sample Customization File
The unattended installation log files capture the installation status of each software component and the result of each unattended installation dependency check. For more information about log files generated by the dependency check, see "Dependency Check."
Two log files are generated in a temp folder during an unattended installation, ominstal.log and omstatus.log. The temp folder is typically located at \tmp. Each log provides the installation status of each component, the host system name, and the start and end time of the installation. On a large-scale, unattended installation deployment of hundreds or thousands of servers, users can save the unattended installation log file for each server and easily isolate an installation problem on one or more servers with the host information in the log file.
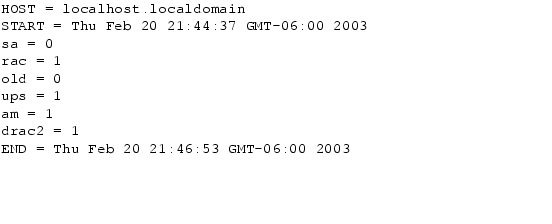
The omstatus.log provides installation information in a shortened format that is designed to be easily read by scripts. You can use this information to write automatic script files to query the installation status and take remedy actions as needed. See Figure 3-5.
One line per software component is available. A value of "0" indicates that the installation of the component succeeded, a value of "-1" indicates that installation of the component failed, and a value of "1" indicates that the component did not install because a dependency was not met. See "Dependency Check" for information about identifying installation dependencies. The software component ID is the same 2- to 5-character designation described in "Customization Files."
Figure 3-5. Example of a Short omstatus.log File
The ominstal.log file provides full text installation information about the components. See Figure 3-6.
Figure 3-6. Example of a Full Text ominstal.log File
The start.sh -dcheck program provides the capability to examine the dependency status of software components without launching the actual installation. This program generates two log files to your system's tmp folder: ominstal_check.log and omstatus_check.log.
The ominstal_check.log file provides full text information about the dependency status of software components.
The omstatus_check.log file provides dependency status information in a shortened format that is designed to be easily read by scripts. See Figure 3-5 for an example of a log file.
There is one line per software component. A value of "0" indicates that the installation is ready to proceed, a value of "1" indicates that one or more components has a dependency warning, and a value of "2" indicates that one or more components has a dependency error. The software component ID is the same 2- to 5-character designation described in the "Customization Files" section.
where "0" means OK to install, "1" means warning, and "2" means dependency error. See "Log Files" for more information.
The format is very similar to the .sil file format and the software component IDs are identical.
Use the following command line settings with the dependency check feature.
Table 3-10 shows the dependency check command line settings available for unattended installation. Type the optional settings on the command line after start.sh -dcheck with a space in between each setting.
Table 3-10. Command Line Settings
|
Setting |
Result |
|---|---|
Runs a dependency check on the components specified in the .sil file. For more information about the format of the .sil file, see "Customization Files." | |
For example, running start.sh -dcheck -sil dep.sil runs the dependency check for all components listed in the customization file (dep.sil), and saves the dependency check log files (ominstal_check.log and omstatus_check.log) in the temp folder.
You can uninstall Server Administrator using the Systems Management CD or from the Red Hat Linux command line. Additionally, you can perform an unattended uninstallation on multiple systems simultaneously.
You must be logged in as root.
If the CD does not automatically mount, type mount /mnt/cdrom.
After the CD mounts, the File Manager should automatically start and display the contents of the root directory of the CD.
The Welcome to Dell OpenManage Systems Management Installation screen appears.
A software license agreement appears.
A message displays stating that a setup wizard is being prepared to lead you through the setup process.
The Select Setup Type screen appears.
The Uninstall Selection screen appears. Each managed system software component listed has a check box to the left of its name. A check in the check box indicates that the software component is selected for uninstallation. As a default, all installed managed system software components are selected.
The Uninstall Summary screen appears, listing all of the managed system software services you selected for uninstallation.
The Confirm Uninstall dialog box appears.
The Uninstall screen appears. Messages display, stating which components are being uninstalled.
The Systems Management CD features an unattended uninstallation procedure.
Unattended uninstallation allows you to uninstall Server Administrator from multiple systems simultaneously. The unattended uninstallation package is distributed to the remote systems using a software distribution tool from an ISV. When the package is distributed, the uninstallation script executes to uninstall the software.
The Systems Management CD has been preconfigured to act as the unattended uninstallation package. To distribute the package to one or more systems, perform the following steps:
The uninstall.sh program executes to uninstall Server Administrator on each remote system.
On systems running supported Red Hat Linux operating systems, you can configure Server Administrator to change the default password for SNMP Set operations.
|
NOTE: The default password for root is calvin. |
dcinuser32
The Systems Management User Security utility displays the following instructions:
Dell Systems Management User Security Utility
Dell Computer Corporation.
Version x.y.y (BLD_zzzz)
The user name and password allow SET commands to be honored
by
Server Administrator; otherwise SET requests will be
rejected.
Do you want to change the default security settings for
Server Administrator?
(Y for Yes, N for No, or Q to Quit; then press the Enter key):
If you do not want to change the default password, press <n> or <q> to exit. Exiting resets the root password for allowing SNMP Set operations to its default value.
This section explains how to install, upgrade, and uninstall Server Administrator on a system that is running a supported Novell NetWare operating system. This section includes the following topics:
This section explains how to install and upgrade the Server Administrator. There are two installation options:
The following are prerequisites for installing Server Administrator:
|
NOTE: During a Custom or Express installation, individual Server Administrator services will not be installed on managed systems that do not meet the specific hardware and software installation requirements for that service. For example, the Server Administrator Remote Access Service software module will not be installed during an Express installation unless the managed system has an installed remote access controller. |
All available volumes display.
|
NOTE: A dialog box listing previously selected paths might appear after pressing <Enter>. Press <Esc> to close this dialog box. |
A default message appears, stating that the product is to be installed from drive A.
Erase A: and type volume_name:netware, where volume_name is the name of the volume assigned to the CD drive.
|
NOTE: You cannot enter spaces in the pathname. |
Indicate which file groups you want installed.
|
NOTE: Items selected for installation have an X next to them. Pressing <Enter> next to an item selects that item. Pressing the spacebar next to an item toggles the selection between selected and not selected. |
The installation of Server Administrator and the components you selected begins. Status messages appear.
The Systems Management Security Utility appears and asks whether you want to change the default security settings for SNMP Set operations.
|
NOTE: The default password for root is calvin. |
Type the new password, and then type the password again to confirm.
The installation of Server Administrator and the components you selected continues. Status messages appear. When the installation is complete, a dialog box appears stating that the installation is complete.
Use the following procedure to silently install Server Administrator for the first time or to upgrade to a more recent version of Server Administrator.
All available volumes display.
The installation script installs all necessary files to the managed system. If you are upgrading to a more recent version of Server Administrator, the installation script will uninstall previously installed versions before installing the current version of Server Administrator.
|
NOTICE: The -license setting must be added to the command for a silent installation to run. Adding -license to the command confirms that you accept the software license agreement for using the silent installation program. You can view the license agreement (license.txt) on the Systems Management CD in the app/doc directory. |
You can uninstall Server Administrator from your system using the Product Options menu in the NWConfig utility or using the silent uninstallation script provided on the Systems Management CD.
At the NetWare command line console, type omunins.ncf and press <Enter>. The uninstallation script uninstalls all Server Administrator files from the managed system.