This chapter provides the following information:
![]() Broadcom
Advanced Server Program Overview
Broadcom
Advanced Server Program Overview
![]() Broadcom
Advanced Server Program for Windows 2000
Broadcom
Advanced Server Program for Windows 2000
![]() Broadcom
Advanced Server Program for Windows Server 2003
Broadcom
Advanced Server Program for Windows Server 2003
![]() Broadcom
Advanced Control Suite
Broadcom
Advanced Control Suite
![]() Broadcom
Advanced Server Program for Novell NetWare
Broadcom
Advanced Server Program for Novell NetWare
![]() Broadcom
Advanced Server Program for Linux
Broadcom
Advanced Server Program for Linux
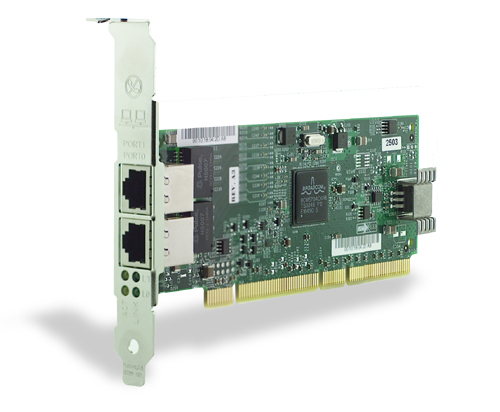
The Broadcom NetXtreme™ Gigabit Ethernet Adapter connects a PCI or PCI-X (5701, 5703, 5704) compliant server or workstation to a Gigabit Ethernet network. This adapter incorporates a technology that transfers data at a maximum rate of one gigabit per second10 times the rate of Fast Ethernet adapters.
The Gigabit Ethernet Adapter targets the increased congestion experienced at the backbone and server in todays networks, and provides a future upgrade path for servers or high-end workstations that require more bandwidth than Fast Ethernet can provide.
Figure 1. The Broadcom NetXtreme™ Gigabit Ethernet Adapter (5700 shown)

Figure 2. The Broadcom NetXtreme™ Gigabit Ethernet Adapter (5701 shown)
Figure 3. The Broadcom NetXtreme™ Gigabit Ethernet Adapter (5703 shown)
Figure 4. The Broadcom NetXtreme™ Gigabit Ethernet Adapter (5704 shown)
If your adapter was not shipped as part of a server or work station it should Include the following:
Inform your network supplier of any missing or damaged items. If you need to return the adapter, you must pack it in the original (or equivalent) packing material or the warranty will be voided.
| NOTE If your adapter was shipped as part of a system, see the systems documentation for the location of the drivers and software for the NIC. |
The following is a list of the Broadcom NetXtreme™ Gigabit Ethernet Adapter features for all supported operating systems:
The faceplate on the 10/100/1000BASE-T adapter provides an RJ-45 connector for connecting the adapter to another network device.

Figure 4. Broadcom NetXtreme™ Gigabit Ethernet Adapter Faceplate (5700, 5701, and 5703)
The adapter has four LEDs, one for each port speed option (10 Mbps, 100 Mbps, and 1000 Mbps), and one for Activity. The three port speed LEDs indicate active links, and the ACT LED indicates data transfer status. Once the adapter is installed and the cables are connected properly, the appropriate speed LED is lit and the ACT LED is on if data traffic is present.
Once the adapter hardware has been properly installed on
your system, the LEDs indicate the following adapter states:
Table 1. Gigabit Ethernet Port LED Status
| LED | State | Description |
| 1000 | On | Good 1000 Mbps Ethernet link. |
| Off | No 1000 Mbps link; possible link at different speed, possible bad cable, bad connector, or configuration mismatch. | |
| 100 | On | Good 100 Mbps Fast Ethernet link. |
| Off | No 100 Mbps link; possible link at different speed, possible bad cable, bad connector, or configuration mismatch. | |
| 10 | On | Good 10 Mbps Fast Ethernet link. |
| Off | No 10 Mbps link; possible link at different speed, possible bad cable, bad connector, or configuration mismatch. | |
| ACT | Blinking | Brief bursts of data detected on the port. |
| On | Streams of data detected on the port. | |
| Off | No data detected on the port. |
The faceplate on the 10/100/1000BASE-T adapter provides two RJ-45 connectors for connecting the adapter to other networking devices.

Figure 5. Broadcom NetXtreme™ Gigabit Ethernet Adapter Faceplate (5704)
The adapter has two LEDs, one for each Activity (ACT and LINK). The ACT LED indicates data transfer status. Once the adapter is installed and the cables are connected properly, the appropriate speed LED is lit and the ACT LED is on if data traffic is present. The LINK LED indicates the port speed option (10 Mbps, 100 Mbps, and 1000 Mbps) for ports 1 and 2.
Once the adapter hardware has been properly installed on
your system, the LEDs indicate the following adapter states:
Table 2. Gigabit Ethernet Port LED Status
for Ports 1 and 2
| LED | State | Description |
| ACT | Blinking | Brief bursts of data detected on the port. |
| On | Streams of data detected on the port. | |
| Off | No data detected on the port. | |
| LINK | On | Good 10, 100, and 1000 Mbps Fast Ethernet link. |
| Off | No link; possible link at different speed, possible bad cable, bad connector, or configuration mismatch. |
BASP is a Broadcom intermediate software
driver for Windows 2000, Windows Server 2003, NetWare, and Linux, that provides load-balancing,
fault-tolerance, and VLAN features. These features are provided by creating
teams (virtual adapters) that consist of multiple NIC interfaces. A team can
consist of one to eight NIC interfaces and each interface can be designated
primary or standby*. All primary interfaces in a team will participate in Load-balancing
operations by sending and receiving a portion of the total traffic. Standby
interfaces will take over in the event that all primary interfaces have lost
their links. VLANs can be added to a team to allow multiple VLANs with different
VLAN IDs. A virtual adapter is created for each VLAN added. Load-balancing and
fault-tolerance features will work with any third party's NIC adapters. VLANs
only work with Broadcom NIC adapters.
| NOTE - *Standby can only be used in Smart Load-Balance mode (see below). |
Smart Load-Balance (SLB) is a protocol specific scheme and the level of support for IP, IPX, and NetBEUI are listed below.
Failover/Failback - All Broadcom
Failover/Failback - Multivendor
IP
IPX
NetBEUI
IP
IPX
NetBEUI
W2K
Y
Y
Y
Y
N
N
Windows Server 2003
Y
Y
Y
Y
N
N
NW 5.x/6.0
Y
Y
N/S
Y
N
N/S
LX AS2.1, 8.0
Y
N/S
N/S
Y
N/S
N/S
Load Balance - All Broadcom
Load Balance - Multivendor
IP
IPX
NetBEUI
IP
IPX
NetBEUI
W2K
Y
Y
N
Y
Y
N
Windows Server 2003
Y
Y
N
Y
Y
N
NW 5.x/6.0
Y
Y
N/S
Y
Y
N/S
LX AS2.1, 8.0
Y
N/S
N/S
Y
N/S
N/S
LEGEND: Y = yes N = no N/S = not supported
*Third party adapters must be NICE patched or NESL compliant to be fault tolerant and load balance in a multivendor team in Linux and Netware, respectively.
Smart Load-balance (SLB) mode works with all Ethernet switches without configuring the switch ports to any special trunking mode. Only IP traffic will be load-balanced in both inbound and outbound directions. IPX traffic will be load-balanced in outbound direction only. Other protocol packets will be sent and received through one primary NIC only. Fault-tolerance for non-IP traffic is only supported using Broadcom NICs. The Generic Trunking mode requires the Ethernet switch to support some form of port trunking mode (e.g. Cisco's Gigabit EtherChannel or other switch vendor's link aggregation mode). This mode is protocol-independent and all traffic should be load-balanced and fault-tolerant.
| NOTE Broadcom recommends disabling the spanning tree protocol at the switch when using BASP. This will minimize the downtime due to spanning tree loop determination when failing over. |
The following options are supported under Windows 2000. Refer to "Windows 2000 Driver Software," for additional information.
| NOTE Adapter speed connection when the system is down waiting for a wake up signal is either 10 Mbps or 100 Mbps, but can return to 1000 when the system is up and running if connected to a 1000 Mbps capable switch. Systems intending to use WOL should be connected to a switch capable of both 1000 and 10 or 100 speeds. |
| NOTE Wake on LAN is supported at 10 Mbps on the 5700 and 5704 adapters. The 5701 and 5703 adapters support Wake on LAN at 10 or 100 Mbps. Dell supports Wake on LAN on one device in the system at a time. |
The following options are supported under Windows Server 2003. Refer to "Windows Server 2003 Driver Software," for additional information.
| NOTE Adapter speed connection when the system is down waiting for a wake up signal is either 10 Mbps or 100 Mbps, but can return to 1000 when the system is up and running if connected to a 1000 Mbps capable switch. Systems intending to use WOL should be connected to a switch capable of both 1000 and 10 or 100 speeds. |
| NOTE Wake on LAN is supported at 10 Mbps on the 5700 and 5704 adapters. The 5701 and 5703 adapters support Wake on LAN at 10 or 100 Mbps. Dell supports Wake on LAN on one device in the system at a time. |
The Broadcom Advanced Control Suite is a graphics user interface with the following functions. Refer to "Broadcom Advanced Control Suite " for additional information.
The following options are supported under Novell NetWare. Refer to "NetWare Driver Software," for additional information.
For optimum fault tolerance and recovery operations, BASP.LAN relies on the NIC drivers to generate NESL (NetWare Event Service Layer) events during link changes and other failure events. NESL is an optional feature in the ODI driver specification and not all drivers support it. For NESL events to propagate properly to BASP.LAN, ODINEB.NLM must be loaded before the NESL compliant ODI drivers.
Do the following to check if a NIC driver supports NESL events. Load BASP.LAN and create a team by binding the NIC adapter to the virtual slot (See instructions and examples below). In the "Virtual Adapter X Team Members" screen of the BASP.LAN's menu interface, the Link status of all bound NIC adapters are shown. Disconnect or connect the NIC adapter's cable and the link status shown on the screen should change immediately if the NIC driver supports NESL events.
| NOTE Adapter speed connection when the system is down waiting for a wake up signal is either 10 Mbps or 100 Mbps, but can return to 1000 when the system is up and running if connected to a 1000 Mbps capable switch. Systems intending to use WOL should be connected to a switch capable of both 1000 and 10 or 100 speeds. |
| NOTE Wake on LAN is supported at 10 Mbps on the 5700 and 5704 adapters. The 5701 and 5703 adapters support Wake on LAN at 10 or 100 Mbps. Dell supports Wake on LAN on one device in the system at a time. |
The following options are supported under Linux. Refer to "Linux Driver Software" for additional information.
SLB mode requires NICE drivers and works with all Ethernet switches without configuring the switch ports to any special trunking mode. Only IP traffic will be load-balanced in both inbound and outbound directions.
Generic trunking mode does not require NICE and can work with any NIC, however, it requires the Ethernet switch to support the technology and be properly configured. This mode is protocol-independent and all traffic should be load-balanced and fault-tolerant.
802.3ad mode requires NICE drivers and Ethernet switches supporting IEEE 802.3ad Link Aggregation. This mode is protocol-independent and all traffic should be load-balanced and fault-tolerant. All the physical interfaces in the 802.3ad teams are defaulted to be LACP active. A 802.3ad team requires all the member NICs support NICE. All the member NICs, once in the 802.3ad team, will be set with the same MAC address.
| NOTE Adapter speed connection when the system is down waiting for a wake up signal is either 10 Mbps or 100 Mbps, but can return to 1000 when the system is up and running if connected to a 1000 Mbps capable switch. Systems intending to use WOL should be connected to a switch capable of both 1000 and 10 or 100 speeds. |
| NOTE Wake on LAN is supported at 10 Mbps on the 5700 and 5704 adapters. The 5701 and 5703 adapters support Wake on LAN at 10 or 100 Mbps. Dell supports Wake on LAN on one device in the system at a time. |
| NOTE The following instuctions apply if your adapter was supplied with Broadcom installation media. If your adapter was provided by an OEM, refer to the documentation that was supplied with your system, or the CDs provided with the kit. |
Create driver disks using the Broadcom MakeDisk utility (setup.exe file). This utility runs under Windows, and allows you to create disks with the following drivers:
To create a driver disk, perform the following:
Select (check) the driver or drivers of choice. Note that selecting multiple drivers will result in creating multiple disks.
Click Next. The Setup Needs the Next Disk screen will appear.
If more than one driver was selected, the Setup Needs the Next Disk screen will appear again. Insert another diskette and click OK.