This chapter provides the following information:
![]() Installing
the Driver Software
Installing
the Driver Software
![]() Modifying
Configuration Parameters
Modifying
Configuration Parameters
| NOTE The Broadcom NetXtreme™ Gigabit Ethernet Adapter must be physically installed in your system prior to installing the driver software. See Installing the Hardware for details. |
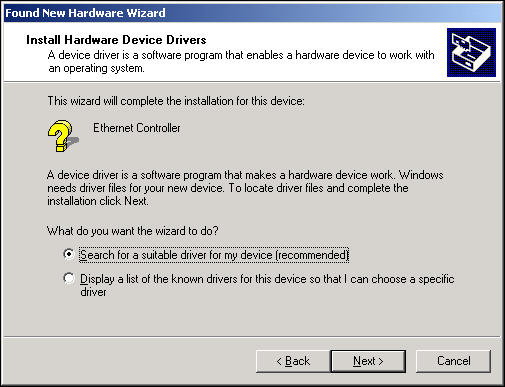
When the Windows 2000 system first boots up after installing a new hardware device, such as a Gigabit Ethernet Adapter, the system automatically detects the new hardware and prompts you to install the driver software for that device.
A network device driver must be installed before the Gigabit Ethernet Adapter can be used with your Windows 2000 system.
To install the adapter software for Windows 2000, do the following
|
NOTE Before beginning this procedure, verify that
the Windows 2000 system has been upgraded to the latest version with
the latest service pack applied. When updating the adapter software on existing Broadcom devices, the Advanced Property settings may not be updated unless the existing Broadcom device is removed by following the instructions in the Removing the Driver Software section. You must then perform a scan for hardware changes in the device manager, followed by re-installing the Broadcom device with the current adapter software as described in the Installing the Driver Software section. Prior to uninstalling the Broadcom device, ensure to capture all Advanced Property settings because the parameters will be lost. |

Example: e:\
Where "e:" is the designation of the CD-ROM drive on your system.

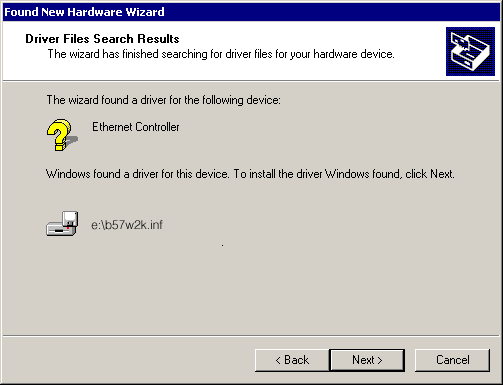
| NOTE If the Insert Disk window appears, do not insert the Windows 2000 disk: |
Some early versions of Windows 2000 may display a spurious message requesting you to insert the Windows 2000 disk. If this occurs, leave the driver installation media in the drive and click OK. If asked to specify the location of the Windows 2000 CD-ROM instead, click Browse (dont use the text entry field) and locate the path to the Gigabit Ethernet drivers that was specified above.
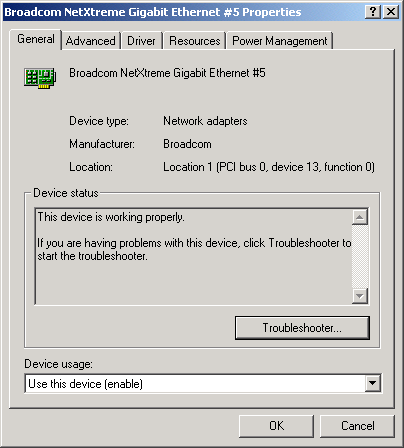
Once installation of the driver software is complete, you are ready to modify configuration parameters.
Although the default values should be appropriate in most cases, you may change any of the available options to meet the requirements of your specific system. Once the adapter driver software has been installed, you can use this procedure to verify or change the following adapter properties:
To configure the adapter parameters, bring up the Driver Properties Advanced tab as follows:
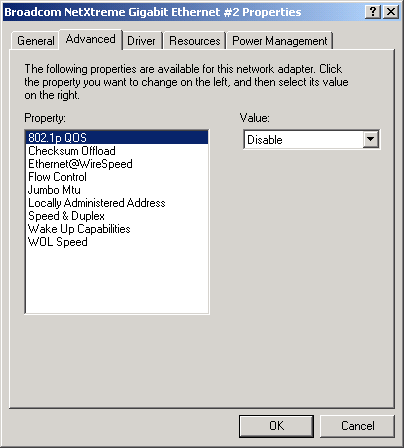
The 802.1p QOS parameter is a standard that enables Quality of Service (QOS). It is responsible for the QOS provisions on the local segment, and the avoidance of the "all packets are treated equally" issue, which falls onto the hub or switch servicing segment. 802.1p QOS provides prioritization of packets traversing a subnet. Thus, when the local segment becomes congested and the hub or switch workload results in the delay (dropping) of packets, those packets with flags that correspond to higher priorities will receive perferential treatment, and will be serviced before packets with lower priorities. Disabled by default, select Enable from the Value drop-down menu to enable this parameter. Once enabled, select Disable from the Advanced tab Value drop-down menu to disable this parameter.
NOTE Enabling 802.1p QOS also requires an 802.1p aware switch.
Normally the Checksum Offload function is computed by the protocol stack. By selecting one of the Checksum Offload parameters, the checksum can be computed by the Gigabit Ethernet Adapter. To enable one of the Checksum Offload parameters, select the parameter from the Advanced tab Value drop-down menu. These parameters described and shown below:

The Ethernet@WireSpeed parameter enables a 1000BASE-T Ethernet adapter to establish a link at a lower speed when only 2 pairs of wires are available in the cable plant. By default, the adapter is set to Enable. To disable the Ethernet@WireSpeed™ parameter, select Disable from the Value drop-down menu as shown below:

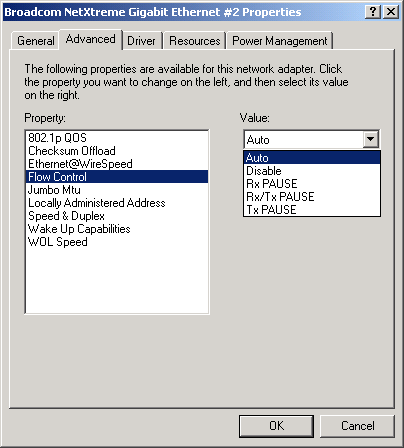
The Flow Control parameter allows the user to enable or disable the receipt or transmission of PAUSE frames. PAUSE frames enable the adapter and the switch to control the transmit rate. The side that is receiving the PAUSE frame will momentarily stop transmitting. The recommended selection is Auto, which will optimize PAUSE frame receipt and transmission. Set to Auto by default, to disable Flow Control to receive, transmit, or receive and transmit PAUSE frames, select the appropriate parameter from the Advanced tab Value drop-down menu described and shown below.
The Jumbo Mtu parameter allows the adapter to transmit and receive oversized Ethernet frames that are greater than 1514 but less than 9000 bytes in length. Note that this parameter will require a switch that is able to process large frames.
Set at 1500 bytes by default, to increase the size of the received frames, increment the byte quantity in 500-byte increments from the Advanced tab Value counter, shown below.
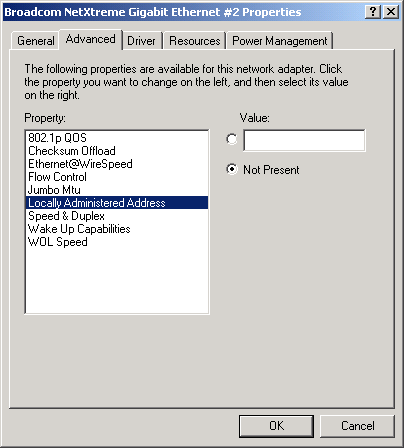
The Locally Administered Address is a user-defined address that will be used in place of the MAC address originally assigned to the adapter. Every adapter in the network must have its own unique MAC address. This locally administered address consists of a 12-digit hexadecimal number
The appropriate assigned ranges and exceptions for the Locally Administered Address include the following:
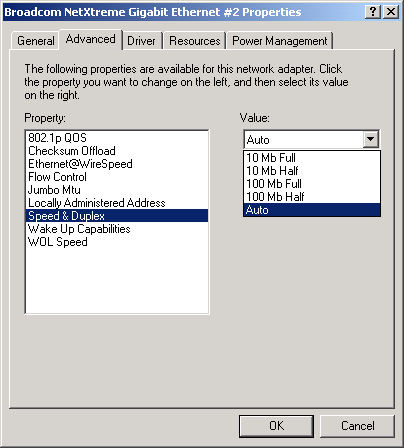
The Speed & Duplex parameter allows the user to set the connection speed and duplex mode of the network. Note that Duplex Mode allows the adapter to transmit and receive network data simultaneously. The adapter is set to Auto (optimum connection) by default. Set the speed and mode as described and shown below:
|
|
NOTE 1Gbps speed is enabled by selecting Auto. |
|
NOTE N-way auto-negotiation requires that the link partner be set to the same Speed and Duplex setting for proper operation. |
|
NOTE Auto is the recommended selection. This selection allows the adapter to dynamically detect the line speed and duplex mode of the network. Whenever the network capability changes, the adapter will automatically detect and adjust to the new line speed and duplex mode. You must ensure that the link partner is also set to Auto. Note that 1000 Mbps makes use of Auto-Negotiation, some switches (Cisco 6509) do not allow setting Auto on ports but allow 1000 Mbps. |
The Wake Up Capabilities parameter allows the user to set the adapter to wake up from a low power mode when it receives a network wake up frame. Two wake up frames are possible: Magic Packet and Wake Up Frame. By default, the adapter is set to Both. To choose the type of frame the adapter will wake up from, select the appropriate Advanced tab parameter from the Value drop-down menu as described and shown below:

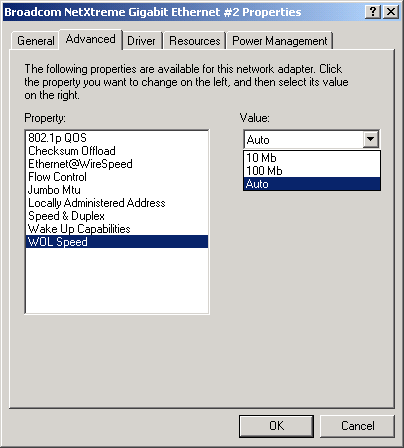
The WOL Speed parameter allows the user to select the speed at which the adapter connects to the network during Wake-on-LAN mode. By default, the adapter is set to Auto. Set the speed as described and shown below:
| NOTE WOL Speed at 100 Mbps is supported only on the 5701, 5703, and 5704. 5700-based network adapters support only a WOL connection speed of 10 Mbps. This is the network speed when the system is in a standby mode awaiting wake up on LAN. |
|
NOTE Wake on LAN is supported at 10 Mbps on the 5700 and 5704 adapters. The 5701 and 5703 adapters support Wake on LAN at 10 or 100 Mbps. Dell supports Wake on LAN on one device in the system at a time. |
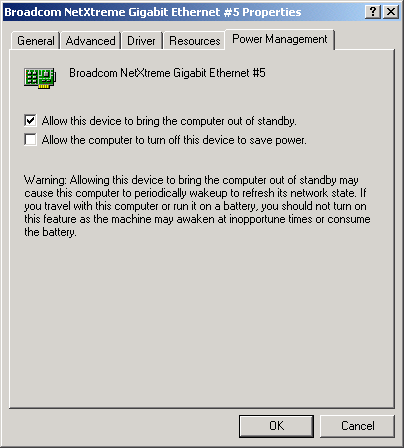
Power management specifies whether the operating system turns off the selected device if that device is able to be turned off. If the device is busy doing something, however, (servicing a call, for example), the operating system will not shut down the device. The operating system will try to shut down every possible device only when it is hibernating. Some devices must stay on at all times. If you need the device to stay on at all times, do not check this box.
| NOTE To enable the Wake-on LAN in standby mode for the Broadcom NetXtreme™ Gigabit Ethernet adapter you must select the "Allow the device to bring the computer out of standby" checkbox. |
|
NOTE WOL must also be enable on the device using the Advanced tab properties for ACPI WOL. Also, WOL must be enabled in the firmware in order to wake from a Windows shutdown or Out of Box WOL (see the DOS Diagnostic User's Guide). |
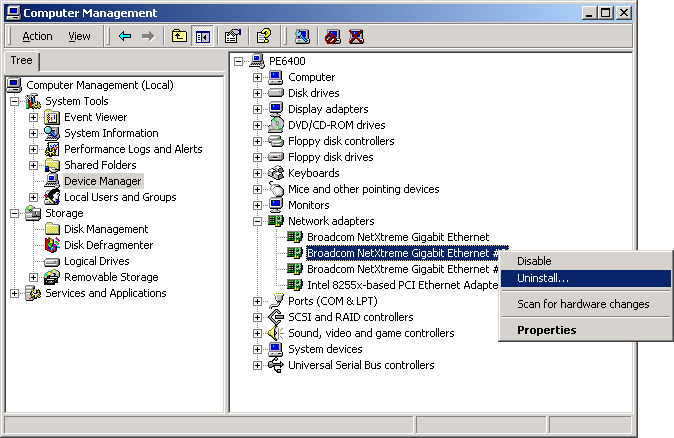
Before physically removing an adapter from your system, first remove the adapter driver software.

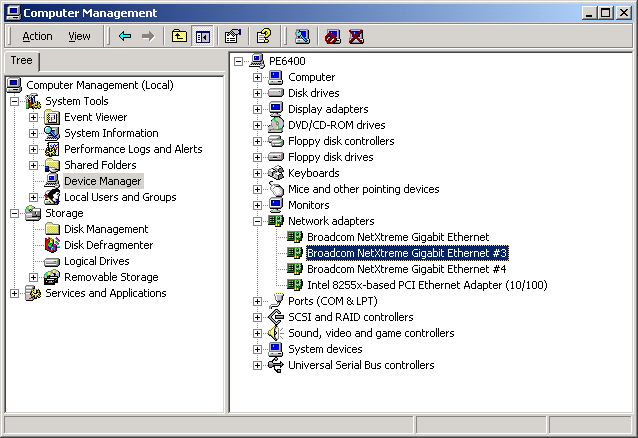
Click Device Manager to display the Computer Management window.
|
NOTE Not all driver files are removed as part of this procedure. Note that the driver and adapter can be removed via Hot Plug, if supported. |