CS 488/688: Introduction to Computer Graphics
Assignment 2: Ray tracing
Summary
The latest GPUs support hardware-accelerated ray tracing, and it is getting increasingly popular to use ray tracing for interactive applications. You may have seen something like "ray tracing is offline rendering and rasterization for interactive rendering", but that is no longer true. Ray tracing can do something difficult with rasterization, albeit it can be computationally more expensive. The goal of this assignment is to write a simple ray tracer that can do (at least) the following:
- Intersect primary rays with scene geometry;
- Cast shadow rays from intersection points to each light source; and
- Use the gathered information to perform illumination calculations and compute the pixel value based on shading.
cs488.h from A1 as a starting point. Doing so allows you to use your rasterizer to perform interactive rendering of an object before running ray tracing. If your rasterization is correctly implemented, it also helps debug your ray tracer since you can generate some reference images. However, you can still complete all the tasks in A2 even if you failed everything in A1.
Task 0: main.cpp
Comment out A1(argc, argv) and comment in A2(argc, argv) to enable a simple setup code in main.cpp. That being said, the only difference from A1(argc, argv) is that now we set globalRenderType = RENDER_RAYTRACE;. This variable now tells the framework to run in a ray tracing mode. You can toggle between different rendering modes by pressing the "R" key. If the code runs, you just see a window that shows nothing. Again, it is not a bug; your task is to make it render something interesting (and consistent with rasterization in most cases).
Task 1: Ray-triangle intersection
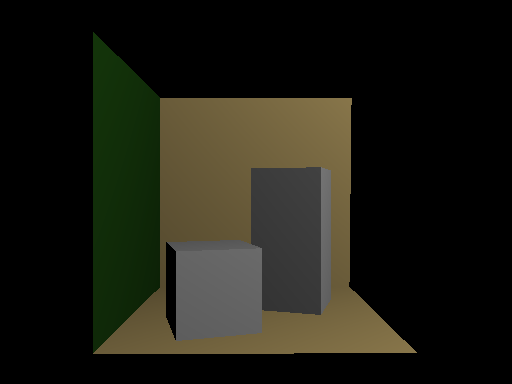
Look for bool raytraceTriangle(HitInfo& result, const Ray& ray, const Triangle& tri) in the TriangleMesh class. The function is currently empty. Implement a ray-triangle intersection code and fill in result with proper hit information. You would like to interpolate normals and texture coordinates via barycentric coordinates. Be sure to normalize the interpolated normal. The function should return true when there is a valid intersection between tMin and tMax, and return false otherwise. If everything is done right, loading cornelbox.obj results in this image, which is exactly the same as the results of rasterization (i.e., toggling with the R key would not change the image, except that you now don't need proper clipping).

globalShowRaytraceProgress = true with some overhead.
Task 2: Shadow ray tracing
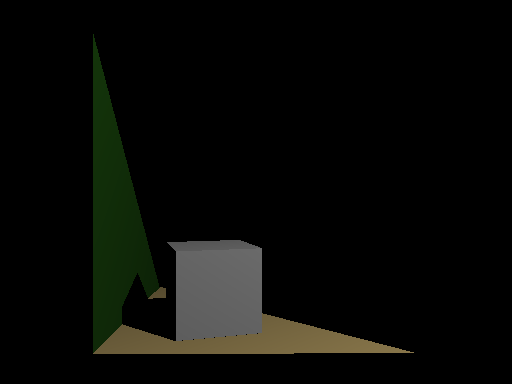
Look for static float3 shade. At the moment, the code returns at return brdf * PI; //debug output that just returns the reflectance of the Lambertian material. Comment out that line to enable illumination computation for a point light source. Implement a shadow ray tracing to account for shadows from a point light source properly. You may want to start tracing from a hit point of the eye ray, and check if there is an intersection between the light source and the hit point. Here is an image without shadow ray tracing:

which will become the following with shadow ray tracing.

Task 3: Specular reflection
Look for static float3 shade again. Right now, the code path for else if (hit.material->type == MAT_METAL) is empty. Implement a recursive ray tracing to support specular reflection. You get an image like this (disabled lighting and shadow to make reflection visible):

Note that viewDir, by default, is pointing away from the surface. You may also want to utilize level there.
Task 4: Specular refraction
Look for static float3 shade yet again. The code path for else if (hit.material->type == MAT_GLASS) is empty. Implement a recursive ray tracing to support specular refraction that considers a proper index of refraction. Be sure to check if your ray is entering or existing from an object to calculate a refracted ray direction, and handle total internal reflection properly. You do not need to support Fresnel reflection. For this task to work, you need to make sure that your ray-triangle intersection returns a hit for a ray hitting the "back-side" of a triangle. This task is similar to Task 3. Here is an example result:

Task 5: Environment mapping
Implement environment mapping so that a ray that did not hit anything will get a value from a panoramic image. You may use the loading feature of the Image class. You do not need to implement image-based lighting (which is an extra task), but the environment map should be visible through specular reflection and refraction. Here is an example result:

Extras
These are optional extra tasks for those of you who would like more challenges and potentially gain extra points. Specification of an extra task is intentionally very-high level. Explain what you did in README if you want an extra point. You may or may not receive an extra point depending on our evaluation.
Extra 1: Faster ray tracing
Implement bounding volume hierarchy based on the surface area heuristic (SAH BVH) to accelerate ray tracing. You can utilize the existing code in cs488.h, which already implements a simple non-SAH BVH. Report the performance boost. You can also add any further optimization, except for using other libraries or APIs. Make your ray tracer as fast as possible!
Extra 2: Image-based lighting
Environment maps right now do not affect anything on MAT_LAMBERTIAN (diffuse surfaces). Implement image-based lighting so that they are now properly illuminated by an environment map. Be sure to trace shadow rays to account for occlusion.
What to submit
The submission process for this assignment is basically the same as the one for Assignment 0. Prepare a ZIP file of your code, omitting unnecessary files (executables, build files, etc.). Upload the ZIP file to LEARN.
As with Assignment 0, you must submit the README. In this assignment, you need to provide multiple screenshots to demonstrate what you achieved in each task. Name them as screenshotTask2.png etc., to clarify which task you are referring to. If you omit either of the files, you will receive a deduction. See Assignment 0 for instructions about how to prepare these files.
If you do extend the base code, be sure to document your extensions in your README file. Keep in mind that
you must still satisfy the core objectives listed here. If your changes are so radical that your modified program is
incompatible with the original specification, you must include a "compatibility mode" that makes the interface behave like the requirements here, or consider creating an entirely separate project (but hey, is that making sense?).
If you are using your own .obj file to render images, be sure to include them in your submission. That being said, do not include a too large .obj file.
Other thoughts
After completing this assignment, your code is ready for interactive and non-interactive applications. Your rendering system is a hybrid of rasterization and ray tracing, which is the state of the art in 3D graphics as of 2023. Think about how you might want to extend or any additional techniques you might want to implement on top of it. Those are great candidates for your final project. It will not hurt for you to start implementing those features. We can still consider those in the final project if you do not claim points in this assignment.
You might want to check out how the .obj loader converts the values from .mtl (material definition file for .obj) to the material definitions in the base code. You can extend this part to have more variation of materials, and that might help you to later load a more complex .obj file in the final project.
Objectives
Every assignment includes a list of objectives. Your mark in the assignment will be based primarily on the achievement of these objectives, with possible deductions outside the list if necessary.
- Ray-triangle intersection is returning correct hit/miss.
- HitInfo is filled in properly.
- Shadow is properly rendered by shadow ray tracing.
- Specular reflection is working correctly.
- Specular refraction is working correctly.
- Environment map is loaded and used properly.