3 A Eurorack System
In this chapter, I’ll continue to introduce concepts of modular synthesis through an overview of my Eurorack system at a particular point in time. It may not be kept completely up to date as I buy more modules, or sell any. My point is not to accurately catalogue, but to describe a set of choices made over years, and the reasoning behind them.
This being a collection of Web pages, I can’t assume that you’ve read the previous chapter, but I will use terminology that I explained there, as well as introduce new terminology here. If I use a term you don’t understand, you know where to look.
Since this chapter is long and you might not read it all, here is some generic advice right at the beginning: Think carefully about whether you want to invest in Eurorack. Don’t be fooled by short social media videos showing little cases. Get a case with sufficient room for expansion and ample, clean power. Don’t fill it all at once, and treat its space as a precious commodity. Get one sound source, perhaps one sound shaper, some modulation sources, more signal modifiers and utilities. Go slowly. Please.
3.1 Design Principles
I didn’t design my system entirely and then build it. I acquired it in a piecemeal fashion, and I couldn’t have predicted the directions in which it evolved. Nonetheless, there are certain broad principles that guided my thinking.
I have a small collection of more conventional fixed-architecture synthesizers, notably several made by the Swedish company Elektron, and even one (the Erica Synths DB-01 Bassline) which is based on a Eurorack module. There would be little point in replicating in Eurorack what I can do easily with them, or approximate to my satisfaction. I wanted sounds and experiences to complement the ones I could already make, and to discover sound design and performance ideas that I could take back to those other devices.
There is considerable debate over the merits of digital versus analog, as there is about food, wine, acoustic instrument design, and just about any facet of human experience that can’t be reduced to just numbers. What is a gate produced by the all-analog Falistri if not a digital signal? I doubt my ears can tell the difference between a digital oscillator and an analog oscillator. But I can taste the difference between natural vanilla and synthetic vanilla in some situations, and there are signals produced by analog circuits that would be difficult to simulate or model by digital methods. Not impossible, but maybe not worth anyone’s time or effort.
Since my day job inextricably involves computers in many ways, I decided to, as much as possible, focus on analog sound sources or sound shapers, rather than digital ones. This also reduced the amount of choice, which can be overwhelming. I already had some devices (notably the Elektron Analog Four) which combined analog sound and digital control for stability, sequencing, and other things at which computers excel. So I decided that digital control would be all right, though I didn’t want modules which were essentially computers with a tiny screen and a few buttons and knobs. We saw in the previous chapter that it’s difficult to draw a distinction between control voltage and audio signal, and it’s not possible to be dogmatic about this either, not that I’m so inclined.
For every Eurorack module, it is worth asking: can I do this outside the rack at less cost or easier? Of course the hassle of interconnections and separate power are worth considering, but I decided some things were better done outside. Percussion, for example. My Elektron Analog Four, Digitakt, Digitone II, and Roland TR-6S all can provide quite good percussion at quality levels that would be difficult or expensive to match in Eurorack. Each of these can take in audio signals and apply effects such as delay and reverb, and those effects are also available in pedals (many originally designed for guitar, but which work fine with synthesizers) of which I have a few. So these two things, percussion and effects, would not be priorities in my Eurorack system (as you’ll see, I did eventually acquire some of each).
I have, since about mid-adolescence, taken a critical look at what is popular, and kept an eye out for the overlooked or underappreciated. I try not to be snobbish – there is often a good reason why something is popular – but I also know that popularity snowballs, that sometimes people latch onto something simply because others have.
I mentioned, in the previous chapter, the module Maths, made by the American company Make Noise (MN) headed by Tony Rolando, which was for a long time the single most popular module on ModularGrid based on appearance in virtual racks (some unknown number of which mirror physical racks, as some of mine do). When I started writing this chapter, Make Noise had five other modules in the top 25 by popularity, and twenty-one in total in the top 100. They sell whole systems, such as the Shared System, the Techno System, or the Tape and Noise Machine, that are in short supply and eagerly sought after.
Even more popular are the modules made by Mutable Instruments (MI), a French company headed by Émilie Gillet. There were, at the time of writing, eight MI modules in the ModularGrid top 25, and nineteen in the top 100. The most popular module was Plaits, a digital oscillator with many options. But this understates their influence on Eurorack, as they open-sourced nearly all of their designs and code, and several other companies have produced smaller and cheaper clones, or ones with altered or enhanced functionality (sliders instead of knobs, for example). MI does not sell complete systems, but it is common to see both virtual and physical racks posted on Eurorack forums (such as ModularGrid or ModWiggler) that are mostly or entirely comprised of MI modules. Although MI announced in 2022 that it would wind down its business, the clones will ensure continued popularity of their modules, and originals can command a premium in resale markets.
My initial choices involved no modules from MI or MN, though I have great respect for their work and influence. (I subsequently acquired one original MI module, and one clone.) Similarly, for a long time I bought no modules from the US company Noise Engineering (NE), even though they are well-regarded and attract much attention. (I currently have one.)
The reasons for my avoidance of these dominant manufacturers are partly the above-mentioned critical examination of popularity, partly the discovery of lesser-known gems, partly my preference for analog, and partly my training and experience as a computer scientist, mathematician, and educator, which biases me towards situations where I know what is happening. Some aspects of modules from these manufacturers can be opaque and, to my taste, over-designed. There are times when one can’t predict what will happen but one understands the mechanism, as with the controlled use of randomization, chaotic systems, or generative algorithms. There are also modules with knobs that do something interesting when you twist them, but it’s not clear exactly what, and I tend to be less happy with those.
I mention this mostly to alert you to the fact that my rack is not typical or representative, and I will be talking only a little about the modules from these popular manufacturers, perhaps only to point them out as alternatives. If you want to learn more about them, look at just about any other Web site describing Eurorack.
3.2 Quick Overview of My Cases
The whole point of modular is that one can move modules in and out of cases, and rearrange them. So this overview is just a snapshot at a particular moment in time (currently, from the beginning of 2026). If you’re curious about my current configuration, I maintain an approximation on ModularGrid.net, and the images below are taken from those mockups (so they are composites of manufacturer-supplied photos instead of actual photos of my cases). Full details of all the modules follow in later sections.
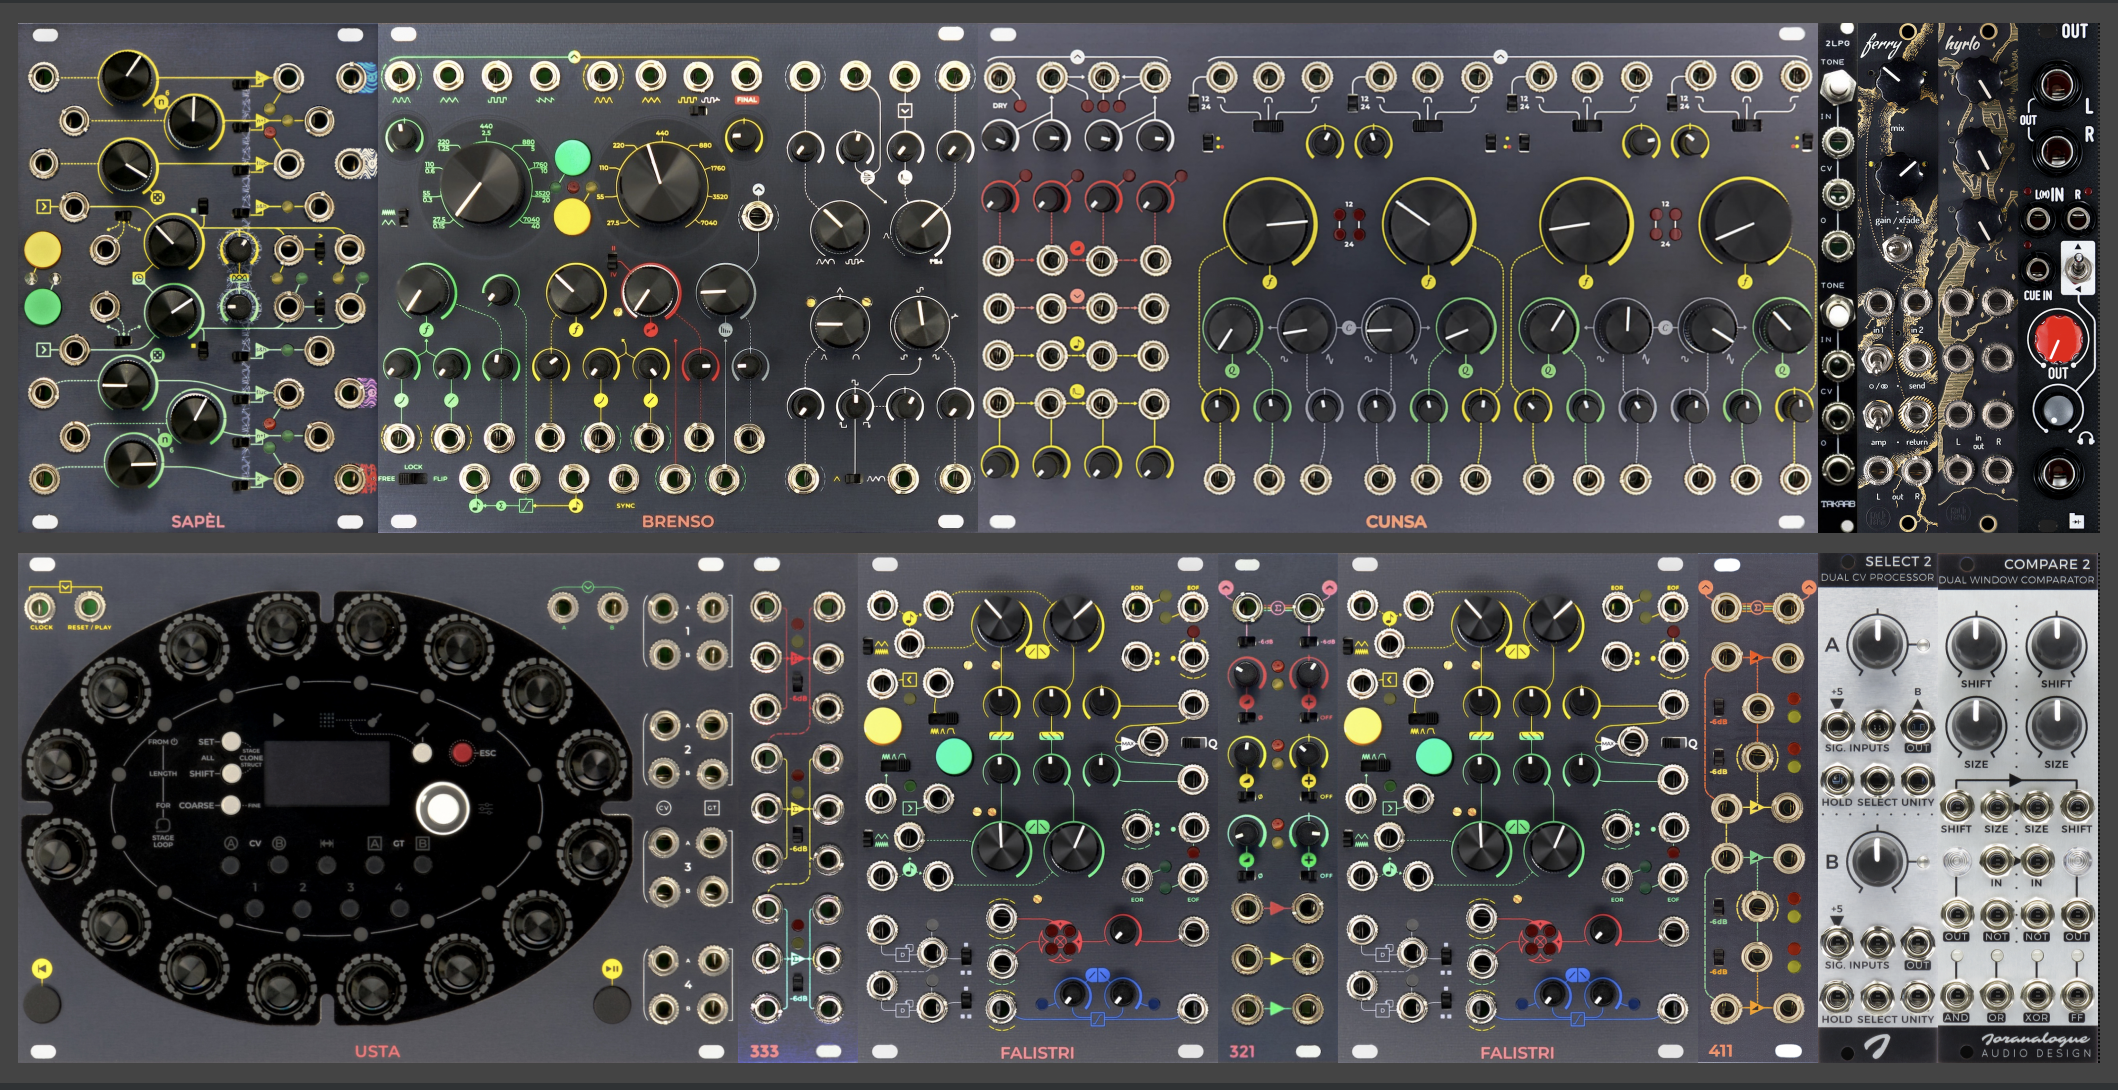
My Frap Tools modules alone would not fit into a single case. They look good and work good together, so they are in a double case, and they nearly fill it. The major modules are Usta (pitch and gate sequencing), Brenso (the complex oscillator), Falistri (which does all the things described in the previous chapter, and I now have two of them), Cunsa (a quadruple resonant filter), and Sapèl (random gates and voltages). Three smaller utility modules fill out the Frap Tools collection.
At top right, a pair of Knob Farm modules provide stereo send/return for effects, and the ability to mix the return with other sounds from the case before being sent out. At bottom right are two clever building-block modules (offering two CV-controlled selectors and two window comparators respectively) which fit into the general philosophy of the case, reminiscent of larger panels by Serge (about whom more, below). This case is nearly all analog; only Usta is digital.
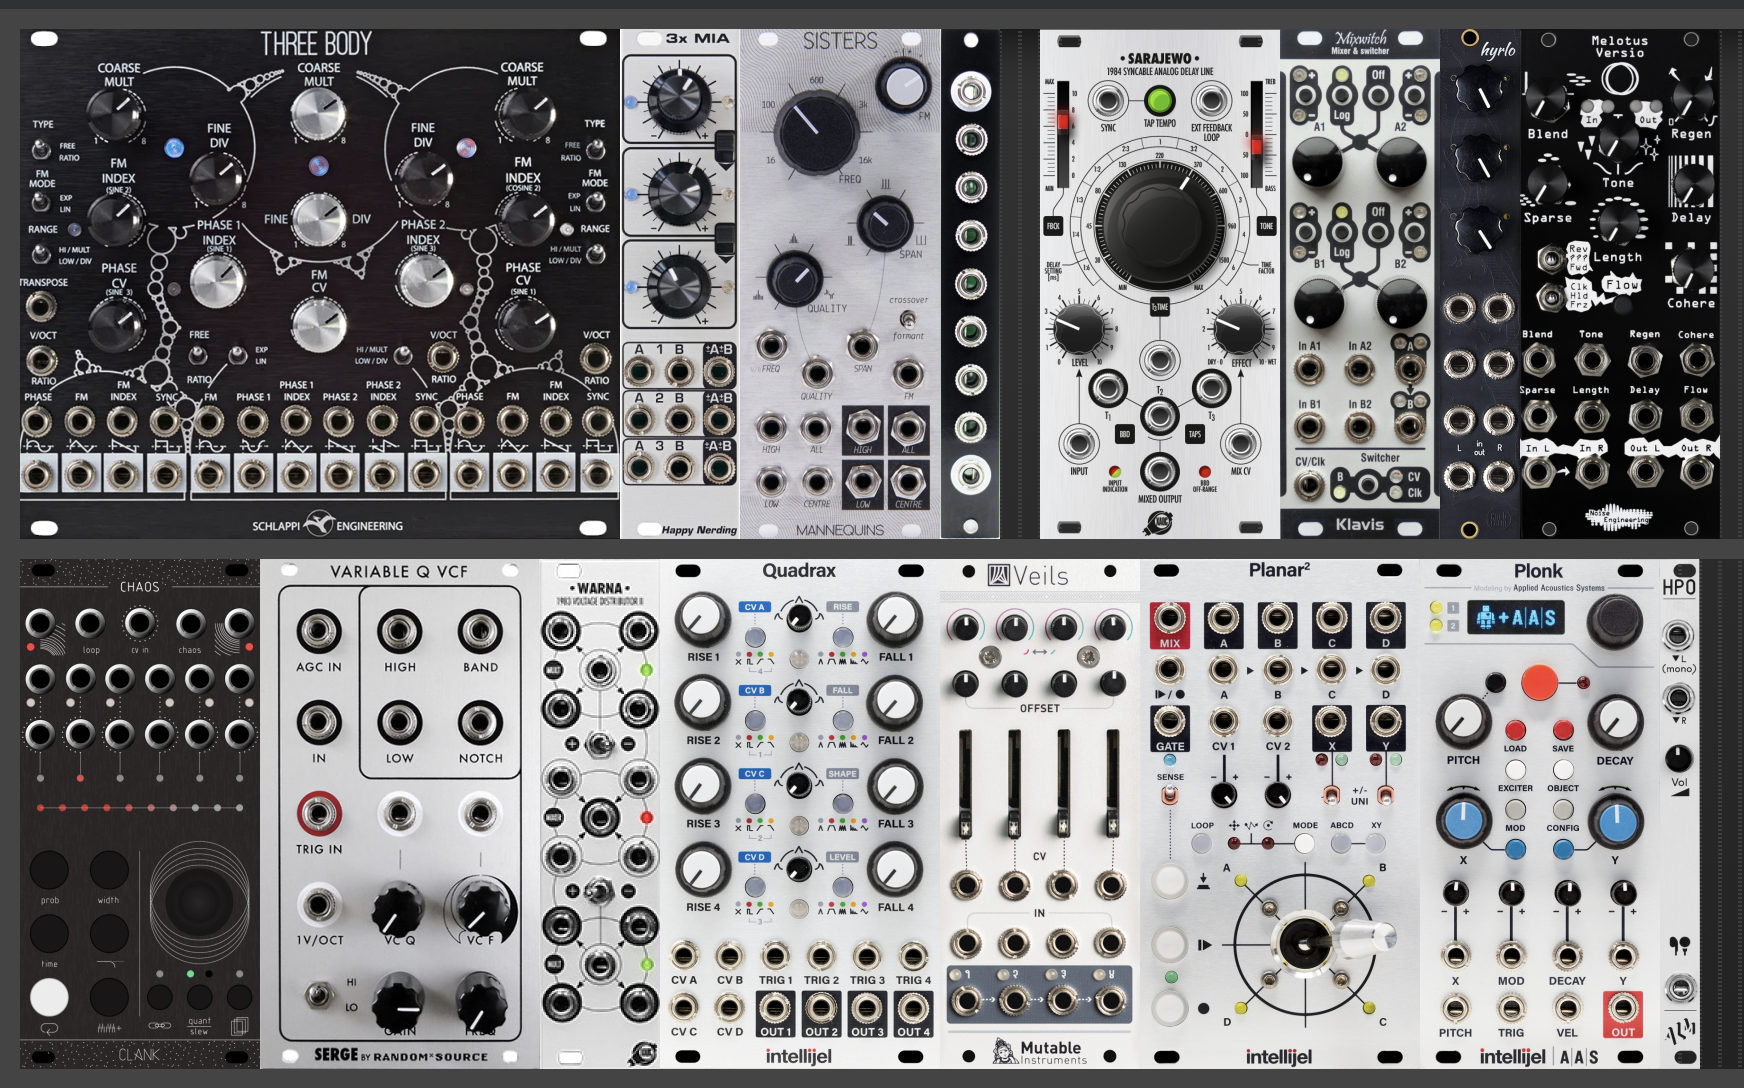
In contrast, this double case is dominated by digital modules, though there are some analog ones as well. It is a little less wide than the one above. It was purchased to house the Three Body triple digital oscillator. The Frap Tools case feels like a finished design, with only a bit of wiggle room. This case feels more fluid. These modules go well together, but one can imagine swapping them out for others.
In addition to Three Body, VCFQ below it is usually used as a voice, and Plonk at lower right models a wide range of percussion instruments. There is a sequencer, a quad function generator, a triple filter, VCAs, mixers, utility modules, and two effects modules.
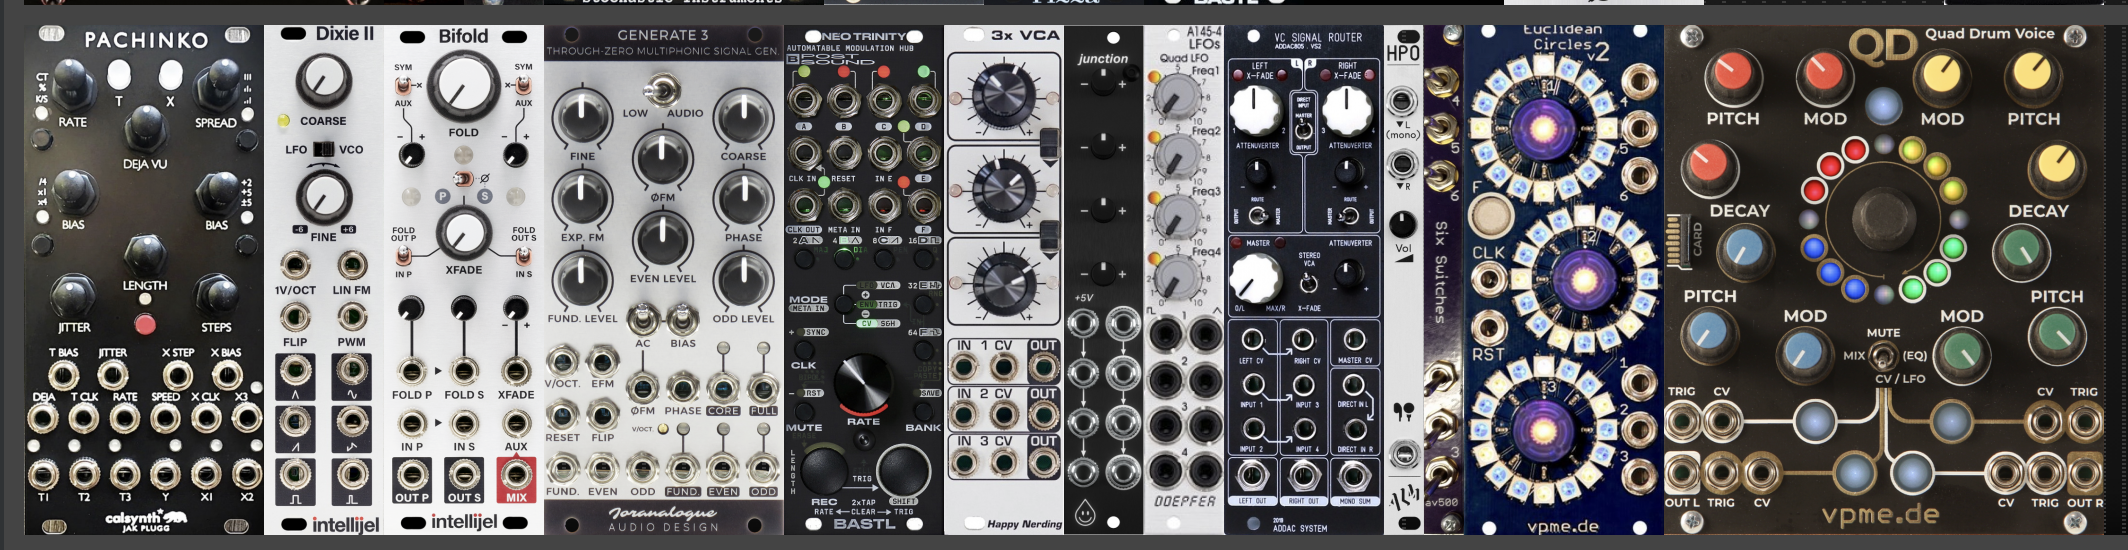
I have two single cases, or skiffs. These are the same make as the Frap Tools case, and can be attached together, but it makes more sense to have them separate, so one of them can be combined with one of the double cases for more flexibility. The one shown above is complete enough to be a full system on its own. It has a sequencer, two oscillators and a wavefolder, a source of envelopes and LFOs, and in the right one-third, a set of drum voices and an associated source of multiple trigger channels.
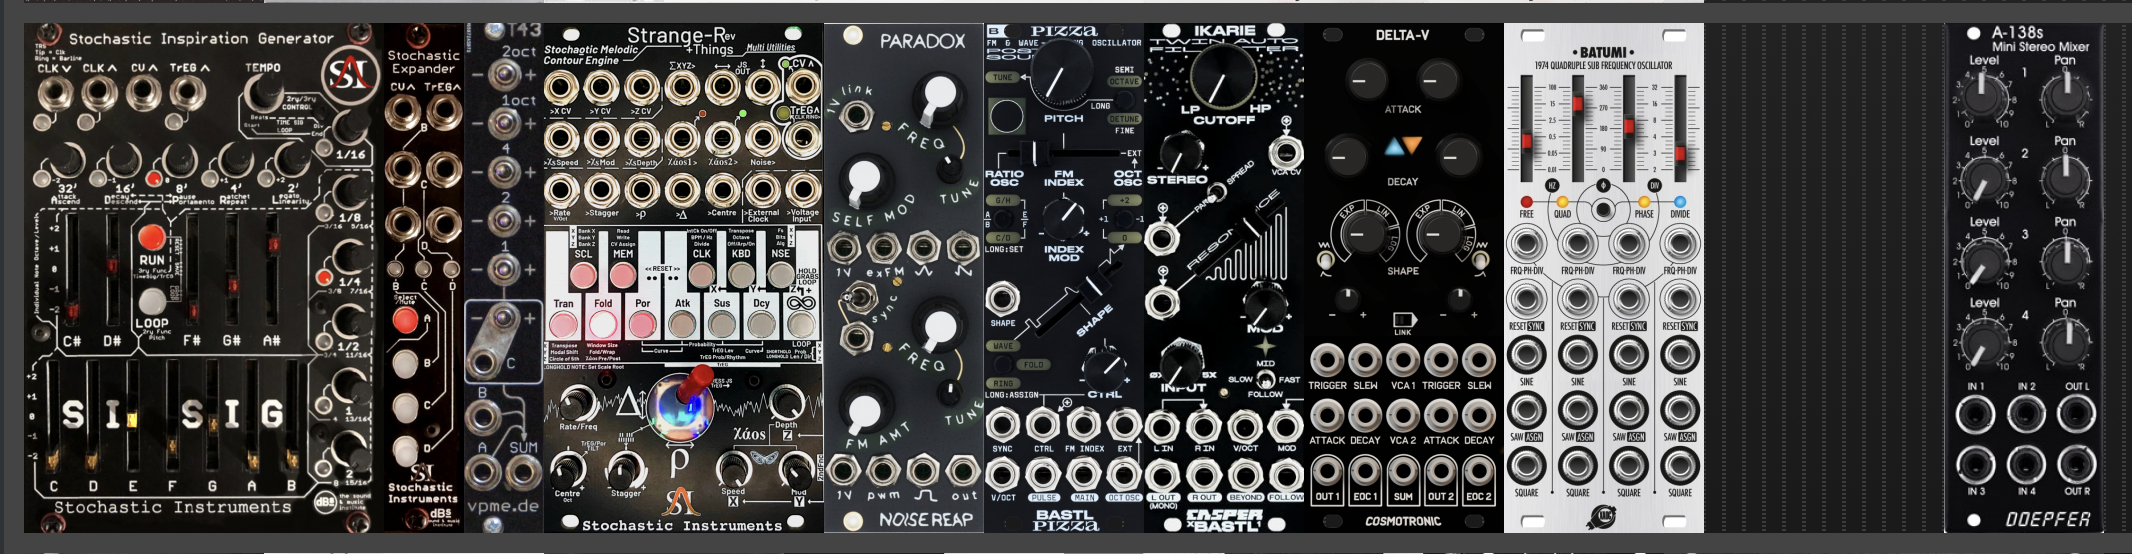
This one is less complete. It lacks an output module, for example, and while it has three independent voices, it has only two function generators, with the only VCAs linked to those in the same module. The skiff is dominated by the two idiosyncratic and unusual melodic sequencers made by Stochastic Instruments.
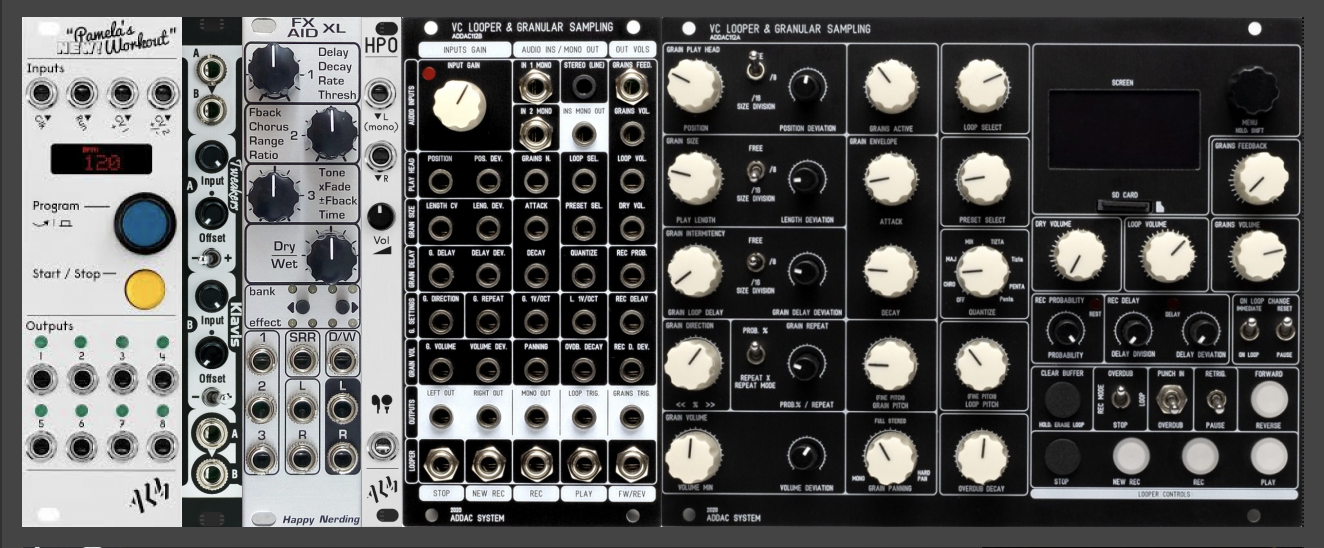
In addition to these large cases, I have two smaller "pods". One of them is dedicated to the ADDAC 112 looper and granulator (my largest module, taking up almost three-quarters of the pod), with a few carefully-chosen support modules. The other pod is used for ad-hoc configurations of occasionally-used modules that usually live in their boxes, or ones borrowed from the above cases.
Now, let’s go into more detail.
3.3 Cases, Power, Cables
A Eurorack module is connected to power by a ribbon cable with a 10-pin socket on the module side, and a 16-pin socket on the power side.
A Eurorack case will have rails with fixed screwholes or sliding nuts to attach modules, and sometimes a power source connected to headers on the inside back of the case into which the 16-pin sockets on the cables from the modules can be plugged. Other cases lack a power source, and a module must be bought for that purpose, with a flying cable providing power headers for other modules.
There are three types of power provided by a Eurorack power source and available within the case to modules: +12V, +5V, and -12V. Manufacturers usually list power requirements, or they can be looked up on ModularGrid, but these do not include "surge requirements" at power up, so it is advisable to keep tabs on the total power required by one’s modules and keep that below 75% of the power available from a source. Cheaper power sources might have line noise which can affect audio and CV.
My knowledge of electricity and electronics is sparse and almost entirely theoretical, so that is about all I can say about Eurorack power requirements. Basically, the standard is underspecified, circuits can behave in complex and unpredictable ways, and many people have difficulties when they connect their latest purchase and it or something else in the case fails to work. It’s prudent to buy a reliable case with ample, clean power. But even cases by major players such as Make Noise or Intellijel may be underpowered or contain just enough power for the configuration of modules they contain in a pre-designed system.
My initial choice (as with others below) was unusual: cases made by Tall Dog, a manufacturer of clone modules and Eurorack cases in Massachusetts. These, at the time I started my foray into Eurorack, were available from only one source (not even from Tall Dog itself), a store called Control, in Brooklyn. I happened to be living part of the year in Brooklyn, so it made sense for me, as I could pick up in person and avoid shipping charges. (They are now available from the larger retailer Perfect Circuit, in California.) What attracted me about the Tall Dog cases was that they are made of sturdy aluminum and are themselves modular. A single 3u x 104hp case (or "boat" or "skiff", as a narrow case is sometimes called) could be attached to others, vertically (with optional feet) or at an angle. A skiff could have its own power supply or have a power cable threaded from another attached skiff.
I started with one skiff, not close to being full with my initial purchases, but bought a second one at the same time, as everything I read suggested that it was all too easy to outgrow a case. Currently I have four Tall Dog skiffs, two connected into a double case and two separate (as seen above), and three external power supplies, so that I can power up various configurations as appropriate. The power supplies are also designed by Tall Dog, and have proved quite ample for my purposes.
Alternatives I considered included the Tiptop Mantis cases, and the various cases made by Doepfer, some of which are quite homely (unfinished wood, reminiscent of IKEA) but good value. It is possible to buy cases with lids for travel, and to spend a lot on very attractive wooden cases (in Europe, Case from Lake appears to be a good option). It is also possible to buy components (mounting rails, etc.) and make your own, cheaper case, if you are at all handy with power tools (which I am not). There are some cheaper cases that are problematic, and a number of smaller "beauty" cases or pods which look attractive, but are better designed for temporarily housing a few modules from a larger selection rather than for a first configuration (I have two of these). The most recent case I acquired was a double from ADDAC, slightly narrower than the Tall Dog skiffs.
When I am using these cases, they are usually on one of four Roadworx metal racks (this is the house brand of the German music retailer Thomann). Two of these racks are attached together, and the resulting double rack can hold one double case and one single case or two pods. The two single racks can each hold a double case by themselves.
The screws holding modules in the case are quite inexpensive, but even here there are at least two standards. The Tall Dog cases require M2.5 screws, but M3 screws are more common (and often supplied with modules). Nylon washers to avoid damage to module panels are also inexpensive, and I don’t know why everyone doesn’t use them. I invested in two cans of Befaco Knurlies (one of each size), which are about ten times more expensive than ordinary screws, but can be screwed and unscrewed by hand, without using a screwdriver (though slot, Phillips, and hex can also be used). This makes more of a psychological difference than one might think, and lowers the barriers to moving modules around. Knurlies come with built-in washers.
There are a number of options for cables (which have 3.5mm plugs on either side, and come in various lengths and colours) but it is difficult to find useful reviews. I’ve been happy with the LMNTL cables I bought from Perfect Circuit in Los Angeles, which have braided jackets. I chose colours consistent with length, but others use colours to indicate audio or CV signal paths, or just use them at random.
Sometimes one needs to duplicate an audio or CV signal. Tiptop Stackcables are a useful convenience; these have a socket on the back of each plug, so the signal can be duplicated at either end. I have a few of these (they are more expensive, and take up a bit more room, so can be awkward to use on narrow modules), and a few made by Tendrils, with thinner cables and right-angle plugs, good for patching within a module. I also have a couple of inexpensive "star" multipliers. For pitch CV, sometimes (but not always) these options cause an unacceptable voltage loss, so it is better to use a buffered multiple module, as described below in the Utilities section.
3.4 Modules
I have grouped the modules I’m discussing into some broad families. This classification is not to be taken too seriously; as we saw in the previous chapter, sometimes it is not so easy to characterize what a module does.
I’ll try to describe what I find interesting about each module, but you can learn a lot more from ModularGrid (which you can access without an account, and an account is free anyway) or from the manufacturers’ Web pages, which often include manuals and detailed video overviews. The images here are from ModularGrid. I might list a few alternatives here, but in each category there are many more choices.
It might help, in reading what follows, to keep in mind the visions of the two early inventors of modular synthesis, Robert Moog and Don Buchla. Moog’s "east coast" design had the sound of an oscillator going through a voltage-controlled filter (VCF) and then into a voltage-controlled amplifier (VCA), with both the filter and amplifier controlled by envelopes (sometimes the same one, sometimes different ones). In contrast, Buchla’s "west coast" design added more modulation options to the oscillator, and replaced the VCA and VCF with a low-pass gate which combined some of their features. Current Eurorack modules often combine aspects of both approaches, whose historical details one can read about on sites like the Moog Foundation or VintageSynth.com. More recently, Dieter Doepfer’s first Eurorack modules were circuits from his MS-404 fixed-architecture synthesizer, packaged and sold separately.
Other types of modules, besides the types we have already discussed, include clock sources which produce regular sequences of gates or triggers used to synchronize the actions of different modules; clock dividers/multipliers to alter the rate of such sequences; mixers to combine signals in varying proportion; panners and cross-faders to position audio signals in a stereo field and to smoothly transition between different signals; quantizers to round voltages to discrete steps such as the ones used for semitones in the V/oct standard; noise sources for sound that has enough different frequency components that it does not have a discernable pitch; sample-and-hold and track-and-hold for freezing signals at specified points of time; and finally a broad category of utility modules for features like attenuation, inversion, and Boolean logic for combining signals that can be considered "digital" (0V/5V).
This list is by no means exhaustive. There are other smaller categories, and many modules that don’t fit neatly into a category.
3.4.1 Oscillators
Here I’ll talk about modules whose primary purpose is to act as an oscillator to supply audio signals, though some of the ones I describe below can also oscillate at low frequency for control purposes. As we saw in the previous chapter, other kinds of modules can act as oscillators, and I’ll talk about this as needed when those modules show up in other categories. Even sticking to my more narrow personal criteria, there are too many potential choices to list. These are the ones I currently enjoy.
3.4.1.1 Frap Tools Brenso
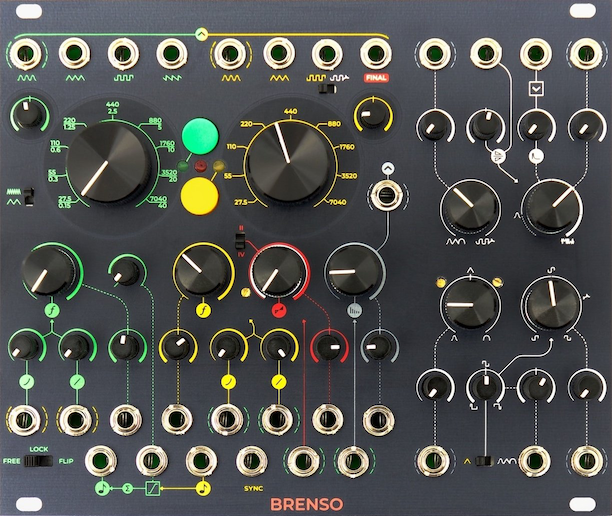
I mentioned above that I sought from Eurorack what I couldn’t easily replicate outside it. Brenso, by the Italian company Frap Tools, was the module that drew me into Eurorack, and the second one I ordered, after Falistri from the same manufacturer. I fell in love with its sound from online demos. What captured me was the wide variety of ways its sounds could be changed without sounding harsh or unpleasant.
As Eurorack oscillators go, it is on the large and expensive side. But the size is due to the number of modulation options, nearly all of which have attenuators or attenuverters. There isn’t a lot of wasted space, and some of the switches, as with Falistri, are downright tiny.
In the last chapter, we saw that Falistri’s yellow and green sections can be used as oscillators that can frequency-modulate each other. This is the basic setup of Brenso, down to the colours. The design (minus the colours) is shared by other complex oscillators, such as Make Noise DPO and Instruo CS-l.
Falistri’s yellow and green sections are nearly identical. There is more differentiation between Brenso’s yellow and green oscillators. The yellow one should be considered primary. It provides simultaneous sine, triangle, square with pulse-width modulation, and a "final" output subject to even more complex modulation. The green one provides simultaneous sine, triangle, square, and sawtooth waveforms, and the possibility of acting as a complex LFO. Both exponential and through-zero linear FM are simultaneously possible with both oscillators, which are normalled to frequency modulate each other with their sine waves. (The difference between regular linear FM and through-zero linear FM is like the difference between AM and RM, in that the latter offers an interpretation for modulation that makes the carrier frequency negative, by inverting the carrier.) If FM is used, it’s best to use the same pitch CV for both (if pitch CV is used at all), but the two oscillators can be completely decoupled and sent separate pitch CVs independently.
Each oscillator has a large coarse tuning knob, which can be locked against accidental variation while playing (the one digital part of this otherwise analog module) and a fine tuning knob which remains active. Tucked in among the yellow and green sections are a red AM/RM section, and a "modulation bus", which is a VCA normalled to four inputs of the white section making up the right third of the module.
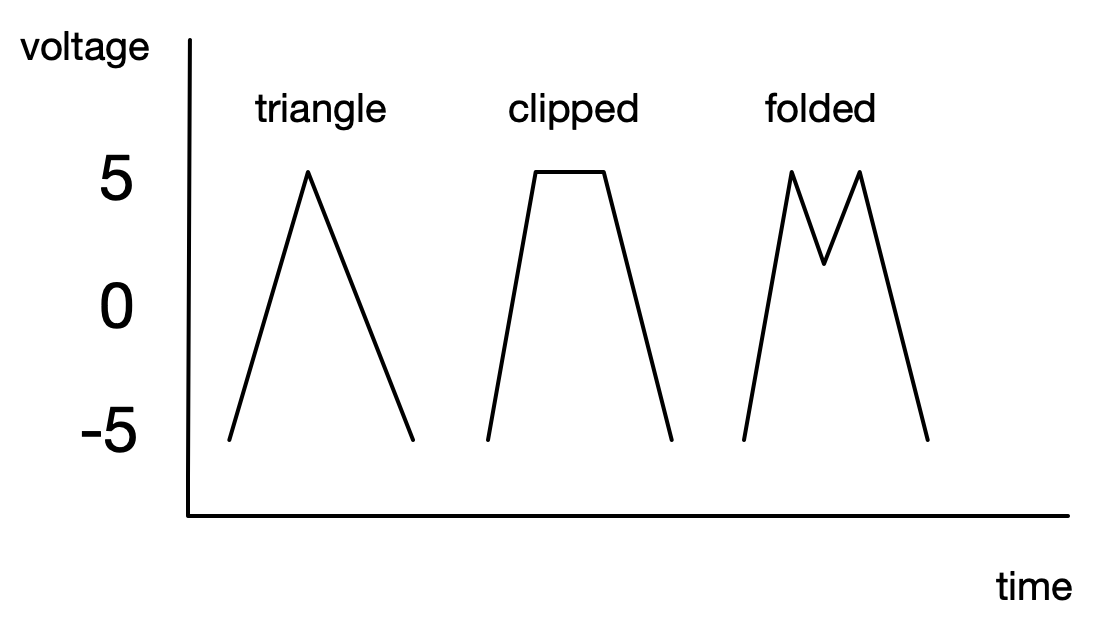
This white section is dedicated to complex modulation of the yellow oscillator. There is waveshaping from sine to triangle to something more concave downward, like Falistri’s logarithmic curves. The key component of this section uses an idea we haven’t previously discussed, called "wavefolding", which is important to the Buchla "west coast" sound. If you amplify an audio signal past its usual -5V to 5V range, usually it just clips to a flat signal at the extremes of that range. A wavefolding circuit acts as if the excess is folded down along that flat line, rather than just being erased. The resulting complex waveform is more harmonically rich, and Brenso offers a number of ways to affect it.
Wavefolding does not make sense for some sounds, for example a square wave, where the result is just an amplitude change. But one can change the width of the square or pulse to good effect. This is known as pulse-width modulation (PWM). Brenso goes beyond most oscillators offering PWM by providing access to the parameters of how it is usually implemented, followed by an additional "pulse shaper" stage for more variation. For details, I refer you to Brenso’s excellent manual. The resulting waveform can be mixed (under CV control, of course) with the waveform derived from the triangle before the result is wavefolded. The pulse shaper gives the wavefolder something to chew on.
The modulation bus normalization offers a convenient way to tweak four of the most significant of these parameters at once (each normalled connection has an individual attenuverter), but one can also plug in individual cables with completely independent signals. A single note, held over a few beats, can change character in a very pleasing way. As with Falistri, there are a number of other small, convenient options scattered across the panel.
There are complex oscillator modules smaller than Brenso, but duplicating the full functionality or even significant parts of it would require much more space than Brenso takes up. It has been the crown jewel of my rack from the beginning, and I expect that to continue.
I mentioned other complex oscillator modules above, but it’s also possible to build your own out of two simpler oscillators with FM capability (which can be the same or different), a wavefolder, and the utilities needed to glue them together. Since all these pieces can be repurposed, some prefer this "building block" approach. As you saw above, I did this in one of my cases, with the two oscillators described right below, and Bifold, which is covered in the sound shapers section.
A complex oscillator (whether bought or constructed) is not necessary. Many get by just fine with simpler oscillators, processed with filters and effects.
3.4.1.2 Joranalogue Generate 3
Brenso has two oscillators, but if I’m using it as a complex oscillator, there is really only one melodic line (albeit available in multiple waveforms). It’s apparently a common beginner mistake to have too many voices; they need modulation, and the mix can get too busy. I can get voices out of other modules that are not primarily oscillators, like Falistri, but as my collection approached 200hp, I found myself wondering about a second oscillator module.
Brenso has a very sweet sound, but there are times when I want something with a little more edge, or a sound I don’t feel is being ruined by further processing. Generate 3, from the Belgian company Joranalogue, is a little less refined, a little more buzzy and unstable (only in comparison to Brenso, which I think is exceptionally clean for an analog oscillator). It also has some interesting features that make it a compelling choice, which also let me discuss sound synthesis a little more while describing them.
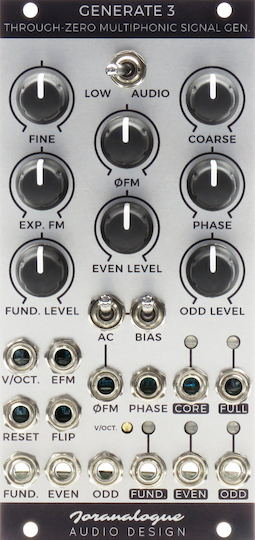
Generate 3 is a triangle-core oscillator, like the two oscillators on Brenso. This means that at its heart is a circuit making a triangle wave. That wave is available at the CORE output, tunable by the coarse and fine knobs. But there are four other outputs around it. They are labelled FUND, EVEN, ODD, and FULL. The FULL output is a mix of the other three, each of which has a dedicated attenuverter knob and a CV input.
The FUND output is the fundamental, a sine wave one octave higher than the core frequency. I said earlier that sine waves are useful in the analysis of periodic functions. A waveform that repeats exactly (like the ones produced by a single section of Falistri without modulation) can be expressed as a sum of sine waves, starting with the fundamental at the frequency defined by the period of the waveform, and adding others whose frequencies are integer multiples of this frequency. These are known as harmonics. A waveform that has a dominant pitch we can perceive usually has a fundamental at that pitch, and harmonics added in smaller quantities. We’ve heard sounds that seem to have two or more pitches (for example, when using RM), and things get even more complicated with FM. But let’s focus on the simpler situations for now.
The FUND attenuverter knob and the FUND input act exactly like the red section of Falistri, as a bipolar VCA. This lets us control how much of the fundamental sine appears at the FUND output and is mixed into the FULL output. With nothing plugged into the FUND input, it is normalized to +10V (as are the EVEN and ODD inputs), so without any CV coming in, the FUND, EVEN, and ODD knobs can be used to create waveforms.
The EVEN output adds even harmonics (multiples of the fundamental frequency that are 2, 4, and so on) in the right proportion to generate a sawtooth waveform. Since the lowest frequency is twice the fundamental, the pitch is an octave above the fundamental.
The ODD output adds odd harmonics (3, 5, and so on, omitting the fundamental), in proportions chosen by the circuit designer, creating an unusual waveform. It looks like a square wave, but with the top plateau allowed to sag, and the bottom plateau allowed to bulge. It is also pitched at an octave above the fundamental. Turning the fundamental knob full on and turning the ODD knob down from full a bit will produce a square wave.
Many other interesting waveforms can be produced with knob twisting. Slow modulation into the FUND, EVEN, ODD inputs will produce timbre changes. By setting the core frequency quite low and putting snappy envelopes into these inputs, one gets a percussion ensemble with three voices (four, if one puts the CORE output through a separate VCA). Or the core frequency can be set higher and three separate voices are available, locked into their octave relationships, but with sufficient variety to spice up a pitch sequence. Audio-rate modulation of these inputs can be used to do AM or RM.
Exponential FM and through-zero linear FM (TZFM) are available with similar CV jacks and attenuverter knobs. The implementation is different from Brenso and many other modules; on Generate 3, a cable into the TZFM input directly controls the speed of the oscillator. It is thus relatively easy to make it stall or sputter, especially if you approach it like other FM oscillators, which tend to take pains to avoid this, at the cost of some flexibility. With this implementation, at certain settings, the roles of carrier and modulator are sonically reversed; the frequency of the modulator affects the pitch of the sound produced by the oscillator, while changing the frequency of the carrier affects the timbre of the sound.
The PHASE knob and CV input provide a modulation opportunity that is relatively rare. They affect the starting point of the waveform. For a triangle or sine wave, shifting the phase by 180 degrees will put the peak where the nadir or lowest point used to be. Of course, with a repeating waveform, one is hard-pressed to say where the starting point is, and in fact if one turns the PHASE knob quickly enough (with no CV input), one would be lucky to hear the slightest variation when the knob is moving, and none at all when it is still, regardless of its position, which will make no difference to the stable sound. But with modulation at audio rates, one gets another interesting source of complex waveforms.
There is a mathematical relationship between phase and frequency: frequency is the derivative of phase, just as speed is the derivative of distance. So theoretically each of phase modulation and frequency modulation can be used to simulate the other. But if the same modulation is used on phase and frequency, they will sound different sonically, just as a push to the back of a car has a different effect than the same push applied to the accelerator. Phase modulation tends to be even better for pitch stability than through-zero FM, though the resulting timbres are not as varied.
Finally, there are a couple of jacks that allow synchronization with another waveform. The RESET jack will start the core triangle from zero; the FLIP jack will reverse the direction in which it is going (up or down). These changes propagate to the other waveforms. Brenso offers similar but more limited capabilities.
Generate 3 has a very clever design overall, in a relatively small amount of space (40% of Brenso’s width, albeit with only one oscillator), and offers many possibilities for self-patching and for interaction with other modules.
I haven’t put many sound snippets into this chapter because the manufacturer demos available online tend to do a much better job, but I rather like this étude I did of through-zero FM on Generate 3.
In the étude, I do a manual carrier pitch sweep on the coarse tuning knob of Generate 3, starting with it all the way counterclockwise. Because I am using through-zero FM as described above, this affects the timbre rather than the perceived pitch of the carrier. The fundamental knob is turned up, and occasionally I add or remove a touch of higher harmonics with the ODD and EVEN knobs. The modulator is coming from Falistri at audio rate, whose V/oct input is receiving random pentatonic minor notes from Pam’s New Workout (described below). Pam’s is also sending snappy envelopes in different Euclidean rhythms to Generate 3’s exponential-FM and V/oct inputs. The FULL output of Generate 3 is put into the Xaoc Sarajewo delay (described below) with clock-synchronized delay times (quantized ratios swept by a slow LFO, the effect of which you can hear as pitch changes in the reverb-like sound) and feedback turned up to the edge of overload.
3.4.1.3 Noise Reap Paradox v2
Generate 3 responds very well to audio-rate modulation. I wanted a module to supply this, but one that could also be used on its own. I settled on Paradox, by the American company Noise Reap. It packs a lot into a small space at modest cost.
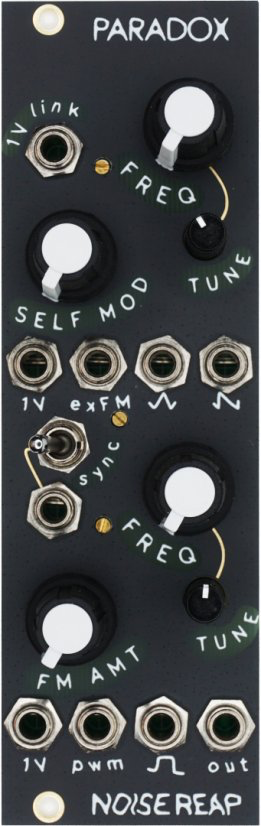
Paradox has two analog oscillators, each with coarse and fine tuning knobs, and separate V/oct jacks as well as a linked one. The top oscillator has triangle and saw outputs, a jack for exponential FM, and a "self-modification" knob unique to this design that further shapes the waves. There is an external sync input for the top oscillator, and a switch that chooses between this and internal sync with the bottom oscillator.
The bottom oscillator has a square output and a pulse-width modulation jack to vary its shape. A knob controls the amount by which the top oscillator frequency-modulates the bottom one. Finally, there is a combined output that mixes the upper saw and lower pulse.
The basic sounds of each oscillator are decent but unexceptional, what one might call "bread and butter" sounds. But if the two are tuned to unison, fifth, or octave intervals and then slightly detuned, one gets a rich sound with good analog waver. The other possibilities for modification work quite well.
It also works well to modulate Generate 3. I sometimes wish, for this purpose, that the lower triangle output present in the earlier v1 had been retained in v2. But if I can’t fit in the pulse to modulate G3 (which often I can), it can be a respectable independent bass voice, drone, or suboscillator, especially if pulse-width modulation is used.
Unfortunately, Noise Reap shut down in 2022, so Paradox may be hard to find. Like some other manufacturers affected by COVID and chip shortages, they have recently dropped hints about returning. Let’s hope it happens.
3.4.1.4 vpme.de Quad Drum
For a long time, I avoided buying modules whose primary function was percussion. When I started working with Eurorack, I already had several devices that did an excellent job with percussion, which I would either sequence independently or trigger with MIDI sent out of the rack. I could also synthesize simple percussive voices within the rack, using components such as noise generators, filters, and low-pass gates. Eventually, I acquired Quad Drum (QD), by the German company vpme.de (an abbreviation of Vladimir Pantelic Musikelektronik).
What convinced me to change my mind? One factor was my acquiring Euclidean Circles (by the same manufacturer, described below). I was impressed with the design and playability. While I could use EC with my external devices, QD has a similar interface, making working with both together quite straightforward. I had borrowed the module Rings, by Mutable Instruments, and liked the sounds it made, but was frustrated by some design decisions and its limited polyphony. I also felt there were some features on it that I would rarely use. Since the code for nearly all Mutable Instruments modules is open-source, some of it (I think from Braids rather than Rings) has been adapted for use in QD, providing some Rings-like sounds I wanted over multiple voices. QD also offers some basic digital oscillators (enough to create a bass line or modest arp) and the ability to play samples, both of which broaden its sonic palette and range of potential uses. Its users are generally quite enthusiastic about it.
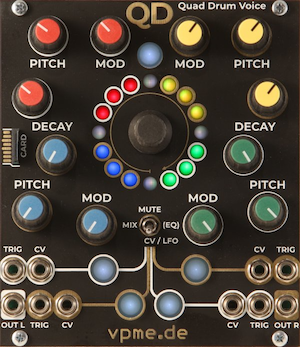
As the name implies, Quad Drum has four voices. Each has three control knobs, for pitch, decay, and modulation control. These are arranged in the corners of a square around a ring of multicoloured LEDs with a push encoder in the centre. This, together with the 3-way mode toggle switch below, and four push buttons, forms the user interface. Each voice has a trigger input. There are four assignable CV inputs, and there are two audio outputs.
Any voice can use one of 15 digital percussion or oscillator models, or 48 sample/wavetable sets. The samples and wavetables are kept in an SD card accessible on the front of the module. Factory content is provided but the user can add their own. Each voice has an LFO, with a choice of several synced or free-running waveforms, assignable to one of the knobs, or to pan or volume. Each CV input can also be similarly assigned, to any voice. There is a global mixer, panner, equalizer, and compressor. There’s even a delay and reverb, originally a hidden "Easter egg", but later fully revealed in the manual.
As I had expected, the combination of EC and QD is very compelling, but I also have plenty of other sources for gates to use with QD. QD is no match for my out-of-rack analog and digital drum machines, but it does a good job, and it’s easy to tweak the sounds. The factory content is impressive, and I won’t feel the need to add my own samples for quite a while, if ever.
3.4.1.5 Bastl Pizza
There are two things I don’t like about Pizza, from the Czech company Bastl: its name, and the font in which that name is printed on the panel. That’s about it for dislikes; there’s an astonishing range of sound packed into its slender form.

I had bought the Bastl Ikarie filter (described below) earlier, and was quite happy with it. When Pizza was announced, my first inclination was to say that it looks quite interesting, but it’s too bad that it’s a digital oscillator. However, I was in the process of designing a travel case (see details below) and was having trouble building a complex voice in the limited space. Pizza was the obvious solution.
Analog complex oscillators tend to be large. We’ve seen Brenso at 32 hp, and its alternatives are similarly sized. They come with loads of character, but at a cost: they need to be tuned by hand, and sometimes retuned when they warm up. When FM is involved, the frequencies have to get at least close to certain whole-number ratios, or the result is atonal and clangourous (which may be desirable at times, but not always). Digital oscillators can avoid all this, but they can sometimes seem too clinical and precise.
Pizza has been designed to try to maximize the sweet spots of digital FM, and provide pitch stability, while not ruling out the wilder side. It also costs half as much as most complex oscillators. The design replicates the playable diagonal slider and large top-center knob of Ikarie, while adding an additional horizontal slider, and some modal buttons.
There is a main oscillator that can be phase-modulated by another oscillator. Generate 3 has phase modulation, but Brenso does not. It is better for pitch stability, and was the main method used on the legendary and influential Yamaha DX7 synthesizer. The large knob defaults to controlling the octave of the main oscillator. A button allows switching to semitones or to arbitrary "detuning".
The "other [modulating] oscillator" can be external, but internally there is a choice between an "octave" oscillator and a "ratio" oscillator. The choice (and FM index amount) is made by the horizontal slider. The octave oscillator has a button choosing among four octaves, and the ratio oscillator has a button choosing among four ratios (which can be individually changed to a selection from fifteen useful whole-number ratios).
The diagonal slider controls waveshaping of the main oscillator and the modulating oscillator. There are three modes. The "wave" mode morphs the shape of the octave and ratio oscillators from sine in the middle to square at the left and saw at the right. The "fold" mode controls wavefolding of the main oscillator, using a classic Buchla-style algorithm to the left, and a new, smoother algorithm based on Chebyshev polynomials to the right. The third mode is "ring", which does ring modulation between the main oscillator and the octave or ratio oscillators. One can get a lot of timbral variation by clicking among these and moving the diagonal slider.
The three outputs at the bottom are for the main oscillator, the octave oscillator (which can be mixed back in to restore the low end when the wavefolder has added higher harmonics) and a pulse version of the main oscillator where the FM index chooses the pulse width, but the modulating oscillators have no effect.
There are six inputs, of which the obvious ones are shape, FM index (with attenuverting knob), V/oct (only one, so this is a single voice), a jack for an external modulating oscillator, and oscillator sync. The sixth input is "CTRL", or control. This is an assignable input, with an attenuverter knob that acts as amount if nothing is plugged in. There are thirteen possible destinations, including a bipolar VCA with associated envelope (so Pizza can be a complete voice). This makes possible control over two options that might otherwise be mutually exclusive because of the button design described above. For example, the diagonal fader can only control one of wave or fold, but the control knob can be assigned to the other.
All of this sounds quite intimidating, but in practice, it’s easy to vary the sound in pleasing ways. One quickly learns where the harsh zones are (there’s also good stuff there, but one needs to step in deliberately). Pizza won’t replace Brenso or Generate 3 for me, but it can work alongside and with them nicely, and it means I won’t miss them as much when I’m working with it among a small selection of modules in a small case.
Pizza could be a nice way to start using a complex oscillator for a beginner, but keep in mind that I already had experience in this area, and I still ran its output through the Mordax DATA oscilloscope (below) for the first couple of days, to visualize the waveforms it was creating. Paradox is the same size and half the price, not really a complex oscillator, but provides two independent (or possibly internally linked) voices with some scope for tweaking the timbre of each one.
In 2023, Bastl announced that Pizza is actually a platform, and produced a second firmware, Basil, which does effects. Like the Noise Engineering Versio platform described below, Bastl will make alternate faceplates available, but any version they sell will be able to run any of the firmwares.
Having used Pizza a lot, I do have a small criticism to add to the rather silly ones I started with. The horizontal FM index slider can change the sound considerably with only a slight physical change, so it often has to be played very gingerly. This is aggravated by the fact that the extreme positions to left and right are rarely useful, so one is tweaking in a smaller range. I could fix this by patching something like a channel from 3xMIA into the CV input to be able to get finer control. I need to remember to do things like that more often.
3.4.1.6 Schlappi Engineering Three Body
Three Body contradicts all the careful rationalization I wrote above. It is as big and expensive as Brenso, but it is a digital oscillator. How did I come to acquire one?
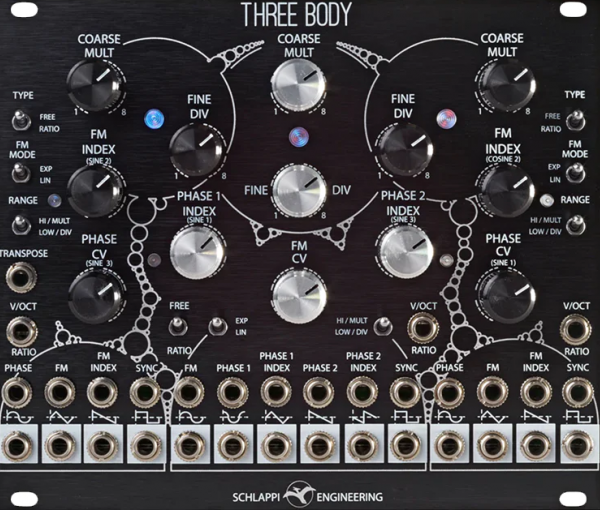
Three Body is definitely digital, and doesn’t try to be anything else, but it is styled like an analog oscillator module. There is no screen, no buttons, no hidden states or modes, no presets. The LEDs show only signal strength and polarity. The entire bottom row of jacks is audio outputs, fourteen of them, with another row of modulation inputs just above, and some more on the panel. There are satisfying metal toggle switches and good-sized knobs with proper resistance, so they stay where you put them and can be adjusted minutely. The three bodies are three oscillators, with various normalizations among them, and if you’ve read everything above, then none of the features I describe later will be a surprise. But it is the implementation that makes this module special.
Eric Schlappi is an electrical engineer and performing musician who started building modules for his own performance needs. His interest is in noise, and his early modules, with names like Interstellar Radio, 100 Grit, and Angle Grinder, telegraph this. If you push Pizza’s FM slider to one of its extremes, or turn up the FM cross-modulation of Brenso’s two oscillators past a moderate amount, you definitely get noise. I had been following the discussion on Three Body since the first units shipped in fall 2022, and the first demos inevitably turned up the knobs. The quality of the noise was definitely different, but it didn’t amount to a compelling case to own one. In fall 2023, a synth YouTuber with the handle BRiES posted a Three Body deep-dive video that was more than two hours long, and provided many examples of how good it sounded in moderation. It was a very good advertisement, but I didn’t commit.
The pivotal moment for me was when a good synth friend was looking for an appropriate sound source to use with Frap Tools Fumana (a dual bank of 16 bandpass filters with spectral transfer, like a vocoder). I suggested Three Body. They investigated, were convinced, and raved about it. At the same time, I watched some talks Schlappi gave on the architecture of Three Body. Finally, during a visit to Bristol in summer 2024, I got to spend an hour with Three Body in the Elevator Sound synth store. I used no patch cables apart from the two going from outputs to an oscilloscope and then to stereo speakers. I just listened to and manipulated drones, using the internal normalization. After that, I was convinced also.
Schlappi worked for nearly four years on Three Body. Originally it was a project for him to learn how to use FPGAs, but he liked the results enough to make it a commercial release. To explain how special Three Body is, I will have to get a bit technical, but not too much.
A digital computer gets things done by transferring information between a small set of fast registers and a larger, slower memory, interspersed with changes to the registers via arithmetic or logical operations. It is definitely possible to use a general-purpose computer for sound synthesis or manipulation; that is what an app or plugin on a laptop or desktop computer does. A digital module may have a small general-purpose processor, or it may use a more specialized chip for digital signal processing (DSP), such as the Daisy or Spin chips used in modules described below. It is a lot of work to design a special-purpose digital chip, and this doesn’t happen very often.
But if you did want to do it, you have a number of options. You can work with design software to simulate a chip, and then send it out for fabrication. Quicker prototyping can be done on FPGAs. The acronym stands for "field-programmable gate array", essentially hardware that can be configured or "programmed" at a low level. It is not as fast as a fabricated chip, but the develop-test cycle can be faster. Depending on the chip, there are various open-source libraries and frameworks available to help the developer.
Three Body has an FPGA inside it, but it is not going to be "field-programmed". There have been no firmware updates, and I don’t expect any. The manual says nothing about how this might happen, and I suspect most of us don’t have the right equipment. What the FPGA did was let Eric Schlappi spend those four years repeatedly revising his special-purpose design.
Most general-purpose computers do one thing at a time (the so-called "von Neumann architecture"). But they can do it very fast. While an FPGA is slower, it allows for parallelism, where different computations are carried out at the same time. This is hard to harness for general computation, but can possibly be exploited for specific computations, as Eric did. He built a number of functional units running in parallel to do exactly the kinds of things he wanted the module to accomplish.
We don’t have the design to look at, but we do have the specifications as revealed by Eric in his talks, and of course the resulting sound. Digital audio is characterized by the number of samples per second, expressed in Hz, and the resolution of each sample, expressed in bits. CDs or WAV files use 44100 Hz or 44.1kHz, and 16 bits (65536 levels). Three Body’s outputs are 96kHz, 16-bit. Human hearing falls off after 15kHz, with the threshold falling with age. The additional headroom helps limit digital artifacts or "aliasing".
The inputs are 14-bit oversampled, a standard for analog-digital converters (ADCs). Eric originally used quality ADCs purchased commercially, but later programmed his own on the FPGA. The resolution of the internal modulation is even more astonishing: 12.5 mHz, 18-bit. That high rate is overkill, but it is the clock rate of the FPGA, and it doesn’t cost anything to run it that fast. The resulting sound is pristine under low modulation, but when the parameters are pushed past moderate, the character of the noise is extraordinary. It’s hard to describe, because it’s not just one sound, but a whole range of sounds, with smooth transitions to and from moderation. The imperfections of other oscillators (drift for analog, lower resolution for digital) make their extremes feel like a descent into chaos. Here it feels like an ascent into complexity.
Let’s look at the features. The three oscillators are nearly identical internally; they have similar controls, but different normalizations and different outputs. Each has a coarse and fine tuning knob, and three mode switches. One switch controls range, high or low (LFO to low audio); one controls type of FM, exponential or through-zero linear; one determines whether the oscillator is free or locked into a ratio. In the case of ratio locking, the coarse and fine tuning knobs become whole-number multipliers and dividers, respectively, of the frequency to which the given oscillator is locked. As described above, these type of ratios give more musical results for linear FM. Each oscillator has a SYNC input to provide the frequency to lock to, but the two outer oscillators have this normalled to the centre one.
Each oscillator has an FM input; for the two outer oscillators, this is normalled to the centre oscillator. Each oscillator also has an FM index knob, and the two outer oscillators have an FM index input for which this knob becomes an attenuator (with no plug inserted, this input is normalized to 10V).
Three Body also has phase modulation, as seen on Generate 3 above. The outer oscillators have a phase input normalled to the centre oscillator and a knob which acts as an attenuator. The centre oscillator has two phase inputs normalled to the outer oscillators, as well as two phase index inputs with knobs. Since the effects of phase modulation are not as extreme as frequency modulation, these are a rich source of musical timbres. All this normalization was the reason I could be enthralled for an hour by just turning the knobs on an unpatched module.
Each oscillator has a V/oct input, which acts as CV on the multiplier or divider in ratio mode, to give harmonic pitch changes on the oscillator’s outputs, and discrete timbral changes if it is used as a modulator. There is also a transpose input, which provides additional V/oct for any oscillator in free mode.
The two outer oscillators have four outputs: sine, triangle, saw, square. The centre oscillator has two additional outputs: cosine (sine, but a quarter-cycle out of phase under no modulation) and cosaw (same idea for saw). Phase modulation affects these outputs in the opposite direction, so the sine-cosine pair (or the saw-cosaw pair) can generate interesting stereo effects. A set of headers on the back of the module allows some configuration (for example, eliminating this opposite-direction phase modulation, if desired).
I put Three Body in a Pod with only a couple of additional modules to learn how to use it, but it needs more of a support system to fully realize all its possibilities, so it was moved to a double case (in fact, it triggered the reorganization of all my cases that I mentioned earlier). It is easily swappable with Brenso, or the Generate 3 / Paradox / Bifold combination, if I want to mix things up. While I will use it for noise on occasion, I am more likely to give it melodic or harmonic duties.
3.4.1.7 Intelljel Plonk
I hadn’t planned to acquire Plonk. I was only dimly aware of it when I saw it listed for on a local buy/sell forum along with another module. I had a module for sale on the same forum and suggested a trade, one for two. I was delighted with my side of the bargain; I hope the person I traded with was, also.
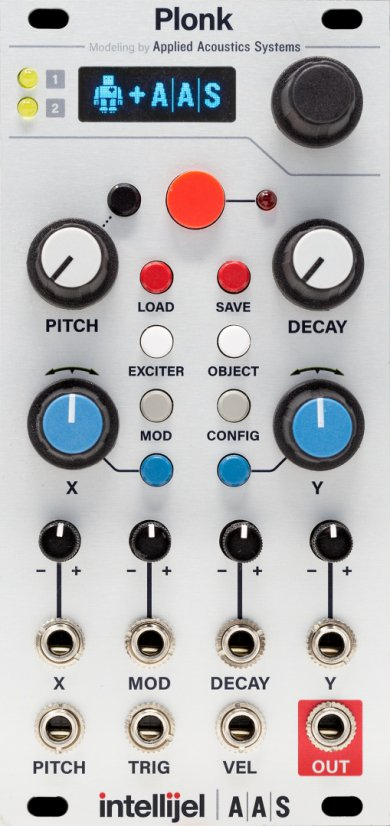
Plonk is a digital module that uses physical modelling to simulate the sounds of a wide variety of percussive instruments. Quad Drum (above) has such models, but a limited range, and each one has a small number of parameters. Plonk is more sophisticated, and offers much more scope and control. It has a single trigger input, but is duophonic, so a sound can overlap with the one from the previous trigger.
To set up a sound in Plonk, one chooses a resonator and an exciter. The resonator models the object being struck; choices include string, beam, marimba, drumhead, membrane, and plate. There are a number of resonator parameters, including a pitch envelope. The exciter consists of a modelled mallet (with a parameter for stiffness) and white noise (with many parameters to control the frequency distribution, and an attack/decay envelope). The parameters are set using the small screen and push encoder at the top of the module. Each set of choices can be saved as a preset.
There are two dedicated knobs for pitch and decay, and two assignable knobs. There are also CV inputs with attenuverters for decay and the assignable knobs, and a pitch input that tracks V/oct. Finally, there is a trig input and one for velocity (volume, exciter strength, or accent), one called MOD (with an attenuverter), and a single output. Not visible on the panel are the effects (saturation and bitcrushing) that can be applied to the output.
Up to three of the many parameters of a preset can be controlled by CV, through the assignable inputs and the MOD input. But the MOD input also allows for additional features. It can be used to choke the resonator, exciter, or both, to simulate things like open/closed hi-hats. It can be used to randomize all settings (this can also be done by a button on the panel) or to morph between two presets. Most interesting is the possibility to use it to select presets. You set the first and last preset in your "kit", and the CV selects within this range. This, plus the duophony, lets Plonk sound like a lot more than a single drum voice.
Users actually complain that Plonk sounds too realistic; they want more electronic sounds, like older Roland machines. There is quite a range in the factory presets, and while some are very lifelike, others are unabashedly artificial. There is an external website to help one manage presets, including rearrangement and external save/restore, but I suspect many will not put in the work.
Plonk sends my double case in a new direction, because it had no percussion before (and I didn’t tend to hook up an external drum machine). But more than kick/snare, Plonk can do tuned percussion, from toms to bells to plucks. There are a number of bass presets. So it really is another voice, and one complementary to Brenso. Usta is there to sequence presets and their parameters, which would be more difficult without precise digital control. There is a great deal of potential here.
3.4.1.8 Intelljel Dixie II
Dixie II is the other oscillator I received in trade with Plonk, above. It is a bread-and-butter or utility oscillator, but with a number of useful features.

It is 6hp wide (up from 4hp for the original Dixie), with two large coarse and fine tuning knobs at the top. A switch selects between low- and high-frequency modes, and there are four inputs for pitch, linear FM, flip synchronization (as in Brenso), and pulse-width modulation. The six outputs provide triangle, sine, saw, zigzag, square, and pulse.
There is a newer version, Dixie II+. It is even wider (8hp) and adds an octave switch at the top, a switch to choose between linear and exponential FM, a second FM input, and a knob for controlling pulsewidth. The square output has become a sub (one octave below).
Dixie II is a good source of audio-rate modulation, and can provide a simple bassline or supporting harmony for a more complex primary voice.
3.4.2 Oscilloscopes
If you have watched any social media performance videos or product reviews involving synthesizers, you have probably seen in-rack or on-device oscilloscopes doing X-Y plots of harmonically related sine waves, known as Lissajous curves (after the French mathematician who investigated them), to provide a little visual interest to what would otherwise be a largely static image (if sequencers are used instead of live keyboard playing).
Oscilloscopes are much more useful than they might look from that perspective. When researching my first synthesizer purchases as an adult, I found oscilloscope traces of waveforms very helpful in understanding the relationships between sounds and the parameters of their generators, and one of the first things I did was add oscilloscope and spectrum analyzer plugins to Ableton Live to learn about what my new devices could do.
That turned out to involve more fussing with software, interfaces, and cables than I really cared for, so I started thinking about a physical oscilloscope. A scope also helps with understanding slow modulation, especially when it is not having the intended effect. The alternative is to put the CV into an oscillator and hope that what you hear can be translated into information about the voltage. This not only requires repatching, but can be too indirect. The scope is not only a learning aid, but a tool for debugging.
Oscilloscopes have a long history in electrical and electronics work, and there are many models available as standalone devices, both analog and digital. I looked into these, but it seemed that a decent external scope would cost about as much as the module I was contemplating, would offer a lot of features I wouldn’t understand or didn’t need (since I wasn’t doing the kind of work it was intended for), and would be awkward to interconnect.
With the module I chose (Mordax Data), I can quickly disconnect a cable from its destination, plug it into an input of Data, and connect the corresponding output of Data (supplying the incoming signal) to the original destination. Data is thus eavesdropping on the signal, whose display can be turned on as needed. The module also offers a number of useful auxiliary functions, as described below.
Smaller and cheaper alternatives include Dave Jones O’Tool, vpme.de ZeroScope, Intellijel Zeroscope 1U, Tall Dog DSO and DSO2, and a number of inexpensive handheld digital scopes.
3.4.2.1 Mordax Data
Data is the only module to date from the US company Mordax. It has four channels, each with an input jack and paired output jack. There are also four auxiliary output jacks, four push buttons above and below the screen, a push encoder at bottom right (an encoder is a knob that can be turned continuously without limit; the push capability allows one to confirm a setting or select a menu item), and a larger main menu button at top right.
The module is very digital, and there is a fair amount of "menu-diving", though preset configurations can be saved. There are six major functions.
The first and probably foremost major function is being an oscilloscope. This is mostly intended for rapidly changing signals (audio rate), though it can handle slow signals as well (but there is another major function for those). Each channel’s display can be turned on or off independently, with separate vertical voltage scale and vertical translation so that displayed waveforms can be superimposed or separated. There is a global time scale and trigger mode (how to define the start point of the waveforms).
Here’s an example of how it looks, with the ODD waveform from Generate 3. Such a display is probably more informative than my "droopy square wave" description.

In order to get a stable image on the display, I needed to put a signal from the CORE output of Generate 3 into the second channel of Data, and instruct Data to use that as the trigger.
The other five functions are spectrum analyzer, tuner, wave output, clock output, and voltage monitor.
The spectrum analyzer will display a spectrogram, which is a bar graph of the amount of each harmonic of a wave form (frequency on the horizontal axis, amount on the vertical axis). This gets more interesting when the signal doesn’t have a dominant pitch, and you want to know what you are hearing. The processor in Data isn’t as powerful or fast as one in a laptop, so this mode isn’t as rich as the Ableton plugins I referred to earlier. But it can still be useful.
Even more useful is the tuner. Brenso and Generate 3, like most analog Eurorack oscillators, have coarse and fine tuning knobs. There’s no way to tell them to tune oscillators to a reference pitch, such as A440 (the A below middle C, standardized to 440 Hz or 440 cycles per second). Brenso has a numerical scale around its coarse tuning knobs, but that isn’t intended to be accurate; it only gets one into the vicinity. It doesn’t matter so much if one is using a single oscillator, but if one wants two oscillators playing harmoniously, or one wants to do FM which works best with whole-number frequency ratios, then more precise tuning is helpful.
Since I played cello for over a decade, I can tune by ear to a note from a tuning fork, computer or phone app, second oscillator, or a tone from an external synthesizer with digital tuning control. But it’s more convenient to have a good tuner in the rack.
The tuner works best with simple waveforms (I usually use sine). It can’t be expected to do its job if the oscillator is being modulated. It’s best to tune at the start of a session, and then check the tuning after the oscillators have warmed up for a half-hour or so.
The wave output provides two digital oscillators with pitch and amplitude control. The waveforms available are sine, square, sawtooth, and triangle, with the option of clipping or wavefolding. Although Data probably won’t provide anyone’s main voice, it’s nice to have these two sound sources available as subsidiary voices or sources of audio-rate modulation.
The clock output produces four clock signals. As I mentioned before, these are trigger sequences held at a constant frequency, useful for synchronizing the actions of various modules. Typically one chooses a master clock source and distributes it to followers, but one can also use multiple clock sources for effect. Data can either be a clock source or can synchronize to an external clock. In either case, the base clock frequency can be divided or multiplied for the produced signals.
The voltage monitor is designed for slow signals, and provides a nicely-arranged display of the four inputs, with a 12-second sweep. It can also provide four outputs, which can be constant voltages, or gates/triggers controlled by the channel buttons.
3.4.3 Function Generators
We’ve already discussed function generators in the previous chapter, including the very popular Make Noise Maths. On the simpler side, they become envelope generators, as in the earliest Moog designs. In a fixed-architecture synthesizer, an oscillator or filter might have a dedicated envelope, and a separate LFO. These functionalities can be combined in function generators, and new ones added.
3.4.3.1 Frap Tools Falistri
I wrote about Falistri extensively in the previous chapter, but for the sake of completeness, here is a short description.
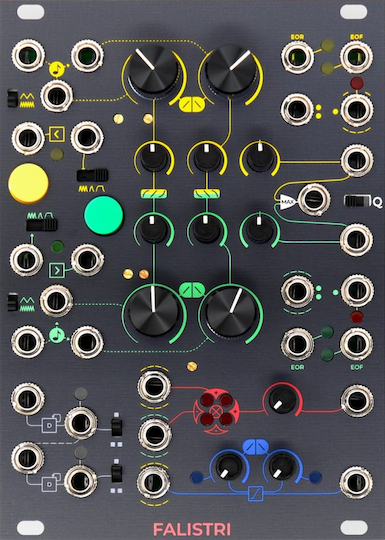
Falistri has two sections, yellow and green (like Brenso), which can create independent envelopes (attack-release [AR], or attack-sustain-release [ASR]). These can be synchronized, or combined into an attack-decay-sustain-release (ADSR) envelope, as available on many fixed-architecture synthesizers. There are knobs and CV control over rise and fall times, knobs controlling the rise and fall shape, and manual triggers as well as jacks taking trigger inputs. Unipolar (full-range) and bipolar (both full-range and attenuated outputs) are provided. The module also produces gate signals based on end of rise (EOR) and end of fall (EOF) for each envelope.
Each section can be put into repeat mode to create an LFO, and sped up to audio rate to create an oscillator. Each has an input that will track V/oct pitch signals accurately. The bottom third of the module is a collection of utilities, including a bipolar VCA (making Falistri a "complete voice", but also facilitating AM and RM), a slew limiter (which delays the rise and fall of a signal, with separate knobs for each, making gates into ASR envelopes, and doing interesting things to audio signals), and a cascaded flip-flop which can divide frequencies by 2 and 4 (clock division, and also for creating a square sub-oscillator one or two octaves lower). Note that the slew amounts are not voltage-controlled, as they are on Maths, or Delta-V just below.
In March 2025, more than three years after I bought Falistri as my first module, I bought a second one, to sit in the same case with my other Frap Tools modules.
3.4.3.2 Cosmotronic Delta-V
Delta-V, from the Dutch company Cosmotronic, was my initial alternative to the ubiquitous Maths (twice the size), before I decided to instead indulge in the larger and more expensive Falistri. But I later acquired Delta-V anyway, for use in situations where space is a concern. Delta-V is by far the smallest of these three modules (10hp, compared to 18hp for Falistri and 20hp for Maths).
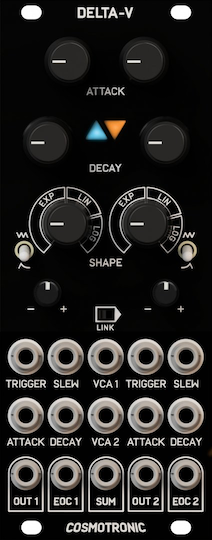
Compared to Falistri or Maths, it lacks a number of auxiliary inputs and outputs as well as some attenuverters, and it doesn’t track V/oct well, so its utility as an oscillator is limited. But it has a VCA jack for each of the two envelopes. If nothing is patched into them, the envelope appears at the output. But if an audio signal is patched in, the output is that signal shaped by the VCA acting on the envelope. It has a slew limiter for each channel, and an output summing both attenuverted channels (Falistri has maximum instead) to produce more complex envelopes.
The net effect is that Falistri, Delta-V, and Maths are all incomparable, in that they are somewhat close to each other in capability, but each of them can do things the others cannot do. Unfortunately, the manual for Delta-V is a little too brief, even by Eurorack standards. But the module rewards experimentation. I have version 2, but there is now a version 3, with the same front panel but slight improvements to the circuitry.
3.4.3.3 Intellijel Quadrax / Qx
Falistri is lovely, but it only provides two function generators, and I quickly found myself needing more. Quadrax was the second one I acquired.
Quadrax is a digital module made by the Canadian company Intellijel. It has four channels, each one being comparable to Falistri’s yellow or green section. But because it is digital, more functionality can be crammed in. Besides the AR and ASR envelopes and repeat (LFO/oscillator) mode, there is a "burst" mode for ratchet-like behaviour, and a "low-frequency vacillator" mode that produces a voltage wandering in a chaotic random fashion.
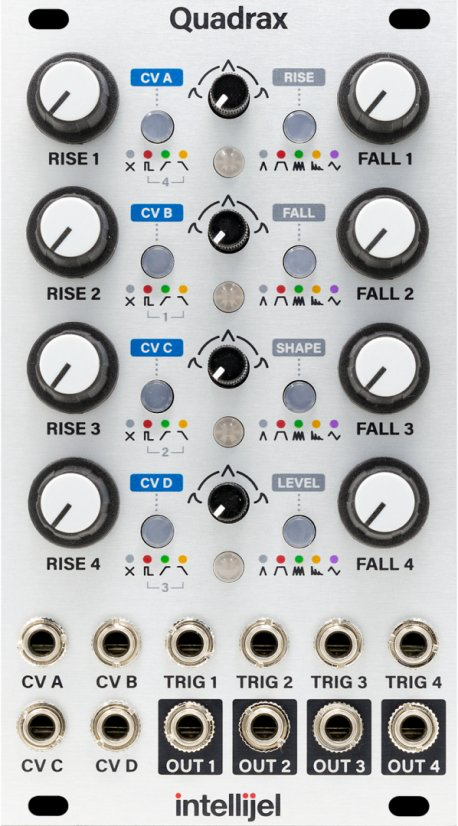
A Quadrax channel has two knobs (controlling rise and fall times for standard envelopes), one smaller knob for wave shape, a mode button, a link/CV-assign button, and a multicolour indicator LED. The two buttons also have multicolour LEDs beneath. The digital nature of the module makes it easier to repurpose the knobs in different modes. For example, in LFO mode, the rise knob controls rate, and the fall knob becomes a "morph" knob that sweeps through many different waveforms. Quadrax will track V/oct, but it is more difficult to tune, for some reason.
At the bottom of the module are four trigger jacks for the four channels, four output jacks, and in lieu of individual CV jacks for each channel, four general CV jacks that are assignable with the CV-assign buttons (to rise, fall, shape, and level, as indicated by the grey labels). The same buttons can be used to link adjacent channels, for example to have the second one trigger when the first one falls to zero. There is also a way to invert and attenuate the channel output using the buttons (necessarily a small fixed number of settings rather than continuously).
The Qx expander is a small auxiliary module that connects to Quadrax by a cable plugged into the back of each, and provides end-of-rise and end-of-fall gates that are similar to Falistri’s. The link capability can handle some situations where these might be used for self-patching, but not all such situations, and these gates can also be sent to other modules. Quadrax and Qx together are the same width as Falistri, with more functionality packed in. But there is an obvious cost in complexity. Some uses of Quadrax are not intuitive, or are difficult to remember without a lot of practice, because knobs and buttons change function with mode (and there are a lot of button colours to keep track of), and because some features (such as LFO morph) are inherently complicated. Consequently, the manual (or a cheat sheet or personal notes) needs to be consulted more often.
As an example of the capabilities of Quadrax, one can implement the Krell and bouncing ball patches from the previous chapter entirely within Quadrax, using no other module. The VCA capability is provided by self-patching, putting the output of an envelope into a CV input, and assigning that to modulate the level of another channel. The internal EOR/EOF link capability also helps (if channels are carefully arranged), even if Qx is not installed.
3.4.4 Voltage-Controlled Amplifiers
VCAs are a fundamental component in most electronic music systems. In the last chapter, we used Falistri’s bipolar VCA, which essentially multiplies its two signals (with appropriate rescaling). But most VCAs are asymmetric, with unipolar CV controlling the amplitude of a possibly bipolar signal (which may be audio, or may be CV below audio rate).
You might think there is nothing much to distinguish one VCA from another, but there are differences. First of all, in the way the amplitude CV affects the signal. For a linear VCA, doubling the amplitude CV doubles the signal. But an exponential VCA has a steeper response curve. This can be useful to convert a triangle envelope into something snappier. It is less important if one is using an envelope or function generator that already has the capability of making exponential envelopes.
Amplification of the signal to the same level as the input is called "unity gain". If gain cannot go above unity, what we have is a CV-controlled attenuator. For amplifiers that can go above this level, the question is how much, and what character the amplifier imparts to the sound. Effects include warmth, clipping, and noisy distortion.
Finally, we have additional features (some of which I will discuss with the two examples below), and ergonomic factors (size, usability).
None of the VCAs below are bipolar. Mutable Instruments Blinds has four bipolar VCAs and WMD Triple VCA has three, to name a couple of possibilities. Other utility modules will sometimes include a "ring modulator", which, as explained in the previous chapter, is another name for the same thing.
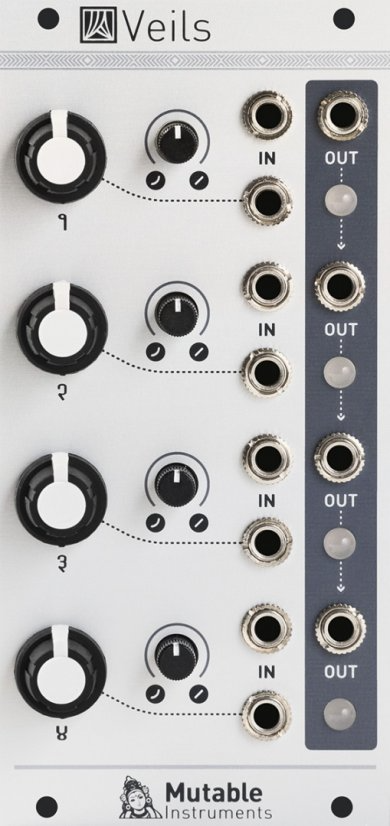
3.4.4.1 Mutable Instruments Veils
The 2020 redesign of Veils, a quad VCA, was the first module I bought specifically to replace another one (by Intellijel). It was also the first Mutable Instruments module that I bought, though I was familiar with Plaits (a multi-mode oscillator), because MI’s open-source software for Plaits was incorporated by Arturia in their Microfreak standalone synthesizer. The original Veils was released in 2016. While Mutable Instruments has ceased production, clones of this and most of their other modules are available from several manufacturers.
A quad VCA has (not surprisingly) four channels, each with input, CV, and output jacks. Designs differ in the number and type of additional controls, and in their layout.
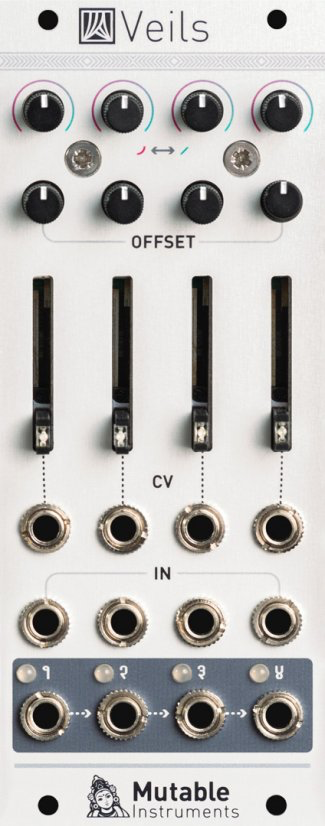
In Veils 2020, the channels are laid out vertically. A small knob at the top of each channel shapes the response (from linear to exponential), followed by another small knob for an offset to the CV for gain (essentially setting a base level for amplification). A larger vertical slider attenuates the gain. There is an LED in each slider to indicate the amount of gain, and one for each output which indicates both amount and (through colour) polarity.
Each output is normalled to be mixed into the next one to the right, so a single cable from the rightmost output will carry the mix of all four outputs. As with other normalizations, these can be broken with a "dummy cable", that is, a cable plugged in to interrupt the normalization, but whose other end is not plugged into anything. This setup means that it makes sense to start using the rightmost channel first, and then adding in the rightmose unused channel as needed.
There is a small knob for attenuverting the CV, a small knob for shaping the response from linear to exponential, and a larger knob for supplying an offset to the CV (essentially setting a base level for amplification). The CV in is normalized to 8V, so with nothing plugged into that jack, the channel acts as an attenuator.
Veils 2020 replaced the Intellijel Quad VCA in my rack. That module is very popular on ModularGrid.
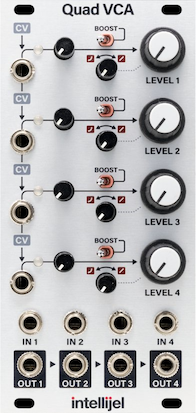
The Intellijel design was inspired by the original Veils, but it adds some features that both versions of Veils lack.
You can see that the 2016 Veils lacks the offset knob.
With linear response, the maximum gain of a Quad VCA channel is unity (as with Veils), but a small switch provides a +6dB boost. "dB" stands for decibel, a unit used for both sound and arbitrary signals. It has a logarithmic scale. In this case, +6dB would correspond to a doubling of voltage (useful, for instance, to take a CV in the range -5V to +5V into the range -10V to +10V, if some module expects that), and -6dB would be halving. Quad VCA also has an additional normalization of CV inputs, so that, for example, one envelope can be used for several sound sources. Quad VCA does not have the output LEDs.
So why did I replace it? I wouldn’t say that I made a wrong initial choice; I had to use it in order to find out that I had particular issues with it. (Thankfully, I didn’t have to learn this about many modules.) I found myself not using the large offset knob much, and using the smaller CV attenuator knob more (so switching to a larger slider for that feature made sense). I also didn’t use the boost switch or the CV normalization. There are cases when it’s preferable not to have the normalization, for example, when one wants to start by mixing in a continuous sound, and then applying an envelope to break it up into discrete notes without changing the mix level. Finally, I found the exponential response quite aggressive, and avoided it.
Together, these three modules provide an interesting study in feature creep and ergonomic redesign.
3.4.4.2 Happy Nerding 3xVCA
The 3xVCA, by the Ukrainian company Happy Nerding, is half the size of the Intellijel Quad VCA. Compared to that module, it loses one channel, the boost switch (maximum gain is unity), and the response knob (it has linear response). The offset and attenuverter knobs for a channel are stacked one atop the other, an unusual but functional arrangement. Instead of normalization, there are two switches between the three channels to add/remove mixing.
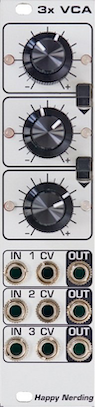
The result is a highly effective solution for cases where space is at a premium. Because the CV has an attenuverter knob rather than an attenuator, it can be used for such tasks as ducking (applying a negative envelope to lower sound while the same envelope raises another sound), cross-fading, and stereo panning.
3.4.4.3 Frap Tools 411
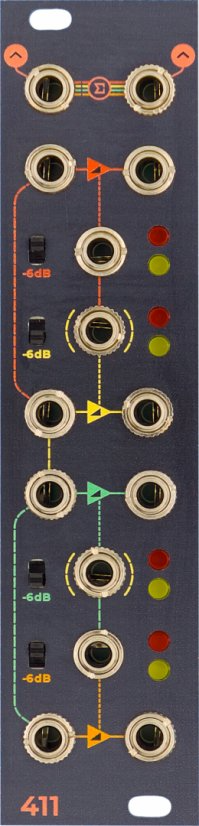
The 411 is simpler and smaller than the modules above, because it has no knobs. It packs four VCAs into 6hp. Red and green LEDs indicate polarity, and the inputs are semi-normalled downward, so one input can feed the other inputs below it if they are unpatched. There are two mix outputs, one for all four outputs, and one for any outputs which are unpatched. If these mix outputs are too hot, each channel has a switch reducing the signal by 6dB (50%).
The module is DC-coupled so it works for both audio and control voltage. It’s a handy utility in my Frap Tools case, and it fits in aesthetically.
3.4.5 Sound Shapers
I have lumped several modules into this rather broad category that might otherwise live in different categories. There are four filters, two effects, one low-pass gate, a wavefolder, and a looper/granulator.
A filter removes some frequencies from a signal and possibly enhances some of the ones it lets through. A low-pass filter lets through low frequencies and above a cutoff frequency (controlled by a knob or CV), the amount let through drops off rapidly. The slope of the dropoff is typically expressed in decibels per octave. 6dB/oct, 12dB/oct, and 24dB/oct are typical.
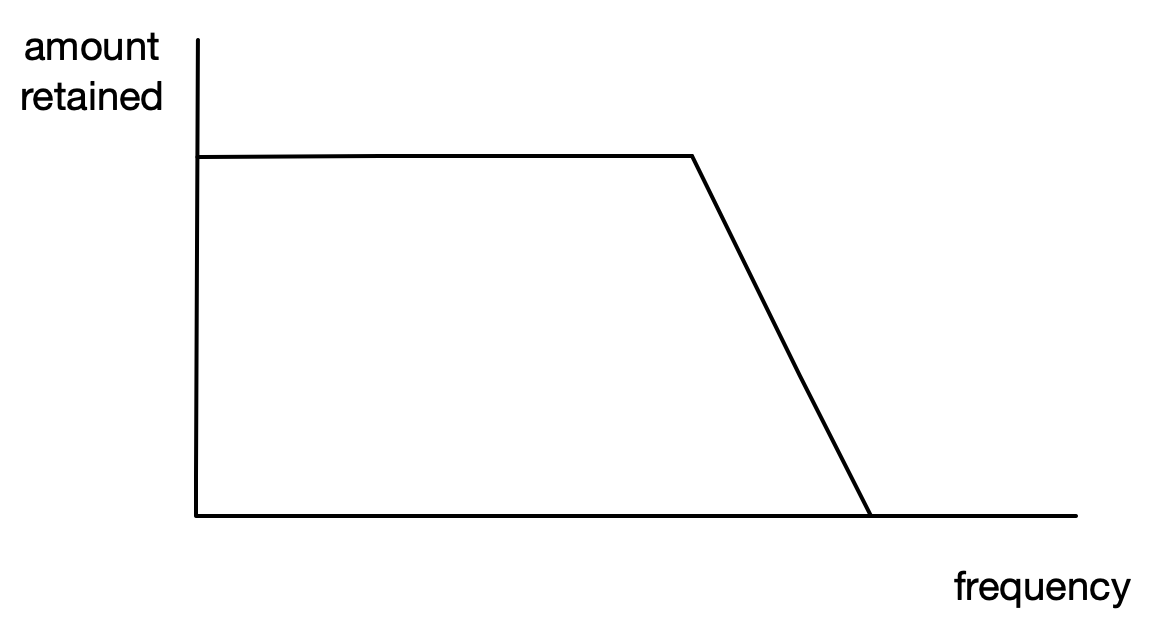
The enhancement is called "resonance", and it is also typically controlled by a knob or CV. It boosts the amplitude near the cutoff frequency, making the response curve look more like this.
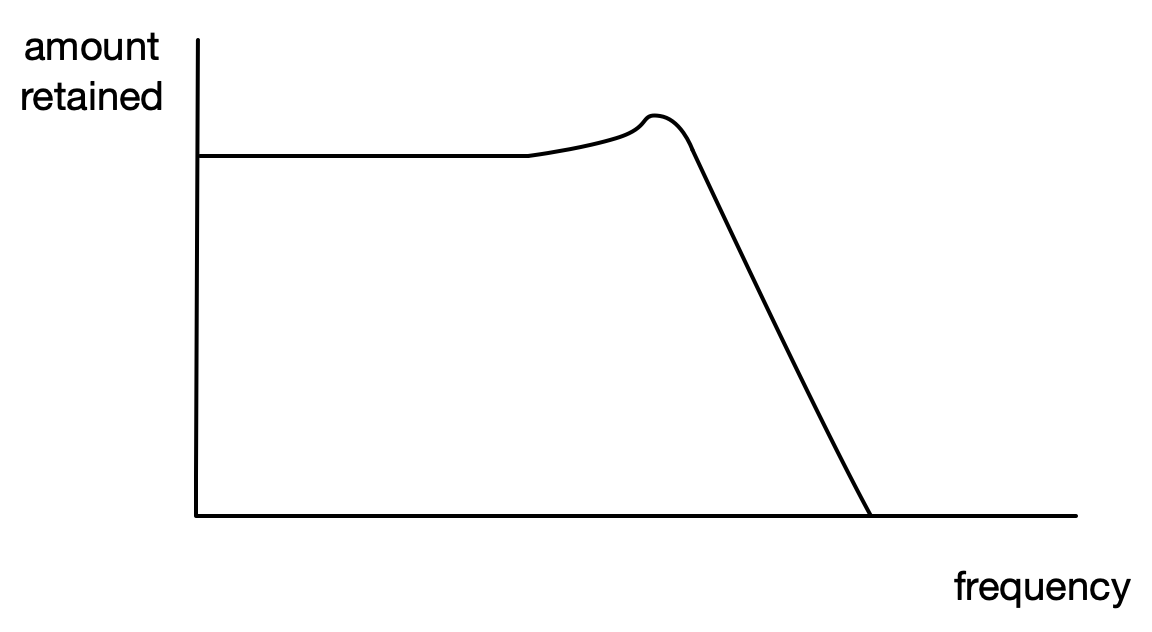
The effect is subtle if cutoff frequency and resonance are static, but if cutoff frequency is controlled by an envelope (perhaps the same one controlling volume, or another one), the sound is probably familiar to you, as might be the one where resonance is turned up (the "acid squelch" of techno).
A high-pass filter flips the graph left-to-right; it lets through higher frequencies but the amount drops off below the cutoff frequency. A band-pass filter combines the two, so the graph is roughly an inverted V, and resonance increases the peak, or makes it into an inverted W shape.
If resonance is increased, the frequencies above and below the cutoff frequency start to drop away, and at some point they vanish or become insignificant, and the sound can be sustained without any external input. In this case, the filter is said to be self-resonating, and it can be used as an oscillator. The character of the resulting sound varies considerably among filters that are capable of this sort of behaviour. One can also get close to this point and then excite the filter with a trigger or short gate going into the input; this is known as "pinging" the filter.
There are many different effect types: chorus, delay, reverb, distortion, phasers, flangers, granular sampling/synthesis, and others. One of my design principles was to avoid these in my rack, because I have some good options outside it. The three exceptions I have made are for an analog delay that has a sound difficult to emulate digitally, a digital processing platform that can load multiple firmwares, and a digital looper/granulator that can do things I cannot replicate in inexpensive software or external hardware.
We’ll start with the filters, of which I have two singles, a double, triple, and quadruple! Rather than discuss them in numerical order, I will use the order in which I acquired them.
3.4.5.1 Bastl Ikarie
My fixed-architecture synths have an East Coast subtractive setup, with one or more filters as an integral part of the setup. The Brenso oscillator has more of a West Coast feel, and a sweet enough tone that a filter seemed largely unnecessary. Some of the effects of a filter could be achieved by appropriate modulation of the wavefolding section. But some filters can add considerable character to a sound, and Brenso is not the only oscillator in my rack.
In doing research on possible filter choices, I was impressed by Bastl Ikarie, and it was the first Eurorack filter I bought. Ikarie is a stereo analog filter; it can have a mono or stereo input, and a mono or stereo output (including producing stereo output from a mono signal).
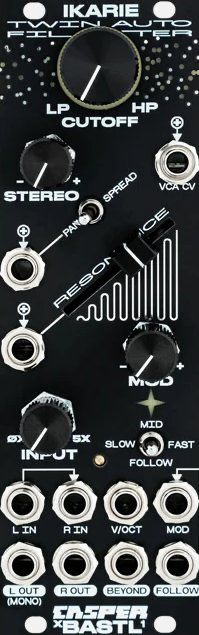
It is set up like a dual filter (a mono signal is normalled to both sides), but the two channels are linked, in that they share a single frequency cutoff control knob and a single resonance slider (both designed to be interactively "playable"). The cutoff knob has a low-pass effect to the left and a high-pass effect to the right. There is an attenuverter knob marked "STEREO", and an associated switch with two settings, spread and pan. On the spread setting, the knob spreads the cutoff frequencies for the left and right channels; on the pan setting, it increases the volume of one or the other.
There are CV inputs for stereo and resonance, and two CV inputs for cutoff frequency. One is labelled "MOD", and the other "V/OCT". The second one can be useful if one wants an envelope on cutoff to have the same effect regardless of what the pitch of the signal is, or when the filter is pushed into self-resonance and used as an oscillator.
An input gain knob can multiply the input signal up to a factor of five, which adds colour to the resulting sound. Ikarie has an envelope follower, which creates an envelope from the amplitude of the input. That is normalled to the MOD input, which results in the classic sound that results when the same envelope is used to control a VCA and a VCF. There is a three-position switch affecting how quickly the envelope follower responds to changes in the input, which in turn affects the resulting sound.
There is a separate CV input labelled "VCA". This is a byproduct of the internal use of VCAs to switch from low-pass to high-pass modes; it was relatively easy for the designers to provide this. Finally, there is a curious output labelled "BEYOND", which provides the difference of the two filter output signals. This has the effect of providing a double-peak bandpass filter. If this is combined as a right-side output with the left output alone (which, when nothing is plugged into the labelled right output, goes into mono mode and adds the two signals from the two filters, thus providing a double-peak low-pass or high-pass filter, depending on the cutoff control), one can get rather interesting stereo images.
To summarize this rather confusing welter of features: Ikarie can act as a quite conventional low-pass or high-pass filter, and when the resonance is raised, it can act as an oscillator that tracks V/oct. It can take a mono signal and produce a stereo signal that can vary gently with slight modulation in a more complex fashion than a typical mono filter, or that can get really spacey if the modulation is turned up and the BEYOND output used.
As with Sarajewo below, it’s really hard to avoid pulling Ikarie into a patch, just because it does such interesting things.
3.4.5.2 WMD C4RBN
Sometimes I just need a simple filter, for example, to take the buzz off the Generate 3 oscillator in some settings, or to create a percussive sound from noise. It seemed overkill to use Ikarie for this (and sometimes it was being used for other purposes).
After doing some research, for my second filter, I settled on C4RBN, a product of the American company WMD. It is slender, but packs a lot of features in. There is a single (mono) input, but this is a multimode filter, so there are three simultaneously available outputs for low-pass, high-pass, and band-pass. These are 2-pole (12dB/oct slope), but there is a second 2-pole filter connected in series (with resulting slope 24db/oct), and a fourth output for that, which also provides some additional features.

There is a button to manually cycle the fourth output through low-pass, band-pass, and high-pass modes, and the expected knobs for cutoff frequency and resonance. A third knob, labelled FM, acts as an attenuvertor for a CV input for cutoff (also labelled FM). There are CV inputs for resonance and V/oct.
The additional features are input gain resuting in saturation (a sort of warmth resulting from pushing the circuitry to its limits, with three levels controllable by another button, as well as CV input) and output wavefolding, which is only on/off (the same button), but which is an unusual addition to a filter, and one which adds complexity to the sound.
Finally, there is a "ping" input, which takes a gate and produces a short decay envelope applied to cutoff frequency. This is not the same kind of ping as I discussed in my general introduction to filters above; that used a gate or trigger into the main audio input. Unfortunately, I don’t particularly like the sound that this ping input makes.
I did not use C4RBN as much as I had expected to. While it works as advertised, it is perhaps a bit too gentle, and while it does a lot in a small space, that makes it awkward to manipulate. When I ran out of space, it was one of the modules I unracked, given that I had three other filters I preferred at that point.
WMD announced in 2023 that they were closing down. Fortunately, they changed their mind within a few months. Several of their classic modules, including C4RBN, will continue to be available, and new designs are planned.
3.4.5.3 Mannequins Three Sisters
Mannequins modules are made by a small American company called Whimsical Raps. Due to limited supply (aggravated by the COVID-19 crisis), they have been in high demand for many years, some changing hands for two or three times list price on the used market. In late 2021, the company announced that a small number would be made available, with purchasers determined by lottery among those interested. I put my name in, and to my surprise, won the right to purchase the Three Sisters filter at list price.
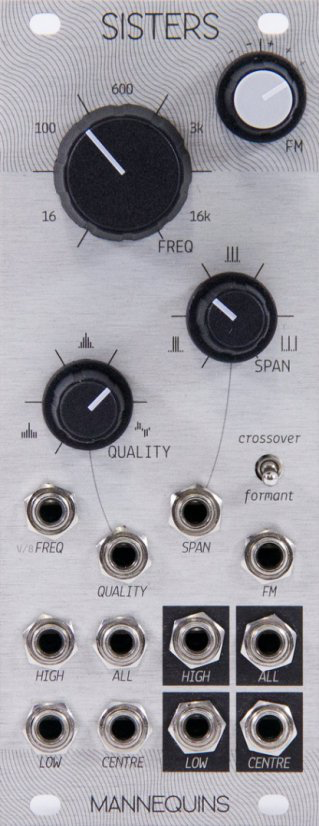
As befits a company with that name, their product descriptions are, well, whimsical, but they also provide long, detailed "technical maps". The one for Three Sisters reveals some similarities to Ikarie. But instead of two linked channels with one filter each, there are three linked channels (named Low, Centre, High) with two filters each. There are separate inputs and outputs for each channel, and also an "All" input and output.
There is a single cutoff frequency knob, with an FM CV input and attenuator, as well as a V/oct input. The Span knob controls the spread of the cutoff frequencies of the three channels. So far, this resembles Ikarie. The first difference comes with the switch labelled "crossover / formant". In crossover mode, the channels act as three bandpass filters. In formant mode, Low and High are lowpass and highpass filters, while Centre is a bandpass filter.
The next difference is seen in the resonance knob, here labelled Quality. The closest to zero it gets is at the 12:00 position, where it is still slightly resonant. Turning the knob clockwise from this position increases resonance. But turning it counterclockwise mixes in the opposite filter response (e.g. for the LOW output, some of HIGH is mixed back in). This can make the channel into a "notch" filter with a V-shaped decrease in amplitude around the cutoff frequency. Span and Quality also have CV inputs.
This combination of features is quite versatile. A lot can be done with a single oscillator sound and just the All input and output, with Span and Quality tweaked by envelopes and/or LFOs. The multiple inputs can be used for different sounds, and the multiple outputs panned for stereo effects. The filters self-oscillate nicely and produce three related sine tones, which when slowed with negative CV on frequency, become LFOs. Put three different gate sequences into the three inputs to ping the filters, and one gets a three-voice drum kit.
It’s easy to see why the module is in high demand. It is not without its quirks. Because the All output is summed, it can easily overload. The manufacturer suggests using a passive multiple on the individual channel outputs to avoid this. There are times when clicks appear in filter sweeps due to a momentary overload when frequencies line up just right (or wrong). But overall, it is a delight. It doesn’t feel redundant to have both Three Sisters and Ikarie, because they sound different, and each of them can do things that the other cannot.
Whimsical Raps announced a slightly modified new version of Three Sisters in 2024 (among other improvements, the All output has a limiter on it). It continues to command high prices, with limited availability.
3.4.5.4 Frap Tools Cunsa
Cunsa is the most expensive module that I own, and on arrival it was the largest, meaning my four cases plus the auxiliary Pod were all completely full. Why did I buy a quad multimode filter, when I already had six filters?
As I mentioned above, my double case had been the home of my other Frap Tools modules, plus whatever would not fit in the single cases. Those other modules, capable though they were, could not adequately support the stars of the case. When two more voices (Plonk and Dixie II) arrived, the mixing capability was insufficient, and I was light on VCAs and envelopes. Brenso has a sweet sound, but when I wanted to modify it, I had to alter FM or wavefolding amounts, which tended to add higher harmonics, not always the effect I wanted.
Frap Tools has another large filter module, Fumana, with the same size and price, but very different functionality. I’ve always wanted to play with one, but never saw compelling reasons to own one. I didn’t really know how I might use it. Initially, when it was announced, I put Cunsa in the same category. But as details emerged, and demos were made available, I found some reasons.
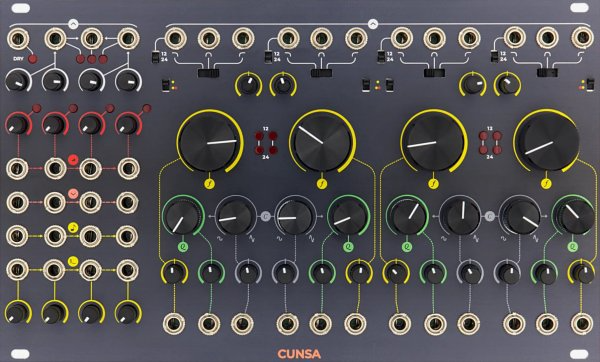
Cunsa is more conventional than Fumana (which has 32 narrow bandpass filters at fixed frequencies), which made it possible for me to imagine how I might use it more. It has four identical sections on the right (though two are mirror-reversed), each consisting of a single multimode filter. Each filter has a large knob for cutoff frequency, and two smaller knobs for resonance and "character". Below are attenuverters for CV inputs for each of these. At the top of each filter section are three outputs, for lowpass (choice of 12dB/oct or 24dB/oct slopes), bandpass, and highpass filters. The filters will self-resonate (there is a fine tuning trimmer), and the technique of setting the resonance just below this and then "ringing" it with a trigger input gives nice percussive sounds.
The character knob controls how the filter responds to high input amplitude. The filter modules described above have a fixed response, which is part of their character. When a Cunsa character knob is all the way counterclockwise, the input is soft-clipped, so there is not much effect. The knob gradually raises this limit when turned, allowing more overdrive. This can have considerable effect when combined with the rest of the module.
To the left is a section with inputs and outputs, but also CV inputs for modulation and mixing. Some of the details here are similar to Frap’s CGM mixer modules. There are four inputs, one for each of the filters, with normalization to the right, so an input to the first filter will also go to the others unless another cable is used on one of them. There is a VCA for each filter, with greater-than-unity gain possible (working well with the character knob, going beyond saturation into distortion).
There are four V/oct inputs for cutoff frequency, also normalized, and four ping inputs (C4RBN above has one with more basic functionality), which generate an envelope applied to cutoff frequency, with rapid rise, and fall dependent on the input as well as the setting of the trimmer just below. These can act like a low-pass gate (see Takaab below).
At top left is a mixing and output section, with level controls for all four filters (again with greater-than-unity gain possible), and output jacks for a mix of all four filters, two for two filters each (permitting stereo effects), and one for a dry mix. One of the three outputs of each filter can be sent to the mixing section, selected by a small switch in each filter section, even as all three outputs remain accessible through their jacks. With so many opportunities for amplication, sometimes careful gain staging is necessary to get the desired sound.
Cunsa can juggle several different sounds, or take a single sound, cut it into pieces along the frequency spectrum, manipulate and reassemble them. It now defines the main signal path for my Frap Tools double case, with a great deal of flexibility thanks to its design. Of course, it has the solid build quality and good looks of its siblings, as well.
Although my other Frap Tools modules take inspiration from classic Buchla and Serge designs, the closest point of comparison to Cunsa is more recent: the Cwejman QMMF-4, released in 2013. QMMF-4 is slightly larger and about twice the price, if you can get hold of one, which is not at all easy. After Wowa Cwejman’s death in 2022, his family continued production at a reduced rate (the rate was never very high to begin with), and both waiting list counts and resale prices increased.
The feature sets of Cunsa and QMMF-4 overlap but have definite and significant differences, and the two modules look and sound different.
3.4.5.5 Random*Source Serge VCFQ
My fifth filter module (!) was purchased in person at Schneidersladen in Berlin, who specialize in modular equipment. They had just opened two showrooms, one with several rooms with large modular setups which the casual visitor can play.
VCFQ is short for "Variable Q Voltage Controlled Filter", Q being a common abbreviation for resonance. The name "Serge" is prominent at the bottom, and this refers to Serge Tcherepnin, a composer and teacher who was inspired by Don Buchla’s early designs to create his own modular synthesizer system named after himself. Like Buchla, he produced commercial products, but shut down his company in the 1980’s. Some systems were produced under license, but enthusiasts in the DIY community convinced Serge to recently become active again, mostly notably in collaboration with the German company Random*Source. The original Serge panels were in the 4U format, but Random*Source also started making them available in the now-popular 3U Eurorack format. Serge panels have a spacious design, and you can see that here; it’s not as cramped as, say, C4RBN.

The four outputs at top right will be familiar if you have read about the filters above. Several of the inputs will also be familiar: the regular audio input, CV control over resonance (with an attenuator) and filter cutoff (with an attenuverter), and V/oct control over filter cutoff. The other two inputs are perhaps unfamiliar. The AGC in offers "automatic gain control", which is a way to ensure that the output will not overload and distort if the resonance boosts the input too much. The last input, with the red circle around it, is the trigger input.
I have discussed how filters can be pinged by a trigger or gate going into the main audio input. This usually requires some careful adjustment of the height and width of the trigger, as well as the resonance setting, which has to be just short of self-oscillation. Sometimes changing the cutoff frequency will require re-adjustment of some of these parameters, which can be frustrating.
Serge’s design created very nice pings. This in fact is the main reason I bought the module (and the main reason for most purchasers). VCFQ is not capable of self-oscillation unless one explicitly patches an output back into an input. I don’t understand the electronics, but there might be some correlation of this fact and its superior pings. To facilitate their use, Serge included a trigger input that senses a rising edge and creates a trigger optimized for pinging the filter, which is passed into the main audio path.
So with no other input, one can patch a gate sequence into the trigger input, and use the Q knob to control the duration of the pings and the F knob to control their pitch. Of course, the associated CV inputs can be used to automate these. In the following short demo, Pachinko (discussed below) is providing random V/oct and gates. The low output of VCFQ is mixed with a constant background drone from Pizza, and the sound put through Source Audio Collider for external delay and reverb.
3.4.5.6 Xaoc Sarajewo
I have said (probably more than once) that I have resisted in-rack effects, this being my first exception.
Out of the rack, I have a multi-effects box (Korg NTS-1) that costs about $100 (USD), and does a credible job. Another one costs about $300 (Source Audio Collider), and does much better, providing several types of delay and reverb, any two of which can be combined. I also have a number of effects available via inexpensive iPad apps.
It would cost about $150 for the simplest in-rack effects module, $200 for something I’d consider, $250-350 for modest alternatives. I paid $450 for Sarajewo, produced by the Polish company Xaoc (pronounced "chaos"), which provides one effect, an old-fashioned delay. Why?
To answer that, let’s go back to those cheaper multi-effects boxes. They contain a digital signal processor (DSP) and, to make use of it, analog-to-digital converters (ADCs) that will chop up the analog input signal into discrete digital samples. This is like replacing the smooth waveform with an approximation using only horizontal and vertical lines. The horizontal lines have a length that is dependent on the sample rate. One common standard is the one used by CDs, 44.1kHz, or 44100 samples per second. The vertical distance from zero will be in units dependent on the resolution of a sample. A 16-bit sample will offer 65536 levels. The output of these boxes is, like the input, analog, meaning digital-to-analog converters (DACs) are used. When converting from digital to analog, the waveform is smoothed and interpolated in such a way as to avoid the higher harmonics associated with sharp transients.
The most basic digital delay will stick incoming samples into memory, then pull them out and output them a while later. The samples are reproduced exactly, but remember they are only approximations of the original signal. Nonetheless, just as a CD or WAV file played back sounds quite fine to our ears, a digital delay has a crisp fidelity. Various algorithms can be used in a DSP to alter the character of the repeated sounds.
What about analog delay? There are several classic techniques. One can use a loop of recording tape, with the record and playback heads physically separated. There is some loss in fidelity in the recording and playback, and some slight pitch variation caused by the physical medium and motor speed variation. This is known as "tape delay", and some digital delay units will use their DSP to model these phenomena.
Sarajewo uses a technique known as the bucket-brigade delay (BBD). This involves capacitors. A capacitor is an electrical component that holds a charge and then discharges it. A BBD involves a series of capacitors, each of which discharges and charges the next. The term "bucket brigade" is a metaphor for early firefighters passing buckets of water by hand. We can think of this as like a digital delay, but the vertical axis (the charge on the capacitors) is continuous, instead of being chopped into 65536 levels. But the horizontal axis (time) is still discrete, the unit being the time between the charging of the first capacitor in the series and its discharge. This time can be controlled, though there is a minimum (since charging is not instantaneous) and a maximum (because charge will start to leak away).
There are a number of technical challenges to be overcome regarding artifacts in the sound produced by the sampling process. Sarajewo takes a mono signal and puts it through three stages of delay, each stage consisting of a series of 4096 capacitors. The output of each stage feeds into the next and is also available via a jack. These points in a delay where outputs are available are known as taps. The output of the third delay is also put through an amplifier and LP/HP filter (volume and cutoff respectively controlled by sliders on either side of the module) and then mixed as feedback with the incoming signal. (There is actually a feedback input normalized to the output of the third tap, but one can break the normalization and put in whatever one wants.) The large central knob controls the delay time (for which there is also a CV input) and the central green button lets one set the delay time by tapping manually. Changing the delay time on the fly will change the frequency of signals currently in the delay, so there will be noticeable pitch changes at subsequent taps.
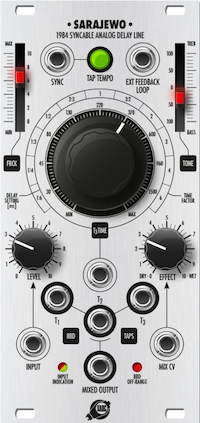
At the bottom of the module, there are two knobs controlling input gain and dry/wet mix of the effect (dry for the original signal and wet for a mix of the three taps available as a separate output), as well as CV inputs for both.
Finally, at the top, there is an input for a clock signal, labelled "Sync". If this is supplied, the delay time knob and associated CV will be quantized so that various divisions or multiplications of the clock frequency will be used. These not only work rhythmically, but have the side effect of making the pitch changes harmonious.
The sound is coloured considerably by the passage through the BBD, especially with slow delay times, when it becomes fairly dark. But Sarajewo does well at longer delay times not usually achievable by analog means. The flip side is that it is not made for extremely short delays, which can be used to create certain sonic effects. There are other delay modules that focus on shorter ranges.
There is an example of the sound transformations effected by Sarajewo in the section on Generate 3 above. I think it is beautiful, but very distinctive, and care has to be taken to not overuse it.
3.4.5.7 Noise Engineering Melotus Versio
Melotus is one module in Noise Engineering’s "World of Versio", a series of modules based on the Electrosmith Daisy digital signal processing platform. The physical internals of each module are identical, as are knob and jack placements; only the labelling differs. Each firmware can be run on any of the modules, with downloads available from NE’s web site. The NE software isn’t open-source, but NE has released a framework to let users adapt software written for the Daisy platform to run on Versio, and there are several user firmwares available.
So although my module is labelled Melotus, it probably isn’t running the Melotus firmware as you read this (since there are others I prefer). Melotus is a granular texturizer that continuously records the input and creates a number of "grains", short snippets that can be played in overlapping fashion, forward or backward. Desmodus is a tail generator reminiscent of a reverb but not focussed on sounding realistic, Electus (my current favourite) is a clocked version of Desmodus, and Imitor is a multi-tap delay. Several more NE firmwares have been released, with still more expected.
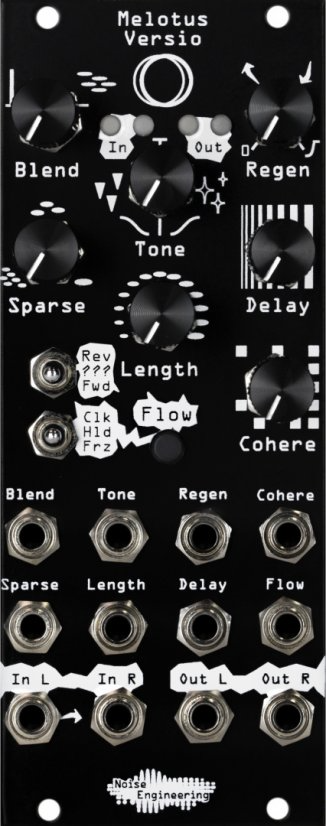
I wrote above that in-rack effects were not a priority for me, because external pedals tend to be of higher quality. There were three things that changed my mind, at least enough to acquire Versio.
One was the ability to swap functionality. Versio is not unique in this respect, but other modules either offer a large number of more conventional effects, or provide a sort of programming platform, which doesn’t appeal to me.
The second was the type of functionality provided. NE have tried to not just duplicate what can be done with other devices, but to use the processing platform as an opportunity for creative exploration. They have a good track record of innovation, and I liked the demos I heard.
Finally, there is the possibility of modulation. I tend to use conventional delays and reverbs in a set-and-forget fashion, but with a more unusual sound processor, modulation might make more sense. On Melotus, for example, one can modulate the number and length of grains. A Versio module has stereo in and out pairs, eight modulation jacks, seven knobs, two three-position switches, and a small push button. External pedals sometimes offer control via MIDI or an expression pedal input that can take CV, but it’s more awkward to set up and use.
3.4.5.8 Happy Nerding FX Aid XL
This module definitely contradicts the design principle I stated earlier. It is a digital in-rack multi-effects unit that doesn’t sound as good as an external effects box or iPad, and doesn’t do anything really special like Versio. But hooking up a good effects box and configuring the ability to monitor it on headphones was often too much fuss, especially when I wanted to work on a single skiff or small pod away from my main music desk. As mentioned above, an in-rack module also makes modulation much easier.
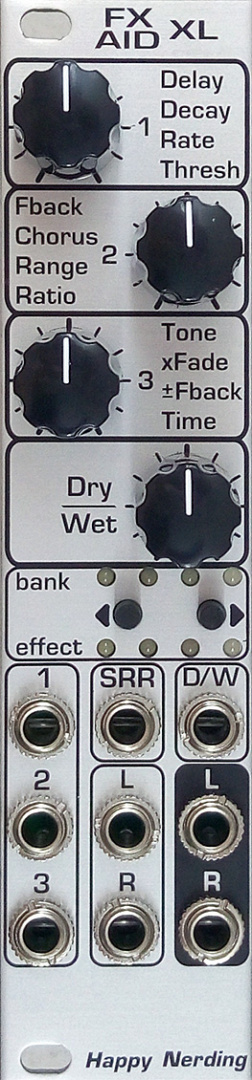
FX Aid XL is only 6hp wide (a good size for swapping), and offers quite a variety of reasonable-sounding effects. (There is a 4hp version with more cramped knobs and only a single assignable CV input, and a 14hp "Pro" version with a screen, two more knobs, and other useful features.)
At the top, there are three knobs for effect parameters and one for dry/wet control. At the bottom, there are stereo pairs of input and output jacks, one jack for CV control of each knob, and one for a sample-rate reduction effect (changing the clock rate). In between are two buttons for effect selection (forward and back), and eight LEDs to indicate which effect is selected.
The module can hold 32 effects, but these are selected from a pool of more than 200, with new ones being added regularly. There is a web page where one can do the selection and get a firmware update file, which is an audio file to be played through one of the jacks to reflash the module. The site also generates a PDF guide to what LED combination indicates each selected effect and what the parameters do.
There are many delays and reverbs to choose from (some emulating famous pedals by manufacturers such as Eventide and Strymon), but also effects like chorus, flangers, phasers, frequency and pitch shifters, and even some percussion. Although only one effect can be used at a time, some effects are combinations (e.g. delay into reverb as a single effect, though with reduced control because the number of parameters is fixed at three).
I don’t expect FX Aid XL to sit in one place in one case. It will be moved around as needed.
3.4.5.9 ADDAC 112 VC Looper and Granular Processor
The Portuguese company ADDAC offers more than seventy modules, each with a three-digit number and brief title (a little like the course offerings at my university). 112 is a large digital module that comes in two parts, connected from behind by two broad ribbon cables. One part contains a screen and a number of knobs, trimmers, buttons, and switches; the other part contains jacks corresponding to nearly every knob, trimmer, or button. With a total width of 45hp, it is the largest module I own, but the design ensures the knobs are well-spaced and minimizes cable interference. The module is thus both highly playable and highly controllable. The manual for the ADDAC 805, described below, is little more than a signal diagram, but the manual for 112 is almost fifty pages long.
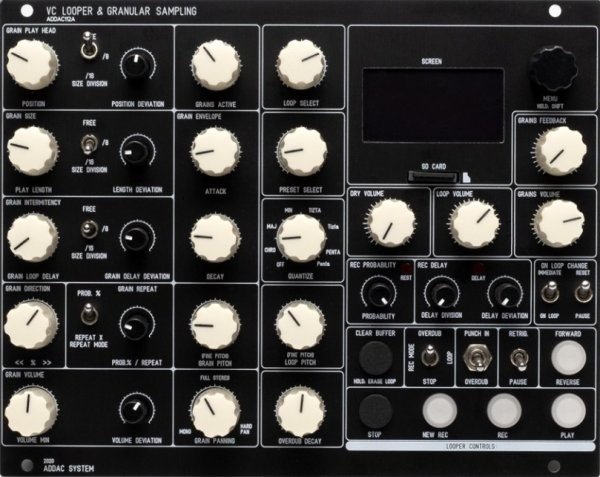
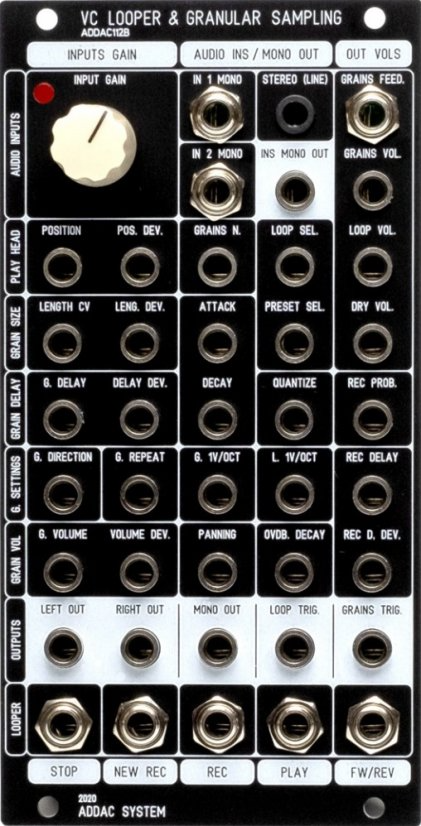
112 has had a chequered history. It was announced in early 2021 but didn’t ship until the middle of the year. The 112 thread on the ModWiggler forum, which I followed from 2022 on, has over a thousand posts, a significant fraction of which are complaints about bugs and crashes. It was an ambitious design to begin with, and ADDAC added more features in firmware updates, even as they corrected issues. Only with the release of firmware 1.8 in late 2023 did I feel that the module had gotten to a point where I could commit to it. It helped that by that point, I was living in the same city where the module was produced, so I could pick it up in person and talk to its creators.
I briefly alluded to the idea of granular processing in the previous section on Melotus Versio. It centres around an audio buffer (stereo in this case). On Melotus, the buffer can be manipulated only indirectly, but 112 makes everything more accessible and centred around this buffer, called the loop buffer. It can either be filled by recording in real time, or loaded from WAV files on an SD storage card accessible just below the screen. The WAV files on the card are arranged into banks. Each bank contains a number of loops and a number of presets. The idea is to keep all the information associated with a bank in fast memory so that one can quickly switch loops and/or presets (using knobs or CV). Because of this requirement, the total size of loops cannot exceed 180 seconds. Loading a bank takes a few seconds.
The loop buffer can be played back in forward or reverse, and the speed can be altered by knob or CV. Normally this alters the pitch (doubling the speed raises all pitches by one octave) but pitch and speed can be decoupled, though this is computationally intensive and must be used sparingly. A loop editor was added in a firmware update, and this permits non-destructive changing of start and end points, with zooming to find zero-crossings to avoid clicks. The endpoints can be manipulated in real time, though it’s a bit awkward. The sound of the loop is mixed with the live input, and with one other sound source, namely the grains (small snippets of sound) generated from the loop buffer.
With 112, one has precise control over the number of grains, their length (as a function of loop length), their position, their pitch, their direction of play, their repetition, and the delay before a new grain is regenerated. Length, position, repetition, and intermittency can be altered randomly, with the degree of randomness controlled by trimmers on 112 itself. Pitch, of both the loop and grains, can be unquantized, or quantized to one of fourteen scales defined on user-editable files on the SD card.
A loop can be, well, looped, or played like a one-shot sample, or overdubbed with both new live input and generated grains, with control over how much of each is added to existing material (perhaps enough to obliterate it entirely). There is a mode to synchronize playback and recording to an external clock, though at the time of writing there are some issues with it still. A late firmware addition permits grains to be triggered externally. There are also outputs for end-of-loop and start-of-grain triggers, to interact with other modules or for self-patching.
The main source of information is the OLED screen, which is small but really well-designed, with a lot of information displayed in a way that does not overwhelm or make it hard to interpret. Menu diving, using the push encoder, is limited to saving/loading banks, engaging the loop editor, or setting options.
Playing with Melotus, one easily generates a sort of tinkly effect from short grains, or a wash of sound from tiny grains and a frozen buffer. 112 can do the tinkly part to some extent, but it cannot do the wash. This is a deliberate decision: grain size cannot get very small, but it can extend to the entire length of a loop. It is perhaps more accurate to call 112 a microlooper than a granulator. The main points of comparison are not so much Melotus or other granular effects such as Mutable Instruments Beads; rather, they are modules like Make Noise Morphagene (introduced in 2017 as part of the Make Noise Tape and Microsound Machine, and one of the more popular modules on ModularGrid) or Instruō Lubadh/Arbhar (large and expensive looper and granulator modules, respectively). None of these offer the degree of immediate control over so many parameters that 112 does. And the Instruō modules also have bugs and glitches. (Morphagene has weaknesses, like the difficulty of setting pitch change precisely to zero.)
112 allows me to dynamically mix three sources of sound: the main inputs, the loop, and the grains, with control over pitch, position, and duration of the latter two. In my limited experience, I have achieved the best results with prepared samples or asynchronous live-recorded loops, and a modest number of grains, at most six, and not too short. With default settings, I can push things to twelve grains without issues, and by reducing grain sample rate to a quarter of usual, I can get nearly forty-eight grains, though the processor complains unless I raise the intermittency above zero. At that grain level, I can do better with laptop or tablet software. There are switches on 112 to quantize grain position, size, or intermittency to 1/4 or 1/8 of loop length, presumably for drum kits or samples that are precisely one or two bars long. I can do that sort of thing on my Elektron Digitakt, and don’t feel the need to duplicate that functionality in modular. But it’s nice to have the option.
3.4.5.10 Takaab 2LPG
The 2LPG, made by the Thai company Takaab, is small, quite inexpensive, and consumes no power. Its only drawback for me was that it took a few months to arrive by post. It contains two low-pass gates, which act as a limited combination of VCA and VCF. Low-pass gates are an important component of the Buchla west coast sound, and it’s possible to pay more than ten times as much for an LPG module.
Each gate on the 2LPG has an input jack, a CV jack, and a tone selector switch. A gate signal going into the CV jack will create an envelope for the input signal, with a short attack and longer release, and a low-pass filter effect on the release. The tone switch varies the release time and degree of filtering, and has three positions: off, bright, and dull. It adds a nice colour to short, percussive sounds.
![]()
3.4.5.11 Intelljel Bifold
Brenso has a great wavefolding section, but it is hardwired to the yellow oscillator, and has no external input. Bifold provides wavefolding capability to any sound, not only the output of an oscillator, but more complex sounds such as synthesized or sampled percussion.
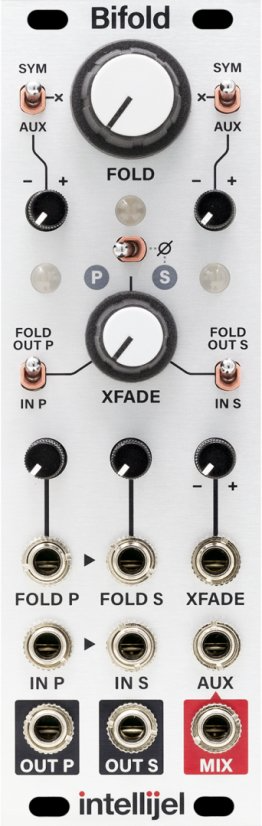
Analog wavefolding is implemented with a circuit called a difference amplifier, which produces the difference of two signals. The original Buchla design set these up in parallel, while the later Serge design used serial routing. Both of these options are present in Bifold, hence the name. It has separate inputs for each (with normalization) and separate outputs, plus a mix output.
The upper large knob controls fold amount (fading to zero at fully counterclockwise, just like Brenso) and the lower one cross-fades the mix output between the two separate outputs. There is, as you might expect, a CV input for cross-fade, with an attenuverter. But since there is only one fold knob and two separate wavefolders, there are also two CV inputs with attenuators for parallel and serial fold, so different amounts of fold are possible. The final input is a general-purpose AUX input.
Two small switches on either side of the cross-fade knob bypass each of the folders, allowing for dry/wet control. Two more three-position switches on either side of the fold knob, with corresponding attenuverters, allow for further configuration. In SYM mode, an offset is added to the input signal before folding. For a symmetric waveform, this breaks symmetry, and allows more variance in the sound. Brenso has a similar arrangement in its wavefolding section. In AUX mode, the AUX input is added to the input signal before folding, and in the third position (labelled X), the input signal is not modified.
One final switch between the large knobs inverts the phase of the serial folder (negating the signal). There is also one final normalization: the AUX input is normalized to the mix output. This is a feedback loop, which can result in instability at certain settings.
The overall design is quite clever, allowing for a wide variety of uses, including ring modulation (using that phase inversion switch) and amplitude modulation. Like Ikarie, Bifold can take a monophonic input and create an interesting stereo signal from it. The combination with Generate 3’s waveshaping and multiple outputs is a powerful one.
3.4.6 Mixers
If you want to listen to a single monophonic signal, it can be duplicated and sent to each ear when you are listening on headphones (the sound will appear to come from the middle of your head). Many modules that provide a pair of inputs for left and right stereo signals will do the duplication by normalling the left channel to the right channel. If you have two different signals, you can put them into left and right channels, but depending on their nature, it might sound strange or unbalanced.
Mixers take two or more signals and combine them in various ways. Sometimes a module will have a specialized mixer built in (for example, the dry/wet mixer in Sarajewo). Modules offering several VCAs or attenuators will sometimes include mixing capabilities. Then there are a number of modules that are primarily mixers. Those intended primarily for audio use will sometimes filter out really slow signals ("AC-coupled"). Those intended for combining CV (they can also be used for audio) will not ("DC-coupled"). Some mixer modules are digital; the ones below are all analog.
3.4.6.1 Doepfer A-138sv
The A-138sv has four mono inputs and two outputs (stereo left and right). Each input has a level knob and a pan knob which controls positioning of the sound in the stereo space. It is simple and highly effective. The module is DC-coupled.
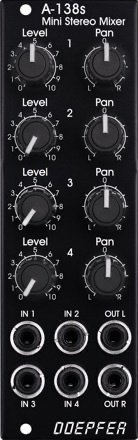
(The "v" in the name stands for "vintage", Doepfer’s curious choice indicating a black panel module. It is also available in the original silver. The difference is purely cosmetic.)
3.4.6.2 knob.farm Hyrlo
Hyrlo, a slender module from the Ukranian company knob.farm, has three stereo input pairs, with a level knob for each, and one stereo output pair. If only the right output is used, it becomes a six-input mono mixer. It is AC-coupled. I use Hyrlo a lot. It doesn’t do anything fancy, but it’s often just what is needed.

3.4.6.3 ADDAC 805.vs2
The 805, second version, from the Portuguese company ADDAC, has a complicated signal path that allows for many configurations. It has three stereo input pairs, one stereo output pair, and a mono sum. Two of the stereo input pairs have separate left and right cross-faders, with a knob and also CV input with attenuverter. The third pair can be mixed in or cross-faded with the result (again with a knob, CV input, and attenuverter). There are a number of small switches controlling routing topology.
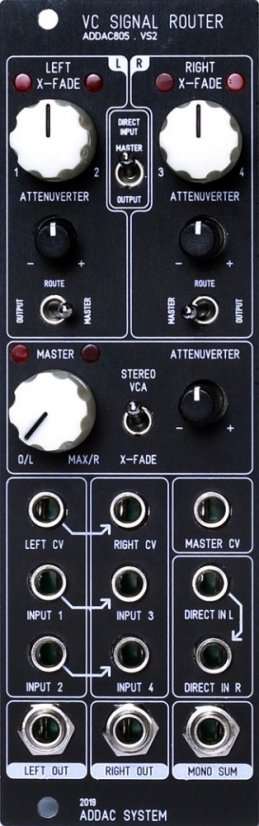
This makes the module highly capable, though a little difficult to use casually or configure on the fly. For example, one can place two mono signals at opposite points in the stereo field and pan them under CV control (if an LFO is used, they will swing out to left and right, then towards each other, and cross in the middle) while mixing in another stereo signal (or cross-fading to it). These animations can add life or complexity to a patch.
The module is DC-coupled.
3.4.6.4 Takaab Nearness
Nearness is based on an open-source design which is simple and elegant. It has nine jacks in a vertical row. The topmost and bottommost are left and right stereo outputs. The other seven jacks distribute their signal in the stereo field according to their distance from the respective output. It is based on an open-source design, and available from several manufacturers. I have the 3hp version, but later on they crammed it into 2hp.
![]()
3.4.7 Interfaces
At the very least, with a Eurorack system, one needs to get some sound to one’s ears, via headphones or speakers. One might also want to bring sound into the rack for processing. Then there is the matter of control signals, coming from or headed to non-Eurorack devices. All of this is complicated by the fact that Eurorack audio signals have greater amplitude than line-level signals or the even-lower instrument-level signals (for example, produced by a guitar without a preamp). Furthermore, few devices create control voltage suitable for Eurorack; more often, they are capable of creating MIDI, digital musical information transmitted over 3.5mm cables or through USB.
Many people want to connect their Eurorack with software running on a computer, perhaps a digital audio workstation (DAW), to potentially have many signals running in both directions. I’m not interested in doing that, so there’s a huge area about which I know very little. I do know that Expert Sleepers make a number of relevant modules, and that DC-coupled audio interfaces play a role.
What I do want to do is: listen to the rack on headphones; connect it to powered speakers; connect it to an external effects pedal (usually at end-of-chain, but with the potential for returning audio to the rack for further processing); connect it to other devices that can run the rack audio through effects and mix it with audio produced by the devices; receive MIDI and convert it to CV; convert CV to MIDI to drive other devices.
The modules in this section will, collectively, do all these things, except for MIDI to CV, for which I have an external solution detailed further below.
3.4.7.1 Befaco Out v3
As I said before, a simple attenuator will reduce Eurorack-level signals to line level, and many other devices can handle hot inputs (for example, my Elektron boxes, or my external mixer). But for safety and convenience, an output module is useful.

Out, made by the Spanish company Befaco, has a pair of Eurorack-level 3.5mm stereo inputs, a pair of line-level stereo 1/4" outputs (TS), a single 1/4" stereo headphone output (TRS), and two separate level knobs for the line and headphone. The line outputs are balanced, which minimizes electrical interference with long cable runs, though I suspect most users will not notice the difference. (These are also required by some equipment, such as the Tascam DR-40x mentioned below.) It also has a single 3.5mm Eurorack-level cue input, and a switch to toggle the headphone output to it. This last feature is handy to audition a sound being designed without repatching. Three LEDs provide a visual indication of signal level for the inputs.
3.4.7.2 ALM Busy Circuits Headphone Out
When I started my third skiff, with the possibility of using it standalone, I needed a way to listen to it away from the other two. The HPO, built by the UK company ALM Busy Circuits, was a small and inexpensive alternative to a second Befaco Out. It’s very thin (2hp), and has a pair of 3.5mm stereo inputs (Eurorack-level TS), one 3.5mm stereo output (TRS), and a volume knob.
![]()
I liked it enough to buy a second one for a second standalone skiff, and then a third. This is the only duplicate module that I own.
3.4.7.3 knob.farm Ferry
Ferry offers send/return capabilities for using external pedal effects in the middle of a Eurorack signal chain. It has a pair of 3.5mm stereo inputs (Eurorack-level TS), a line-level 3.5mm stereo (TRS) send output, a line-level 3.5mm stereo (TRS) return input, and a pair of 3.5mm stereo outputs (Eurorack-level TS).

There is a switch for gain/cross-fade mode, and a knob that correspondingly either controls gain on the inputs or cross-fades between them. Another knob controls the dry/wet mix (original signals / returned signals). A switch puts the unit into mono mode (many pedals have mono inputs) and another switch will boost the return amplification. It is AC-coupled.
I bought Ferry used at a good price, and it is small, so for me it was a sensible way to add useful capabilities. Most devices I use it with take mono 1/4" plugs, so I do have to use adapter cables, but 1/4" jacks would make this module wider. I don’t always use both send and return; using only one gives me handy conversion between line level and Eurorack level in the direction I need.
3.4.7.4 Befaco CV Thing
There are many options available for MIDI to CV conversion, and relatively few in the other direction, CV to MIDI. In part, this is due to demand (there are a lot more MIDI-producing devices out there than there are CV-producing devices) but there is also the inherent difficulty due to CV being continuous and MIDI using discrete messages containing discrete values.
There are several kinds of MIDI message. For example, a MIDI note-on message will contain information about the note value (discrete pitch using the standard Western chromatic scale), velocity (amplitude), and channel number (1-16, for selectivity among receivers). There is a separate note-off message. CC messages allow one to change parameters on the receiving device. The designers of a MIDI-to-CV module must choose how much customization is possible, and how the user can configure it.
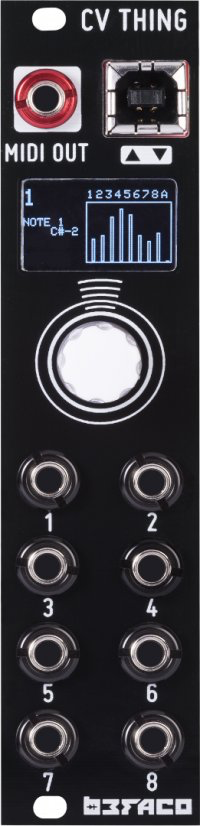
The CV Thing is a cut-down version of Befaco’s CVMC, which has twice as many inputs, and eight buttons and sliders. CV Thing has eight CV inputs, 3.5mm and USB MIDI outputs, and a small screen with push encoder for configuration.
The reason I acquired one is that I have a lot of possible sources of gates and triggers, but for a long time had no dedicated in-rack percussion. I have external devices that can do analog drum synthesis (Analog Four, Digitone, Roland TR-6S) or play samples (Digitakt). These all have their own sequencers, and sometimes it suffices to synchronize clocks and sequence percussion separately. But the rack can produce irregular, modulatable, off-grid gates and pitch sequences, and the CV Thing lets me use those with other devices that accept MIDI.
3.4.7.5 Grayscale Synapse
Synapse, by the American company Grayscale (known for their alternate front panels and open-source clones) is probably the most replaceable module I own. But as it’s discontinued and has a niche audience, I found it used at a very good price.
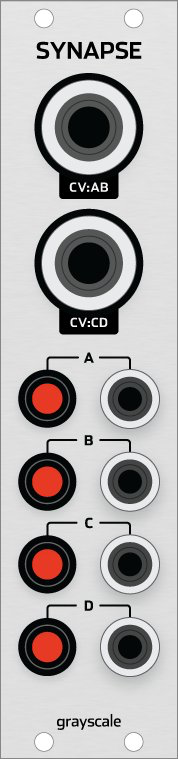
The Elektron Analog Four synthesizer has four CV outputs, but they are available in pairs from two 1/4" TRS jacks. A 1/4" TRS to dual mono 3.5mm TS adapter cable is fairly rare. Synapse provides this capability. The four CV outputs from Synapse are buffered to maintain pitch stability, and there are four LEDs indicating signal levels.
(A used Elektron A4mk1 is one of the best bargains in synthesizers today!)
3.4.8 Sequencers
A sequencer creates a discrete sequence of triggers, gates, or CV sequences (often but not exclusively representing pitch), or synchronized combinations of them. They vary considerably in size, cost, and capabilities. There are sequencers as small as 2hp, or as cheap as $50 US. At the other end of the spectrum are "battleship" sequencers, which, as the name implies, are large, powerful, and expensive. It is possible to spend a lot on a sequencer. The Sequentix Circlon V2 (out of rack, but with CV capability) costs two thousand euros and has a waiting list of several years.
A sequencer is not necessary in a rack. Nearly all acoustic instruments are sequenced by the human brain and body, and a modular synthesizer can be played with a keyboard or just by twisting knobs and pushing buttons. Sequences can be created by scaling and combining clock pulses or square-wave LFOs, or by quantizing more continuous voltage sources.
The sequences produced by a sequencer might be quite short and easily tweaked on the fly, or might be much longer, requiring advance setup and relatively little interference during playing. It is difficult to tell from reviews and demonstration videos just how usable and playable a given sequencer will be, and of course individual taste and capability plays a significant role.
3.4.8.1 Frap Tools Usta
Usta is definitely a battleship sequencer. It is not the largest and most expensive module that Frap Tools makes; those would be the Fumana spectral editor and Cunsa quad resonant filter. But it is still large and expensive. I included a photo of my own personal Usta in the previous chapter, but here is the official image from ModularGrid.
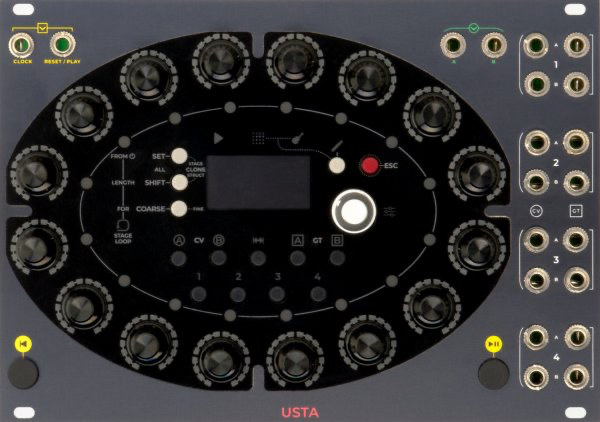
The manual for Usta is forty pages long. Even the "cheat sheet" created by Frap Tools is seven pages long! My short description won’t be able to do justice to all that Usta is capable of, but I hope it will give you some sense of it.
Usta is a digital module whose design was inspired by the late-career Buchla 265e (2004, also digital). The original Buchla and Serge modules are not Eurorack-sized (3U) but in the larger 4U format. More recently, Tiptop Audio and Random*Source have begun to release authorized Buchla and Serge Eurorack modules, respectively, but the full lineups are not available yet.
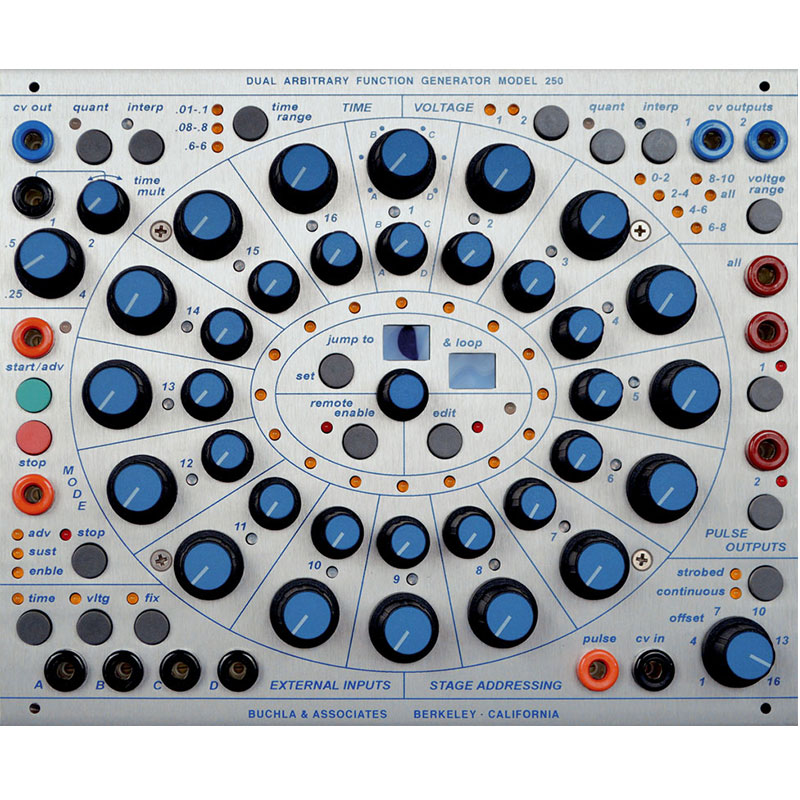
There are all-analog sequencers, but they tend to be more limited in capability. Usta has four independent tracks, each with two CV outputs and two gate outputs. CV can be quantized to one of a large number of scales, or left "raw". There is an external clock input (which can take irregular clock signals) and an internal clock. Tracks can have their own independent BPM using the internal clock, or be set to run at multiples or divisions of a steady external clock.
A track can have one to thirty-two patterns, each pattern consisting of sixteen stages. With many sequencers, a "stage" would be a sixteenth note, but with Usta and a few others, each stage has its own length (which can easily be tweaked on the fly). You can think of a stage as a period during which the CV is constant, though there is an option to have it continuously slide to the next value, or for it to be muted (in which case the previous value is held).
The sixteen push encoders arranged in an oval around the centre screen let one tweak various settings for the stages of a chosen pattern, even as it is playing. One can select the track and output, and then one of several layers holding information about stages. For example, for a CV output, there is a layer for value, one for the probability of a deviation or variation from that value, and one for the variation range. A gate output has these layers as well, but the value can be interpreted as the length of the gate or the number of repetitions or ratchets. A gate can also be muted.
There are a number of editing functions to avoid endless twisting of knobs, such as options to turn one encoder and have it affect many stages, or to do cut-and-paste at various levels. Composition mode lets one can scrub back and forth through a pattern rather than play it all sequentially, and one can enter notes using CV from an external keyboard. Song mode chains selected patterns (with possible repetitions) together. Everything can be saved as a project.
Finally, there are a number of additional performance options, including a dynamic stage loop within the given pattern and a pattern loop within the set of available patterns. One can change patterns at the end of the current stage or at the end of the current pattern, and one can temporarily play another single pattern while in pattern loop or song mode. Interestingly, the number of patterns and their arrangement are independent for each track. This contrasts with Elektron sequencers, where a pattern change affects all tracks simultaneously, and there is a global clock for all tracks. Usta records either the last full pattern played or the last 16 stages (each of which can be unpredictable due to the use of randomization) and these can be saved to a new pattern, if you hear something you like.
The module has two CV inputs, which can be assigned per track to one of several behaviours: shifting pitch, root, gate values, stage values (while preserving rhythmic structure), variation, next pattern, microtiming of a whole track, and indexed pattern change. Most of these take effect at the start of a stage, but pitch shift is continuous, meaning that Usta can quantize external voltage to a scale while running, even if those voltage changes are not synchronized to Usta’s clock.
Usta can be played in simple but rewarding ways without worrying about all the complicated features (this is mostly what I do), but it provides considerable depth to be explored over time or as ambition dictates. The Elektron sequencers remain my gold standard, but there are a few tricks they could learn from Usta.
3.4.9 Modulation Sources
In this rather vague category, I have grouped a number of modules that differ considerably in their function. The common theme is that they provide CV for modulation, though that’s also true for some of the utility modules in the next section.
3.4.9.1 ALM Busy Circuits Pamela’s New Workout
Pam’s, as this module is colloquially known, is another very popular module, both on ModularGrid and in terms of recommendations for purchase. The reasons for this are rapidly discernable. It offers considerable bang for the buck.
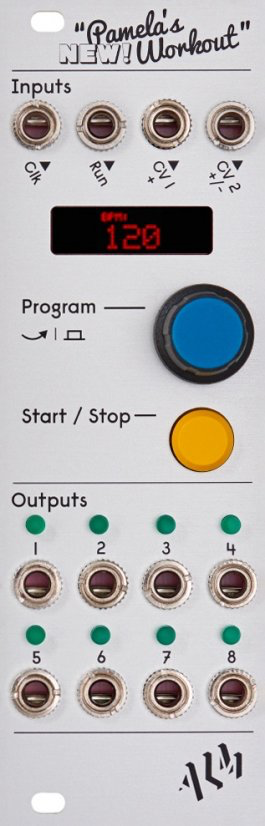
This is a digital module. Its description on ModularGrid includes a number of tags, some of which, like "Envelope Generator" or "Sequencer", are stretching things a bit (there’s no need for exaggeration, it does a lot). At its heart, it can generate a clock signal or synchronize to a regular external clock signal. It then uses those to generate CV on eight outputs. There are also two CV inputs for external modulation.
Each output can operate at an independently selectable multiple or division of the clock rate (it can’t go as high as audio rate). It can provide square/pulse/trigger, sine, and triangle waveforms, as well as exponentially decaying (percussive) envelopes and sampled or continuous random voltages. The level can be set, and there are width and phase parameters. Any output parameter can be assigned one of the two CV inputs, with attenuation and offset.
Firmware upgrades gradually added more capabilities, including Euclidean rhythms (where you can specify a length and number of beats, and the beats are distributed as evenly as possible according to an algorithm based on Euclid’s for computing the greatest common divisor), quantization to a scale, and some basic Boolean logic (for example, only putting out a gate if another output is also doing so). It’s possible to save and recall full configurations.
The module has a small screen, a start/stop button, and a single push encoder for configuration and interaction. I would have liked one more button to improve the user interface, such as ALM added to their most recent MFX module. To configure an output, one has to scroll to it, then long-press for one second to enter its menu. Scroll to a parameter, push to select it, scroll to change it, push to deselect, long-press to go back up to output selection. It’s fine for setting up in advance, but not so easy when one wants to change things up on the fly.
Kudos for this last bullet point in their official description: "Unlikely to actually improve aerobic fitness".
In 2022, ALM announced a new version, called Pamela’s Pro Workout. Incredibly, they still did not include a back button, though they did increase the size of the screen, and upgraded the processor and memory so that more software features could be added. I chose not to upgrade. While Pam’s remains useful to me, and I still recommend it to beginners, I have mostly moved towards using other modules.
3.4.9.2 Bastl Neo Trinity
I mentioned above that I had bought the Bastl Pizza FM digital oscillator primarily for use in my small 64hp Pod case when I didn’t have access to the rest of my modular system. It did well in that role, and since then it has tended to land in places where other large modules cause a space crunch. Most recently, it was next to the Bastl Ikarie filter, which is a good pairing, but the case lacked an envelope generator or VCAs. Pizza has a mode where those are provided, but using it that way limits its flexibility. Ikarie also could use envelopes and LFOs, and the large module limiting the space was the ADDAC 112 looper/granulator, which also has many modulation inputs.
As if reading my mind, Bastl announced the Neo Trinity, another digital module. Initially, I didn’t pay attention, because I had had a bad experience with the original Bastl Trinity module, while using it in a donated rack at the Synth Library Prague (a short distance from where Bastl is located), and because the movie reference annoyed me (and made it much more difficult to use common search tools to learn about it). But a couple of demo videos from people whose opinions I trusted (and who backed up those opinions in their patches) changed my mind.
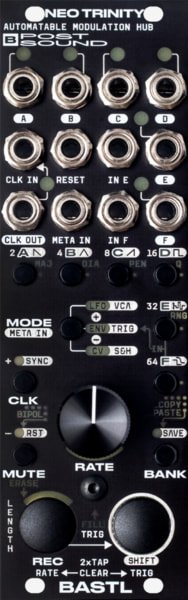
Pam’s above provides eight channels of very useful modulation, but prioritizes logical arrangement over ease of real-time manipulation. Bastl has made a different choice; they have tried to make it easier for Neo Trinity to be playable.
Neo Trinity, like Pizza and Ikarie (and Pam’s), is 8hp wide, and it completes a trilogy with these other two Bastl modules. (Okay, there are other Bastl modules that some might put in a trilogy, but I’m less impressed with them.) That width means that four jacks can fit across one row. But Neo Trinity has six output channels, labelled A through F. So the last two, E and F, have outputs down the right side, not in the same row. At first glance, this seems like the output awkwardness in Pachinko below. But it’s not that bad, because channels E and F are special in that they have their own dedicated CV input to the left of each output, whereas channels A through D must share a CV input ("Meta In"). There is a small button associated with each channel, and these are found below the output jacks, in the same four horizontal and two vertical configuration.
Pizza has a number of modes, notably in the use of the CTRL input, and these must be distinguished by LEDs on the panel that have a different primary purpose, meaning one has to look at the manual if one isn’t using the module regularly enough to have it in mind. On Neo Trinity, there are more buttons with multiple functions, and Bastl has done a decent job of labelling these on the panel, reminiscent of SIG below (though maybe not quite that thorough).
The only knob is at bottom centre, labelled RATE. Its function varies with channel function. There are two large buttons at the bottom. On the right is SHIFT, for secondary functions, and on the left is REC, for recording automation.
Six channels, A through F. The small buttons with those labels focus attention on that channel. A channel can take on one of three primary roles: LFO, envelope, or general CV, chosen by the small MODE button above the RATE knob. There is an internal clock (rate set by knob or tap tempo), but also a jack for external clock (dividers/multipliers available), and each channel can either be synced to the chosen clock or run freely.
In LFO mode, the RATE knob acts as a frequency control, continuous if the channel is running freely, or clock divisions/multiplications if it is synced. The shape of the LFO is selected by one of the A-E buttons together with SHIFT: saw, triangle, ramp, pulse, random. The F button "smooths" each of these. The LFO can be made unipolar (0/5V) or bipolar (-5V/5V).
There are two automation lanes, for the RATE knob and the SHIFT button acting as a trigger source. These can be recorded into by holding down the REC button and twisting or tapping respectively. Parts of the automation can be overdubbed or erased. In LFO mode, the triggers are LFO resets.
In ENV (envelope) mode, buttons A-D select envelope shapes. A is variable decay, C is variable attack, D is variable pulsewidth, and B is like the envelope in VCA mode on Pizza, with fixed attack and decay increaing from 12:00 clockwise, and both attack and decay increasing counterclockwise. While this is not as fully flexible as the function generators described above, it is a reasonable set of choices. Once again, the knob and trigger modulation lanes are available for real-time use. These envelopes can also be triggered by external gates through the CV inputs described below.
In CV mode, it is primarily the automation lanes and CV inputs that drive the output. While it is possible to mix triggers/gates and curves, it probably makes more sense to do one or the other. There are options to quantize the output to various scales, and to use the CV inputs to do inversion, attenuation, sample-and-hold, and VCA duties. Triggers can be quantized to the clock.
This is already a considerable number of modulation possibilities, but Neo Trinity also has a number of built-in trigger patterns (designed for kick, snare, and high-hat, but they can be used for anything), as well as clock multiply/divide, Euclidean, and random on-grid patterns. These work in all three channel modes, and can be overdubbed or selectively erased.
As mentioned above, channels E and F have their own dedicated CV input, while channels A-D share the META IN input. Each channel can be configured to respond to its CV input, or ignore it. There are a number of possibilities for the response: adding to RATE, subtracting from RATE (inverted), each of these with fixed attenuation, a bipolar VCA mode, a trig mode, and a sample-and-hold mode. For these, as with the trigger patterns, one does have to memorize LED combinations (or consult the manual).
Finally, there are six banks in which one can save all settings and quickly recall them.
Neo Trinity has improved the case it is in, from a large module plus a collection of leftovers that would fit, into a fully-featured set of complex possibilities. It was a pretty good investment.
3.4.9.3 u-he CVilization
The German company u-he is well-known for their software synthesizers and effects. CVilization is their first Eurorack module, in fact, their first hardware of any kind. Not surprisingly, it’s a digital module, but it also defies categorization. Their design meetings must have been great fun. There are four modes, each of which implements functionality found in another class of modules, but always with a twist.
I came across CVilization while looking for a quantizer that could round two or more channels of CV not originally designed for pitch (for example, from an LFO) into a musical scale. Usta and Pam’s can do this, but they only have two CV inputs, and it’s a waste of their full capabilities. It’s pretty simple to use CVilization as a quad quantizer, but it can do a lot more, including some things I found quite promising.
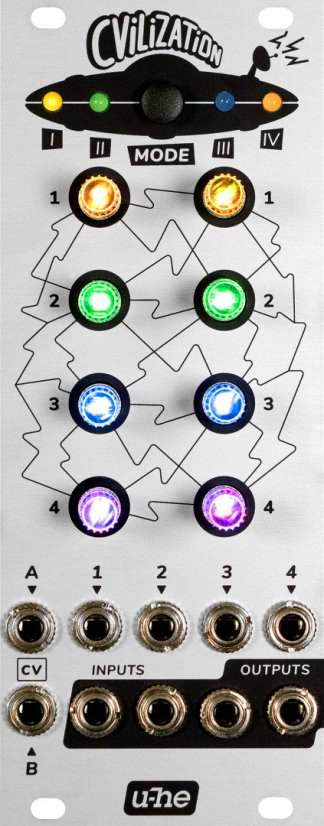
There are four main inputs and four outputs. There are also two CV inputs. A button at the top selects among the four modes. Between them are eight push encoders with multicoloured LEDs beneath them. Crucially, there is no screen. Configuration and use is managed by LED colours, flashing, and slow "breathing". A training period is definitely needed, and even the supplied "cheat sheet" should be kept at close hand.
The first mode is "matrix mixer". Traditionally, this is a 4 x 4 grid of knobs, with four inputs at the left edge, and four outputs at the bottom edge, like a two-dimensional matrix in mathematics. The four knobs above an output mix into it the four inputs. There are a lot of uses for this, for both audio and CV (though it’s probably not wise to mix the two much) which I’ll leave to your imagination.
But CVilization doesn’t have sixteen knobs. The way it works is: push a left encoder, representing an input. Then the right four encoders control how much of that input goes to each of the four outputs. Similarly, pushing a right encoder means that the left four encoders control how much of each input goes to that output.
Simple and elegant, but in addition: the outputs can be quantized to various scales (my original motivation), they can be set to sample and hold based on clock fed into a CV input (see the next module for an explanation of that), and there are various other ways they can be configured or affected by the second CV input.
The second mode is "sequential switch". Traditionally, this is one input routed round-robin style to multiple outputs when a clock ticks, or multiple inputs, one of which is routed to a single output, again rotating based on clock ticks.
Here, each output is an 8-step sequence with each step chosen from among the four inputs (or a fixed voltage, or random, or skipped entirely). The left encoders will let you stop or pause a sequence; the right encoders will let you live-select an input. The same quantization and sample-and-hold options as for the matrix mixer mode are also available.
The third mode is called "quad mucorder". This is closest to the traditional CV recorder, which can record a CV sequence and play it back. CVilization’s recording is discrete, in that the inputs are sampled at clock ticks (sequence length one to sixteen ticks). But on playback, the sequences can be mutated (randomly or towards an adjacent sequence). The mutation can be reversed, frozen, or saved. Transposition is also possible. This is what sold me on the module, as I’d been looking at other modules that mutated sequences. (Usta can, but not quite like this.)
The fourth mode is "quadraphonic panner". This is an audio-only mode where each input is panned among the four outputs (left encoders for volume, right encoders for position). While home theatre systems have made having more than two speakers common, I don’t have such a setup. But I have only limited panning capability among other modules (only the ADDAC 805 can be wired for some CV control of panning) so it’s possible I could mix this down into stereo in a useful way, perhaps with the Takaab Nearness. But even if I can’t use this mode much, the other modes are definitely useful.
There is, of course, a way to save and load preset configurations.
My description of this module is largely theoretical. While it has worked well for what I’ve used it for, I feel as if I have barely scratched the surface of it. Part of the problem is that, apart from basic matrix mixer mode, the other modes, or advanced options, require looking at the manual to use, and so tend not to come to mind when actively patching. One thing I have noticed, even with basic use, is that the encoders are discrete, that is, they click from one setting to the next, rather than moving continuously. While this facilitates certain uses of the module (such as setting sequence length), it interferes with others. For example, if one adds CV sources in matrix mixer mode and then quantizes the result, one click of an encoder can alter the result more than one can achieve with an analog mixer.
3.4.9.4 Doepfer A-118-2 Noise/Random/S&H/T&H
At first, you wouldn’t think that a noise source would be particularly useful in Eurorack. But it is. If you put it through a bandpass filter, you get a cymbal or hi-hat sound. It’s an important component of the sound of a snare drum. A small amount of noise in modulation can make an interesting difference in sound.

White noise is a mix of all audible frequencies at equal levels. Other distributions are assigned different colours: blue for more concentration of higher frequencies, red for more concentration of lower frequencies. This module provides a white noise output and a coloured noise output affected by two knobs for blue and red levels.
It also uses the coloured noise signal to derive a continuous random voltage and make it available at an output, with knobs for the level and rate of change. Finally, there is a switch to put the unit into one of two modes, and an auxiliary gate input (labelled "clock"). In sample-and-hold mode, when the gate goes high, the continuous random voltage is sampled and held at an output until the next time the gate goes high. In track-and-hold mode, the output follows ("tracks") the random voltage when the gate is high, and freezes (samples) the output at the voltage when the gate goes low, until it goes high again.
The module is purely analog, which means that it has to be turned on and allowed to warm up for several minutes before it works properly. While this is recommended for many other analog modules (including many Frap Tools modules) they usually work more quickly or only change slightly when warm. For this reason, and the fact that I acquired more sources of randomness and noise, this module tends to be unracked recently.
3.4.9.5 Calsynth Pachinko
Pachinko is a narrower panel redesign of the open-source Marbles digital module, originally designed by Mutable Instruments. This one was built by the American company Calsynth. I’ll refer to it as Marbles below, because there are many clones available, and most of what I say applies to all of them.
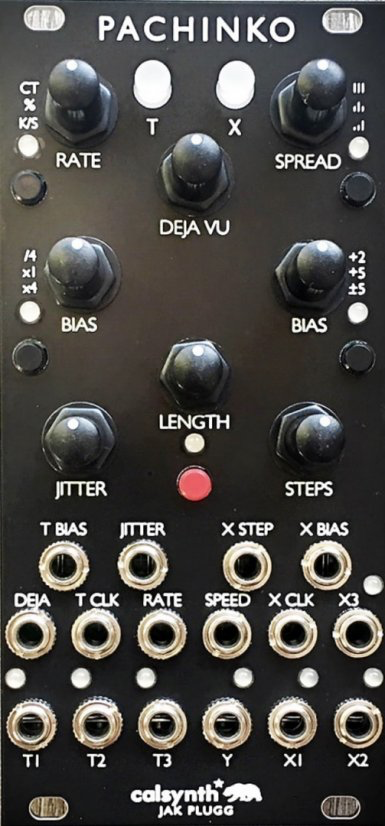
Marbles is at its heart a source of random gate/CV, though it can also add randomization to external signals. On the left side, it has three "t" outputs producing gates. The middle one is regular (though a knob adds humanizing "jitter") and the other two are random but quantized to the same beat. There are a couple of button switches to choose various modes, a rate knob (external clock is also possible), and a bias knob to control probability distributions.
On the right side, it has three "X" outputs producing random CV. These can be quantized to pitches in various scales or parts of scales, or made stepwise linear or smoothly curved, under control of a "steps" knob. Changes on each X output are synchronized with the corresponding t output. That is, t1 and X1 form a random gate/CV pair. The probability distributions on the X side can be controlled with a bias knob and a spread knob, and once again there are a couple of button switches for modes. Finally, there is a Y output for smooth random CV. Some knobs on both sides have corresponding CV inputs for modulation.
Although what I’ve described so far provides controlled random modulation for three separate voices, there is another major component. In the middle of the module are two switches allowing the most recent values on either or both sides to be captured and looped. The "deja vu" knob increases randomization in one direction and permutation in the other, and another knob controls loop length. The intention here is that Marbles be played like an instrument, using bias and spread to alter rhythm and melody, and periodically capturing loops that sound good to riff on them for a while.
For me, Marbles sits in between the simple but limited random sequences provided by Pam’s, and the randomization that can be added to sequences composed on Usta. One issue I have with it is that some of the knobs turn continuously but have functionality that changes at discrete points. It’s hard for me to tell which partial scale I am in, for example. This is aggravated by the smaller Pachinko redesign, which lacks some graphics on the original larger panel. The asymmetry of the arrangement of outputs is also annoying. Nonetheless, the module is pretty easy to use in basic ways, and offers a lot of scope for customization.
3.4.9.6 Clank Chaos
This module is comparable to Marbles and Pam’s in that it provides random but clocked gates and synchronized, possibly pitch-quantized CV, with the option to capture and loop a sequence. But its design is, for me, more usable and offers more scope, even though it doesn’t do everything that those other two do.

Chaos, from the Italian company Clank, provides eight channels of gate and CV. It doesn’t have a screen, but it makes clever use of the row of ten LEDs across the middle of the module to indicate various values. There is a single push encoder, as on Pam’s, but there is no menu diving, and the button combos make sense.
There is optional clock in, but otherwise the first channel serves as internal clock (and there is a steady clock out). The rates of the other channels are multiples or divisions of this rate, as on Pam’s, but without the fractional rates that Pam’s provides. A channel can be selected for observation or parameter changes by rotating the encoder. The six LEDs just above the row of ten indicate the selected channel.
Each gate out has an LED indicator, and the row of ten serves as a discrete VU meter for the CV of the selected channel. Five of the six black buttons at lower right can be held to let the encoder change parameters of the channel: probability of a gate and associated CV change, width of a gate, tempo multiplier/divider, range of CV, lower limit of CV. The sixth button lets one capture and play a loop on the channel. Some modifications to the parameters is possible for a captured loop (for example, lower limit becomes transposition).
The three buttons under the encoder are used for more complex changes: channel settings, quantization/slew, and saving/recalling presets (including captured loops). There are 24 scales defined for quantization. One does have to remember or look up what they are, but it’s easier to light the right number of the row of ten instead of trying to hit a knob position on Marbles. A channel can be quickly reset, copy and paste of settings is possible, and channels can be muted.
There is one CV in, which can be used as a sample source instead of the internal source of randomness, so an existing sequence can be sampled and altered. It can also be used to affect some parameters (for instance, transposition). A loop input will take a gate to capture a loop.
A firmware update added a sequencer mode, in which each note of a captured loop can be edited. As you can imagine, this can take some work, but it’s not hard to quickly correct one off note in a loop.
Finally there is the chaos that gives the module its name. Tapping the encoder without holding a modifier button will randomize all parameters. As you can imagine, this is kind of extreme, so there are ways to tame it for the whole module, on a channel-by-channel basis, or even for individual parameters within a channel. The chaos input takes a gate to automate that encoder tap.
The overall design is pretty impressive, even if a few features are a bit awkward to use. Chaos is the brains for one of my double cases.
3.4.9.7 Frap Tools Sapèl
Sapèl is one of the earliest Frap Tools modules, but it was a fairly late acquisition for me, once I had amassed enough of its siblings to realize how it would integrate with them and provide useful support.
The design phases of Sapèl and Marbles above overlapped, so their designers wouldn’t have known about each other’s work, but each of them took inspiration in different ways from the Buchla 266 Source of Uncertainty (my vote for the best module name of all time), a classic from the 1970s.
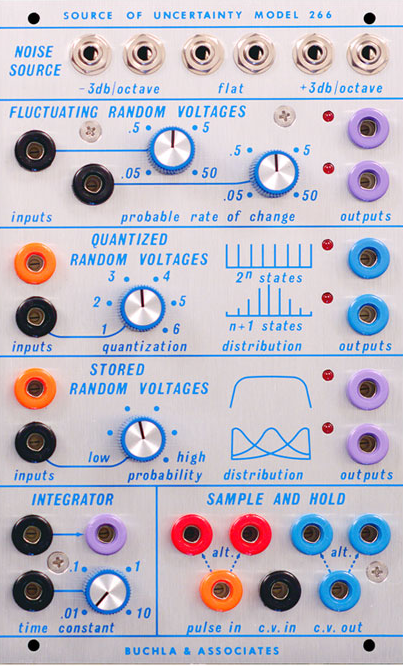
Studying the front panel of the 266 helps understand both the subsequent design of Sapèl and the nature of those inspirations. The bottom two sections are utilities that don’t directly involve randomness. It is the top four sections that are important. At top, sources of coloured noise, as in the Doepfer A-118-2 above; next, two sources of smooth random CV, like the Y output of Marbles. Below that there are two clock inputs which trigger a sample-and-hold on a random source, but there are two different forms of quantization. For a value of n between 1 and 6, the top output will generate one of 2n (two to the power of n) uniformly distributed random values, while the bottom output will generate one of n+1 random values, with a Gaussian ("bell curve") distribution. This should remind you of the X outputs of Marbles. Finally, the fourth section also uses sample-and-hold on a random source, but here one can control the shape of the Gaussian distribution, pushing it towards lower or higher values, as the bias knobs on Marbles do.
Sapèl is closer to 266 than Marbles is, but as with other Frap Tools modules, there are a lot of clever design decisions and nice touches. We see the familiar Frap Tools design elements (primary colours, universal graphics, modest knobs, small trimmers, and tiny switches) and some labels that recall the 266, but things are perhaps less obvious.
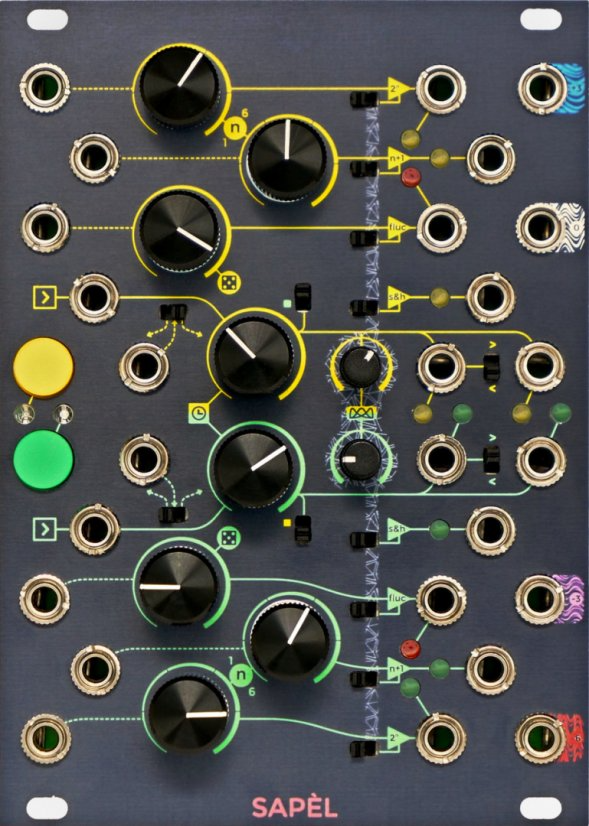
We should immediately deal with the rightmost column of jacks, which are various flavours of coloured noise, labelled with swirly graphics and the slope of the filter used. As with Falistri, the yellow and green sections are identical, so we can focus on one, say the lower green section. The top knob is labelled with a small clock, and this is indeed a tempo control for an internal clock, with the corresponding output jack furthest to the right. But to the left is an input jack (with a > label) that will accept an external clock signal (in which case the knob does nothing). Alternately (selected by the tiny switch in between) that input can be CV that modulates the internal clock rate like the knob.
While the rightmost output jack is a regular clock (or mirror of the possibly irregular input clock), the jack just to its left incorporates randomness. Depending on the position of the switch next to it, it will either remove gates from the clock, or add to it. The distribution of the random subtractions/additions was chosen by the designer for best musical effect.
Moving down, we see a jack for a sampled-and-held random voltage, but there is no separate gate input for this as on the 266, because this is tied to the clock for this section. Next is a jack for a smooth fluctuating random voltage, with a knob (and associated CV jack) controlling the rate of fluctuation. Finally, there are n+1 and 2n outputs, as on the 266. But there are two major differences. First, there is a separate n knob for each, as opposed to a common one. Second, and more important, the quantization to a specific set of discrete random voltages is more restricted on Sapèl. The n+1 output is quantized to whole-number voltages. In V/oct terms, this represents octave jumps. The 2n output is quantized to 1/12V increments, or semitones. For both outputs, the range increases as the knob is turned clockwise, with the precise values specified in the manual. The result is more oriented towards traditional musical tones than on 266, and having a precision adder module (Warna II or T43) nearby provides further possibilities.
There is also a significant difference in design under the hood. 266 uses a pseudo-random shift register technique, with the result that the sequence of quantized voltages will repeat after 63356 samples (one is unlikely to notice this). Sapèl was designed from scratch and does not use this technique; it provides true randomness. Because the sampled thermal noise is used for all outputs, the 2n outputs have a Gaussian distribution, not uniform as on 266. This makes sense given the quantization to semitones. With a five-octave range, a bell-shaped random distribution will sound more musical.
There are some trimmers, buttons, and switches whose purpose remains to be specified. Returning to the clock level, there is a trimmer whose label shows the graphic from the section on 266 that biases the distributions. And indeed, this does the same on Sapèl, but we can choose, by the small switches near each output, whether or not the bias applies to that output. There is another switch near each clock knob. When engaged, this adds the other clock in.
Finally, there is the button on the clock level. You might expect this to provide an additional gate, but it does not. Instead, what it does is freeze the respective clock and the sampled inputs. It thus provides the possibility of interactively pausing the random generation of gates and voltages.
What prompted me to finally acquire Sapèl was the mounting list of features I lacked in my Frap Tools case as it became dominated by modules from this manufacturer: short triggers (needed to ping Brenso and Cunsa), random clocks and V/oct (Usta can provide some randomness, but it takes more work and is less tweakable, and the randomness is uniform), and various colours of noise. I realized that the Frap Tools modules that followed Sapèl were designed with it in mind, and my various substitutes were not as effective. This is another example of how owning multiple modules from the same manufacturer can be a sensible strategy.
Sapèl does require warmup, but unlike the Doepfer A-118-2, it will work right after powering on; however, the various random outputs will not reach their full level of variation until it is warmed up.
3.4.9.8 Stochastic Instruments Stochastic Inspiration Generator
I had Pachinko (above) for only a few weeks before I put myself on the waiting list for the Stochastic Inspiration Generator (SIG), the only product (so far) from Stochastic Instruments (a company consisting of two teachers, a musician and an electrical engineer). I had been following discussion of SIG online, but my frustrations with the user interface of Pachinko convinced me that it would be a useful improvement. It took four months for my name to come up, since SI do not sell through retailers, and they don’t ask for preorder payment or even a deposit.
The wait was worth it. SIG is delightful and very usable. Apart from clock in, it has no CV inputs, and as we’ll see, it is not really set-and-forget; it asks to be played as an instrument.
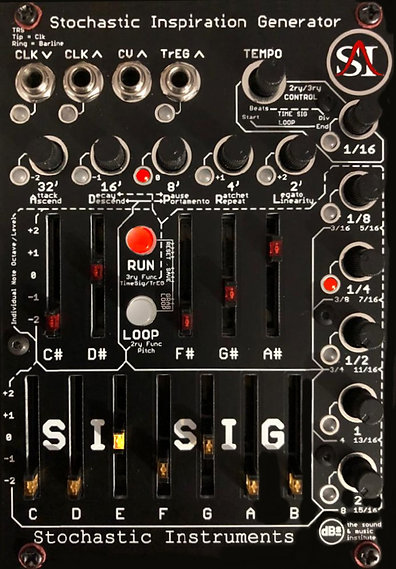

The heart of SIG is the twelve sliders for the twelve semitones of a Western chromatic scale, arranged as on a piano keyboard. These control relative probabilities. If the C slider is pushed halfway up, a C note will be generated on average half the time. The row of knobs at the top of the sliders do the same for octave jumps (the middle knob is no jump) and the column of knobs to the right for note durations.
The Run button starts/stops the generation of notes and triggers (there is an internal clock if no external clock is provided). The Loop button can be used to capture the last 18 note events. The last-captured loop can be played back (with dynamic control over start/end position) but random generation continues in the background, and one can switch between it and the loop, or capture a new loop at any point. This behaviour differs crucially from Marbles, where each use of the looping function captures a new loop, and when one stops playing it, it is lost. But there is no ability to mutate or permute the loop here.
The Run and Loop buttons act as shift buttons for secondary and tertiary functions assigned to the knobs and sliders. An immediate consequence is that their visual state may not represent the settings that the module is using; there are lights on each slider and by each knob to indicate when they are involved in note events. The secondary functions involve scale and pitch. Individual notes can be pitched up or down one or two octaves (which can affect perceived root), portamento and global pause (rest) probability are available, and more durations can be specified, including some dotted ones.
Perhaps the most interesting secondary feature is linearity. This makes it more likely that the next note will be closer to the previous one, creating quasi-melodic runs. Depending on the note probabilities, this could result in the sequence ascending or descending too much, so there are secondary functions to "steer" it if this happens.
The tertiary functions involve the triggers or "TrEGs" as SI styles them, which can be lengthened into gates of full note duration. Individual note volumes are available, and there are functions for setting probabilities of 50% attack or decay segments, as well as ratchets. These aren’t as flexible as a separate envelope generator would be, but they work for some situations. There are additional features involving time signatures and barlines. Finally, a 4hp expander adds three more independent channels, with select/mute buttons (and even more to keep in one’s head or pick out of a set of voices). (The company has now combined the module and expander, and does not sell them separately any more.)
It’s easy to get nice-sounding sequences from SIG using only the primary functions. At this level, it resembles the independently-developed Vermona meloDICER, which is larger (and even harder to obtain), but more loop-oriented. The secondary and tertiary functions, and the expander, offer a great deal of depth and scope, including the possibility of using TrEGs for modulation other than note volume. SIG does require one to listen to what’s going on, and contemplate what to do next. Things can get dissonant or chaotic if one pushes sliders at random without paying attention to at least the basics of music theory (scales, intervals, consonance, harmony). If SIG had been released in quantity by a more well-known manufacturer, or if SI had played the game of giving modules to YouTube personalities to review and hype, it would probably be in much more demand.
3.4.9.9 Stochastic Instruments Stochastic Strange-R Things
Strange-R is the second module from Stochastic Instruments. Like SIG, it is not available through retailers, only from the manufacturer. It has an even denser "manual on the panel", and a longer user manual even heavier on music theory. SIG has a few things I doubt I will ever use (alternate durations, portamento and legato). S-R has many more.
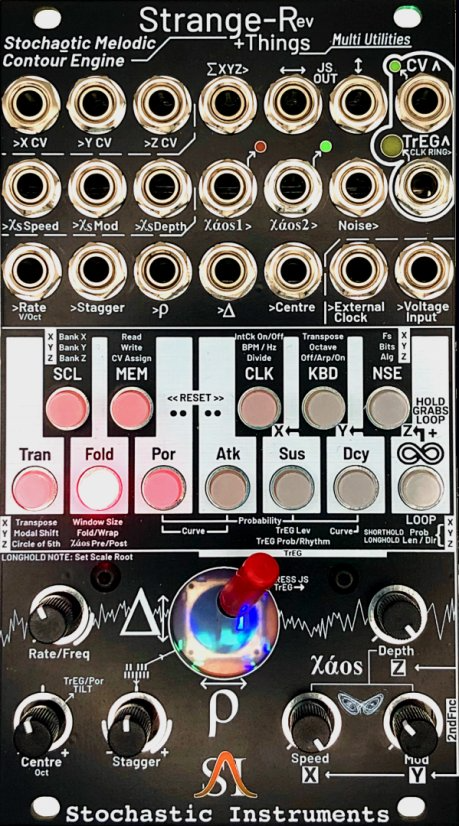
This is the regular 14hp version, but there is an 8hp version for portability in small cases, and the main circuit board can be removed from one and plugged into the other.
One of the nicest things about SIG is the linearity feature, which tames random selection into something a little more melodic. The problem with it is that the implementation is unstable, in that it tends to climb or descend without limit. I usually have a quick transposer (VPME T43) nearby, and use an oscillator with an octave knob (Bastl Pizza) to handle these excesses, while I invoke the tertiary Ascend/Descend functions, not fully explained in the manual, to gradually get things back on track. It can be frustrating.
S-R can be thought of as taking the core of the idea of that feature and designing a whole new module around it. Gone are the individual probabilities on notes that made SIG an attractive alternative to Marbles and other sequencers combining randomization and quantization to a scale. Instead, the module generates a continuous random walk (well, it is digital, so one with very fine resolution) and then quantizes. You get the ability to quickly select predefined scales and to add/subtract from them using the keyboard buttons (or just use those to start from scratch). And, crucially, there is a small joystick to control drift (up/down tendency) and jumpiness (rate of change of the random walk), which responds much faster than the controls on SIG. As a generator of a single melody line, it is an improvement. (There is a mode where the keyboard can be used as a keyboard, with optional arpeggiator, but it’s of course not easy to play!)
There is just one channel of output. The multiple channels on SIG are a real pain to manage, so I’m not sure this is a drawback. The chosen scale cannot be communicated to other modules. SIG has no CV in apart from clock; this module has more, and has an external input that can be used as input to the process instead of the internal random walk. This changes the meaning of parameters like drift, jumpiness, and chaos. It tends to sound good when the input is already quantified to the same scale, but in this case, it’s not clear what the advantage is over running them independently. The developers must have a lot of experience using the two modules together, but so far they have not shared any tips on this.
Besides calling up one of 24 predefined scales, or tapping out one’s own, there are three transformations provided: transposition, modal rotation, circle of fifths. But these only affect the scale, so the change will be subtle unless only a few notes are active. S-R has an internal notion of root note, which can be changed, and changes how modal rotation works. But that (or transposition) cannot be communicated to tune an external oscillator.
There are two possible behaviours of the random walk when it hits an upper or lower limit: wrap around, or reflection (called "fold" in the manual). The distance between the limits, and the position of the centre, can also be affected by panel controls. Wraparound with low jumpiness will produce runs in the same direction; with high jumpiness, they will sound more like arpeggios.
Three different loops can be captured (they differ slightly in what is captured) and the probabilities that each one replays can be adjusted. But what is captured is the underlying "continuous" contour, not the final quantized notes, and during loop playback, this contour can be affected by other panel controls. So you may get something that is similar to a repeating pattern rather than an exact copy.
SI calls the module "stochaotic", a portmanteau of "stochastic" and "chaotic". We’ve been talking about the stochastic part. The chaotic part is an undescribed algorithm that like many other modular implementations of chaos, veers between gentle change and wilder fluctuations, in a manner likely to repeat. The knobs at lower left control the speed, depth, and internal feedback of this chaos (the last one is not really explained and requires experiment). The effect of this is to move the centre of the random walk window. In practice, it feels like only very modest amounts of chaos are musically useful, and it’s unclear how much it adds to the stochastic process.
There are a lot of CV inputs, some dedicated, some assignable. There are two main outputs (and some minor ones), V/oct and the augmented gate idea from SIG called TrEG, which can be an envelope. However, unlike SIG, S-R has no notion of duration other than the clock. The only way, using internal clock, to get a note not to sound is to reduce its probability, or to choose a particular setting where a new TrEG is generated only when the pitch changes. Each of these make it impossible to predict the time of the next note, so the TrEG cannot span the distance; it just uses one clock tick. That makes it less useful than on SIG (also S-R retains the idea from SIG from having each of attack, sustain, and decay, if selected, be of equal size, also not that useful).
Finally, as you can see from the panel, there are primary, secondary and tertiary functions on nearly all of the twelve keyboard buttons, plus some multi-button combos. There is a great deal of functionality packed in here. Of course, these overload the few knobs, and as with SIG, their positions are often not representative of the actual parameter values, because they were moved to set something else. Some design choices are hard to fathom. Why is "stagger" (the ability to bend the clock in rubato-like or Krell-like fashion by playing higher notes closer together, or further apart) given a precious trimmer to itself, rather than made a secondary or tertiary function?
The demo videos show how SIG can be run at audio rates, as an oscillator. This was not a design goal, but something they realized was possible late in development. Unfortunately, the waveforms are either simple (variations of saws, squares, and triangles), or noisy.
It’s possible to easily get a pretty nice sounding melody line out of S-R without much effort. I need to work more with it to learn how to use it with other modules, even SIG. It is possible to save up to seven full states of S-R (every time SIG is powered up, one starts from scratch) and there is a clear procedure for firmware updates, so perhaps there will be some additions or tweaks to improve usability.
3.4.9.10 vpme.de Euclidean Circles and Six Switches
I mentioned that Pam’s offered the possibility of Euclidean rhythms. But the menu structure makes it difficult to tweak on the fly if using more than one channel in this fashion. Euclidean Circles provides immediate controls for three channels, with another three just an encoder long-press away.
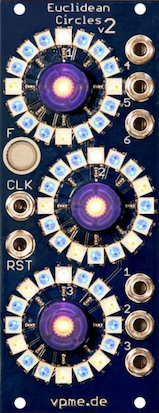
Pressing the encoder for a channel cycles through having it control length (up to 16), fill, and start point, the function indicated by the colour of the encoder LED, and the pattern visualized on the circle. The same interface has to be used for additional functionality. One can save and recall up to sixteen presets (configurations of all six channels). There are a number of settings and alternate modes, for example to "chain" two or three channels to play patterns sequentially, or to let the set steps of one channel clock the next one. Speaking of clock, there is an internal clock, as well as an external clock jack, and a reset jack. The customizable F-button allows for fast access to a chosen feature.
Getting a good deal on this module and its expander was definitely an impetus towards getting my first dedicated drum module (the Quad Drum by the same manufacturer, described above). Before that, I mostly used EC in conjunction with CV Thing to drive external drum machines which don’t offer Euclidean rhythms themselves. Euclidean rhythms can be programmed by hand, but usually such programs can’t be easily changed while improvising.
If you are interested in the algorithm used to compute Euclidean rhythms, there is a discussion of it in section 9.1 of my flânerie FICS.
3.4.9.11 Intellijel Planar 2
In the early 2020’s, there was a worldwide chip shortage, which many people experienced as a shortage of appliances and automobiles. It had a considerable impact on electronic music devices. The COVID pandemic was a contributing factor, but not the only one. Planar 2, along with many other Intellijel modules, was out of stock for quite a while. When retailers received a modest shipment of this module in late 2023, I immediately placed an order.
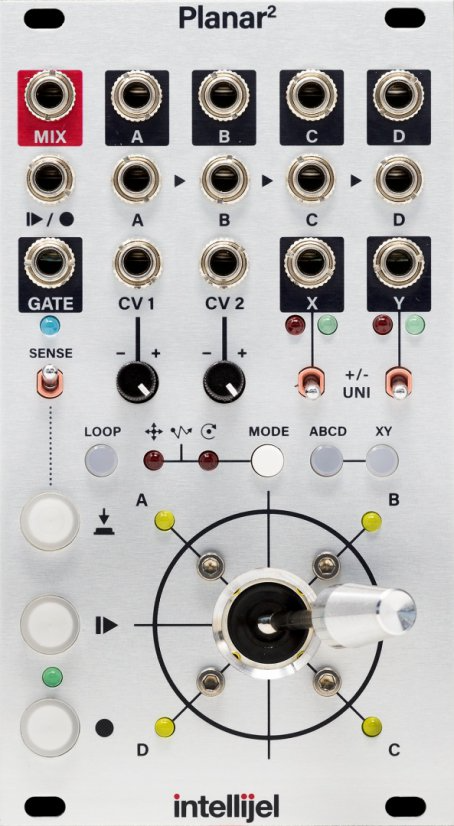
Planar 2 is clearly a joystick, which allows one to generate two dimensions of control signals. The most common way of using one has one dimension left-right (X) and one up-down (Y), and you can see the X and Y outputs marked with black squares on the panel. The switches below let one configure whether the outputs are unipolar (0-10V) or bipolar (-5V to 5V).
Simultaneously, the joystick can generate control signals along the diagonal axes, A-C (top left to bottom right) and B-D (top right to bottom left). Unlike the X-Y signals, there are associated inputs A, B, C, D. Joystick motion will crossfade between A and C, and between B and D, putting the result out on individual outputs and on a single mix output. The letter inputs are normalized to 10V so one can get CV out as with the X-Y outputs.
The documentation calls these "entirely independent sets of outputs", but of course they are not; there are only two degrees of freedom. If X and Y are at maximum, for example, that entirely determines the amounts of A, B, C, D that will be provided. But correlated outputs can still be useful, as long as you understand the correlations (and they’re not mysterious in this case).
There is also a gate output. This can be triggered either by a manual button, or optionally it can be high whenever the joystick is in motion.
At bottom left there are buttons controlling recording and playback. Up to four minutes of joystick motion and gates can be recorded (either manual start or synced to the trigger input) and played back either as a one-shot, looped, or scrubbed through. In the last case, the position is controlled using one of the two CV inputs. These have other uses as well, for example, to simulate circular or spiral motion of the joystick. Recordings can be overdubbed, and on playback, each of XY or ABCD can have the current joystick position override the recording, or be muted entirely.
Planar 2 offers a lot of possibilities for not only spontaneous interaction but design and interaction with complex modulation via the recording features. The one improvement I’d like to see (probably in the next version) is the ability to save the recording. Currently it is volatile and will not survive power-down.
3.4.9.12 Doepfer A-145-4 Quad LFO
Simple and straightforward. Four LFOs, each with square and triangle outputs; four knobs to control frequency; four jumpers on the back to set the range (fast/slow) of the knobs (a jumper is a removable small electrical bridge between two pins on a circuit board).

I used this module a lot in conjunction with the 3xMIA (described below) to attenuate it, or with modules such as Brenso that have attenuverters on their CV inputs. It’s very easy to throw another LFO onto a parameter for more sonic variations. Lately, I will tend to reach first for the larger and more configurable Batumi described below, but I still use the Quad LFO.
The jumpers on the back of the module seem like a nuisance, but take a look at the Pequeño Interruptor in the next section.
3.4.9.13 Xaoc Batumi and Poti
The history of the digital modules with open-source firmware originally developed by Émilie Gillet of Mutable Instruments demonstrates the complexities that can arise when many diverse people get involved. Xaoc Batumi, besides being a very useful module, provides a smaller case study in some of these issues.
Batumi was originally released in 2014. The original firmware was rewritten by Matthias Puech in 2016, under contract (he has since gone on to other collaborations, notably the design of the 4MS Ensemble Oscillator). Puech also wrote an alternate "expert" firmware, which is open-source, and others made their own versions. But the panel design is fixed, requiring some interesting user-interface choices.
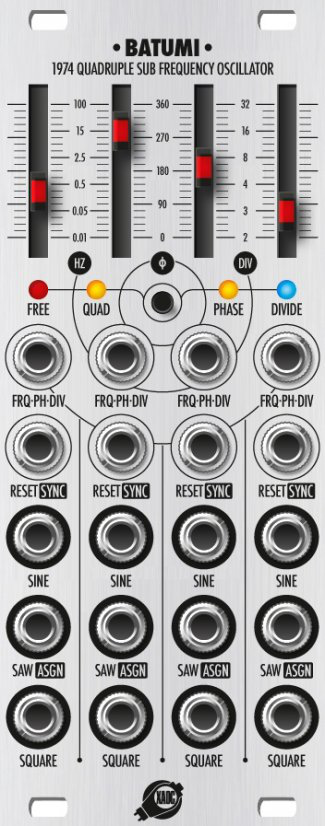
Let’s start with the official 2016 firmware that still ships with the module. Batumi is at heart four LFOs. Each one is controlled by a vertical slider and has a CV input. There is an additional reset input. There are three outputs, for sine, square, and sawtooth waveforms. Jumpers on the back of the module let the sawtooth waveform be replaced by ramp, triangle, or trapezoid. Another jumper turns the reset input into a sync input. The Poti expander provides front-panel switches for these.
What the sliders and CV inputs control depends on the mode. There are four modes, selected by a small button and indicated by four LEDs. The first mode is "free", where the LFOs are not synchronized with each other. In this mode, each slider controls the frequency of its LFO. The wave produced is -5V to 5V; attenuation has to be done externally.
The second mode is "quad", where the frequency is set by the first slider. Each of the remaining three channels uses the same frequency, but with the phase (position of the peak) shifted 90, 180, and 270 degrees respectively. This is useful for modulations that are linked but not coincidental, and there are other modules specifically dedicated to this purpose. The sliders for the other channels control amplitude.
The third mode is "phase", which is like quad, but the sliders control phase instead of amplitude. The fourth mode is "divide", in which the first slider controls the frequency of the first LFO, and the others are at divisions of that frequency set by their sliders. A fixed set of divisions is available: 2, 3, 4, 8, 16, 32. The reset input has different functionality in these last three modes as well.
The "zoom" feature added by Puech gives a clue to the subsequent direction of development. Holding the mode button down for a second makes the sliders into fine tuners. This includes the possibility of divisions in between the fixed set. What happens when one exits zoom mode and the sliders are not where they were? There are a number of possibilities. The value of the parameter controlled by the slider could jump immediately to the new indicated value. It could jump there when the slider is next moved. Or the slider could need to "catch up" by passing through the position of the old value, at which point the value starts changing. This last policy allows for smoother transitions, at the cost of some hunting, and is what the official firmware implements. The four mode LEDs, conveniently positioned below the sliders, blink if the slider position currently does not match its parameter value.
You can see that things become complicated if additional functionality has to reuse the four sliders and the single mode button, with only the four mode LEDs to guide interactions. This pattern continues with the "expert" or "alternate" firmware written by Puech and introduced at the same time as the update to the official firmware in 2016.
The alternate firmware makes three major additions. The first one augments the choices of waveforms to replace the sawtooth with a new set of four (selectable by pressing the mode button for two seconds instead of one). The new waveforms are random (technically pseudo-random, since this is a digital module), and a chaotic waveform called Verhulst’s logistic map, which is sort of in between the regularity of an LFO and full randomness. Chaotic processes exhibit some regularity but also change in unpredictable ways. This can make for a more organic sound when used for modulation. Both random and chaotic waveforms are available in smooth or stepped versions.
Quad mode becomes "new quad" mode, which is quite a change. The first slider controls the frequency of the first channel, and the other three channels are at frequency divisions of 2, 3, 4 (for now), with their sliders controlling amplitude. This sounds like divide mode, but in new quad mode, the outputs behave differently. Each output is the sum of that channel and all channels to the left. Consequently the leftmost output will have the most complex waveform. Summing LFOs with different frequencies to get more complex modulation is often done with utility modules, so it’s nice to be able to do it here.
Finally, the advanced zoom interface gives each slider separate functionality, to be applied to the last channel whose slider was moved (its LED blinks during the two-second press to get into zoom mode). Slider 1 is fine tuning, as before, but slider 2 is now amplitude, slider 3 is CV attenuation, and slider 4 is phase. The exceptions are in quad mode, where slider 2 is division, and phase mode, where slider 4 is division.
The alternate firmware was documented by Puech in a one-page addendum to the manual, typeset in the same style, and the software and addendum were put on Xaoc’s webpage for Batumi. But the company started getting questions and bug reports, and Puech was not a permanent employee. Finally Xaoc pulled down the links, leaving only a vague textual reference to different firmware versions. The materials are still available online, in Xaoc’s GitHub repository. The result is that an owner has to do some Internet detective work to locate them.
Anyone can fork (copy) the GitHub repository and try making their own firmware. Someone whose name I cannot cite (but they appear Japanese, and blog at voltexture.net) produced the "individual wavebank" firmware in 2018. This works like the alternate firmware, but when the random wavebank is selected, one can move a slider to select among the four possibilities (random/chaotic, smooth/stepped) for that channel. A four-second press on the mode button conveniently resets all advanced settings.
I have the individual wavebank firmware installed. The accumulation of new features, in addition to the original already attractive ones, makes Batumi quite powerful, but also potentially confusing. When I need support, I have to consult several sources (the original manual, the addendum, and a "cheat sheet" for the individual wavebank firmware created by a user and posted to the ModWiggler forum).
This somewhat muddled situation is unlikely to change in the current circumstances of chip shortages and pandemic disruption. But Batumi remains a good choice.
3.4.10 Modulation Modifiers and Utilities
It’s harder to get excited about utility modules, compared to oscillators, filters, and sequencers. But utilities are the glue that holds a system together. Some are more general, while others have specific purposes. It’s also harder to choose utility modules, because it may take time to realize the need for one, or the utility of one may not be immediately apparent (besides the bare statement of its technical capabilities).
I have a soft spot for utilities, because they remind me of the small library functions that contribute to the clarity of functional programming. There is overlap with the previous section, but these modules primarily transform CV, rather than create it (though most of them can certainly do creation of various sorts).
3.4.10.1 Xaoc Warna II 1983 Voltage Distributor
I’ve written earlier about the possible need for buffered multiples when duplicating a pitch CV. Even if that level of precision is not needed, an in-rack multiple can be more convenient than a star or stackcable (though that convenience comes at a cost in space, power, and dollars).
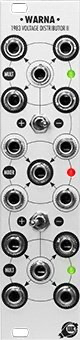
Warna has two 1-to-4 multiples at top and bottom, with the input at the centre and the outputs around it in a circle. A switch inverts the outputs. It also has a 4-to-1 mixer in the centre, with inputs in a circle around the output. One of the outputs from each multiple is normalled to one of the inputs of the mixer. It’s an attractive and functional design. I bought Warna II because the similar Frap Tools 333 was unavailable, but I don’t regret the choice.
3.4.10.2 Doepfer A-160-2 Clock/Trigger Divider
The A-160-2 has a clock input (which can take irregular clock) and seven outputs, which put out gate or trigger signals (selected by a switch) at divided frequencies of the input (for example, half as slow for a divisor of 2). There are three ranges of divisors for the outputs, selected by a switch. The first adds one to each subsequent divisor, so 2, 3, 4, 5, 6, 7, 8. The second is made up of prime numbers, so 2, 3, 5, 7, 11, 13, 17. The third doubles each subsequent divisor, so 2, 4, 8, 16, 32, 64, 128.

The advantage of prime number divisors is that combinations will not repeat as often. For example, divisors of 4 and 6 will repeat the same pattern on those two outputs every 12 clock ticks. But divisors of 5 and 7 will only repeat every 35 clock ticks.
There is a reset input as well. Some configuration options (rising/falling edge, inverted outputs, reset options) are controlled by jumpers on the back of the module. Unfortunately, it’s a bit too noisy to use at audio rate, or it could have been used as a frequency divider, like the one we rigged using Falistri in the subharmonics patch in the last chapter. Some other modules do better.
There are simpler clock dividers with fewer options. The white section at the bottom left of Falistri will divide by 2 and 4. Clock multiplication is more complicated, because it requires a steady clock. More general-purpose modules such as Usta, Pam’s, and Quadrax provide it (notice that all of these are digital), but there are also specialized modules such as the 4MS Shuffling Clock Multiplier.
3.4.10.3 Happy Nerding 3xMIA
3xMIA is in just about every patch I make, unless I’m patching in a case where it isn’t currently located. I have other modules with overlapping functionality, but it’s often easiest to reach for this one.

MIA stands for "Mix, Invert, Attenuate". The layout is identical to 3xVCA; there are three channels, each with two inputs and one output. The two inputs are mixed together at the output, with their levels controlled by two attenuverters with the famous Happy Nerding stacked knobs. If nothing is plugged into an input, it is normalized to an offset. Two switches allow a channel to be mixed into the one below.
There are a number of alternatives, including Frap Tools 321 (below), Mutable Instruments Shades, and Quadrax Triplatt.
3.4.10.4 Klavis Mixwitch
Mixwitch, by the Belgian company Klavis, offers a surprising number of features packed into a small space.
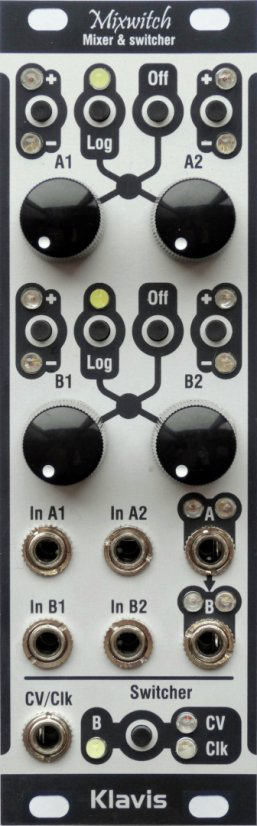
At its heart, there are two 2-to-1 mixers, with the output of the first normalized into the second for 4-1 mixing. As with 3xMIA, there are knobs for levels for each input, and the inputs are normalled to an offset. The difference from 3xMIA is that the knobs on Mixwitch are attenuators, not attenuverters. The inversion is provided by a separate push button.
This design makes it easy to zero out a signal, which is not so easy on 3xMIA, or on other modules like Generate 3, where it is hard to completely eliminate added harmonics. Of course, it’s harder to swoop smoothly through zero, if that’s the effect you want, but that’s the tradeoff.
There are also buttons for clickless muting (it’s easy to mute a signal with an on/off switch, harder to do so without a transient click in the sound) and for changing the scaling of the knob from linear to logarithmic (the latter being the way a volume control typically works, giving a linear reduction in decibels rather than in voltage).
At the bottom is a little section which facilitates the use of Mixwitch as a sequential switch. There are clock and CV inputs, and a button to select mode. In the off mode, this section has no effect, and everything operates as described above.
There is a looping mode, where each clock tick switches the output to the next one of the four inputs in turn. The random mode selects one of the four inputs at random. The CV input can be used to select the input to go to the output (without reference to the clock).
The looping and CV modes can be used with just the two inputs of the B mixer, leaving the A mixer free to operate as above. This opens up a number of possibilities as detailed in the manual. For example, patching nothing to the inputs and using the knobs to vary the offset voltage, we get a four-step sequencer. The switching works at audio rate, so octave subharmonics can be generated, waveforms can be spliced together. The CV control allows for implementation of some comparator and Boolean functions (as described below).
One thing I was warned about before buying this module is that the LEDs are exceptionally bright. So far it hasn’t been a problem with my setup, but some people have used a Sharpie to darken the outer surface of the lights.
3.4.10.5 Joranalogue Select 2
The all-analog Select 2 shares a number of features with 3xMIA and Mixwitch. But it adds a few more capabilities.
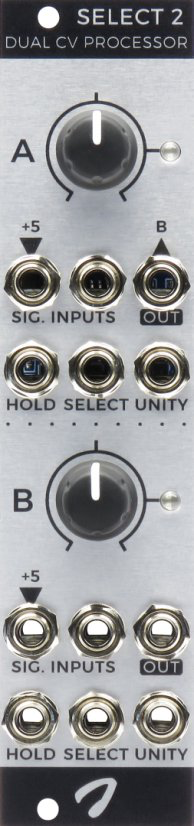
There are two identical sections. Each one has two inputs, the left one being the default, and normalled to an offset. The knob is an attenuvertor. The output of the first section is normalled into the second.
Where it gets interesting, and this is why I bought this module, is that each section has a hold gate. Remember how the Doepfer A-118-2 sampled and held a random voltage? The hold gate does the same thing, but to the input of the section. It is sample-and-hold on an input of your choice, rather than a hardwired random input. There are a number of uses of this, including stabilizing a pitch CV generated by an LFO for the duration of a note, or holding a pitch CV (perhaps dropped an octave or two) across several notes to provide a slower bass or other accompaniment.
There is a select gate, which when high switches to the second input of a section, so a two-input or four-input sequential switch is possible. Finally, there is a "unity gate", which disables the attenuvertor and acts as if it has been turned all the way to the right, to the "unity gain" position.
As with Mixwitch, there are a number of patch ideas in the manual, including ones that put audio rate signals into control inputs. But there are many uses that are not found there. I worked out a number of Boolean logic functions (see Logica XT below), most of which could be done with only one channel (some required two). Select 2 can be used to convert a triangle wave from Falistri (used as an oscillator) into a harmonically-richer saw wave.
3.4.10.6 Frap Tools 321
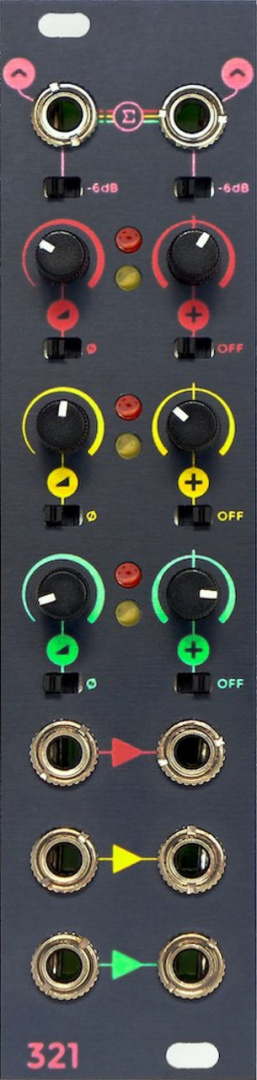
I found myself needing something like 3xMIA in more than one place. Since one of those places was my Frap Tools case, I decided to get 321 instead. It has only three inputs as compared to six on 3xMIA, and small trimmers instead of the concentric knobs on 3xMIA. But there are some compensating factors. Each of the three sections of 321 (one input, one output) has two small switches, one to zero out the scaling factor, and one to zero out the offset. This is difficult to do acccurately on 3xMIA. There are two mix outputs, one of all three section outputs, and the other of the channels whose individual outputs are not already patched. Each of these has a small switch that applies a 6dB signal reduction (that is, cuts the voltage in half).
3.4.10.7 Frap Tools 333
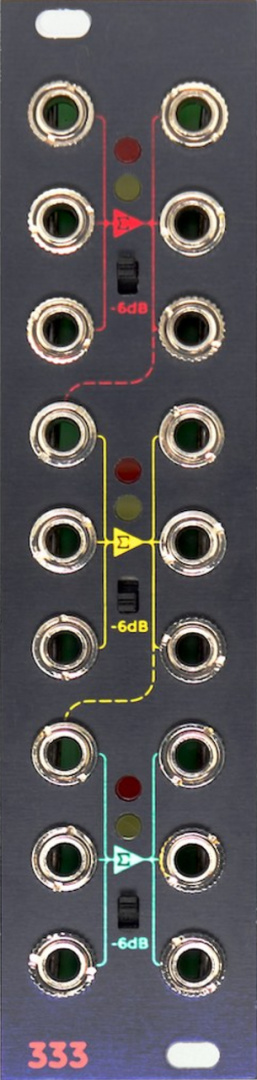
This module resembles Warna in function, but when I acquired Sapèl and put it in the same case as Cunsa, I found that Warna didn’t quite give me what I wanted.
333 is quite simple in design. Each of the three sections has three inputs which are summed and then distributed (multed) to three identical outputs. There is a small switch for each section that applies a 6dB signal reduction.
The situation where this succeeds and Warna fails is when I want to sum the octave and semitone random outputs of each of the two sections of Sapèl, and then distribute each voltage to both a sound source (like Brenso) and one or more filters on Cunsa (for tracking). That requires two precision adders, and Warna only has one.
3.4.10.8 Acid Rain Junction
Junction is another module like 321 or 3xMIA, but smaller and less powerful. I bought it to put next to the Doepfer A-145-4 quad LFO.
![]()
It has four attenuverting channels. Inputs are semi-normalized downward, with the top one semi-normalized to 5V for some offset capability. Outputs are mixed downward if not patched.
3.4.10.9 Klavis Tweakers
Here’s yet another slim module with capabilities similar to the above. I bought it to put next to Pam’s New Workout in a Pod case situation where I had exactly 3hp left, and needed something to combine channels of Pam’s and provide easier tweaking than the single encoder on Pam’s gives.
![]()
There are two channels, each with attenuverter, bipolar offset, and a switch providing polarity inversion or muting. The two inputs and two outputs are semi-normalled as above.
3.4.10.10 Klavis Logica XT
Boolean logic functions are defined on two bi-level inputs (0/1, low/high, 0V/5V) and provide one output of the same type. The AND function, for example, is 1 exactly when both inputs are 1. The OR function is 1 exactly when at least one input is 1. These functions are not only conceptually useful when working with digital signals, but practically important as well, since some of them can be implemented with as few as two transistors, and many integrated circuits are built based on these ideas.

Logica XT, a digital module, provides many of these functions, but defined on three inputs rather than two. The function can be selected by a knob but there is also a CV input to automate this choice. It is a digital module, and packs in some added functionality accessible by an "Xtra" button. The most compelling of the extra functions are gate to trigger, trigger to gate, and merging of possibly overlapping gate sequences into a single trigger sequence. There is also a digital pattern delay with some sample-and-hold capability.
3.4.10.11 Joranalogue Compare 2
A comparator takes an input signal and sets an output gate high exactly when the signal exceeds some threshold. Compare 2, an analog module, takes this idea further by providing window comparators, which work with two thresholds and set an output gate high exactly when the signal is between them.
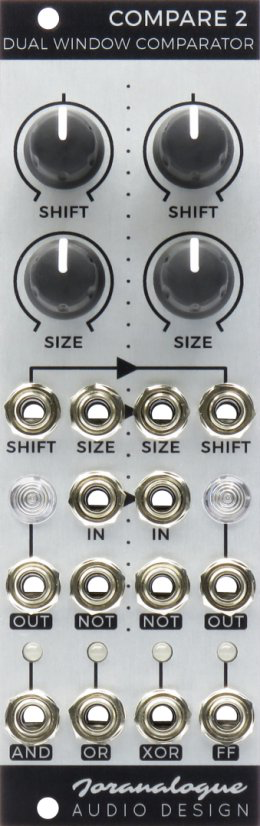
There are two window comparators. The window for each is defined by the shift and range knobs. Shift defines the middle of the window and range its width. CV inputs for these are added to the knob position. Each output gate is available inverted as well. Finally, a logic section at the bottom applies some Boolean logic functions to the two gate outputs.
Compare 2 can implement many of the logic functions that Logica XT provides. However, it is more useful with continuous signals. It can extract interesting rhythms from complex LFOs that can be quickly varied with knob twists or under CV control. One can pull segments from a pitch sequence, or control effects when the sequence falls into a particular range. As with many utilities described here, there are further interesting applications when CV is applied at audio rate.
3.4.10.12 vpme.de T43 precision voltage adder
A precision adder will add voltages, well, precisely. In theory a mixer will do this, but the implementation may not be precise enough if used as pitch. In my limited experience, though Warna above is not advertised as a precision adder, it does a good enough job. But T43 promises it.

If you put two voltages into the A and B inputs, and set all the rest of the switches to their middle positions, they will be summed precisely, that sum available at the SUM output. Does it make sense to sum two pitch sequences? If one is constant, that is a transposition. If one varies in ways likely to be musical, like octave jumps or fifths, it will probably work out. For more intricate sequences, it depends.
Most of the module is dedicated to managing the C output, which is also added into the SUM output. A switch by the C output, which has three positions like all the rest of the switches, controls whether the output is zero, normal (+, to the right), or inverted (-, to the left).
When I first introduced the V/oct standard in the last chapter, I asked, "Where would we get one-twelfth of a volt?", representing a change of one semitone. This is where we can get it. If the switch labelled 1 is switched to its + position, one-twelfth of a volt will appear at the C output, and be added into the sum. This is a transposition of one semitone upward. If we switch it to the - position, that is one semitone downward.
The other switches similarly add, subtract, or withhold multiples of one-twelfth of a volt, or multiple semitones under V/oct. There are switches for 1, 2, 4, one octave (12 semitones), and two octaves. The total range is 43 semitones, about three and a half octaves (and now you can see where the name of the module comes from).
If you want to do unusual transpositions, say from +13 to -7, you do have to do some math in your head, and flip several switches at once across one or two positions (depending on the current configuration, since there are often several ways to achieve the same result). But more usual transpositions (octaves, fifths, major or minor thirds) are easier. You do have to remember how many semitones each of these is (the octave switches are labelled as such).
Usta, and some other sequencers, can do these kinds of transpositions, possibly with self-patching. Some more sophisticated transposers/quantizer modules have a little button keyboard so that one button press will do transpositions up to an octave, or knobs with indents for octaves and semitones. But those are more expensive and larger. T43 offers good value for money.
3.4.10.13 Schenk.work Pequeño Interruptor
This is not really a module. I’ve mentioned above that jumpers are sometimes used on the back of modules as small removable bridges between two pins. This module uses cables that connect jumper pins on other modules (2-pin for on-off or 3-pin for a choice of connections) to switches on the front of the PI. It is only 1hp wide, which works well for me with the odd-width Logica XT.
![]()
I sometimes have it connected to the four jumpers on the back of the Doepfer quad LFO that set the frequency ranges. It can also replace the Poti expander for Batumi (saving 2hp, though harder to use).
3.4.11 Auxiliary External Equipment (0hp)
I mentioned in the Interfaces section above a number of ways that external equipment can be used with Eurorack, but I have a few devices that are primarily used with it. One major way that many Eurorack users interact with their systems is via a keyboard controller that produces CV directly. The most popular of these is probably the Keystep line from the French company Arturia. The basic Arturia Keystep has 25 mini keys and produces one set of pitch-CV, gate, and velocity signals. It can create arpeggios and can store one sequence of up to 64 steps. The larger Keystep Pro has 37 mini keys and four independent sequences with CV outputs for each. I don’t have either of these, though I do have a couple of MIDI keyboard options, in addition to what is listed below.
The devices listed below are small and relatively inexpensive.
3.4.11.1 Korg SQ-1
The Korg SQ-1 was designed as an add-on to Korg’s MS-20 desktop synthesizer. It only costs $100 (even less if you buy it used, as I did). For that, it provides CV and gate for a 16-step sequence, or two parallel 8-step sequences, driven by an internal clock or (possibly irregular) external clock, and powered through USB. You can run the sequence or sequences forward, or have them change direction at either end, or alternate, or pick random steps. Any step can be muted or skipped.
The CV values are set by small knobs and can be quantized to chromatic, C major, or C minor. There is some limited MIDI functionality as well (USB MIDI in/out, 3.5mm MIDI out). This is a nice way to throw in a little bit of melody or stepped modulation without too much fuss.
3.4.11.2 CV.OCD
CV.OCD converts MIDI to CV, the opposite of what CV Thing (described above) does. The same implementation is available in Eurorack form as Hexinverter’s Mutant Brain module, but that costs more and takes up rack space.
I have a number of devices that have sequencers and produce MIDI information, and sometimes I might want to have one of those be the "brains" of a setup. While I could synchronize clocks and use Usta for the in-rack sequencing, sometimes it is more convenient to do everything in one place. I also have a small MIDI keyboard (I would have bought one that produces CV if I’d known I was going to get into Eurorack) and a good keyboard with full-sized keys on the Digitone Keys.
CV.OCD has DIN and 3.5mm MIDI inputs, four CV outputs, and twelve gate outputs. It can be configured by means of a Web editor that generates a SysEx file that is then transmitted to CV.OCD through a MIDI input. SysEx is a standard for transmitting data over MIDI that is used for firmware upgrades, patch descriptions, and other data that doesn’t fit neatly into other MIDI categories.
3.4.11.3 KMI QuNexus Red
The KMI QuNexus is a small (32.5 x 8.4 x 1.1 cm) MIDI/CV keyboard introduced several years ago, but redesigned in red plastic in late 2021 (correcting an unfortunate problem with deteriorating rubber coatings on the earlier black model) and with new firmware adding arpeggiator and sequencer capabilities.
The 25 keys are small rounded rectangles, offering almost no tactile feedback. Although in theory they can provide polyphonic aftertouch (individual key pressure) and even MPE (with left/right and up/down key information), in practice these are limited by the tiny keys. But the unit works well for gate, pitch, and velocity information.
Power and MIDI in is thankfully provided by USB-C, but MIDI out needs an included USB-mini to DIN-5 adapter. The four CV outs require (in pairs) 3.5mm stereo TRS to dual 3.5mm TS adaptors, and the two CV ins (for expression and sustain pedals, and crucially, clock in to synchronize the sequencer and/or arpeggiator with external gear) require an even more obscure 3.5mm TRRS to dual 3.5mm TRS adaptor. KMI sells an accessory pack of useful cables.
Some configuration of the three tracks, each with arpeggiator and 32-step sequencer, is possible via a shift button that assigns a function to each of the 25 keys. More is available via a software editor that runs on a computer. Four presets can be stored (the factory settings provide useful initial configurations).
3.4.11.4 Zoom H1n and Tascam DR-40x
The Zoom H1n is a tiny, light digital recorder. I used it to record most of the sound excerpts posted here. It is powered by two AAA batteries (or USB power), has 3.5mm stereo jacks, stores data on a micro-SD card, and over micro-USB, can act as a USB audio interface or a card reader.
I hadn’t realized just how tiny and light it is. It tends to move around with torque from cable bends, and I have to squint at its screen. Though I don’t use the microphones much, it is hard to operate the unit without picking up hand noise.
So I upgraded to the Tascam DR-40x, which is larger and heavier, so more likely to stay put. The DR-40x also takes 1/4" jacks (but they have to be TRS balanced).
These last two entries are perhaps pushing the boundaries of what might be called auxiliary equipment for Eurorack. They can be used to record anything through their line inputs, built-in microphones, or external microphones. Some people use them as field recorders for sounds that can then be sampled and processed electronically.
3.5 Thought experiment: a boutique case
It’s easy to find modular videos on social media made using small cases, such as the Intellijel palette cases, or the "Pod" cases made by 4ms. Beginners often think that they can start with one of these cases, maybe even copying the exact selection of modules from a video they liked. In reality, nearly all of these videos are made by people choosing a few modules from a much larger selection. What works for the five or ten minutes of a video might not be as interesting over several weeks or months. While one should start with a small number of modules, they should be put into a case large enough to allow for future expansion, and they should be chosen with flexibility in mind.
Prompted by a discussion on the Elektronauts forum in December 2021, I contemplated what modules from my collection I would put into an 84hp case, for someone to use for an afternoon or a few days. Since I had more than 300hp of modules, there were a lot of possible configurations. The original discussion was more wide-ranging, but to make it tractable and not just wild speculation, I decided to restrict the choice to my own collection.
I’ve explained my overall design philosophy above. While I tried not to be wasteful of space (or money) in creating my full Eurorack, I also didn’t buy a lot of tiny modules. Nor do I think one should do so for a small case. They can be difficult to use. A 2hp module is one centimeter wide. Imagine ten of them in a row, with different functionalities, packed into a space about the width of one of your hands.
Although one shouldn’t start with a small case, that doesn’t mean small cases are useless. Some people with larger collections use them to focus and not get lost in possibilities, or to put together a selection for a specific purpose while working with other equipment. A smaller case can be good for travel (see below), for use on the couch, or even while propped up in bed.
Without any digital synth-in-a-box modules, or in-rack effects, I couldn’t hope to design a case specialized for ambient or techno (to name two popular genres). What I could achieve is the scope to make a lot of good sounds, and possibly some great ones with some perseverance. Here is the selection I came up with, along with some reasons for my choices. Just to reiterate: this is not a starter case!
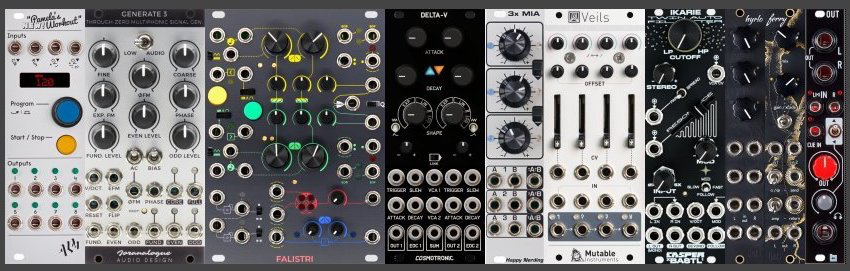
ALM Busy Circuits Pamela’s New Workout (8hp) for clocks, synchronized LFOs, gate sequences, and snappy envelopes. Pam’s does so much that it is the obvious choice for a small case. Although there is a screen and structured menu, it takes about five minutes of instruction or reading the manual to get the hang of the basics, and experimentation will take one a long way towards working out the rest.
Joranalogue Generate 3 (12 hp) as a primary oscillator. I didn’t have a lot of oscillators, and Brenso (30 hp) is clearly too large. At the time of writing, Generate 3 was the only other possibility. There are smaller oscillators out there, and ones that pack in more features for their size. But this is what I had to work with, and it’s not a bad choice. The behaviour of the AC-coupled and bias switches can be a bit mysterious, but if it starts to sputter or stall, it’s easy to get back to stability. It can sound wistful or demonic. There’s a good selection of both inputs and outputs.
Frap Tools Falistri (18 hp) for two function generators (unsynchronized LFOs, envelopes, secondary oscillators). The previous chapter justifies this choice. There is just so much that can be done with Falistri. It’s fairly simple to comprehend in overall structure, and fun to use. Quadrax is smaller (14 hp without the Qx expander) but more complicated to use, and not nearly as much fun.
Cosmotronic Delta-V (10 hp) for envelopes with VCAs and unsynchronized LFOs. Yes, Falistri can provide those (only one VCA, though), but if one wants more than one independent voice in this case, the additional voices will have to come from Falistri.
Happy Nerding 3xMIA (6hp) for, as the name states, mixing, inverting, attenuating. It can work on audio, but would primarily be for modulation CV. Delta-V has no attenuation; Falistri has it on the unipolar outputs but not on the bipolar outputs. Neither provides offsets. The only other possibility here (remember we are working only with modules I owned) would be Joranalogue Select 2, which loses one channel of modulation, but adds sample-and-hold capability and CV-controlled switching, which might also be interesting.
Veils 2020 (10hp) for mixing and VCAs. The mixing is not so important, given what’s coming below, but could still come in handy. But the only other VCAs in the small case are the bipolar one in Falistri and the two in Delta-V. The latter are quite handy, but if one plugs an input into Delta-V, one then loses the ability to access that envelope (only the output of the VCA is available). A separate VCA would let one use the same envelope for volume and some other modulation, such as a filter. Speaking of which...
Bastl Ikarie (8 hp) as a stereo filter. This is just way too much fun, and once again, it rewards experimentation.
knob.farm Hyrlo (4hp) as a stereo mixer. Generate 3 has four audio outputs; Falistri can provide two more sound sources, and Ikarie can take one or two of any of these and produce two or three more. All of these possibilities need to be corralled into a single stereo output (unless we admit the possibility of out-of-rack mixing or processing). Hyrlo is a space-effective way of doing that.
knob.farm Ferry (4hp) for effects send/return. When I made this selection, I only had one in-rack effect (Xaoc Sarajewo), which is too big for a small case. Melotus Versio, which I acquired later, is smaller, but would displace too much. Even if one uses an external delay/reverb pedal as an end-of-chain effect, it is handy to access it via Ferry, as such pedals tend not to have headphone outputs or volume controls.
Befaco Out v3 (4hp) for output, headphones, and the cue input. The only other possibility is the ALM HPO (2hp), and that might allow swapping something above out for something a little larger. But it’s only a 2hp difference, and I didn’t see much I could do with that space.
That concludes our first thought experiment. You might enjoy going over the other modules I have listed above (the number has expanded since I made this selection) and seeing if you would make different choices, or looking on ModularGrid to see if there are others not currently in my collection that you might swap in. But be careful: this activity can be addictive!
3.6 Thought experiment: a teaching case
A post on the ModWiggler forum in 2023 asked for suggestions for a 104hp teaching case. The poster wanted to teach traditional subtractive synthesis at moderate cost. After asking some questions about the intended audience, I came up with the following suggestion, with the caveat that it was somewhat personal and more a source of ideas than a fully polished design.
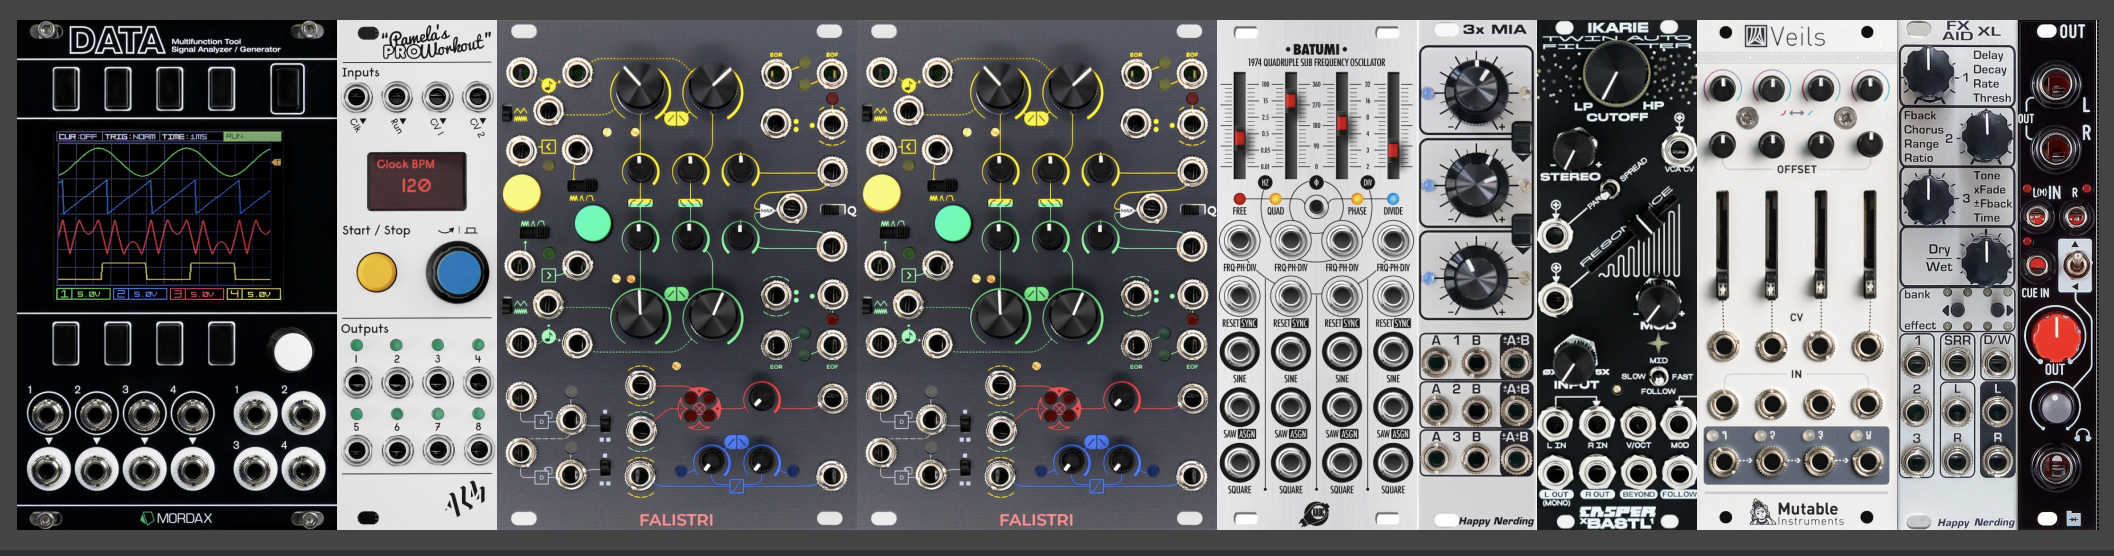
Here is a summary of the reasons I gave for each choice.
Mordax Data:
An oscilloscope is useful for learning about waveforms and debugging CV. There are cheaper scopes, in and out of rack. But Data has a nice bright display, is not too hard to use (some menu-diving), has presets (so a lab can be set up nicely), and has a bunch of additional useful functions (a tuner, constant voltages, dual oscillators for basic waveforms and to press into FM duty). This will help immensely, especially as pass-through is quite easy.
ALM Pam’s:
This was the last addition I made to my design, as I was and am torn about Pam’s. On the one hand, it provides lots of useful functionality in a small package. On the other, it is awkward to use on the fly (because of the long-press to get into and out of channels) and also a bit messy for students just getting started. I chose it to provide clock (and divisions), some basic random quantized V/oct for more variation in sound, and the potential for much more if a student feels inspired.
Frap Tools Falistri x 2:
After a whole chapter using Falistri to teach concepts, I don’t have to justify it here. But two of them? In fact, Frap Tools used two or more Falistris to great effect in their early videos (their Usta introduction video features six Falistris!) before they designed and released the Brenso complex oscillator. Two of them provides four channels of function generation, each of which can be an oscillator, an LFO, or an envelope, and two copies of the handy utilities at the bottom. The original Buchla 281 was a quad function generator.
As a more conventional alternative, I suggested Generate 3 plus Dixie II+ (I wouldn’t suggest this combination for beginners without DATA at hand), plus Delta-V.
Batumi:
Provides very playable LFOs with good visual feedback, making up for Pam’s deficiencies in that respect.
Happy Nerding 3 x MIA:
This rack is probably underweight on utilities, but this one goes a long way, providing playable constant voltages, inversion, attenuversion, and CV mixing.
Bastl Ikarie:
This is a placeholder which may not be right for an actual teaching system. My filters are quirky, except for C4rbn, which is more conventional (but cramped, and discontinued). Ikarie might be too easy to abuse for students, but it is much fun, and the mono to stereo options are interesting. There are many choices for more conventional filters in 8hp or less, for example, the Doepfer A-121-2 (I think the system should have more than just a low-pass filter).
Mutable Veils 2020:
Veils is the most usable and reasonable VCA I know of. The original could be hard to find because MI has ceased production, but Calsynth makes a full-sized clone called Viggen, and there are probably others.
Happy Nerding FX Aid XL:
This is the one module in my design that I didn’t own at the time (I have one now). It’s a sweetener for the sake of the students. Raw sounds can be a little disappointing; a bit of delay and reverb goes a long way. The interface is somewhat awkward, and in demos I find the effects fairly routine. But it can be set up in advance for students. They don’t have to know much about what is happening beyond a prepared handout for what each chosen effect does. Keen students can try modulating the effects.
Befaco Out v3:
The 1/4" outputs could be useful in a lab situation, and the cue output is handy for listening to components of a complex sound without repatching. Otherwise, HPO is half the size.
I would love to be able to teach students using a case like this.
3.7 Design experiment: a travel case
A number of the paragraphs I have written contain some variation on the phrase "I got a good deal", and this is what happened when I acquired a 4ms Pod 64x case, which is 64hp wide, and lighter and shallower than my Tall Dog skiffs.
I originally thought I could just offload some modules, such as Mordax DATA, which were quite useful at times, but which I didn’t use in every session. But I then realized I was heading into a life situation where I would be away from my main modular for at least a few months, and possibly longer. I was planning on taking a few small standalone devices and leaving my large modular cases behind. The Pod purchase let me think about taking a few modules, either in the case or available to be swapped in.
So the parameters of the design were: what modules should be selected to be able to create configurations in a 64hp case? It’s important that among the other devices I planned to take were the Elektron Digitakt, a modest-sized sample-based groovebox which could take stereo input either for sampling (in summed mono) or mixing with its output, and the tiny inexpensive Korg NTS-1, which is basically the digital oscillator and effects from the Korg Minilogue XD, but which in this case could act as a decent portable effects unit.
I came up with a number of possibilities, and even purchased a module (Bastl Pizza, replacing Generate 3) specifically for use in the Pod. Here’s what my base configuration looks like. Once again: this is not a starter case (see the next section for some thoughts on that).
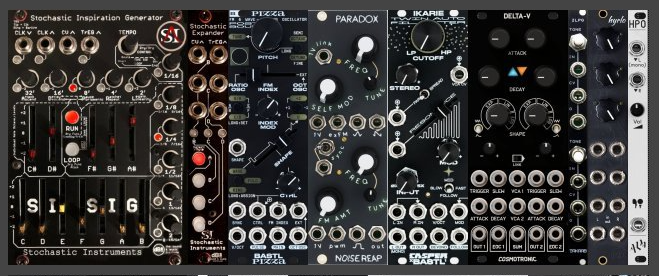
Stochastic Inspiration Generator plus expander (22hp) as the main sequencer. This takes up a third of the space, but provides me with four independent channels of highly configurable random V/oct, gates, and limited envelopes. I could have opted for external sequencing, but nothing else I had would let me hit the ground running.
Bastl Pizza (8hp) for variations on a 2-op FM voice with wavefolding. I bought this module specifically for use in this pod case. Its digital design allows it to be quite small, and ensures stability. It offers a wide range of usable timbres, and I can see it being a rich source of samples for the Digitakt. It could be hard to find enough modulation for it in a small case, or to use all three outputs.
Noise Reap Paradox (8hp) for two independent analog voices, each with some possibilities for internal and external modulation. These will play supporting roles or provide audio-rate modulation.
Bastl Ikarie (8hp), a stereo filter with a great deal of character. It can take one of the simpler voices from Paradox and make something complex of it, or it can process a mix. Knowing that Pizza was developed with it in mind makes it a natural pairing.
Cosmotronic Delta-V (10hp) for envelopes, LFOs, and audio-rate modulation. Its internal VCAs will be important (as will the optional one on Pizza), as I don’t have a dedicated VCA module in this design.
Takaab 2LPG (2hp) will help compensate for some of the limitations of SIG’s envelopes, and provide additional character.
knob.farm Hyrlo (4hp), about the only mixer I have that I can squeeze in, but also one that I really enjoy using.
ALM HPO (2hp), for headphone monitoring and line out (but not both at the same time; fortunately, the devices that would handle that line out all have headphone jacks).
I made the above choices before leaving. The only change I made to the case, from the modules I took along, was to swap Delta-V for the Versio effect processor, running the Electus clocked reverb firmware. That’s the way it stayed for the months before the rest of the modular arrived, and I mostly used it standalone.
3.8 Design experiment: a free virtual starter case
Compelling though the idea of Eurorack may be, the entry cost and complexity of choices can be quite daunting. It’s not uncommon for people to get inspired by seeing a social media video of someone making a few minutes of music with a case like the one in the previous section, and want one of their own. ModularGrid lets them design one, after which some of them post their designs on online forums for comments and advice. One frequent suggestion is to try using VCVRack, which is software that simulates a Eurorack-like experience.
However, this advice requires some caveats which are rarely added. The software is free and easy to install, and the basic installation comes with a good selection of starter modules. The interface is skeumorphic (lifelike), down to the inclusion of screw holes and power headers (though both of these are just for show). One can drag from an output jack on one module to an input jack on another module (or the same one), and a virtual cable can appear. It’s easy to add, remove, and move modules around, and to do the same for cables. Knobs and sliders can be moved by dragging up and down, and more elaborate clicks open up contextual menus. There are ways to get audio and MIDI into and out of VCVRack, so interfacing with other software and hardware is possible.
So what caveats do I think should be voiced? VCVRack was never intended to be a learning stage for Eurorack. It aspires to be an alternative to other forms of synthesis, or at least an equal partner. A library of many more modules is available on the VCV website, but one has to register. Most library modules are free, but some are paid, and there are also "pro" paid upgrades to the software itself. Some library modules were developed by VCV, but most were created by third-party developers.
It is possible to use VCVRack in place of Eurorack, if you are personally satisfied with what it does and how it works. But if you want to use it to inform a decision about whether or not to start working with Eurorack, you must use it carefully in a particular fashion.
It’s too easy to duplicate a module in VCVRack, or add another one, with a few clicks or keystrokes. If you look at posted VCVRack patches, they tend to be large, because someone chasing a particular sound or effect won’t hold back. Polyphony (many voices, as on a piano or electric keyboard) is usually expensive and messy in Eurorack, but VCVRack offers virtual cables that can carry multiple signals, and polyphonic modules to work with them. Adding a physical Eurorack module costs a fair amount of money, and one is always constrained by space and power requirements. Starting out in Eurorack, for most people, means not initially going past something like the small configurations of the sections just above, and probably even smaller than those.
So to use VCVRack to inform a decision about physical Eurorack, one should choose a small number of modules and stick to them for a while, despite how easy it is to add more. I set out to choose a selection of free VCVRack library modules that would simulate a starter case. One thing that helps is that a few manufacturers have generously made available free simulated clones of some of their physical products. (Some also sell paid simulations for less than the physical module would cost.) This is obviously easier with primarily digital modules, but there are many simulations of analog modules as well. I have tried, as much as possible, to use hardware clones.
There’s a link to the configuration file for my selection below, as well as a detailed description and suggestions for alternates. But because access to the library requires registration, I need to explain that. You will also need to follow a slightly complicated process of adding the modules I suggest to your personal selection on the website, then refreshing in VCVRack to make it aware of them, and finally loading the configuration file. If you’re ready, let’s begin.
First, you will need to download and install Rack 2 from the VCV website. There are versions for macOS, Windows, and Linux, and installation is straightforward. There’s a manual for the software, and for the free VCV modules already loaded into the software. If you’ve read everything above and feel confident about trying to design your own starter rack from these, go ahead. Just try to pretend that you are paying a few hundred dollars for each module you install.
If you’d like to use my configuration file, you need to get access to the library where the hardware clones (and many other modules) are. This requires registration on the VCV website. You need to provide an email address to which they will send a validation link, and you need to choose a password.
Once you have registered, you can log in using your email address and password, and you can browse and search in the library. To use my configuration file, you will need to add the following modules to your personal selection on the VCV website. If you find the description of the module, there will be an add button. I will explain more about them below.
Manufacturer: Befaco. Modules: Pony, Rampage, A*B+C.
Manufacturer: Instruō. Modules: I-ō47, øchd.
Manufacturer: Grendel. Module: Quadruple LFO.
Manufacturer: Valley. Module: Plateau.
Manufacturer: BogAudio. Module: Analyzer.
Manufacturer: Audible Instruments. Module: Random Sampler.
Once you have done all this in the website, open the VCVRack software on your computer. It will open with a default patch using many basic VCV modules. Feel free to experiment with this to learn how to use the software. You can recreate it at any point with the "New" option in the File menu.
To make the software aware of the modules you added on the website, look in the Library menu for the item that lets you log in, and then initiate a refresh (if it doesn’t do that already).
Then download the configuration file HWClones.vcv from here, and load it into VCVRack using the Open item in the File menu. You should see something like this.
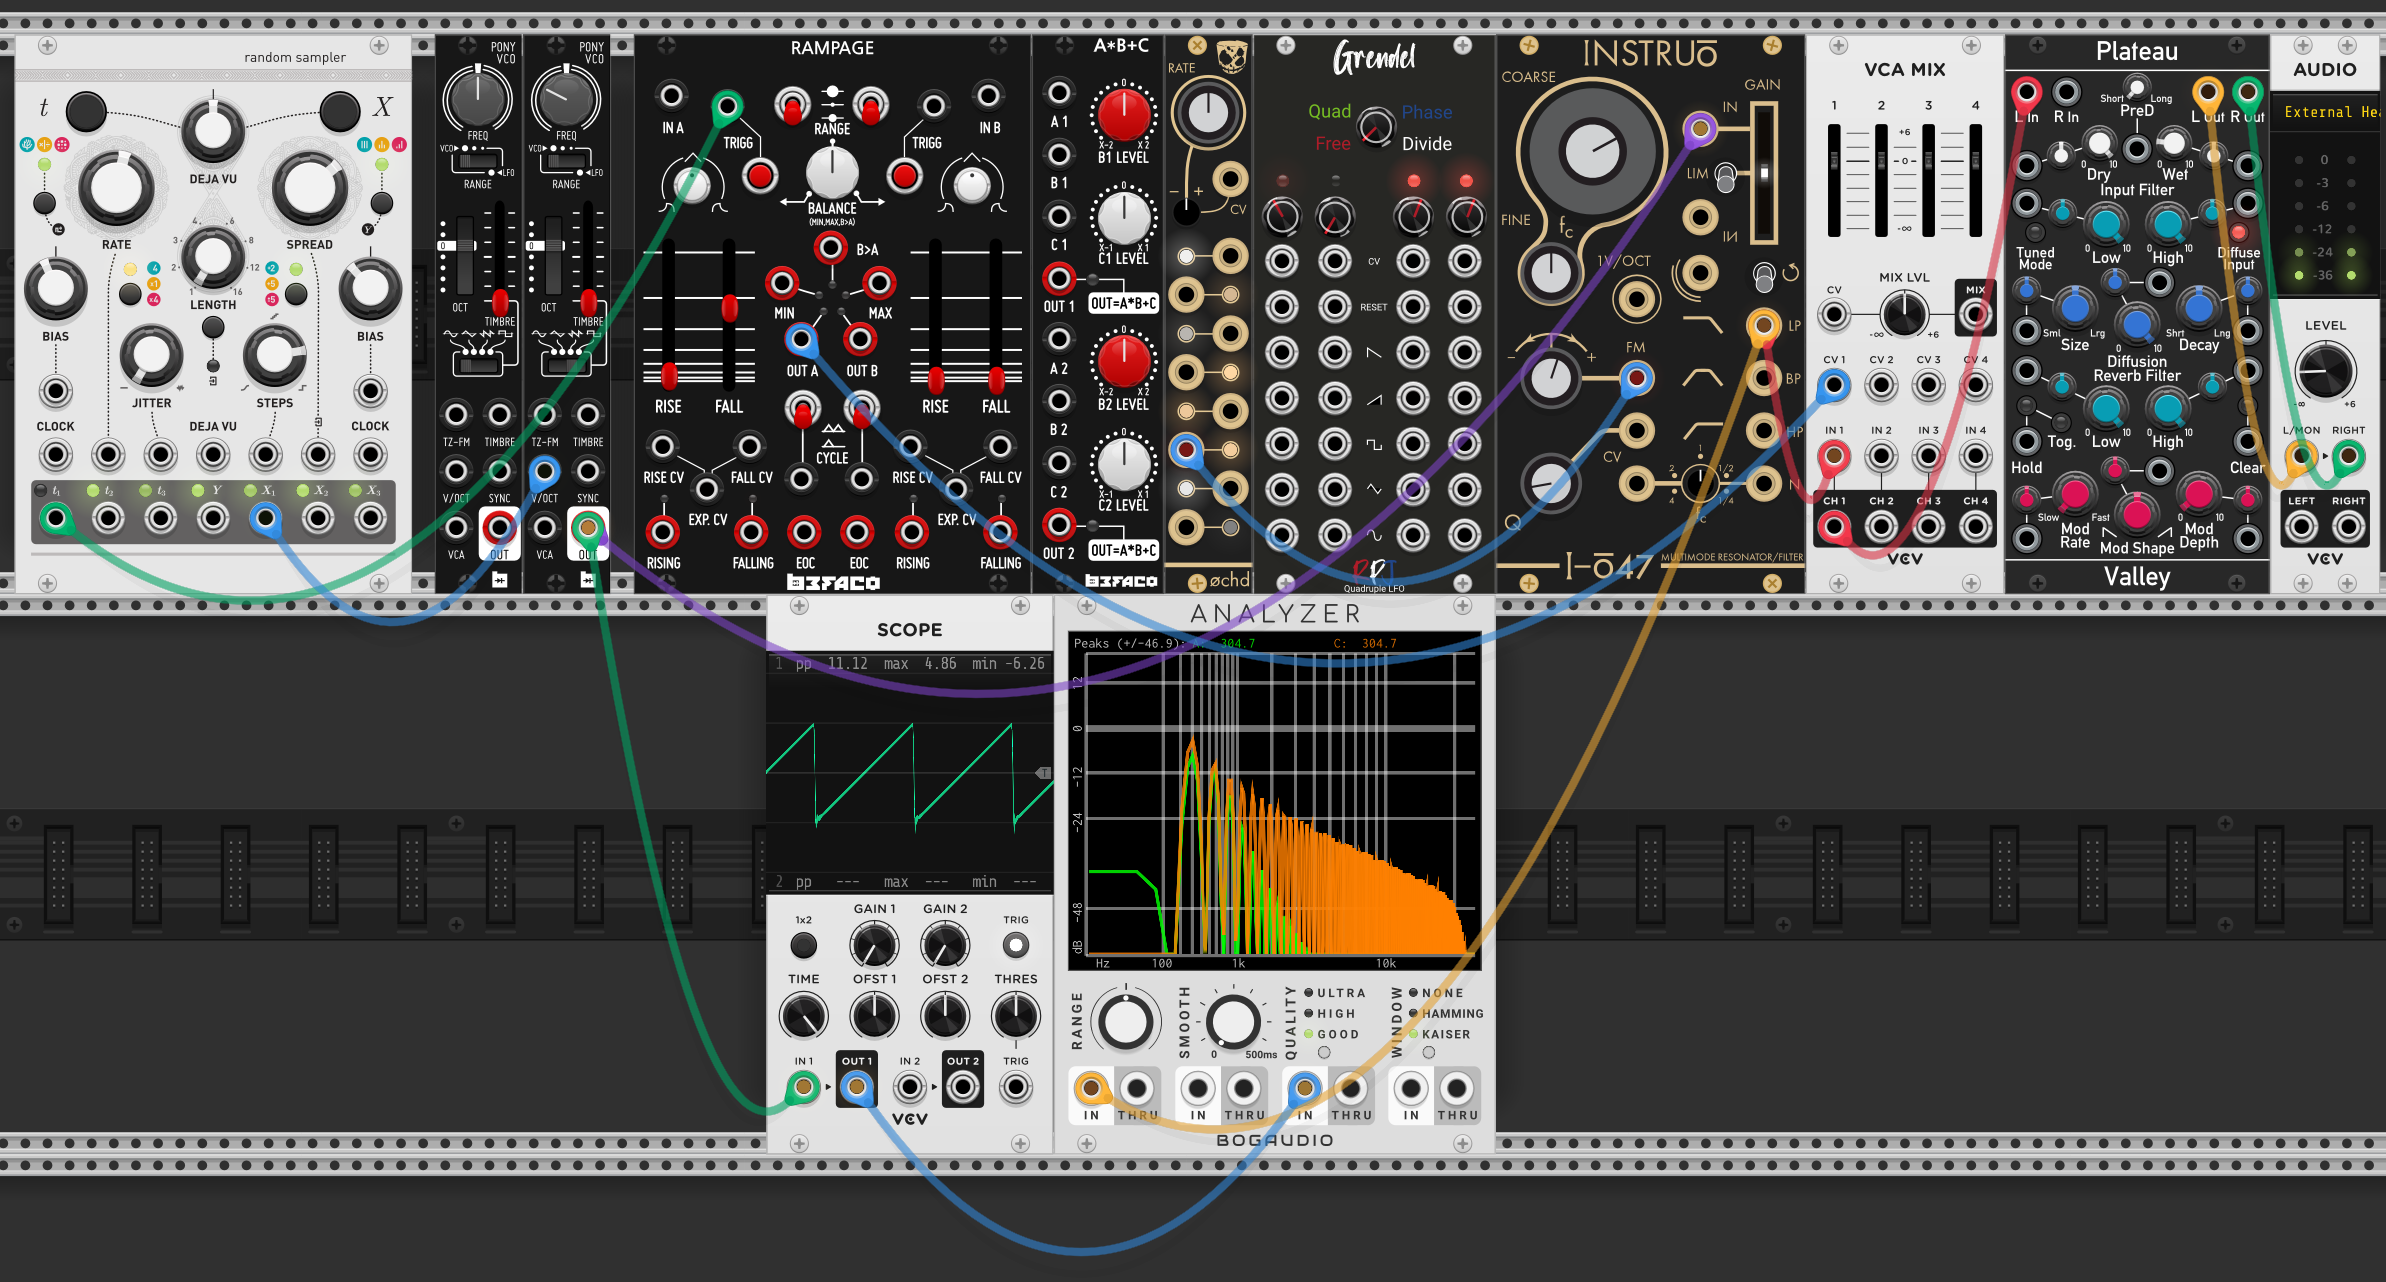
There are two things you will have to do to hear sound. First, click on the top panel of the AUDIO module and choose the sound output. The choices should include whatever you normally use to listen to sound from your computer. Next, turn up the LEVEL knob on the AUDIO module to taste.
Hopefully, what you are hearing is pleasant enough that you can listen to it while you are reading about my choices. I’ll describe the modules from left to right and top before bottom. Each module has a manual link on the VCV website, but these often go to the original manufacturer’s manuals, which vary widely in style and depth.
At the far left is Audible Instruments Random Sampler. The "manufacturer" Audible Instruments is in fact a pseudonym for the use of open-source code from Mutable Instruments, and this is a clone of Marbles (discussed above). This is arguably too complex and modal to be a starter module, but it is here as a sweetener, to be an easy source of quantized V/oct, gate, and CV that can be tweaked to avoid monotony. One can do this with the rate, spread, and bias knobs without getting too deep into complexity. The t2 output is a steady clock affected by the rate knob; the other two t outputs are random gates, and the X outputs produce random CV (possibly quantized to a scale) in sync with the corresponding t output.
An alternative would be to use the basic VCVRack modules RANDOM and QNT for a simpler source of quantized V/oct. Or you could use the module that the "new" template uses to turn the computer keyboard into a source of pitch information.
Next is two copies of Befaco Pony (from the real Spanish manufacturer). This is a slender bread-and-butter VCO with some nice features, including through-zero FM and a wavefolder (the "timbre" slider). Having two of them allows exploration of FM and other audio-rate modulation and constitutes a "complex oscillator" as discussed above. If you’re feeling ambitious, you could replace one of them with Instruō Cš-L or Néoni, and the other with Instruō Tš-L. In the initial patch, I am using only one of them, with V/oct from Random Sampler.
Befaco Rampage is a dual function generator, the nearest free module to Falistri, which I discussed extensively in chapter 2 (and also nearest to the oft-recommended Make Noise Maths). It’s possible to put something simpler in here, such as the basic VCVRack module ADSR which provides a four-stage envelope. But, as with the two copies of Pony, this choice offers a lot of scope for experimentation. In the initial patch, I am using one of the generators for a simple attack-decay envelope, with gates from Random Sampler.
Befaco A*B+C is a utility module that does a lot: two four-quadrant VCAs (such as on the lower part of Falistri) plus offsets, which are capable of attenuation, inversion, and mixing.
The Scottish company Instruō made øchd in collaboration with Ben Wilson (DivKid). It is a set of LFOs with a single rate knob, the LFOs ranging from fastest at the top to slowest at the bottom. One isn’t supposed to worry about the precise rate or ratios.
Grendel isn’t a manufacturer of physical Eurorack, but their Quadruple LFO is a near-clone of Xaoc Batumi, discussed above. This is also a complex module, but it’s pretty easy to use in Free mode, where it provides four independent LFOs, with many independent waveforms available simultaneously, and CV possibilities. QLFO has knobs where Batumi has sliders, but the interaction for these two is the same with a mouse or trackpad, unlike with a physical module. As an alternative, there is a basic VCV LFO module, but it is a bit large and simple compared to hardware LFOs.
There isn’t a lot of choice for free hardware clones that are filters with character. I chose Instruō I-ō47, and in the default patch I am using its lowpass output with a small amount of FM from a slower output of øchd. There’s a lot more one can do with it (don’t forget that a filter can be another voice, via pinging or self-oscillation).
VCA MIX is a VCV Rack 2 basic module, but its design is very similar to Mutable Instruments Veils 2020, a quad VCA described above. One channel is being used to apply the envelope from Rampage (triggered by Random Sampler) to the sound from Pony. The mixing capabilities are not being used in the default patch.
There is also not much choice in free hardware clones of delay/reverb modules. Among the VCV modules, there is a digital delay, but one must pay for the reverb. I have chosen Valley Plateau, which is a reverb that is not a hardware clone, but has a good sound. It has a lot of knobs and jacks (more than would be workable on a physical module), but you can ignore most of them unless you care to go deeper. The dry (original signal) and wet (modified signal) knobs are important, as are the size and decay knobs, which most seriously affect the sound. One of the joys of effects in Eurorack is modulating them, and there are plenty of opportunities here, some of which are available on various physical modules. But the default patch uses no modulation, just a mono signal in from VCV MIX, and a stereo signal out. As an alternative, you can try the basic VCV DELAY, or the Alright Devices Chronoblob 2, a dual delay that is a hardware clone.
The AUDIO module is a basic VCV Rack 2 module. It corresponds to various physical output modules that take Eurorack-level audio signals down to the line levels more common in consumer audio equipment. The default patch sends it the stereo output of Plateau.
On the second rack level, I have placed two modules which approximate what Mordax DATA can do for visualizing signals. The basic VCV module SCOPE is a two-channel oscilloscope (DATA has four channels). The BogAudio Analyzer is a four-channel spectrum analyzer. (DATA can only analyze one of its four channels at a time; its processor is not as powerful as a laptop.) There is a free larger oscilloscope, and a wider analyzer with eight channels, if you wish. The default patch shows the waveform and spectrum of the Pony VCO output and the I-ō47 filter output, so you can see the lowpass rolloff.
This configuration will give you a good sense of what it is like to work with real Eurorack, if you stick with it for a few weeks at least. It’s okay to add new modules, but you should try to roughly preserve the overall size, so if you add something, you should find something to take out to make room for it.
3.9 Where to go from here?
I have been mentioning the Web sites ModularGrid.net and ModWiggler.com. Like many sites that aggregate the thoughts and opinions of many (often pseudonymous) people, they can be a valuable source of information, but also frustrating at times. The Elektronauts forum, though ostensibly aimed at discussion of Elektron products, hosts far-ranging discussions that include many other fixed-architecture synthesizers and even some Eurorack talk. Thanks to strict moderation and a general positive and supportive ethos, it is one of the best places to listen and learn.
If the mathematics behind audio synthesis interests you, my flânerie The Sound of Math (TSOM) uses VCVRack to discuss this topic. It is aimed at students in their first year of university.
I am a great fan of books, but I haven’t really consulted any for my own journey into synthesis and Eurorack (in part because it happened during the global COVID pandemic that closed libraries and restricted travel). Expanding the category to "long-form writing that has been facilitated by professional editors", I should mention the magazines Sound on Sound and Computer Music. Both are still being produced and have back archives accessible online (Computer Music is now part of the larger site MusicRadar). In particular, Sound on Sound hosts a legendary series of over sixty articles by Gordon Reid, called Synth Secrets, which will teach you more than you ever thought you wanted to know about sound synthesis.
At the other end of the scale, I’m also happy to chat with anyone who has read this and found something of value in it, and to take suggestions for improvements and extensions.