Install & Config Tools
There are a number of tools you’ll need installed on your computer to successfully write and test plan definitions. They are:
- Terminal: Built-in; necessary to run the degree audit and testing tools
- SourceTree: Connect with the repository storing all the existing plans; update it with your work.
- Editor: Write the plan definitions
- da-extract-transcript: Extract the transcript of an existing student for testing
- degreeAudit: Perform the degree audit
- da-run-tests: Run a large number of tests
This documentation covers several scenarios:
- Getting started with a provided virtual machine.
- Setting things up without a virtual machine.
- Creating a virtual machine for others to use.
The second and third are very similar and are really the second with notes added for the third.
At the current time we’re macOS only. Not because it won’t work on Windows or Linux but because we don’t have time to research and document more than macOS.
The images, below, are quite small. Click them for a larger version.
Using a provided virtual machine
- Prerequisites:
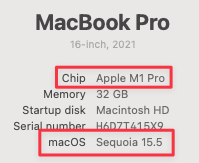 Ensure you have an Apple silicon Mac running Sequoia 15.5 or
higher. Check the Apple menu (upper
left corner of your screen) and choose “About This Mac…” to be sure. Look for “M1” or higher on the first
line and “15.5” or higher on the last line.
Ensure you have an Apple silicon Mac running Sequoia 15.5 or
higher. Check the Apple menu (upper
left corner of your screen) and choose “About This Mac…” to be sure. Look for “M1” or higher on the first
line and “15.5” or higher on the last line.- You need to be able to install software. If your machine is locked down, talk to the administrator to
either let you install software or to install
VirtualBuddy(next step). Depending on how thoroughly it’s locked down, you may also need help moving the virtual machine into VirtualBuddy’s library.
- Go to https://github.com/insidegui/VirtualBuddy/releases/tag/2.0.1. Click the
VirtualBuddy_v2.0.1...dmglink to download the program. - Find it in the downloads folder and double-click. Drag
VirtualBuddy.appto theApplicationsfolder. - Launch VirtualBuddy. It will likely display a window that says “Your Library is Empty”.
- Switch to
Finder.- Choose
Go -> Go to Folder... - Change the folder to
/Users/USERID/LibrarywhereUSERIDis your home folder’s name. Hit the “Enter” key. - Open
Application Supportand thenVirtualBuddy. - Copy the virtual machine image (provided by someone…) into the
VirtualBuddyfolder.
- Choose
- Switching back to
VirtualBuddy, the library window should no longer be empty. Double click theDegAudittile. Then click the triangular “Play” button. You should be shown the login screen. Password isoat3. - Continue with the steps in Common Stuff, below.
Setting up macOS
Set up the VM (if using)
- Open
VirtualBuddyand click the+at the top-right corner. SelectmacOS Sequoiaand thenmacOS 15.5. - Name the machine
degAudit. - In the settings pane, reduce boot disk size to 42G.
- Create a folder on the host’s desktop named
VirtualBuddyShared. In the VM settings, underSharingselect the folder you just created. - Finish the initial machine setup. Set the “Full name”, account name, and password to “oat3”. Uncheck “Allow computer account password to be reset…”. Skip setting up an Apple Account.
- Remove the useless stuff from the Dock – everything but Finder, Safari, and maybe Settings.
- In
Settings -> Wallpaperchoose a non-descript colour (Space Gray?) or image so the VM can be easily differentiated from the host. - The Finder should have a disk named
Guestmounted. Open it and installVirtualBuddyGuestto enable some integrations with the host OS.
Safari (optional)
- Browse to the degree audit documentation. Bookmark
it or set it as the default home page (
Safari -> Settings... -> General -> Set to Current Page). Open new windows with the home page.
Terminal
- This should already be installed. Look in
Applicationsand thenUtilities. Drag the application’s icon to the dock so it’s easy to access later. - Launch
terminal. InTerminal -> Settings... -> Profiles- Change
Shell -> When the shell exitsto “Close if the shell exited cleanly”. - Change
Window -> Window Sizeto 120 x 32. - Close the settings window.
- Change
Create Directories and Environment Variables
Open terminal. Execute the following commands. Particularly for the longer ones, you may want to copy and paste.
cdmkdir -p .oat/keys/private- You’ll need to get a file named
_degAudit.pkcs8from one of the OAT developers. Put it in.oat/keys/private. If you’re setting up a VM, this is probably easiest to do via the shared folder. If you are doing this in a VM, be sure you trust the people you distribute the VM to! mkdir -p oat/binmkdir oat/oat-plandefsecho "export OAT_HOME=/Users/oat3/oat" >> .zshenvecho "export PATH=$PATH:/Users/oat3/oat/bin" >> .zshenvecho "export DEGREE_AUDIT_PLANS=${OAT_HOME}/oat-plandefs" >> .zshenvsource .zshenvcurl https://cs.uwaterloo.ca/~cs-oat/bin/da-download-scripts --output oat/bin/da-download-scriptschmod u=rx oat/bin/*rehashda-download-scriptsrehash
Java
All we need is the run-time, but I can’t find a way to get it installed on a Mac VM. So we install the whole JDK.
- https://download.oracle.com/java/21/latest/jdk-21_macos-aarch64_bin.dmg
- Find it in
Downloads. Open it. Run the installer. - Test your work so far. Go to the terminal and enter
da-extract-transcript 20192274. It should show lots of lines, the last few of which are:
    "component_code" : "LEC",
    "course_grade" : "80",
    "grading_basis_code" : "NUM",
    "earn_credit" : true,
    "include_in_gpa" : true,
    "requirement_designation" : null,
    "student_take_units" : 0.5,
    "attempt_class" : "PASS"
  } ]
}
Editor (VS Code)
- Go to https://code.visualstudio.com. Click the “Download for macOS” button.
- When it’s finished, go to
Downloadsand drag it into theApplicationsfolder. - Find it in
Applicationsand drag it to the dock for easy access later. - Follow instructions to Launch VS Code from the command line. You’ll need to authorize a couple of actions.
- At some point you’ll see a dialog asking “Do you trust the authors of the files in this folder?”. Hopefully you can honestly click the button “Yes, I trust the authors”.
- You’ll also see a “Get started with VS Code” tab. Close it with the X in the tab that says “Welcome” at the top of the window.
- Install the “Compare Folders” extension. Go to “Code -> Settings -> Extensions” and search for “Compare Folders” in the marketplace. Install it. This is useful for comparing actual and expected output of tests and updating expected as necessary.
Python3
SourceTree requires python3. This approach gets it without installing all of the command-line tools. If you’re not using SourceTree, this isn’t needed.
- Visit https://www.python.org/downloads/macos/.
- Click the first “Download” link under “Stable Releases”.
- Find the package in
Downloads; doubleclick to open and install.
SourceTree
SourceTree is a GUI on top of git. If you have other preferences, use them. The URL for the repo itself is https://git.uwaterloo.ca/oat/oat-plandefs.
This is the most complicated one… It’s connecting you to all of the plans that have already been defined and providing the means to add your work to it.
Download SourceTree
- Browse to https://www.sourcetreeapp.com. Click the “Download free” button. Click through several dialogs to download it.
- Open your downloads folder and move the application into your Applications folder. It does not have an installer.
- Find SourceTree in
Applicationsand drag it to the dock.
If you’re preparing a VM, this is the place to stop – before configuring access to the repo with passwords and stuff. If you’re setting up a machine for yourself, continue on with Common Stuff.
Common Stuff
Configure SourceTree
Connect to GitLab
- Go to git.uwaterloo.ca and log in using your UW credentials. You should see “Welcome to GitLab, NAME”.
- An administrator (eg Byron) will need to add you to the project (
Manage -> Members). - After the administrator adds you, you will receive an invitation via email. Click the
link. You will likely need to log into GitLab again. You should then see something like
Clone the Repository
- Wait until you’ve accepted the invitation to the GitLab project.
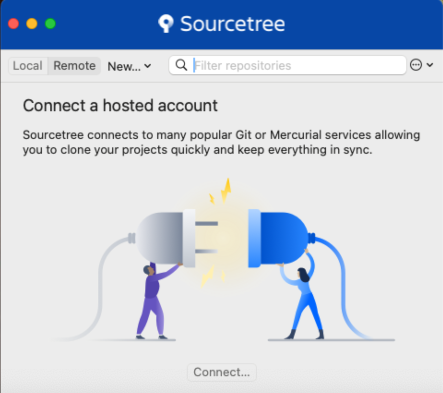
- Launch SourceTree.
- It will invite you to connect to BitBucket. Just click
Continue. - In
Preferences, check “Set global author details” and fill in your name and email address. This is so we can see who made which changes in the plan definitions. - In the following dialog, click “New…” and choose “Clone from URL”.
- A additional dialog will appear:
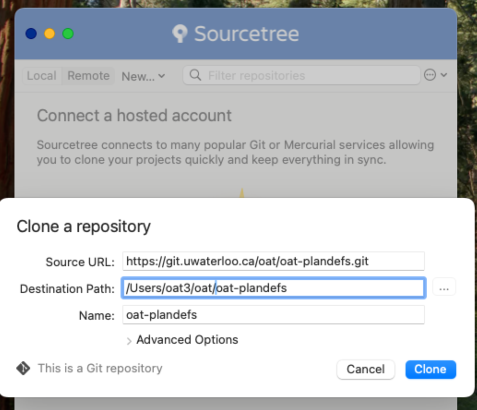
- Fill in:
- Source URL:
https://git.uwaterloo.ca/oat/oat-plandefs.git - Destination Path:
/Users/oat3/oat/ - Name:
oat-plandefs
- Source URL:
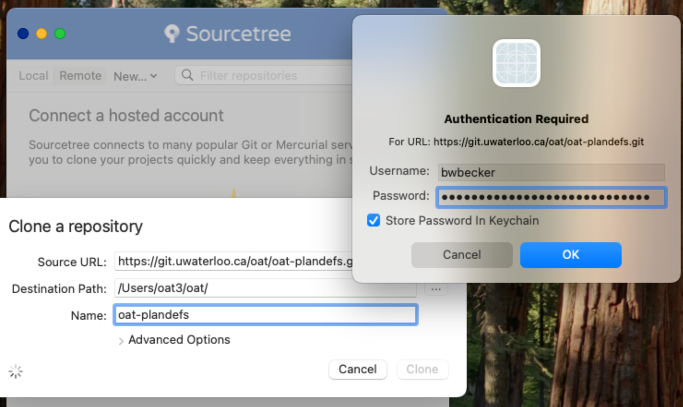 A dialog box asking for authentication details will
have popped up. Fill in your UW credentials. Note that it’s userid/username, NOT email address. Click
A dialog box asking for authentication details will
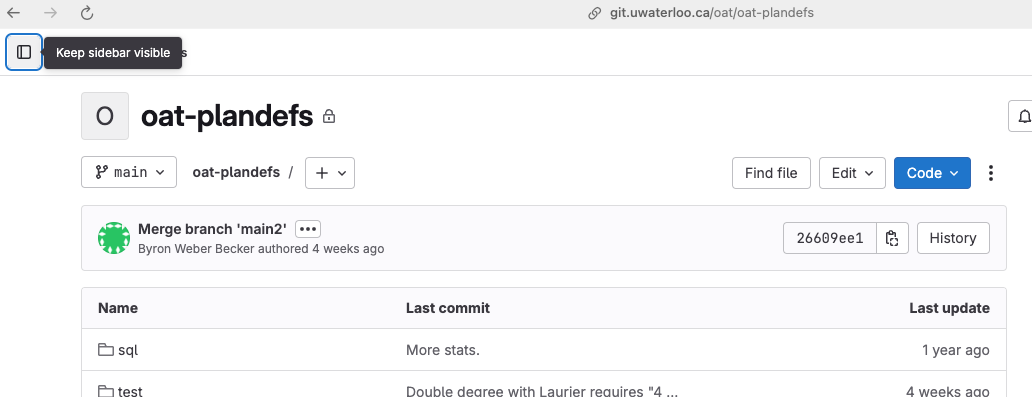
have popped up. Fill in your UW credentials. Note that it’s userid/username, NOT email address. Click OKand thenClone.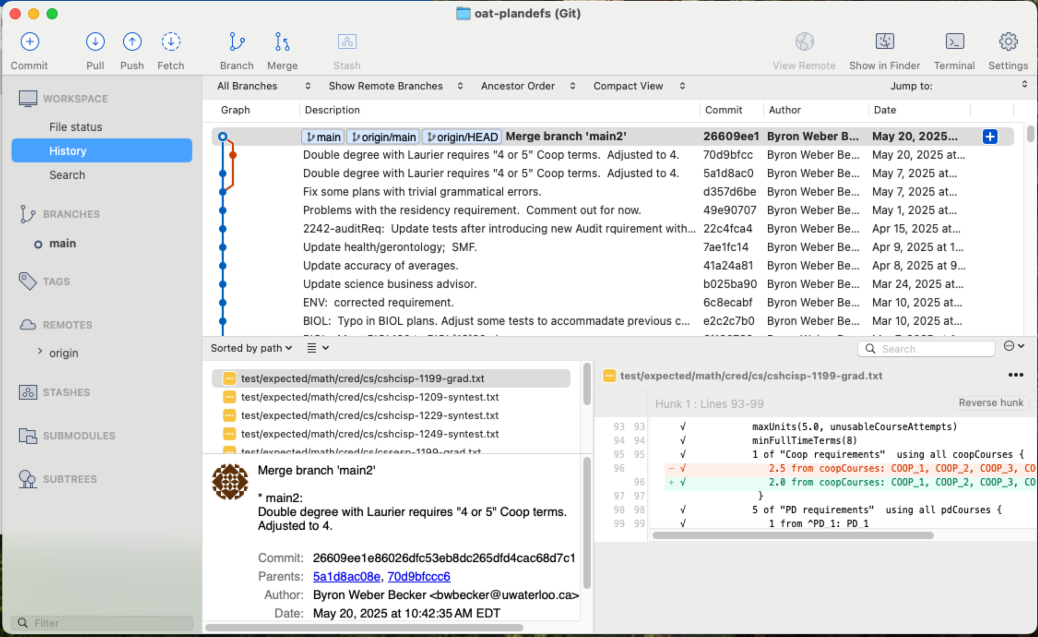 After a brief delay, you should see a window titled “oat-plandefs”. Click the “History” tab on the
left and see the entire history of the degree audit plan definitions!
After a brief delay, you should see a window titled “oat-plandefs”. Click the “History” tab on the
left and see the entire history of the degree audit plan definitions!
Gettng the tools
Download a script with the following command:
curl https://cs.uwaterloo.ca/~cs-oat/bin/da-download-scripts --output ${OAT_HOME}/bin/da-download-scripts
chmod u=rwx ${OAT_HOME}/bin/*
Now execute the script you just downloaded to fetch the rest of the tools. You may need to use the command rehash first.
Addenda
Documentation specifically for the first set of plan writers for while we were hashing this all out.
- Install the “Compare Files” extension in VS Code:
- Open VS Code. In the menus, select “Code -> Settings -> Extensions”.
- Search for “Compare Files”