 Accessing the RAC Home Page
Dell™ Embedded Remote Access/MC User's Guide
This section provides instructions for accessing and using the ERA/MC controller.
 |
NOTE: The terms Web-based remote access interface and Web-based interface may be used interchangeably throughout this section. RAC home page refers to the first screen of the Web-based interface application. |
The ERA/MC controller helps you remotely monitor your system components through a network by using a remote access interface–either the RAC home page or the remote racadm interface. The Web-based interface can be used alone or to extend the system management capabilities of the IT Assistant software. The RAC home page appears in your Web browser window like a normal Web page.
The following sections provide information about accessing a configured controller with the Web-based interface. See "Serial and Remote Racadm Utility Commands" for information about using the remote racadm utility.
You can access the RAC home page through the network through the system management Ethernet connector and IT Assistant or a supported Web browser.
A new window opens and loads the controller Web-based remote access interface.
For more information about using IT Assistant remote access features, see the IT Assistant User's Guide.
The RAC home page appears.
|
NOTE: For more information about using the RAC home page, see the ERA/MC online help. |
You can use the RAC home page to monitor and manage your system, including accessing chassis, server module, and session information, managing controller configurations, and performing remote access functions on the managed system. Figure 3-1 shows a sample RAC home page layout for a user logged in to the ERA/MC controller.
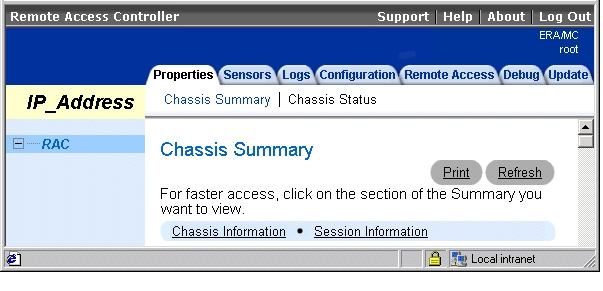
The RAC home page defaults to the Chassis Summary window under the Properties tab.
The RAC home page has three main areas:
|
NOTE: To access the ERA/MC online help, click Help on the RAC home page global navigation bar. |
Additionally, when you are logged in to the RAC home page, the controller, system model, and current user's user name are displayed in the top-right corner of the window.
The RAC home page provides the tabs listed in Table 3-1. Each tab links to a new window.
Some of the RAC home page tabs use status indicator icons (Table 3-2) to graphically represent the status of a sensor or component (as of the latest page refresh).
|
NOTE: For more information about using the Web-based interface, see the ERA/MC online help. |