Features
Dell™ PowerEdge™ Expandable RAID Controller 4/SC and 4/DC User's Guide
Displaying the RAID Controllers
Displaying Logical Drive Properties
Displaying and Rebuilding Physical Drives
Configuring Arrays and Logical Drives
Viewing Physical and Logical Configurations
Resolving a Configuration Mismatch
The WebBIOS Configuration Utility is an HTML-based utility available on the RAID controller that allows you to configure and manage RAID arrays and logical drives. You can use this utility in place of or in conjunction with the <Ctrl><M> BIOS Configuration Utility.
Because the WebBIOS utility resides in the RAID controller BIOS, its operation is independent of the operating systems on your computer. The utility can be used to:
You can use the Configuration Wizard to guide you through the steps required for configuration of the logical drives and physical arrays.
When the system boots, hold the <Ctrl> key and press the <H> key when the following appears:
Copyright© LSI Logic Corporation
Press <Ctrl><M> to Run Configuration Utility
Or press <Ctrl><H> for WebBIOS
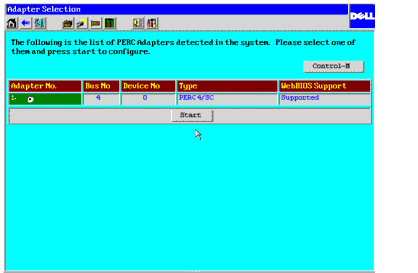
If there are multiple RAID controllers, WebBIOS starts at the Adapter Selection screen after you press <Ctrl><H>. You can use this screen to select the adapter that you want to configure RAID arrays and logical drives for. Select an adapter and press the Start button to begin the configuration. If you want to use the BIOS configuration utility instead of WebBIOS, click the Control-M button.
 |
NOTE: If there is a configuration mismatch between the disks and the non-volatile random access memory (NVRAM) on the adapter, the Select Configuration screen appears first. This screen is used to perform custom configuration, auto configuration with redundancy (recommended), or auto configuration without redundancy. See Configuring Arrays and Logical Drives for information about selecting configurations, and Resolving a Configuration Mismatch for information about configuration mismatches. |
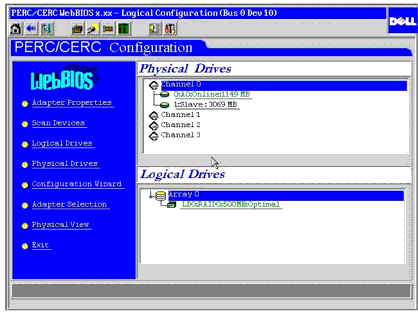
The WebBIOS Main Menu screen appears when you select a controller on the Adapter Selection screen and press Start. The Main Menu screen displays a menu of items that you can select to display information and make changes to the RAID arrays and logical drives. The screen also displays the current configuration of the physical and logical drives, and the WebBIOS toolbar icons.
From this screen, you can configure and manage the RAID arrays on the remote server.
The WebBIOS toolbar icons display on the Main Menu screen. Table 6-1 describes the icons.
Table 6-1 WebBIOS Toolbar Icons
| Icon | Description |
|---|---|
|
Click this icon to return to the WebBIOS main menu screen ("home page"). |
|
Click this icon to return to the page you accessed immediately before the current page. |
|
Click this icon to exit the WebBIOS utility. |
|
Click this icon to display the adapters that you can select. |
|
Click this icon to scan for adapters connected to your system. |
|
Click this icon to display the properties of the adapter, such as the firmware version, BIOS version, and RAM size. |
|
Click this icon to enter the Configuration Wizard so that you can configure arrays and logical drives. |
|
Click this icon to turn off the sound on the alarm. |
|
Click this icon to go from the WebBIOS Configuration Utility to the BIOS Configuration Utility that resides in the RAID controller firmware. |
Select Adapter Selection on the WebBIOS Main Menu screen, to display a list of the RAID controllers in the system. (This screen also appears when you first start the WebBIOS utility.) To begin configuration, select a controller and click Start.
Select Adapter Properties from the WebBIOS Main Menu screen to display the Adapter Properties screen. The Firmware Version and BIOS Version display above the fields described in Table 6-2.
Table 6-2 describes the Adapter Properties menu options.
Table 6-2 Adapter Properties Menu Options
| Option | Description |
|---|---|
Battery Backup |
Indicates whether the battery backup is present or absent. Click the option to view the battery information:
|
RAM Size |
Size of the random access memory |
Cluster Mode |
Use this option to enable or disable cluster mode. Cluster mode is available for PERC 4/DC, but not PERC 4/SC. |
Initiator ID |
Does not apply to this controller. |
Rebuild Rate |
Use this option to select the rebuild rate for drives attached to the selected adapter. The rebuild rate is the percentage of the system resources dedicated to rebuilding a failed drive. A rebuild rate of 100 percent means the system is totally dedicated to rebuilding the failed drive. The default is 30 percent. |
Flex RAID PowerFail |
Select this option to enable or disable the FlexRAID PowerFail feature. This option allows drive reconstruction, rebuild, and check consistency to continue when the system restarts because of a power failure, reset, or hard boot. The default is Enabled. |
Alarm Control |
Use this option to disable, enable, or silence the alarm. |
Adapter BIOS |
Select this option to enable or disable the BIOS on the adapter. The default is Enabled. If the boot device is on the RAID controller, the BIOS must be enabled; otherwise, the BIOS should be disabled or it might not be possible to use a boot device elsewhere. |
Set Factory Defaults |
Select Yes to load the default WebBIOS Configuration Utility settings. |
NAS Enabled |
Indicates that the system is enabled for network attached storage |
BIOS Stops on Error |
When set to On (the default), the BIOS stops in case of a problem with the configuration. This gives you the option to enter the configuration utility to resolve the problem. |
BIOS Echoes Messages |
When set to On (the default), all controller BIOS messages display. |
BIOS Config AutoSelection |
Use this option so that if there is a mismatch between the configuration data on the hard drives and that on the NVRAM during the boot process, you can select a method to resolve it. The options are NVRAM, Disk, or User (the default). |
Spinup Parameters |
Sets the timing for spinning up the hard drives in the computer. The options are Automatic, 2 per 6 secs, 4 per 6 secs, or 6 per 6 secs. |
Fast Initialization |
When enabled, zeros are written to the first sector of the logical drive so that initialization occurs in 2 – 3 seconds. When disabled, a full initialization takes place on the entire logical drive. On a larger logical drive, it is best to disable fast initialization, then initialize. Otherwise, the controller will run a background consistency check within five minutes of reboot or RAID 5 creation. |
Cache Flush Timings |
Use this option to select the amount of time between cache flushes. The contents of the cache are flushed to maintain data integrity. The default is 4 sec. |
Auto Rebuild |
When set to Enabled (the default), drives are automatically rebuilt when they fail. |
Class Emulation Mode |
Defines the type of controller. The options are I2O or Mass Storage. |
When you select Scan Devices, WebBIOS checks the physical and logical drives to see if there are any changes to the drive status. It displays the results of the scan on the main screen in the physical and logical drives section. For example, if a physical drive has failed, the message Not Responding displays to the right of the drive name under the Physical Drives heading.
Select the Properties option on the Logical Drives screen to do the following:
The following is an example of the Properties screen.
After you select a logical drive to boot, the system boots from that logical drive when you reboot. This field is 0-n, where "n" is equal to the number of logical drives created on the controller minus one. For example, it would be 0-0 for a user when there is only one logical drive on the controller.
Perform the following steps to select a logical drive to boot from:
The Logical Drives screen displays.
The Physical Drives screen displays when you select Physical Drives on the Main Menu screen. This screen displays the physical drives for each channel.
The Physical Drive Properties screen displays.
You can press Reset to return to the configuration that existed before you made any changes.
The Physical Drive Properties screen displays.
The selected physical drive becomes a hotspare.
Perform the following steps to configure arrays and logical drives:
The Configuration Wizard screen displays.
The next configuration screen displays.
On this screen, you can select custom configuration, auto configuration with redundancy (recommended), or auto configuration without redundancy.
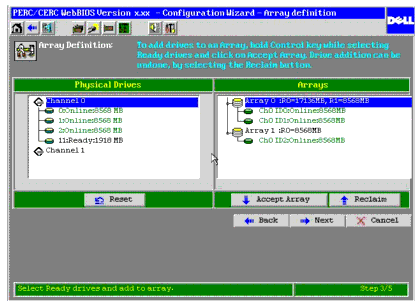
The Array Definition screen displays.
The following screen displays an example of an array being added.
The Logical Drive Definition Screen displays.
Logical Drive Definition Screen
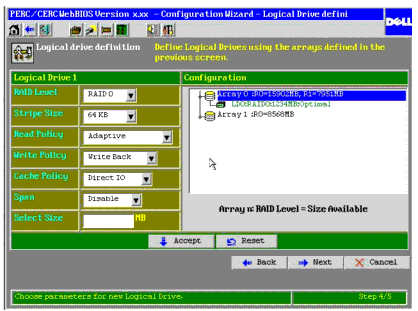
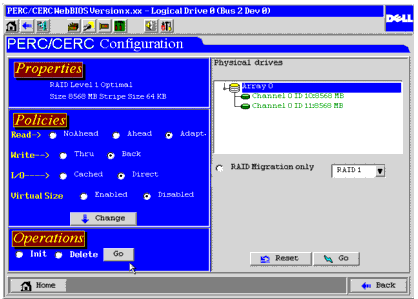
Stripe Size specifies the size of the segment written to each disk in a RAID 1, 5, or 10 logical drive. You can set the stripe size to 2 KB, 4 KB, 8 KB, 16 KB, 32 KB, 64 KB (the default), or 128 KB.
A larger stripe size produces higher read performance, especially if your computer does mostly sequential reads. However, if your computer does random read requests more often, select a smaller stripe size.
The Read Policy (Read-Ahead) enables the IDE read-ahead feature for the logical drive. The options are:
Write Policy specifies the cache write policy. The options are:
Write-through caching provides better data security than write-back caching, and write-back caching offers higher throughput than write-through caching. You should not use write-back for any logical drive to be used as a Novell® NetWare® volume.
Cache Policy applies to reads on a specific logical drive. It does not affect the Read-ahead cache. The options are:
If enabled, the logical drive can occupy space in more than one array. If disabled, the logical drive can occupy space in only one array.
For two arrays to be spannable, they must have the same stripe width (they must contain the same number of physical drives) and must be consecutively numbered. For example, assuming Array 2 contains four hard drives, it can be spanned only with Array 1 and/or Array 3, and only if Arrays 1 and 3 also contain four hard drives. If the two criteria for spanning are met, the RAID controller automatically allows spanning. If the criteria are not met, the Span setting makes no difference for the current logical drive.
The Configuration Preview screen displays.
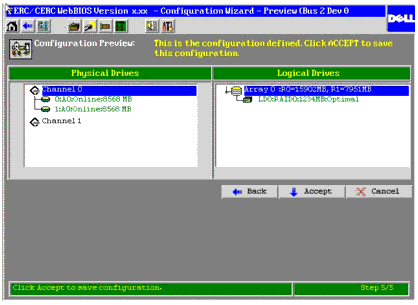
You are prompted to save the configuration.
You are prompted to initialize the logical drives.
The screen used to initialize logical drives displays. See Initializing Logical Drives in this section for more information about initializing logical drives.
To configure RAID 10 and RAID 50 arrays, you must select RAID 1 or RAID 5 arrays and span them. Perform the following steps to configure a RAID 10 or RAID 50 array:
The Configuration Wizard screen displays.
The next configuration screen displays.
The Array Definition screen displays.
The Logical Drive Definition screen displays.
Stripe Size specifies the size of the segment written to each disk in
a logical drive.
The Read Policy (Read-Ahead) enables the IDE read-ahead feature for the logical drive.
Write Policy specifies the cache write policy.
Cache Policy applies to reads on a specific logical drive. It does not affect the Read-ahead cache.
If enabled, the logical drive can occupy space in more than one array. If disabled, the logical drive can occupy space in only one array.
For two arrays to be spannable, they must have the same stripe width (they must contain the same number of physical drives) and must be consecutively numbered. For example, assuming array 2 contains four hard drives, it can be spanned only with array 1 and/or array 3, and only if arrays 1 and 3 also contain four hard drives.
If the two criteria for spanning are met, the RAID controller automatically allows spanning. If the criteria are not met, the Span setting makes no difference for the current logical drive.
|
NOTE: The WebBIOS utility does not display the size of the spanned RAID arrays after you enable spanning. You need to calculate the size of the spanned arrays. |
The Configuration Preview screen displays.
You are prompted to save the configuration.
You are prompted to initialize the logical drives.
The screen used to initialize logical drives displays. See Initializing Logical Drives for more information about initializing logical drives.
You should initialize each new logical drive that you configure. You can use the Initialize option on the Logical Drives screen to initialize logical drives. Perform the following actions to initialize a logical drive:
The progress of the initialization appears as a graph on the screen.
When Fast Initialization is enabled, zeros are written to the first sector of the logical drive so that initialization occurs in 2 – 3 seconds. When disabled, a full initialization takes place on the entire logical drive. On a larger logical drive, it is best to set fast initialization to Off, then initialize. Otherwise, the controller will run a background consistency check within five minutes of reboot or RAID 5 creation.
Perform the following steps to enable the Fast Initialization option:
A list of the current logical drives appears.
The list of controller options displays.
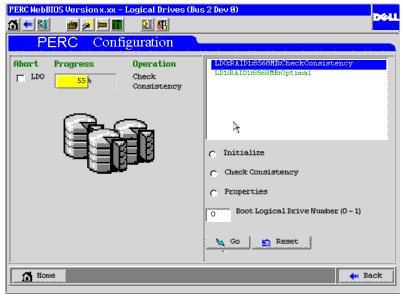
Select the Check Consistency option on the Logical Drives screen to verify that the data on a logical drive is correct. This option is available only if RAID level 1 or level 5 is selected. The RAID controller automatically corrects any differences found in the data.
The Logical Drives screen displays.
a progress chart displays on the left side of the screen to show how much of the consistency check has been completed. There is also an option to abort the check for any or all logical drives.
The Main Menu screen displays the physical and logical views when you select Physical View or Logical View. The option toggles between Physical View and Logical View. For example, if you select Physical View on the screen below, the option changes to Logical View. If you then select Logical View, the option changes back to Physical View. That way, you can go back and forth between physical and logical views.
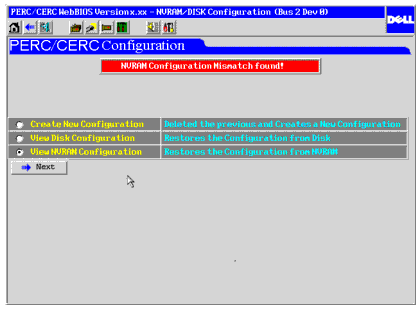
A configuration mismatch occurs when the configuration data in the non-volatile random access memory (NVRAM) and the configuration data on the hard drives are different. The drive roaming (configuration on disk) feature saves configuration data on the NVRAM and the hard drives attached to the system so that it is always available in case of controller failure.
The NVRAM/DISK Configuration screen provides three ways to resolve a configuration mismatch: