 Entering the System Setup Program
Dell™ PowerEdge™ 4600 Systems User's Guide
Entering the System Setup Program
Using the System Password Feature
Using the Setup Password Feature
Disabling a Forgotten Password
Each time you turn on your system, the system compares the configuration of the hardware installed in the system to the hardware listed in the system configuration information stored in NVRAM on the system board. If the system detects a discrepancy, it generates error messages that identify the incorrect configuration settings. The system then prompts you to enter the System Setup program to correct the settings.
You can use the System Setup program as follows:
After you set up your system, run the System Setup program to familiarize yourself with your system configuration information and optional settings. Print the System Setup screens (by pressing the <Print Screen> key) or record the information for future reference.
Enter the System Setup program as follows:
If your system is already on, shut it down and then turn it on again.
<F2> = System Setup
You can also press <F10> to enter Utility Mode or <F12> for PXE Boot. PXE Boot forces a system boot from the network.
If you wait too long and your operating system begins to load into memory, let the system complete the load operation, and then shut down the system and try again.
 |
NOTE: To ensure an orderly system shutdown, consult the documentation that accompanied your operating system. |
You can also enter the System Setup program by responding to certain error messages. See "Responding to Error Messages."
|
NOTE: For help using the System Setup program, press <F1> while in the program. |
If an error message appears on your monitor screen while the system is starting up, make a note of the message. Then, before entering the System Setup program, see "System Beep Codes" and "System Messages" in your Installation and Troubleshooting Guide for an explanation of the message and suggestions for correcting any errors.
|
NOTE: It is normal to receive an error message the first time you start your system after installing a memory upgrade. In that situation, do not refer to "System Beep Codes" and "System Messages." Instead, see "Adding Memory" in your Installation and Troubleshooting Guide for instructions.) |
If you are given an option of pressing either <F1> to continue or <F2> to run the System Setup program, press the <F2> key.
Table 3-1 lists the keys that you use to view or change information on the System Setup screens and to exit the program.
Table 3-1. System Setup Navigation Keys Keys Action Down arrow or <Tab> Moves to the next field. Up arrow or <Shift + Tab> Moves to the previous field. Left and right arrows or <Space> Cycles through the settings in a field. In many fields, you can also type the appropriate value. <Esc> Exits the System Setup program and restarts the system if any changes were made.
For most of the options, any changes you make are recorded but do not take effect until the next time you start the system. For a few options (as noted in the help area), the changes take effect immediately.
The following subsections outline the options on the System Setup screens.
When the System Setup program runs, the main program screen appears (see Figure 3-1).
Figure 3-1. Main System Setup Screen
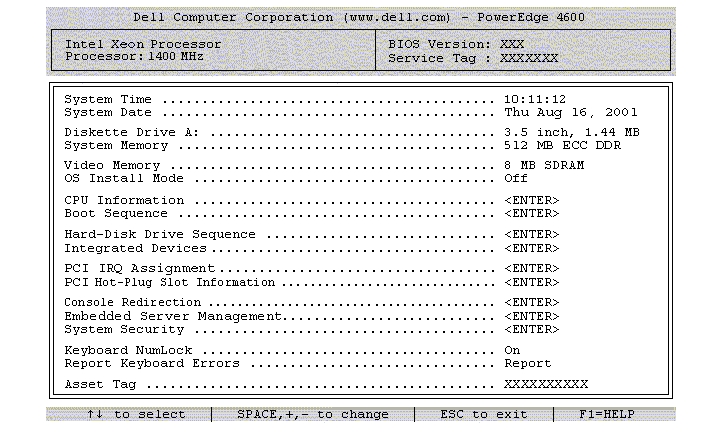
The following options and information fields appear on the main System Setup screen:
The Boot Sequence screen options determine the order in which the system looks for the files that it needs to load during system startup. Available options include the diskette drive, CD-ROM drive, network, and hard drive. You can enable or disable a device by selecting it and pressing the spacebar. To change the order in which devices are searched, use the <+> and <–> keys.
The Hard-Disk Drive Sequence screen options determine the order in which the system searches the hard drives for the files that it needs to load during system startup. The choices depend on the particular hard drives installed in your system. You can enable or disable a device by selecting it and pressing the spacebar. To change the order in which devices are searched, use the <+> and <–> keys.
This screen is used to configure the following devices:
If you set a serial port to Auto and add an expansion card with a port configured to the same designation, the system automatically remaps the integrated port to the next available port designation that shares the same IRQ setting.
You can set the following features through the Embedded Server Management screen:
You can set the following security features through the System Security screen:
|
NOTE: See "Using the System Password Feature" for instructions on assigning a system password and using or changing an existing system password. See "Disabling a Forgotten Password" for instructions on disabling a forgotten system password. |
|
NOTE: See "Using the Setup Password Feature" for instructions on assigning a setup password and using or changing an existing setup password. See "Disabling a Forgotten Password" for instructions on disabling a forgotten setup password. |
To lock the system password, you must first assign a setup password in the Setup Password option and then change the Password Status option to Locked. In this state, the system password cannot be changed through the System Password option and cannot be disabled at system start-up by pressing <Ctrl><Enter>.
To unlock the system password, you must enter the setup password in the Setup Password option and then change the Password Status option to Unlocked. In this state, the system password can be disabled at system start-up by pressing <Ctrl><Enter> and then changed through the System Password option.
|
NOTE: You can still turn a system on using the power button, even if the Power Button option is set to Disabled. |
After you press <Esc> to exit the System Setup program, the Exit screen displays the following choices:
 |
NOTICE: The password features provide a basic level of security for the data on your system. However, they are not foolproof. If your data requires more security, it is your responsibility to obtain and use additional forms of protection, such as data encryption programs. |
Your system is shipped to you without the system password feature enabled. If system security is a concern, you should operate your system only with system password protection.
You can assign a system password whenever you use the System Setup program. After a system password is assigned, only those who know the password have full use of the system.
When the System Password option is set to Enabled, the system prompts you for the system password just after the system starts.
To change an existing system password, you must know the password (see "Deleting or Changing an Existing System Password"). If you assign and later forget a system password, a trained service technician must remove the system cover to change a jumper setting that disables the system password feature (see "Disabling a Forgotten Password"). Note that this erases the setup password at the same time.
|
NOTICE: If you leave your system running and unattended without having a system password assigned or if you leave your system unlocked so that someone can disable the password by changing a jumper setting, anyone can access the data stored on your hard drive. |
Before you can assign a system password, you must enter the System Setup program and check the System Password option.
When a system password is assigned, the setting shown for the System Password option is Enabled. If the Password Status option is Unlocked, you can change the system password. If the Password Status option is Locked, you cannot change the system password. When the system password feature is disabled by a jumper setting on the system board, the setting shown is Disabled, and you cannot change or enter a new system password.
When no system password is assigned and the password jumper on the system board is in the enabled (default) position, the setting shown for the System Password option is Not Enabled and the Password Status field is Unlocked. To assign a system password, use the following procedure:
You can use up to 32 characters in your password.
As you press each character key (or the spacebar key for a blank space), a placeholder appears in the field.
The password assignment operation recognizes keys by their location on the keyboard without distinguishing between lowercase and uppercase characters. For example, if you have an M in your password, the system recognizes either M or m as correct. Certain key combinations are not valid. If you enter one of these combinations, the speaker emits a beep. To erase a character when entering your password, press the <Backspace> key or the left-arrow key.
|
NOTE: To escape from the field without assigning a system password, press <Enter> to move to another field, or press <Esc> at any time prior to completing step 5. |
The System Password option changes to Enabled. Your system password is now set. You can exit the System Setup program and begin using your system.
|
NOTE: Password protection does not take effect until you restart the system by turning the system off and then on again. |
Whenever you turn on or reboot your system by pressing the <Ctrl><Alt><Del> key combination, the following prompt appears on the screen when the Password Status option is set to Unlocked:
Type in the password and... -- press <ENTER> to leave password security enabled. -- press <CTRL><ENTER> to disable password security. Enter password:
If the Password Status option is set to Locked, the following prompt appears:
Type the password and press <Enter>.
After you type the correct system password and press <Enter>, your system completes the startup sequence and you can use the keyboard or mouse to operate your system as usual.
|
NOTE: If you have assigned a setup password (see "Using the Setup Password Feature"), the system accepts your setup password as an alternate system password. |
If a wrong or incomplete system password is entered, the following message appears:
** Incorrect password. **
Enter password:
If an incorrect or incomplete system password is entered again, the same message appears.
The third and subsequent times an incorrect or incomplete system password is entered, the system displays the following message:
** Incorrect password. **
Number of unsuccessful password attempts: 3
System halted! Must power down.
The number of unsuccessful attempts made to enter the correct system password can alert you to an unauthorized person attempting to use your system.
Even after your system is turned off and on, the previous message is displayed each time an incorrect or incomplete system password is entered.
|
NOTE: You can use the Password Status option in conjunction with the System Password and Setup Password options to further protect your system from unauthorized changes. |
If you are asked to enter your setup password, you may need to contact your network administrator who has the setup password.
If Not Enabled is displayed for the System Password option, the system password has been deleted. If you want to assign a new password, continue to step 6. If Not Enabled is not displayed for the System Password option, press the <Alt><b> key combination to restart the system, and then repeat steps 2 through 6.
Your system is shipped to you without the setup password feature enabled. If system security is a concern, you should operate your system with the setup password feature enabled.
You can assign a setup password whenever you use the System Setup program. After a setup password is assigned, only those who know the password have full use of the System Setup program.
To change an existing setup password, you must know the setup password (see "Deleting or Changing an Existing Setup Password"). If you assign and later forget a setup password, you cannot operate your system or change settings in the System Setup program until a trained service technician opens the system chassis, changes the password jumper setting to disable the passwords, and erases the existing passwords. This procedure is described in the Installation and Troubleshooting Guide.
A setup password can be assigned (or changed) only when the Setup Password option is set to Not Enabled. To assign a setup password, highlight the Setup Password option and press the left- or right-arrow key. The system prompts you to enter and verify the password. If a character is illegal for password use, the system emits a beep.
|
NOTE: The setup password can be the same as the system password. If the two passwords are different, the setup password can be used as an alternate system password. However, the system password cannot be used in place of the setup password. |
After you verify the password, the Setup Password setting changes to Enabled. The next time you enter the System Setup program, the system prompts you for the setup password.
A change to the Setup Password option becomes effective immediately (restarting the system is not required).
If Setup Password is set to Enabled, you must enter the correct setup password before you can modify the majority of the System Setup options. When you start the System Setup program, the program prompts you to type the password.
If you do not enter the correct password in three tries, the system lets you view, but not modify, the System Setup screens—with the following exception. If System Password is not set to Enabled and is not locked via the Password Status option, you can assign a system password (however, you cannot disable or change an existing system password).
|
NOTE: You can use the Password Status option in conjunction with the Setup Password option to protect the system password from unauthorized changes. |
To delete or change an existing setup password, perform the following steps:
The setting changes to Not Enabled.
If you forget your system or setup password, you cannot operate your system or change settings in the System Setup program until a trained service technician opens the system chassis, changes the password jumper setting to disable the passwords, and erases the existing passwords. This procedure is described in the Installation and Troubleshooting Guide.