 Entering the System Setup Program
Dell™ PowerEdge™ 1750 Systems User's Guide
Entering the System Setup Program
System and Setup Password Features
Disabling a Forgotten Password
After you set up your system, run the System Setup program to familiarize yourself with your system configuration and optional settings. Print the System Setup screens by pressing <Print Screen> or record the information for future reference.
You can use the System Setup program to:
<F2> = System Setup
If your operating system begins to load before you press <F2>, allow the system to finish booting, and then restart your system and try again.
 |
NOTE: To ensure an orderly system shutdown, see the documentation that accompanied your operating system. |
You can enter the System Setup program by responding to certain error messages. If an error message appears while the system is booting, make a note of the message. Before entering the System Setup program, see "System Beep Codes" and "System Messages" in your Installation and Troubleshooting Guide for an explanation of the message and suggestions for correcting errors.
|
NOTE: After installing a memory upgrade, it is normal for your system to send a message the first time you start your system. |
Table 3-1 lists the keys that you use to view or change information on the System Setup program screens and to exit the program.
Table 3-1. System Setup Program Navigation Keys
|
Keys |
Action |
|---|---|
Cycles through the settings in a field. In many fields, you can also type the appropriate value. | |
Exits the System Setup program and restarts the system if any changes were made. | |
|
NOTE: For most of the options, any changes that you make are recorded but do not take effect until you restart the system. |
When you enter the System Setup program, the main System Setup program screen appears. See Figure 3-1.
Figure 3-1. Main System Setup Program Screen
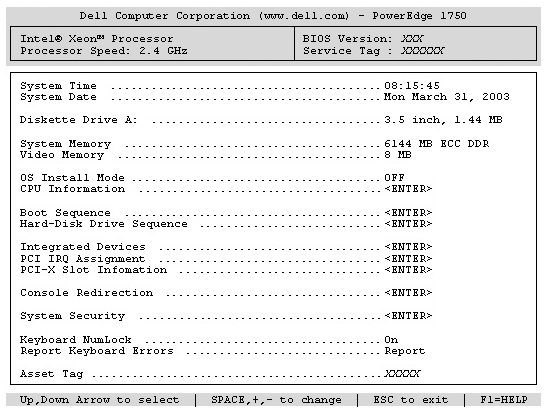
Table 3-2 lists the options and descriptions for the information fields that appear on the main System Setup program screen.
|
NOTE: The System Setup program defaults are listed under their respective options, where applicable. |
Table 3-2. System Setup Program Options
|
Option |
Description |
|---|---|
Displays a screen that allows you to select the type of diskette drive for your system. | |
Displays the amount of system memory. This option has does not have user-selectable settings. | |
Displays the amount of video memory. This option does not have user-selectable settings. | |
NOTE: This feature can be enabled only if all memory banks are populated with memory modules of the same type. | |
Displays a screen to configure the system password and setup password features. See "Using the System Password" and "Using the Setup Password" for more information. | |
Displays the customer-programmable asset tag number for the system if an asset tag number has been assigned. To enter an asset tag number of up to 10 characters into NVRAM, see "Asset Tag Utility." |
Table 3-3 lists the options and descriptions for the information fields that appear on the Integrated Devices screen.
Table 3-3. Integrated Devices Screen Options
|
Option |
Description |
|---|---|
Enables or disables the system's integrated NICs. Options are Enabled and Disabled. | |
Table 3-4 lists the options and descriptions for the information fields that appear on the Console Redirection screen. For more information about using console redirection, see "Using Console Redirection."
Table 3-4. Console Redirection Screen Options
|
Option |
Description |
|---|---|
Enables or disables console redirection after your system restarts. |
Table 3-5 lists the options and descriptions for the information fields that appear on the System Security screen.
Table 3-5. System Security Screen Options
|
Option |
Description |
|---|---|
NOTE: See "Using the System Password" for instructions on assigning a system password and using or changing an existing system password. | |
NOTE: See "Using the Setup Password" for instructions on assigning a setup password and using or changing an existing setup password. | |
Turns system's power off and on.
| |
NOTICE: Use the NMI button only if directed to do so by qualified support personnel or by the operating system's documentation. Pressing this button halts the operating system and displays a diagnostic screen. |
After you press <Esc> to exit the System Setup program, the Exit screen displays the following options:
 |
NOTICE: The password features provide a basic level of security for the data on your system. If your data requires more security, use additional forms of protection, such as data encryption programs. |
|
NOTICE: Anyone can access the data stored on your system if you leave the system running and unattended without having a system password assigned or if you leave your system unlocked so that someone can disable the password by changing a jumper setting. |
Your system is shipped to you without the system password feature enabled. If system security is a concern, operate your system only with system password protection.
To change or delete an existing password, you must know the password. See "Deleting or Changing an Existing System Password." If you forget your password, you cannot operate your system or change settings in the System Setup program until a trained service technician changes the password jumper setting to disable the passwords, and erases the existing passwords. This procedure is described in the Installation and Troubleshooting Guide.
After a system password is assigned, only those who know the password have full use of the system. When the System Password option is set to Enabled, the system prompts you for the system password after the system starts.
Before you assign a system password, enter the System Setup program and check the System Password option.
When a system password is assigned, the setting shown for the System Password option is Enabled. If the setting shown for the Password Status is Unlocked, you can change the system password. If the Password Status option is Locked, you cannot change the system password. When the system password feature is disabled by a jumper setting, the system password is Disabled, and you cannot change or enter a new system password.
When a system password is not assigned and the password jumper on the system board is in the enabled (default) position, the setting shown for the System Password option is Not Enabled and the Password Status field is Unlocked. To assign a system password:
You can use up to 32 characters in your password.
As you press each character key (or the spacebar for a blank space), a placeholder appears in the field.
The password assignment is not case-sensitive. However, certain key combinations are not valid. If you enter one of these combinations, the system beeps. To erase a character when entering your password, press <Backspace> or the left-arrow key.
|
NOTE: To escape from the field without assigning a system password, press <Enter> to move to another field, or press <Esc> at any time prior to completing step 5. |
The setting shown for the System Password changes to Enabled. Exit the System Setup program and begin using your system.
|
NOTE: Password protection does not take effect until you reboot the system. |
|
NOTE: If you have assigned a setup password (see "Using the Setup Password"), the system accepts your setup password as an alternate system password. |
When the Password Status option is set to Unlocked, you have the option to leave the password security enabled or to disable the password security.
To leave the password security enabled:
To disable the password security:
When the Password Status option is set to Locked whenever you turn on your system or reboot your system by pressing <Ctrl><Alt><Del>, type your password and press <Enter> at the prompt.
After you type the correct system password and press <Enter>, your system operates as usual.
If an incorrect system password is entered, the system displays a message and prompts you to re-enter your password. You have three attempts to enter the correct password. After the third unsuccessful attempt, the system displays an error message showing the number of unsuccessful attempts and that the system has halted and will shut down. This message can alert you to an unauthorized person attempting to use your system.
Even after you shut down and restart the system, the error message continues to be displayed until the correct password is entered.
|
NOTE: You can use the Password Status option in conjunction with the System Password and Setup Password options to further protect your system from unauthorized changes. |
If you are asked to enter your setup password, contact your network administrator.
If Not Enabled is displayed for the System Password option, the system password has been deleted. If Enabled is displayed for the System Password option, press the <Alt><b> key combination to restart the system, and then repeat steps 2 through 5.
You can assign (or change) a setup password only when the Setup Password option is set to Not Enabled. To assign a setup password, highlight the Setup Password option and press the <+> or <–> key. The system prompts you to enter and verify the password. If a character is illegal for password use, the system beeps.
|
NOTE: The setup password can be the same as the system password. If the two passwords are different, the setup password can be used as an alternate system password. However, the system password cannot be used in place of the setup password. |
You can use up to 32 characters in your password.
As you press each character key (or the spacebar for a blank space), a placeholder appears in the field.
The password assignment is not case-sensitive. However, certain key combinations are not valid. If you enter one of these combinations, the system beeps. To erase a character when entering your password, press <Backspace> or the left-arrow key.
After you verify the password, the Setup Password setting changes to Enabled. The next time you enter the System Setup program, the system prompts you for the setup password.
A change to the Setup Password option becomes effective immediately (restarting the system is not required).
If Setup Password is set to Enabled, you must enter the correct setup password before you can modify most of the System Setup options. When you start the System Setup program, the program prompts you to enter a password.
If you do not enter the correct password in three attempts, the system lets you view, but not modify, the System Setup screens—with the following exception: If System Password is not set to Enabled and is not locked through the Password Status option, you can assign a system password (however, you cannot disable or change an existing system password).
|
NOTE: You can use the Password Status option in conjunction with the Setup Password option to protect the system password from unauthorized changes. |
The setting changes to Not Enabled.
See your Installation and Troubleshooting Guide.
You can use the Asset Tag utility to assign a unique tracking number to your system. This number is displayed on the System Setup program main screen.
|
NOTE: The Asset Tag utility works only with operating systems that support MS-DOS®-based applications. |
An asset tag number can have up to 10 characters. Any combination of characters is valid. For example, at the a:\> prompt, type the following command and press <Enter>:
To view the Asset Tag utility help screen, type asset /? and press <Enter>.