Back to Contents Page
Setting Up Target Systems: Dell OpenManage Remote Install User's Guide
To bring a target system into the Remote Install management
network, you must
first install the Remote Install agents on the target system. Two
modes of agent installation are available:
- Use Remote Install to configure the system
This mode sets all network interfaces on the target system to use DHCP and requires
that you apply a new configuration to the system.
- Keep the system's current configuration
This mode
does not change network settings and the target system goes directly to the Up
state in the image server, provided that the image server considers the existing
network setting valid. If you want to keep your system's current settings
(host name, password, time zone, network settings), and you are using a
static IP address for the system, use the Keep the system's current configuration
option. This option is the default mode when installing from the Systems Management
CD.
Use the procedures in the following sections to install Remote Install on
your target systems. Use the
same procedures to upgrade the agents on a target system from an earlier version
to Remote Install version 1.1.
 |
NOTICE: Do not attempt to upgrade a target system
while Remote Install is provisioning it or while the target system is in any transitional
state. For descriptions of transitional states, see
"Systems
→ Properties→ List." |
 |
NOTE: You do not have to upgrade a target system until or unless you want to capture an image from it.
You can continue to manage and deploy images captured using Remote Install version 1.0. |
Installing or Upgrading the Remote Install Agents on a Target System Running the Microsoft Windows
Operating System
The Remote Install agents
are located on the Systems Management CD. To install the Remote Install
agents on a target system running the Microsoft® Windows® operating system, perform the following steps:
- Insert the Systems Management CD into the CD drive on the target
system.
The setup program should start automatically. If it does not, click the Start
button, click Run, and then type the following line into the text field:
x:setup.exe
where x is the drive letter of your CD drive.
During the
installation process, click Back to go back to the previous step
or click Cancel to exit the
installation process.
The Welcome to Dell OpenManage System Management Installation
page appears.
-
You can click Next.
The page disappears automatically after a few seconds if you do not make
a selection, and the Dell Software License Agreement page appears.
- Click Accept on the Dell Software License Agreement page.
The system displays a message about preparing the installation wizard.
- From the Select System Type
menu, select Install Managed System or Upgrade Managed System.
- Click Custom Setup or Custom Upgrade.
- Select the destination directory for the installation.
- From the Managed System Software
menu, select Remote
Install Agents and then click Setting
to select one of the following options:
- Use Remote Install to configure the system.
OR
- Keep
the systems current configuration.
- Click OK to go back to the Managed
System Software menu and click Next.
- On the Installation Summary page, click Next.
- In the Confirm Install dialog box, click Yes.
- When the installation finishes, select Yes, reboot my system now and then click
Finish to confirm the reboot of the system.
- Configure the boot order of the target system so that it boots first from
the NIC using PXE. See "Configuring Boot Order."
Uninstalling Remote Install From a Target System Running Windows
|
NOTICE: If you
uninstall the Remote Install agents from a server module that is in the Up
state, the server module goes to the Disconnected state. If you
subsequently reinstall the agents on the same server module, you must
first delete the server module from the list of discovered systems in the
Remote Install interface so that Remote Install can properly rediscover
the server module and correctly report its state (when the system is rebooted). If you do not, Remote
Install continues to show the server module in the Disconnected
state even after the agents are reinstalled and the server module is
rebooted. |
|
NOTE: This procedure
must be performed for all systems, including Dell preinstalled systems. |
To uninstall the Remote
Install agents from a target system running Windows, perform the following
steps:
- Insert the Systems Management CD into the CD drive on the target system.
The setup program should start automatically. If it does not, click the Start button, click
Run, and then type the following line into the text field:
x:setup.exe
where x is the drive letter of your CD drive.
During the uninstallation process, click Back to go back to the previous step or click
Cancel to exit the uninstallation process.
The Welcome to Dell OpenManage System Management Installation
page appears.
-
You can click Next.
The page disappears automatically after a few seconds if you do not make
a selection, and the Dell Software License Agreement page appears.
- Click Accept on the Dell Software License Agreement page.
The system displays a message about preparing the installation wizard.
- From the Select System Type menu, click Uninstall (this option is available only if a Dell OpenManage application was previously installed).
- From the Uninstall Selection page, select Remote Install Agent (this option is available only if the Remote Install agents were previously installed) and then click
Next.
- From the Uninstall Summary page, click Next.
- In the Confirm Uninstall dialog box, click Yes.
- When the uninstallation finishes, select Yes, reboot my system now and then click
Finish to confirm the reboot of the system.
Installing or Upgrading the Agents on a Target System Running the Red Hat Linux
Operating System
The
Remote Install agents are located on the Systems Management CD. To install
the Remote Install agents on a target system, perform the following steps:
- Insert the Systems Management CD into the CD drive on the target system.
Click the start.sh file and select Run at the prompt. If the program does not start, go to the CD mount point and type sh start.sh.
- The Welcome to Dell OpenManage System Management Installation
page appears.
You can click Next.
The page disappears automatically after a few seconds if you do not make
a selection, and the Dell Software License Agreement page appears.
- Click Accept on the Dell Software License Agreement page.
The system displays a message about preparing the installation wizard.
- If you are performing an upgrade, click Upgrade Managed System. If
you are performing a new installation, this option will not appear.
- Click Custom Setup or Custom Upgrade.
- From the Managed System Software menu, select Remote Install Agents and then click
Setting (or More Info, for an upgrade) to select one of the following options:
- Keep the systems current configuration.
OR
- Use Remote Install to configure the system.
- Click OK to go back to the Managed System Software menu and then click
Next.
- On the Installation Summary page, click Next.
- In the Confirm Install dialog box, click Yes.
- When the installation finishes:
- On a system running Windows, click Yes, reboot my system now and
then click Finish. Next, click OK to confirm the reboot of the system.
- On a system running Red Hat Linux, click Finish. Next, reboot the system.
- Configure the boot order of the target system so that it boots first from
the NIC using PXE. See "Configuring Boot Order."
Uninstallation From a Target System Running Red Hat Linux
|
NOTICE: If you
uninstall the Remote Install agents from a server module that is in the Up
state, the server module goes to the Disconnected state. If you
subsequently reinstall the agents on the same server module, you must
first delete the server module from the list of discovered systems in the
Remote Install interface so that Remote Install can properly rediscover
the server module and correctly report its state (after the server is rebooted). If you do not, Remote
Install continues to show the server module in the Disconnected
state even after the agents are reinstalled and the server module is
rebooted. |
|
NOTE: This procedure is for all systems, including preinstalled
systems. |
To uninstall the Remote Install agents from a target system running Red Hat Linux, perform the following steps:
- Insert the Systems Management CD into the CD drive on the target system.
- Click the start.sh file and select Run at the prompt. If the program does not start, go to the CD mount point and type sh start.sh.
The Welcome to Dell OpenManage System Management Installation
page appears.
-
You can click Next.
The page disappears automatically after a few seconds if you do not make
a selection, and the Dell Software License Agreement page appears.
- Click Accept on the Dell Software License Agreement page.
The system displays a message about preparing the installation wizard.
- From the Select Setup Type menu, click Uninstall (this option is available only if
a Dell OpenManage application was previously installed).
- On the Uninstall selection page, select Remote Install Agent (this option is available only if the Remote Install agents were previously installed) and then click
Next.
- On the Uninstall Summary page, click Next.
- In the Confirm Uninstall dialog box, click Yes.
- When the uninstallation process completes, click Finish.
For systems running Windows:
These systems contain a desktop icon labeled "OpenManage
Installation." Double-click this icon to start the Dell OpenManage
installation program.
For systems running Red Hat Linux:
These systems contain the files start.sh and start_text.sh
located in the /dell/omsw directory. The start.sh file allows
users to start installation in graphical mode (with X Windows
started) and allows you to select between Express and Custom
installation. The file start_text.sh installs the agents in Express mode only.
If you select the Express Setup option during the installation, the
installer program installs the Remote Install agents, leaving the
system's current configuration intact. If you select the Custom Setup
option,
the installer program allows you to decide whether you want to
install the Remote Install agents and (a) leave the system's current
configuration intact, or (b) use Remote Install to apply a new
configuration to the system.
|
NOTE: You must reboot your system after installing the
agents. Then configure the system's boot order as described in "Configuring
Boot Order." |
After installing the Remote Install agents on a locally-installed system, you must reconfigure your system
to boot first from the NIC using PXE. To configure boot order, you must
reboot your system and then start your system's System Setup program when
prompted by pressing the indicated key. If you are given an option of pressing
either <F1> to continue or <F2> to run the System Setup program,
press <F2>.
Using the System Setup Program
Table 1 lists the keys that you use to view or
change information on the System Setup screens and to exit the program.
Table 1. System Setup
Navigation Keys
|
Keys
|
Action
|
|
Down arrow or <Tab>
|
Moves to the next field.
|
|
Up arrow or <Shift><Tab>
|
Moves to the previous field.
|
|
Left and right arrows or Spacebar
|
Cycles through the settings in a field. In many fields, you can also
type the appropriate value.
|
|
<Esc>
|
Exits the System Setup program and restarts the system if any changes
were made.
|
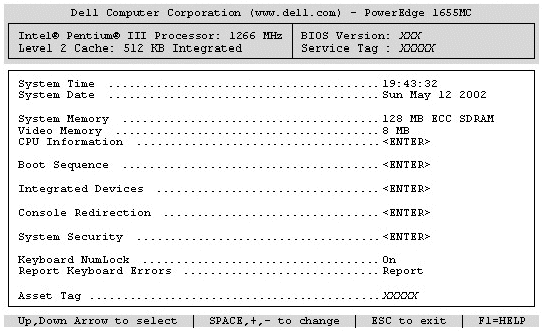
When the System Setup program runs, the main program screen appears (see Figure 1).
Fields that display in blue do not have user-selectable options.
Figure 1. Main System Setup
Screen
For most of the options, any changes you make are recorded but do not take
effect until the next time you start the system. For a few options (as noted in
the help area), the changes take effect immediately.
Setting the Boot Order Field
Use the up- or down-arrow key to navigate to the Boot Sequence field.
This field determines the order in which the system searches for boot devices
during system startup. Use the right- or left-arrow keys to cycle through the
available options; these can include the hard drives, Embedded Primary Broadcom UNDI, and Embedded Secondary Broadcom UNDI. If the USB CD drive or USB diskette drive is connected to the server
module, the device appears in the boot sequence. When a USB drive is attached to
the server module, the default boot sequence order is USB, Embedded Primary Broadcom UNDI, Embedded Secondary Broadcom UNDI,
and Hard Disk Drive.
Using the right- or left-arrow keys, set Boot Sequence to the NIC from
which you want to boot the module, Embedded Primary Broadcom UNDI or Embedded Secondary Broadcom UNDI, and then
press <Esc> to exit. For more information about the System Setup program,
see your system's User's Guide.
Back to Contents Page