 DRAC III/XT Features
Dell™ Remote Access Controller Installation and Setup Guide
Installing the DRAC III/XT Hardware
Software Installation and Configuration Overview
Uninstalling the DRAC III/XT Hardware
This section provides information specifically about DRAC III/XT. It includes a list of DRAC III/XT features, DRAC III/XT kit contents, supported systems, hardware installation instructions, and a software configuration overview.
 |
NOTE: Throughout the remainder of this document, the system in which the RAC is installed or embedded is referred to as the managed system. A system that remotely accesses the RAC is referred to as a management station. The term system console refers to a system's keyboard, mouse, and monitor. |
The DRAC III/XT is a 33-MHz PCI card with its own microprocessor and memory. Under normal operating conditions, the DRAC III/XT is powered by the system in which it is installed. For a complete list of RAC features, see "Remote Access Controller Features."
The DRAC III/XT may be preinstalled on your system, or available separately in a kit. To get started with a DRAC III/XT that is already installed on your system, see "Software Installation and Configuration Overview." If the DRAC III/XT is not installed on your system, see "Installing the DRAC III/XT Hardware" before beginning the software installation and configuration.
DRAC III/XT is supported on the Dell™ PowerEdge™ 1600SC system.
|
NOTE: See your racread.txt file for the most current list of supported systems. |

|
CAUTION: Only trained service technicians are authorized to remove and access any components inside the system. See your System Information Guide for complete information about safety precautions, working inside the computer, and protecting against electrostatic discharge. |
|
|
CAUTION: Only trained service technicians are authorized to remove and access any components inside the system. See your System Information Guide for complete information about safety precautions, working inside the computer, and protecting against electrostatic discharge. |
 |
NOTICE: Failure to dissipate static electricity may damage or destroy static-sensitive components. |
|
NOTE: On the PowerEdge 1600SC, the DRAC III/XT must be installed in PCI slot 6. |
|
NOTE: The maximum length allowed for the LAN cable connected to the RJ-45 connector is 328 feet (100 m). |
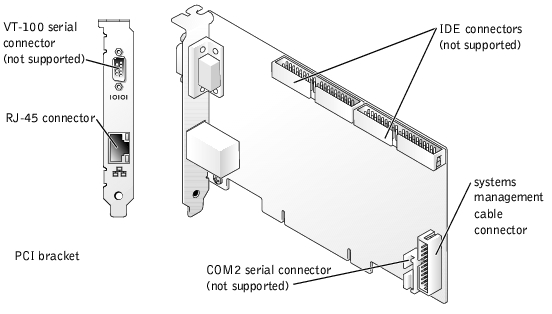
Figure 3-1. DRAC III/XT Hardware Components
After completing the hardware installation procedure, you must install and configure the RAC software. For more information on the RAC software components, see "Software Components." Before beginning the software installation and configuration, see "Software Installation and Configuration Overview."
This section provides a high-level overview of the RAC software installation and configuration process for DRAC III/XT. Some steps give you the option of using several different tools to perform the configuration, including Server Administrator, the racadm CLI utility, and your operating system utilities.
For more information about the RAC software components, see "Software Components."
Depending on the tool used to perform the configuration, see the following documents for more information:
To install and configure your RAC software, perform the following steps in their numbered order:
If you are adding a RAC to an existing managed system, it is recommended that you update the system's BIOS before installing the RAC to ensure full support for the card. See "Updating the System BIOS."
Install the software on the managed system using the Systems Management CD.
For instructions about installing this software, see your Server Administrator User's Guide.
The managed system has the following components embedded or installed: the RAC, the appropriate version of Server Administrator, and the appropriate RAC agent. Depending on the operating system, the RAC agent consists of either Microsoft® Windows® services, Novell® NLMs, or Red Hat Linux drivers and daemons. The RAC agent automatically starts when you boot the managed system.
Configure the RAC network settings using one of the following tools:
|
NOTE: If you are deploying the RAC in a Red Hat Linux environment, see "Connecting to the Remote Access Interface." |
Add and configure RAC users using one of the following tools:
|
NOTE: For more information about user types, see "RAC User Types." |
If necessary, install (or upgrade) the software on the management station, including Server Administrator, using the Systems Management CD.
For instructions about installing Server Administrator software, see your Server Administrator User's Guide.
A management station is a system (typically a workstation running Windows Server 2003 or Windows 2000) that has the following components installed: appropriate versions of Server Administrator, a supported Web browser (for more information, see "Supported Web Browsers"), Windows services (if applicable), Server Administrator services, and user interface elements.
If you are using a client system that connects to the Internet through a proxy server to connect to the RAC Web-based remote access interface, you must configure your Web browser for this connection.
See "Configuring a Web Browser to Display the Remote Access Interface."
To connect to the remote access interface through the network connection, see "Connecting to the Remote Access Interface."
To uninstall the DRAC III/XT from your system, follow the instructions for installing the DRAC III/XT at the beginning of this section, and then uninstall the components and cables in the reverse order that they were installed.