 Starting Your Server Administrator Session
Dell OpenManage™ Server Administrator Version 1.4 User's Guide
Starting Your Server Administrator Session
The Server Administrator Home Page
Using the Preferences Home Page
Using the Server Administrator Command Line Interface
Secure Port Server and Security Setup
Controlling Server Administrator
To start a Server Administrator session on a local system, click the Dell OpenManage™ icon on your desktop. Clicking the Dell OpenManage icon causes the Log in window to be displayed.
To start a Server Administrator session on a remote system, open your Web browser and type:
(where hostname is the assigned name for the managed node system and 1311 is the default port)
(where IP address is the IP address for the managed system and 1311 is the default port)
in the address field and press <Enter>.
The Dell OpenManage Log in window appears.
 |
NOTE: You must type https:// (not http://) in the address field to receive a valid response in your browser. |
|
NOTE: The default port for Dell OpenManage is 1311. You can change the port, if necessary. See "Secure Port Server and Security Setup" for instructions on setting up your server preferences. |
To log into the Server Administrator home page, type in your preassigned Username and Password in the appropriate fields on the Systems Management Log in window.
|
NOTE: You must have preassigned user rights to log into Server Administrator. See "Setup and Administration" for instructions on setting up new users. |
|
NOTE: When logging into Server Administrator from a system running a supported Microsoft® Windows® Server 2003 operating system, you cannot use a blank password due to operating system constraints. |
|
NOTE: When logging into Server Administrator from a remote system running a supported Microsoft Windows Server 2003 operating system, you cannot use a blank password due to operating system constraints. |
If you are accessing Server Administrator from a defined domain, you will also need to specify the correct Domain name.
|
NOTE: The Application drop-down menu will appear as a nonselectable field for systems that can only access one Dell OpenManage component. The drop-down menu is only functional when two or more Dell OpenManage components are available on the managed system. |
To end your Server Administrator session, click Log Out on the "Global Navigation Bar." The Log Out button is located in the upper-right corner of each Server Administrator home page.
You must configure the security settings for your browser to log into Server Administrator from a remote management system that is running a supported Windows Server 2003 operating system.
The security settings for your browser might prevent the execution of client-side scripts that are used by Server Administrator. To enable the use of client-side scripting, perform the following steps on the remote management system.
|
NOTE: If you have not configured your browser to enable the use of client-side scripting, you might receive a blank screen when logging into Server Administrator. In this case, an error message will appear instructing you configure your browser settings. |
With only a few exceptions, the Server Administrator home page has three main areas:
Additionally, when logged into the Server Administrator home page, the system model, the assigned name of the system, and the current user's user name and "User Privileges" are displayed in the top-right corner of the window.
Figure 4-1 shows a sample Server Administrator home page layout for a user logged in with administrator privileges.
Figure 4-1. Sample Server Administrator Home Page
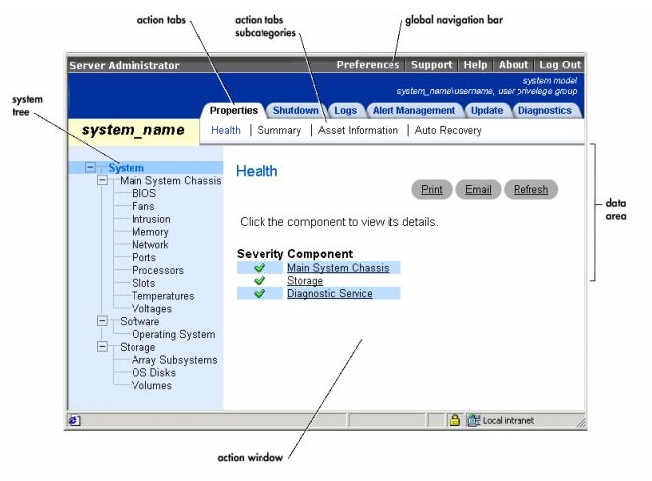
Clicking an object in the system tree opens a corresponding action window for that object. You can navigate in the action window by clicking action tabs to select major categories and clicking the action tab subcategories to access more detailed information or more focused actions. The information displayed in the data area of the action window can range from system logs to status indicators to system probe gauges. Underlined items in the data area of the action window indicate a further level of functionality. Clicking an underlined item creates a new data area in the action window that contains a greater level of detail. For example, clicking Main System Chassis under the Health subcategory of the Properties action tab lists the health status of all the components contained in the Main System Chassis object that are monitored for health status.
|
NOTE: Many of the system tree objects, system components, action tabs, or data area features are not available to users logged in with only User privileges. Admin or Power User privileges are required to view many of the system tree objects, system components, action tabs, and data area features that are configurable. Additionally, only users logged in with Admin privileges have access to the shutdown functionality included under the Shutdown tab. |
The global navigation bar and its links are available to all user levels regardless of where you are in the program.
The system tree appears on the left side of the Server Administrator home page and lists the components of your system that are viewable. The system components are categorized by component type. When you expand the main object known as System, the major categories of system components that may appear are Main System Chassis, Software, and Storage.
To expand a branch of the tree, click the plus sign (![]() ) to the left of an object, or double-click the object. A minus sign (
) to the left of an object, or double-click the object. A minus sign (![]() ) indicates an expanded entry that cannot be expanded further.
) indicates an expanded entry that cannot be expanded further.
When you click an item on the system tree, details about the component or object appear in the data area of the action window. Clicking an action tab displays all available user options as a list of subcategories.
Clicking an object on the system tree opens that component's action window, displaying the available action tabs. The data area defaults to a preselected subcategory of the first action tab for the selected object. The preselected subcategory is usually the first option. For example, clicking the Main System Chassis object opens an action window in which the Properties action tab and Health subcategory is displayed in the window's data area.
The data area is located below the action tabs on the right side of the home page. The data area is where you perform tasks or view details about system components. The content of the window depends on the system tree object and action tab that are currently selected. For example, when you select BIOS from the system tree, the Properties tab is selected by default and the version information for the system BIOS appears in the data area. The data area of the action window contains many common features, including status indicators, task buttons, underlined items, and gauge indicators.
The icons that appear next to component names show the status of that component (as of the latest page refresh).
|
A green check mark indicates that a component is healthy (normal). |
|
|
|
|
|
A blank space indicates that a component's health status is unknown. |
Most windows opened from the Server Administrator home page contain at least three task buttons: Print, Email, and Refresh. Other task buttons are included on specific Server Administrator windows. Log windows, for example, also contain Save As and Clear Log task buttons. For specific information about individual task buttons, click Help on any Server Administrator home page window to view detailed information about the specific window you are viewing.
|
NOTE: The Email, Save as, and Clear Log buttons are only visible for users logged in with Power User or Admin privileges. |
Clicking an underlined item in the action window data area displays additional details about that item.
Temperature probes, fan probes, and voltage probes are each represented by a gauge indicator. For example, Figure 2 shows readings from a system's CPU fan probe.

Context-sensitive online help is available for every window of the Server Administrator home page. Clicking Help on the global navigation bar opens an independent help window that contains detailed information about the specific window you are viewing. The online help is designed to help guide you through the specific actions required to perform all aspects of the Server Administrator services. Online help is available for all windows you can view, based on the software and hardware groups that Server Administrator discovers on your system and your user privilege level.
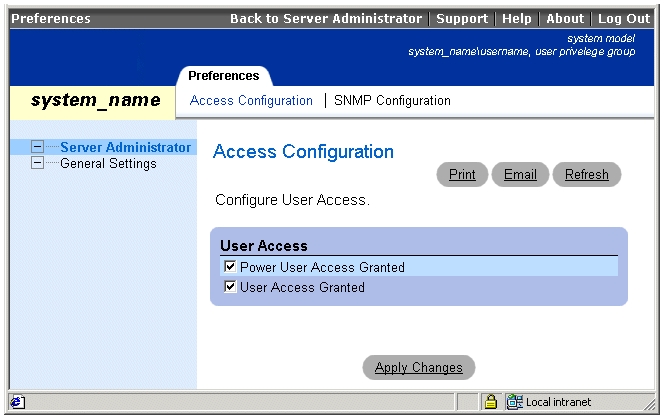
The Preferences home page defaults to the Access Configuration window under the Preferences tab.
From the Preferences home page you can restrict access to users with User and Power User privileges, set the SNMP password, and configure user settings and secure port server settings.
Like the Server Administrator home page, the Preferences home page has three main areas:
Figure 4-3 shows a sample Preferences home page layout.
Figure 4-3. Sample Preferences Home Page
The Server Administrator command line interface (CLI) allows users to perform essential systems management tasks from the operating system command prompt of a monitored system.
In many cases, the CLI allows a user with a very well-defined task in mind to rapidly retrieve information about the system. Using CLI commands, for example, administrators can write batch programs or scripts to execute at specific times. When these programs execute, they can capture reports on components of interest, such as fan RPMs. With additional scripting, the CLI can be used to capture data during periods of high system usage to compare with the same measurements at times of low system usage. Command results can be routed to a file for later analysis. The reports can help administrators to gain information that can be used to adjust usage patterns, to justify purchasing new system resources, or to focus on the health of a problem component.
For complete instructions on the functionality and use of the CLI, see the Server Administrator Command Line Interface User's Guide.
This section contains the following topics:
You set user and secure port server preferences from the Preferences home page.
|
NOTE: You must be logged in with Admin privileges to set or reset user or server preferences. |
Perform the following steps to set up your user preferences:
The Preferences home page appears.
|
NOTE: Clicking Email in any window sends an e-mail message with an attached HTML file of the window to the designated e-mail address. |
Perform the following steps to set up your secure port server preferences:
The Preferences home page appears.
|
NOTE: Changing the port number to an invalid or in-use port number might prevent other applications or browsers from accessing Server Administrator on the managed system. |
|
NOTE: Changing the IP Address to Bind to value to a value other than All may prevent other applications or browsers from accessing Server Administrator on the managed system. |
|
NOTE: For security reasons, your company or organization might not allow e-mails to be sent through the SMTP server to outside accounts. |
Web certificates are necessary to ensure the identity of a remote system and ensure that information exchanged with the remote system cannot be viewed or changed by others. To ensure system security, it is strongly recommended that you either generate a new X.509 certificate, reuse an existing X.509 certificate, or import a root certificate or certificate chain from a Certification Authority (CA).
|
NOTE: You must be logged in with Admin privileges to perform certificate management. |
To manage X.509 certificates through the Preferences home page, click General Settings, click the Web Server tab, and click X.509 Certificate.
Use the X.509 certificate tool to either generate a new X.509 certificate, reuse an existing X.509 certificate, or import a root certificate or certificate chain from a CA. Authorized CAs include Verisign, Entrust, and Thawte.
|
NOTE: Systems running supported Novell® NetWare® operating systems must have Novell Java virtual machine (JVM) for NetWare version 1.2 or later to perform certificate management through the Preferences home page. Novell JVM for NetWare version 1.2 or later is installed as part of the NetWare 6.0 or later operating system installation. See the Novell website at www.novell.com for information about upgrading to Novell JVM for NetWare version 1.2 or later. |
The X.509 Certificates cannot be managed through the Preferences home page for systems running NetWare 5.1 with a version of Novell JVM for NetWare that is earlier than 1.2. You must perform certificate management with the Novell Certificate Server using ConsoleOne running on a NetWare client system if your managed system uses a version of Novell JVM for NetWare that is earlier than 1.2. By default, ConsoleOne is located in the mapped public directory of a NetWare client system.
|
NOTE: Novell Certificate Server cannot be managed using ConsoleOne running on a NetWare server console. |
Using ConsoleOne, you can create or recreate a server certificate if yours becomes corrupted.
|
NOTE: Back up your critical server certificate information before beginning the following procedures. |
To create a new server certificate signed by the NDS Organizational CA, perform the following steps:
The New Object window appears.
The Create Server Certificate (KeyMaterial) window appears. The Standard creation method is selected by default.
nssl.keystore = certificate name - hostname
where certificate name is the name of the certificate you just created and hostname is the name of the managed system running NetWare.
The Security Alert window appears.
The Certificate window appears. A white cross in a red circle appears over the certificate icon at the top of the window. This icon indicates that the certificate cannot be verified to a trusted certificate authority.
Information about the organizational CA is displayed.
The Certificate Manager Import Wizard appears.
Automatically select the certificate store based on the type of certificate is selected by default.
The Root Certificate Store window appears.
A window informs you that the import was successful.
The Java plug-in will now recognize the certificate as valid.
The Systems Management Log in window appears with a yellow lock (in the locked position) at the bottom corner of the window.
To create a new server certificate signed by an external Organizational Authority, perform the following steps:
The New Object window appears.
The Create Server Certificate window appears. The Standard creation method is selected by default.
ConsoleOne generates a Certificate Signing Request (CSR).
The Save Certificate Signing Request window appears.
The CA returns two files: one is the root certificate and the other is a response in a Public Key Cryptography Standard #7 (PKCS#7) format.
nssl.keystore = certificate name - hostname
where certificate name is the name of the certificate you just created and hostname is the name of the managed system running Novell NetWare.
The next time you log into Server Administrator, the Java plug-in recognizes the certificate as signed by an external trusted certificate authority.
Server Administrator automatically starts each time you reboot the managed system. To manually start, stop, or restart Server Administrator, use the following instructions.
|
NOTE: To control Server Administrator, you must be logged in with administrator privileges (logged in as root for supported Red Hat Linux operating systems). |
To start Server Administrator, perform the following steps:
To start Server Administrator on systems running a supported Red Hat Linux operating system, run the following command from the command line:
To start Server Administrator on systems running a supported Novell NetWare operating system, run the following command from the command line:
Dell/omanage/IWS/bin/netware/omastart
To stop Server Administrator, perform the following steps:
To stop Server Administrator on systems running a supported Red Hat Linux operating system, run the following command from the command line:
To stop Server Administrator on systems running a supported Novell NetWare operating system, run the following command from the command line:
Dell/omanage/IWS/bin/netware/omastop
To restart Server Administrator, perform the following steps:
To restart Server Administrator on systems running a supported Red Hat Linux operating system, run the following command from the command line:
To restart Server Administrator on systems running a supported Novell NetWare operating system, run the following command from the command line:
Dell/omanage/IWS/bin/netware/omarestart