Dell™ CERC ATA100/4-Channel RAID Controller Configuration Software Guide
![]() Displaying and Rebuilding Physical Drives
Displaying and Rebuilding Physical Drives
![]() Configuring Arrays and Logical Drives
Configuring Arrays and Logical Drives
![]() Displaying Physical and Logical Configurations
Displaying Physical and Logical Configurations
![]() Resolving a Configuration Mismatch
Resolving a Configuration Mismatch
The WebBIOS Configuration Utility is an HTML-based utility and is available on the RAID card. WebBIOS allows you to configure and manage RAID arrays and logical drives. You can use this utility in place of or in conjunction with the <Ctrl><M> BIOS Configuration Utility.
Because the WebBIOS utility resides in the RAID controller BIOS, its operation is independent of the operating systems on your computer. The utility can be used to:
You can use the Configuration Wizard to guide you through the steps required for configuration of the logical drives and physical arrays.
When the system boots, hold the <Ctrl> key and press the <H> key when the following appears:
Copyright© LSI Logic Corporation
Press <Ctrl><M> to Run Configuration Utility
Or press <Ctrl><H> for WebBIOS
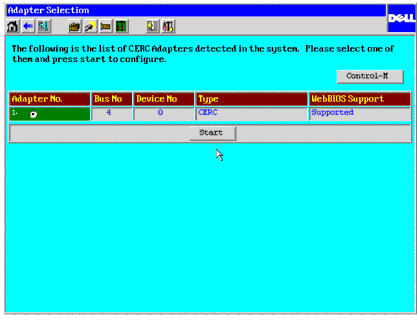
WebBIOS starts at the Adapter Selection screen after you press <Ctrl><H>. You can use this screen to select the controller you want to configure RAID arrays and logical drives for. Select an controller and press the Start button to begin the configuration. If you want to use the BIOS configuration utility instead of WebBIOS, click the Control-M button.
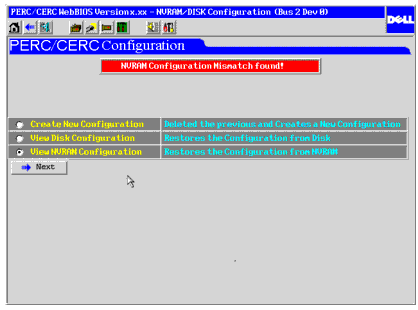
| NOTE: If there is a mismatch between the configuration data on the hard drives and that on the non-volatile random access memory (NVRAM) on the controller, the Select Configuration screen appears first. This screen is used to perform custom configuration, auto configuration with redundancy (recommended), or auto configuration without redundancy. See Configuring Arrays and Logical Drives for information about selecting configurations, and Resolving a Configuration Mismatch for information about configuration mismatches. |

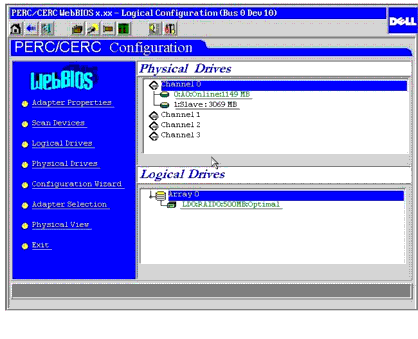
After you select a controller on the Adapter Selection screen and press Start, the WebBIOS Main Menu screen displays. The Main Menu screen displays the following menu of screens that you can select to display information and make changes to the RAID arrays and logical drives:
The screen also displays the current configuration of the physical and logical drives. From this screen, you can configure and manage the RAID arrays on the remote server
| NOTE: If there are multiple adapters, WebBIOS starts from the Adapter Selection screen. |
Table 2-1 describes the WebBIOS toolbar icons.
Select Adapter Properties from the CERC WebBIOS Main Menu screen to view the Adapter Properties screen. Table 2-2 describes the Adapter Properties menu options.
Table 2-2 Adapter Properties Menu Options
| NOTE: To enable an automatic rebuild, you must configure one or more hard drives as hot spares when you configure the array. If a hard drive fails and there is no hot spare with enough capacity to replace the failed drive, you must shut down the system, replace the hard drive, and run the BIOS Configuration Utility, WebBIOS, or Array Manager to perform the rebuild manually. The replacement drive is listed as Failed until the manual rebuild begins. |
When you select Scan Devices, WebBIOS checks the physical and logical drives to see if there are any changes to the drive status. It displays the results of the scan on the main screen in the physical and logical drives section. For example, if a physical drive has failed, the message Not Responding displays to the right of the drive name under the Physical Drives heading.
You should initialize each new logical drive that you configure. You can use the Initialize option on the Logical Drives screen to initialize logical drives. Perform the following actions to initialize a logical drive.
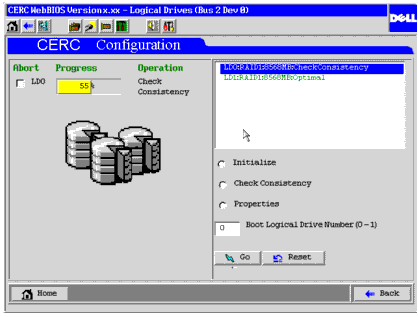
Select this option on the Logical Drives screen to verify the correctness of the redundant data. This option is available only if RAID level 1 or level 5 is selected. The RAID card automatically corrects any differences found in the data.
After you click Check Consistency and Go, a progress chart displays on the left side of the screen to show how much of the consistency check has been completed. There is also an option to abort the check for any or all logical drives. The following screen shows a consistency check in progress:
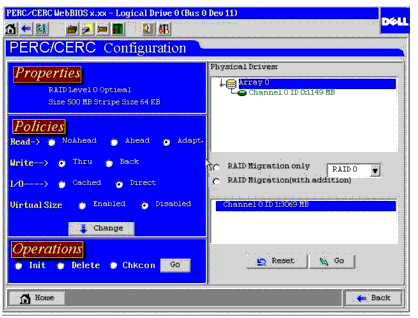
Select the Properties option on the Logical Drives screen to:
The following is an example of the Properties screen.
After you select a logical drive to boot from in the Boot Logical Drive Number field, the system boots from that logical drive when you reboot. This field is 0-n, where "n" is equal to the number of logical drives created on the controller minus one.
Click Go to perform the selected action or Reset to delete any changes.
The Physical Drives screen displays when you select Physical Drives on the Main Menu screen. This screen displays the physical drives for each channel.
The Physical Drive Properties screen displays.
You can press Reset to return to the configuration that existed before you made any changes.
The Physical Drive Properties screen displays.
The selected physical drive becomes a hotspare.
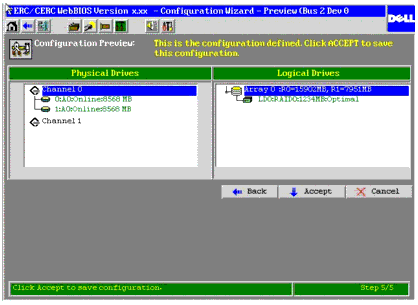
The Configuration Wizard screen displays.
The next configuration screen displays. The step numbers appear in the bottom right corner of the wizard screens.
Step 2/5 displays on the next screen. On this screen, you can select custom configuration, auto configuration with redundancy (recommended), or auto configuration without redundancy.
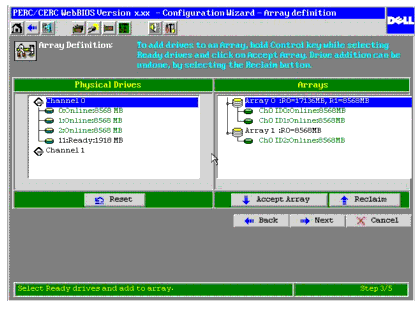
The Array Definition screen displays.
The following screen is an example of an array being added.
The Logical Drive Definition Screen displays.
Logical Drive Definition Screen
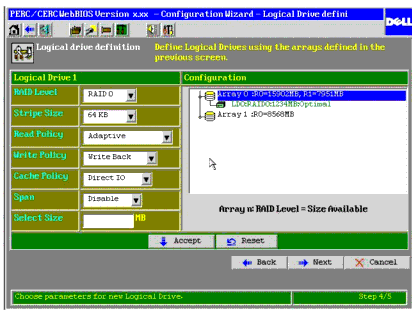
Stripe Size specifies the size of the segment written to each disk in a RAID 1, 5, or 10 logical drive. You can set the stripe size to 2 KB, 4 KB, 8 KB, 16 KB, 32 KB, 64 KB (the default), or 128 KB.
A larger stripe size produces higher read performance, especially if your computer does mostly sequential reads. However, if your computer does random read requests more often, select a smaller stripe size.
The Read Policy (Read-Ahead) enables the IDE read-ahead feature for the logical drive. The options are as follows:
Write Policy specifies the cache write policy. The options are as follows:
Write-through caching provides better data security than write-back caching and write-back caching offers higher throughput than write-through caching. You should not use write-back for any logical drive to be used as a Novell® NetWare® volume.
Cache Policy applies to reads on a specific logical drive. It does not affect the Read-ahead cache. The options are as follows:
If enabled, the logical drive can occupy space in more than one array. If disabled, the logical drive can occupy space in only one array.
For two arrays to be spannable, they must have the same stripe width (they must contain the same number of physical drives) and must be consecutively numbered. For example, assuming array 2 contains four hard drives, it can be spanned only with array 1 and/or array 3, and only if arrays 1 and 3 also contain four hard drives. If the two criteria for spanning are met, the RAID controller automatically allows spanning. If the criteria are not met, the Span setting makes no difference for the current logical drive.
Select the Adapter Selection option on the WebBIOS Main Menu screen, to display a list of the RAID controllers in the system. (This screen also appears when you first start the CERC WebBIOS utility). To begin configuration, select a controller and click Start.
The Main Menu screen displays the physical and logical views when you select Physical View or Logical View. The option toggles between Physical View and Logical View. For example, if you select Physical View on the screen below, the option changes to Logical View. If you then select Logical View, the option changes back to Physical View. That way, you can go back and forth between physical and logical views.
A configuration mismatch occurs when the configuration data in the non-volatile random access memory (NVRAM) and that on the hard drives are different. The Configuration Mismatch screen, shown below, provides three ways to resolve a configuration mismatch:
Please read all restrictions and disclaimers.
