8 Interacting with other devices
You have probably used headphones or earbuds with your M8, plugging them into the 1/8" (3.5mm) audio in socket on the top left of the M8. The plug probably had two black rings on it, forming three metal regions that are connected to three wires inside the cable carrying left and right audio signals. This is called a TRS plug (tip, ring, sleeve). Some listening devices with microphones have a fourth region on the plug formed by a third black ring; these are TRRS plugs.
In the Sampler chapter, we saw how to use the Sampler instrument to sample from the audio in M8 socket, also on the top left of the M8. This also takes a 3.5mm TRS plug. If you sample from the headphone out of a computer or phone, you probably will use a stereo audio cable with 3.5mm TRS plugs on both ends (when we say stereo audio cable from now on, this will be the default). On the right side of the top of the M8 are two sockets of the same size, labelled MIDI in and out. If you have not used these yet, you might be surprised to learn that the same stereo audio cable can be used with the MIDI ports. But the cable does not carry analog (continuous) audio information in this case; rather, it carries digital (discrete) information using the MIDI standard, which can be thought of as instructions to a musical device (e.g. note pitch and velocity).
Between the two sets of 3.5mm sockets, on the top of the M8, is the USB socket (USB-C for M:02 and USB-micro for M:01). You have almost certainly used this to charge your M8. A USB cable can carry power, but some USB cables can also carry information, and this port can be used to send both audio and MIDI information between the M8 and other devices.
The first challenge, then, is to get the right kind of cables necessary to hook the M8 up to other devices that you want to use with it. But you also have to understand something about the nature of the interaction, and how to configure both the M8 and the other devices so that they can effectively communicate with each other.
In this chapter, we’ll go through a number of scenarios for such interactions, and try to alert you to potential issues.
8.1 Using an external display
One of the simplest interactions possible is to use the screen of a laptop or computer monitor as an external display for the M8. Besides offering an almost certainly larger view, this can be used for screen captures (still) or screen recording (video). That’s how we made all the examples of the M8 screens in this document.
For this, you will need a USB cable capable of carrying information, with one end suitable for plugging into the M8, and the other end into your computer. Hubs and adapters can be used. When you make this connection, nothing will happen on either side. Make sure your M8 is turned on.
You then need to use a Web browser to connect to the site m8.run (maintained by Tim). The catch is that not just any Web browser will do. You need one that supports the WebUSB standard. At the time of writing, this is Chrome, or a browser that uses the Chromium toolkit (such as Opera or Edge). The m8.run website will pop up a message if accessed by a browser without this support.
If you are using the right browser and open this site with M8 connected and powered up, it should display the screen. There is a three-line "hamburger" menu in the top left with various options, including a brief help popup. You can get M8’s audio to play through your computer’s chosen output device (usually speakers or headphones). To do this, make sure M8 is set as your computer’s input source or microphone, and make sure that the browser page is authorized to use the microphone (click the little circular button on the left of the URL bar into which you typed "m8.run"). Finally, after doing all this, you might need to reload the browser page, and click in it. You might also want to turn off M8’s own speaker (in the Mixer View page, [SHIFT]+[DOWN] from Song View).
If you prefer an app, there is one written in C, called m8c, and available on GitHub. There is no particular advantage to using this with the M8, except that it might be made to work on devices for which a Chromium browser is not available. This is the case for iOS, the operating system for Apple iPhones and iPads, on which all browsers are just "skins" on top of Safari, which does not support WebUSB. A port of m8c for iOS is available through the App Store.
8.2 USB audio options
USB has evolved over time, resulting in a number of different connectors, but also many digital protocols with different capabilities and speeds. As you are aware, it also provides power: 5V at 500mA commonly, but more recent protocols can negotiate higher voltages and power delivery. Devices that use USB fall into three broad categories: hosts (typically computers, tablets, and phones), peripherals (or clients), and hubs (that increase the number and type of connections).
It’s important to understand that M8 falls into the peripheral or client category. It is not a host. This means it must be connected to a host (or a hub, in the right way) and cannot be connected directly to another peripheral. This is the case for both audio and MIDI (to be discussed below) Most musical devices that are not computers will not be hosts. If you are unsure about a particular device, look in its manual, or in the technical specifications on the manufacturer’s website. If these mostly talk about connecting the device to a computer, it is probably not a host.
Although analog audio cables don’t have a direction marked on them, they typically carry information in one direction, from a source of audio (like M8’s audio out port) to a user or consumer of audio (like the audio in port on a powered speaker). In contrast, a single USB cable can carry information in both directions. We see this with MIDI information when using m8.run. Clearly information is flowing from M8 to the computer in order to animate the display. But the computer keyboard or mouse can be used to affect the M8 at the same time. We will see a more complex example of this in the section below on External Control Surfaces.
This section is primarily about USB audio. USB audio information also can travel in both directions between a host and client. The simpler direction, in terms of options, is USB audio into the M8. You will have to set up the host to make sure it is transmitting USB audio out. Like analog audio through M8’s audio in port, USB audio can be recorded in the Sampler instrument (stereo, mono left or mono right, or mixed with the analog audio). USB audio can be managed in Mixer View, with a volume control into the mix, plus sends to the built-in modfx, delay, and reverb.
Until firmware 6.0, USB audio out from the M8 was a mirror of the analog audio out. While this is a pretty good setup much of the time, there are now more options. The options are selected by the "USB AUDIO OUT" line in the System Settings View. "MIX" is the previous behaviour. There is now a page of diagrams in the M8 manual for some of the new options, such as the ability to send the analog audio in straight to USB audio out. But there are also some significant options that are not mentioned at all in the manual, because the manual in general does not list every menu item.
Chief among these other options is the ability to take an individual track (only one, but "pre-fader", that is, before the mixer page) and send it on USB audio out. What this permits is the use of software on the host to process a given track and then sending it back via USB audio into the M8 to be mixed with the rest of the tracks. This is known as an insert effect (since the returning audio can still be sent to the built-in effects, or used in an External Instrument, as described below).
Other options allow for the USB audio out stereo channel to contain all the sends to one of the built-in effects from all of the M8 tracks. The returned audio can thus replace one of modfx, delay, reverb, or supplant it. From a portability standpoint, this can be done with a single cable and a phone (plus suitable FX apps) that one probably already has along on the go.
Unfortunately, it is not as easy to use conventional guitar pedals (which mostly have 1/4" TS mono inputs and outputs) in this fashion with the M8, even if they have USB audio in/out, because they are unlikely to be USB audio hosts. They can still be used as end-of-chain effects, processing the full analog audio mix from M8 (which may only be one track, the others muted), but the result can only be returned for sampling and not for live mixing with other tracks.
Firmware 6.5 added one more line in Systems Setting View, which is "USB AUDIO MODE", with default "STEREO". This innocuous line heralds something that was long requested but thought too computationally intensive, even by Tim. But he figured it out. The other, new option is "MULTICHANNEL", which when selected has the M8 send a number of individual audio channels via USB: two for the main stereo mix, two for the stereo output of each M8 track, plus two each for the modfx, delay, and reverb sends, for a total of 24 channels. This lets an audio host capable of handling multichannel USB audio in process each of these tracks as wished, playing the result, recording it, or sending it back to M8 (there are still only two channels for stereo USB audio in on M8).
This might take more work to set up in the USB audio host than the scenario made possible by firmware 6.0 (which remains possible), but it clearly has much greater scope. For example, all of the three M8 effect sends can now be replaced by FX apps on the USB audio host, and the result mixed with the main stereo mix there. Stems can be recorded in real time in a DAW instead of having to be rendered on M8 and transferred. As with other M8 features that might stress M8’s CPU, keep the total computational load of your song in mind.
8.3 MIDI Settings View
The MIDI 1.0 standard was first published in 1985. It has been extended in various ways over the years, and MIDI 2.0 came out a few years ago, but relatively few devices support the newer standard so far. We’re not going to try to be comprehensive in our discussion of MIDI, but rather to give some illustrations of the kinds of things you can do with MIDI on the M8. Your further explorations will involve research into your own specific devices, and of course direct experience.
The published standard starts out by specifying the cabling, using cables with 5-pin DIN connectors on either end. These had already been standardized for various electrical uses. The standard only uses two pins for MIDI out and three pins for MIDI in and thru. The plugs have a circular metal shield about 13mm in diameter and five pins grouped on one side of the circle. When manufacturers started making smaller and thinner musical devices, they hit upon the idea of using stereo audio cables, with their narrower plugs. Such cables only have three wires, so there are really only two choices of how to implement the standard, but the manufacturers, in their rush to market, did not try to standardize. As a result, there are two different implementations of MIDI using 3.5mm TRS plugs, Type A and Type B.
Most manufacturers use Type A; a few switched to Type A when it later became part of the MIDI standard. Others stick with Type B. Often a 3.5mm TRS to 5-pin DIN adapter is included with a device that has the narrower ports. However, these adapters are rarely labelled with their type! It doesn’t hurt a device to use the wrong type, but it won’t work. Furthermore, an adapter converting between these two types would, in audio terms, switch left and right stereo channels. Since this is not something people tend to want to do, it’s not easy to find these adapters. As expected, this is a frequent source of MIDI issues, so be warned. The site minimidi.world has a lot of information on TRS MIDI, including a list of devices with their types.
MIDI messages come in several broad categories. The first one is synchronization. Clock messages are used to ensure that different devices stay "on the beat" and make sounds at the same time. Typically there should be at most one source of MIDI clock in a system, and some number of listeners. Clock messages are sent out at 24 to the quarter note, or 24 ppqn. This is exactly the tick rate of the M8, and this is not a coincidence. Tim designed the M8 this way so as to minimize issues with MIDI synchronization.
Another type of synchronization involves the built-in sequencers on devices. You usually want to start and stop these at the same time, but not always. Sometimes a device will have a sequencer, but you will choose not to use it, preferring instead to send note sequencing messages from another device. The start and stop instructions are called transport messages. For each device, then, you have to answer the questions: do you want it to send clock? receive clock? respond to transport messages, or not?
On the M8, this and much more can be set up in MIDI Settings View, which is accessible from Project View. For synchronization, there are two lines in this view labelled SYNC IN and SYNC OUT. Each has a number of options, including OFF, CLOCK, TRANSPORT, and CLOCK+TRANSPORT. There are a couple of other options for which we refer you to the M8 manual. We’ll discuss a few of the other lines in this view in this chapter.
MIDI has a concept of channels (1 through 16). Synchronization messages are not specific to a channel, but note messages are. A channel may be associated with a whole device (for example, if it is monophonic) or a track on a device. A note message has a pitch (standard Western chromatic scale) and a velocity, both encoded in the range 0-127. There is a note-off message, but the usual way to turn off a note is by sending a note message with the same pitch but velocity 0. There are also messages to send mod wheel and pitch bend information, since these were and are common controls on synth keyboards.
Program change (PC) messages can be used to select presets on the receiving device. These could be sounds (like instruments on the M8) or patterns (sequences). On some devices, these are linked (unlike on the M8). The precise way in which a receiving device responds to a PC message depends on the device.
There is even more variation in the interpretation of control change (CC) messages. These are used to select and change parameters on the receiving device. Some devices will have a fixed set of CC messages they respond to; with others (such as the M8) the mapping can be altered.
Finally, there is a category of system messages, of which the ones you are most likely to encounter are System Exclusive (SysEx) messages, which basically form an ad-hoc way of transmitting arbitrary information over a MIDI channel. For some devices, this is the way to do firmware updates; for others, SysEx might be used to backup or receive presets, or to perform various control functions specific to the device. We will encounter a use of SysEx in the section below on external control surfaces.
The most general and direct way to use an M8 track to produce MIDI messages is by using a MIDI Out instrument.
8.4 MIDI Out instrument
In this document, we’ve been able to assume that you either have an M8, or are seriously researching a future purchase. We can’t make any assumptions about other devices you might have or are contemplating with which you might want to use M8’s MIDI capabilities. This makes getting into specifics about interaction a bit tricky.
We’ve chosen a representative device to use in our examples, without getting too far into details which might be significantly different for your devices. Our choice is the Roland S-1 Tweak Synthesizer.
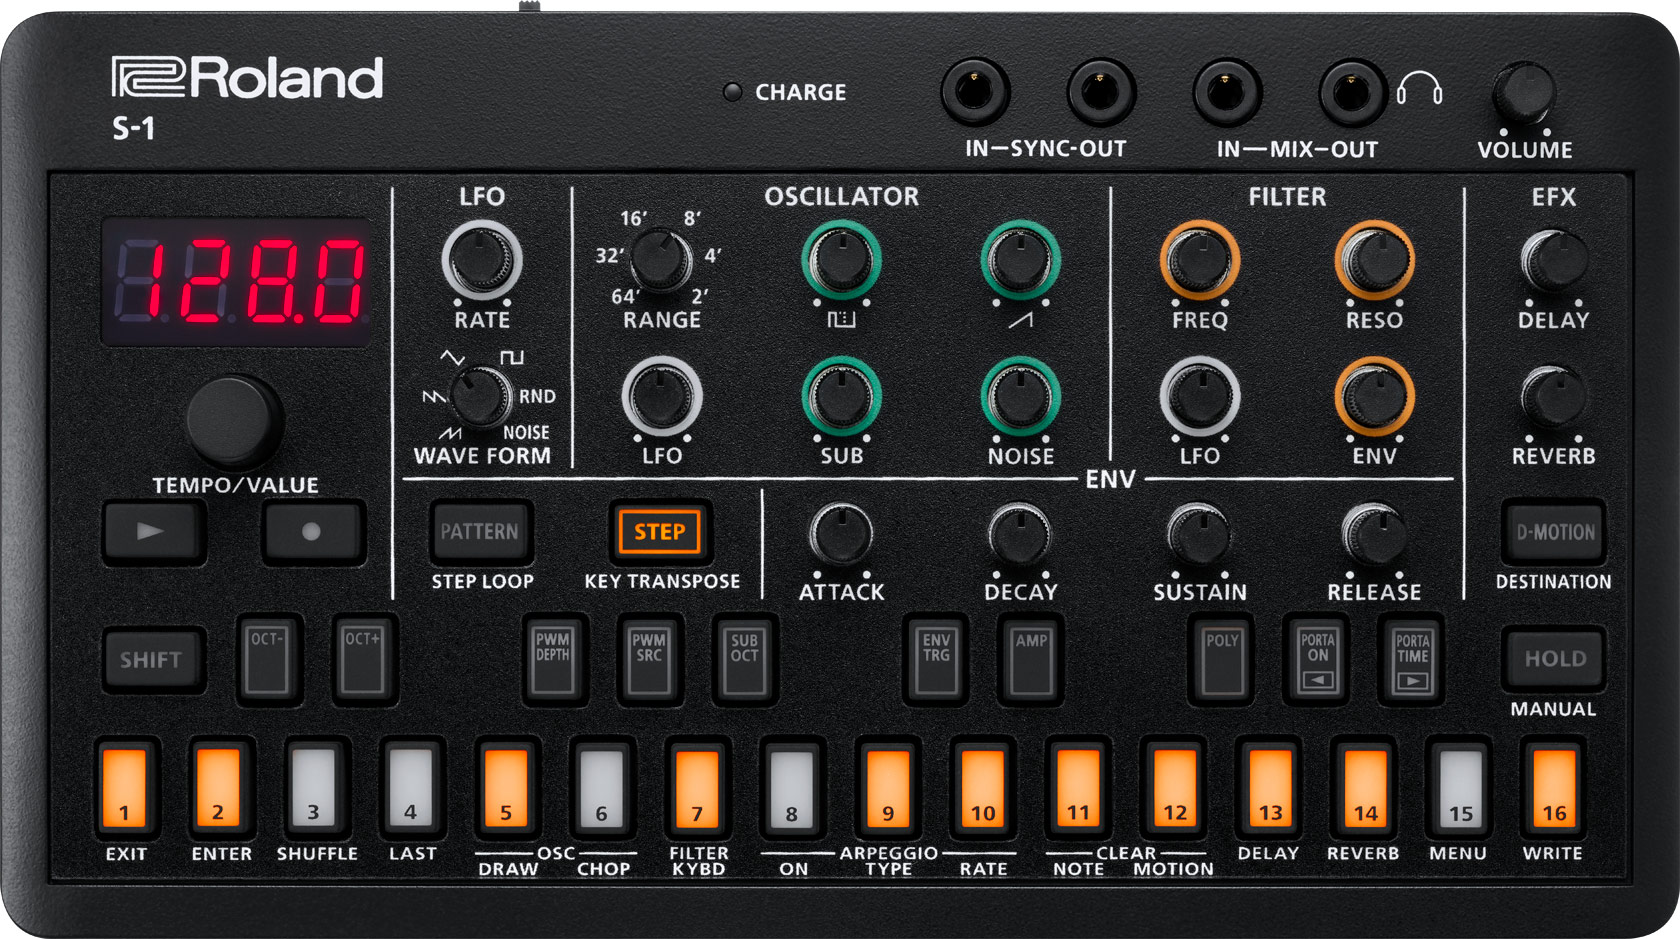
There are several reasons why this is a good choice for our purposes. First of all, it’s a lovely device in its own right, the most capable of several that Roland has released in the AIRA Compact line. It recreates the sound of the legendary Roland SH-101, an analog monophonic synth that can be heard on many hits of the ’90’s. The S-1 is digital, but uses a technology developed by Roland that models the original analog circuits, and by all accounts does a pretty good job of that. It is much smaller and much cheaper (introduced at around $200), has a built-in battery that can be charged via USB, and has four-voice polyphony (four notes may overlap; they all use the same sound settings, but have independent envelopes).
The S-1 is often touted as a good companion for the M8, as it is similarly portable, and offers features that M8 doesn’t: easy four-note polyphony, with lots of knobs to tweak the sound, and a two-octave button keyboard (pretty small buttons, though). It uses 3.5mm TRS audio ports and Type A MIDI ports, so standard stereo audio cables can be used for all connections with the M8. Finally, it is not only a good receiver for MIDI produced by M8, but a reasonable source of MIDI to affect M8, so we can use it in later sections to discuss that.
To have the M8 use MIDI to play the S-1, we need only run a stereo audio cable from M8’s MIDI out port to S-1’s MIDI in port. To set things up on the M8’s side, we use the MIDI Settings page, and set up an instrument of type MIDI Out.
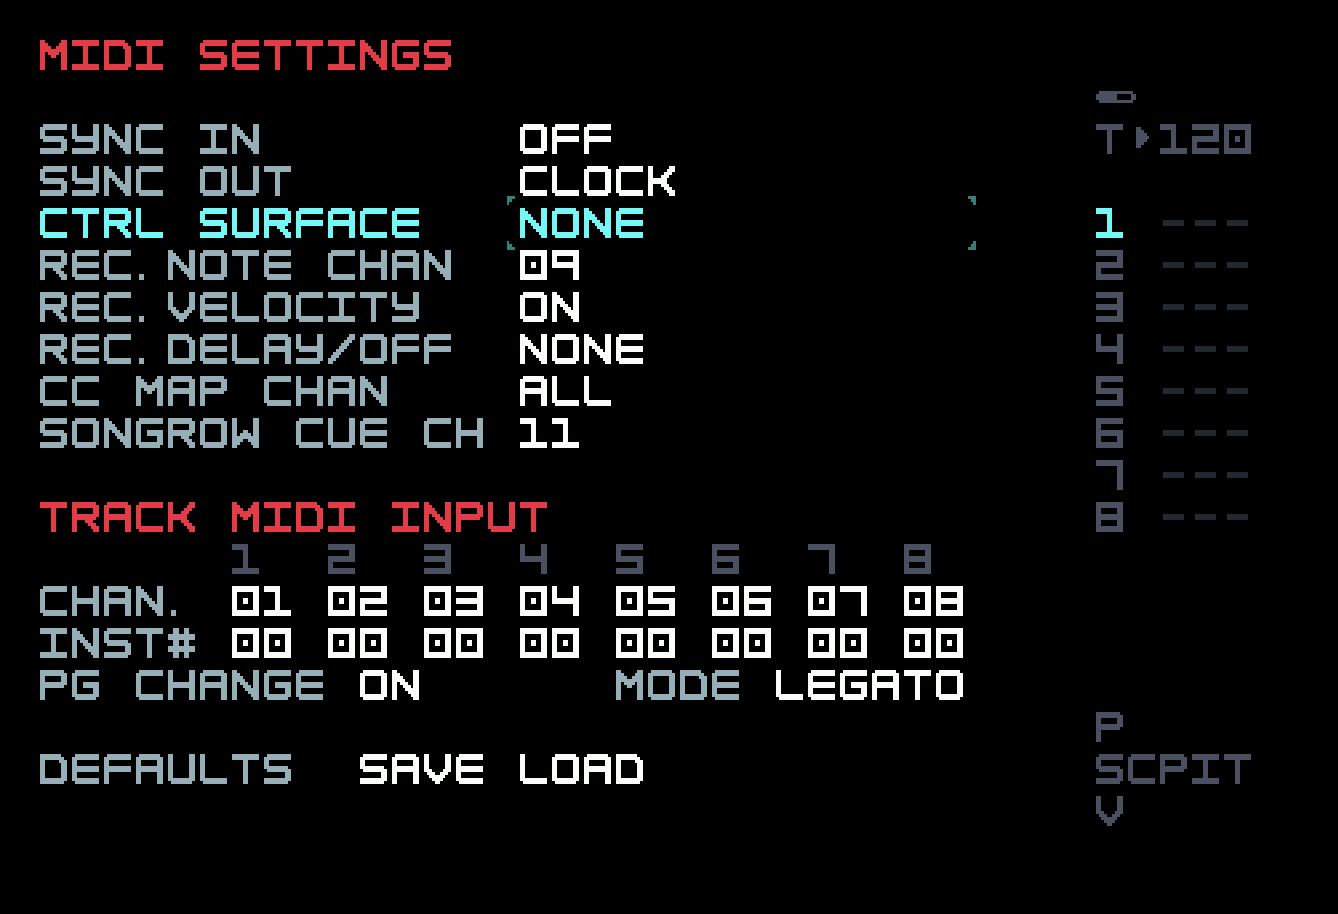
Here we have made sure that the M8 will send clock but not receive it, and that transport is off so the S-1’s sequencer will not be started. None of the other settings are relevant.
Both S-1 and M8 can handle MIDI over USB. However, both are USB peripherals, not hosts, so we can’t connect them directly to each other with a USB cable.
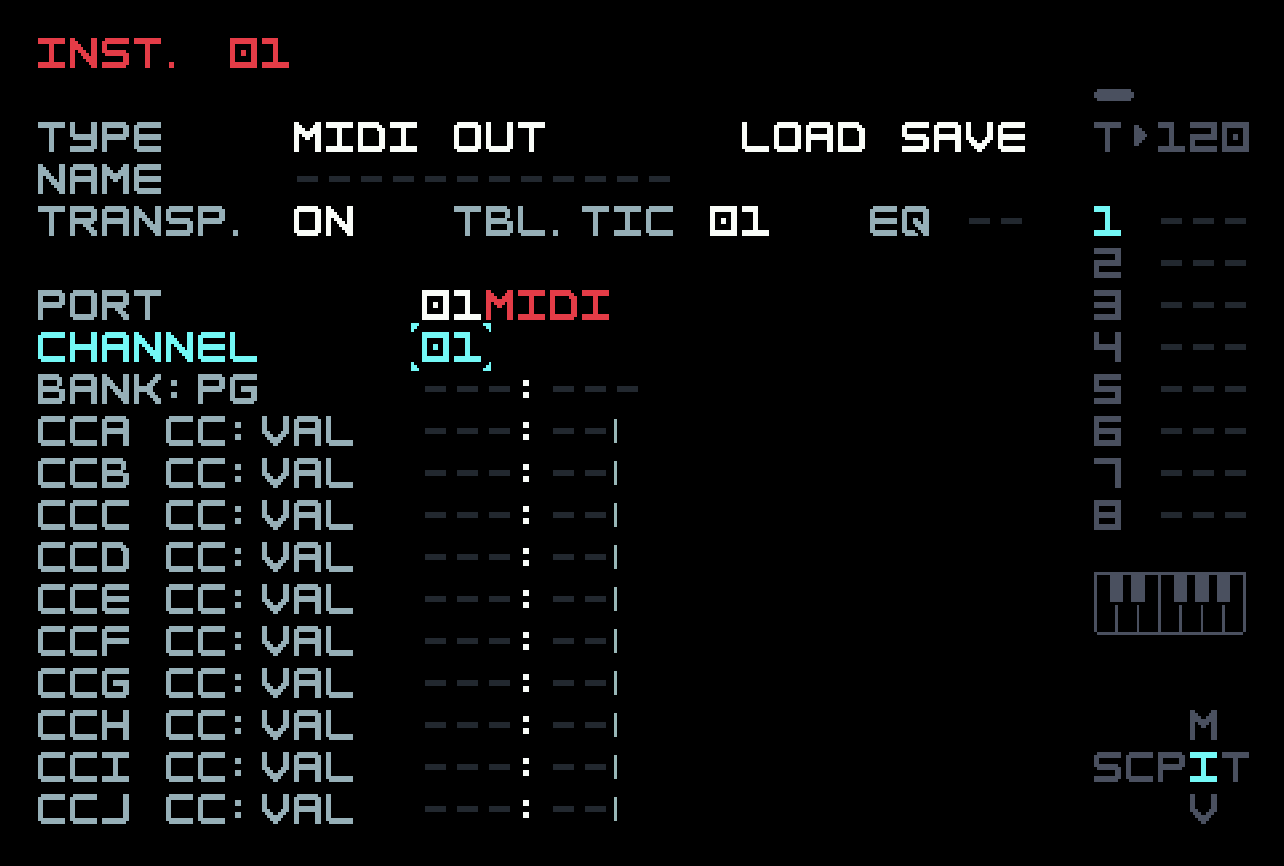
In Instrument View, we set this instrument up so that MIDI is sent out on the MIDI Out port and not USB (just in case you want to charge M8 while doing this). We have to choose a MIDI channel to send on, and we choose channel 1. We don’t need to touch any of the other settings.
On the S-1 side, we have to set it up to receive the required information. Since we aren’t trying to sell you an S-1 (or discourage you from buying one), we’ll spare you the details. Suffice it to say that running through menus with a single four-character seven-segment display that wouldn’t have been out of place in a calculator from the 1970s, and a single encoder plus overloaded keyboard buttons to navigate and edit can be fairly frustrating. There is a menu item to choose the single transmit/receive channel that S-1 uses (so we need to make sure channel 1 is selected); there is a menu item for synchronization (with an "auto" setting, which will use transmitted clocks but otherwise default to the S-1’s internal clock).
Now we can set up a chain and phrase on an M8 track, and play it.
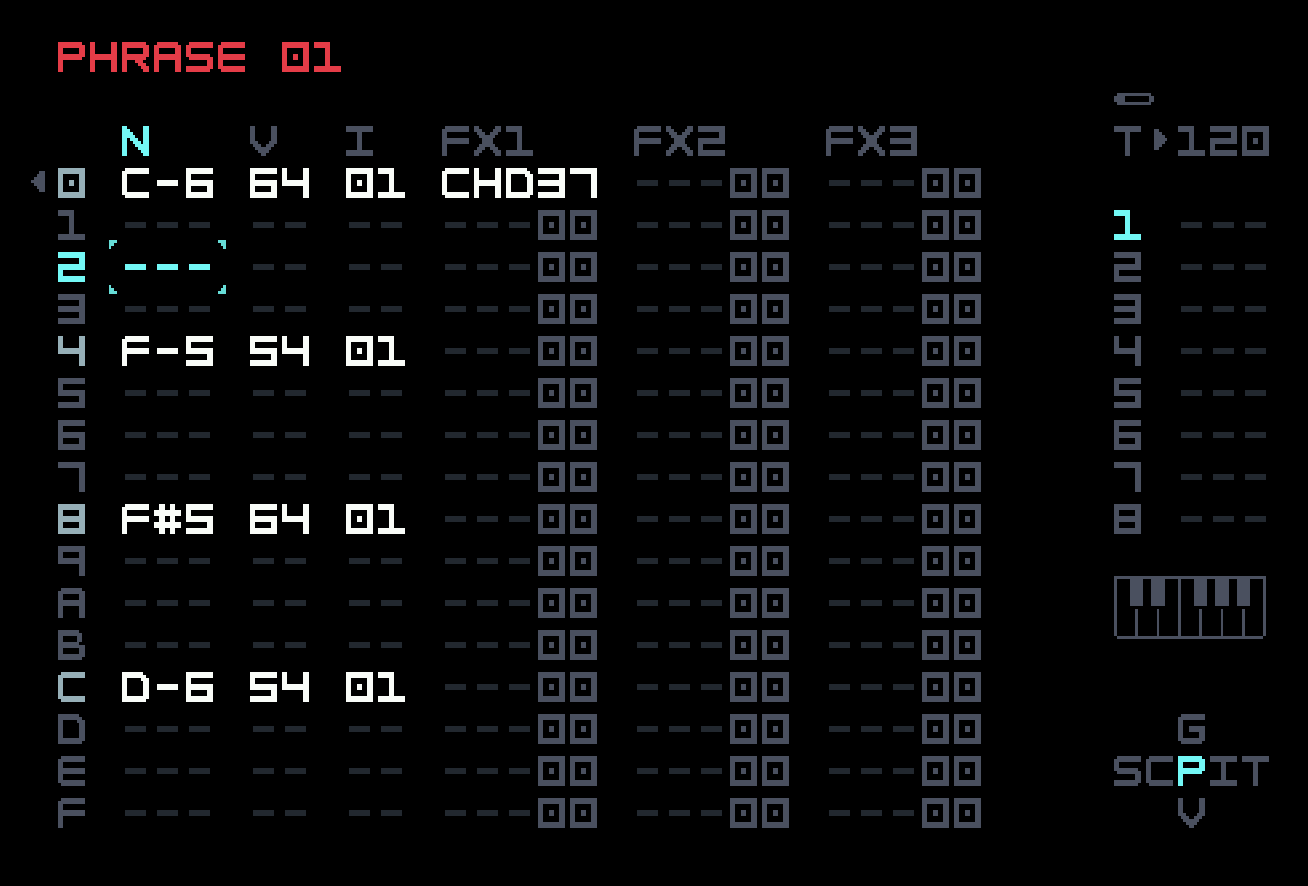
Here we have four notes with four different pitches and some velocity variation. To demonstrate polyphony, we have added a use of the CHD (chord) FX command, which will add two notes to the specified root note. The two digits indicate an offset using the scale in effect. Since we are just using the default chromatic scale, the chord specified is root, three semitones above, and seven semitones above, so a minor triad. We could have added just one note with the ADD command, and using all three FX lanes will let us build a seven-note chord (though S-1 will only play four of them). Tables will allow even more polyphony, if the receiver permits it.
CHD and ADD specify simultaneous notes. If we instead want overlapping notes, we could put in a note with nothing in the instrument column, which will use the previous instrument but not stop the previous note.
This does what we want. S-1 is silent until we press play on the M8, and then it plays the chord and three individual notes, which can be heard at S-1’s MIX OUT jack with headphones. One can twist the knobs to alter the sound on S-1 while M8 is playing it. S-1 has an arpeggiator, and if this is turned on, the chord sounds as three sequential sixteenth notes (their order determined by the arp settings on S-1). If the note on the second beat were not present, the arpeggio would repeat until a new note is played on M8.
S-1 has 64 presets, containing both sound settings and patterns, but since we’re not using the S-1’s sequencer, a program change will just change the sound. We can use the MPG FX command to choose a new preset on the S-1.
S-1 has a fixed set of CC assignments. For example, CC 74 is filter cutoff. (This is actually a common use of CC 74. The MIDI standard defines a few CCs and makes suggestions for others, but many are left undefined.) If we wanted to control that from the M8, we could set up one of the ten CC slots (say slot A) in the MIDI Out instrument to send 74. We would then use the CCA FX command to send a new value when we wanted. We could also, in Instrument Modulation View, assign an envelope or LFO to CCA. But the control values are discrete (range 0-127), and in certain cases may sound "steppy", unlike the more smooth way that envelopes and LFOs are handled internally. This would be noticeable on pitch, and perhaps on filter cutoff under certain circumstances, but not on most parameters.
We could, instead of using headphones with S-1, send audio from S-1 back into M8 using a stereo audio cable. If we are going to do that, though, it is more convenient to use the External Instrument type, discussed in the next section.
At this point, we’re going to remind you that audio coming into M8 (whether by an audio cable, USB cable, or the M:02 microphone) can also be sampled, that is, recorded into a new sample using a Sampler instrument. This can be as simple as starting recording on the M8, starting audio production, ending audio production, stopping recording on the M8, and then trimming out the dead space in the Sample Editor. But there are many more possibilities, including synchronizing recording, recording to a fixed size, starting recording automatically when audio reaches a chosen threshold level, having a metronome playing, and even a "count in" bar if you’re playing something live. In chapter 5, we mentioned this useful video covering the subject, and you now know enough about external interaction to appreciate it fully.
Jay Maculate – How to Record Samples on the Dirtywave M8
8.5 External Instrument
External Instrument offers special handling of the common case where audio from another device controlled by MIDI from M8 is being fed back into M8 (via the analog inputs or USB audio in) to combine with other audio tracks there. The advantage offered by External Instrument is that, in contrast to the usual handling of audio into M8, here the audio goes through the filter and amp stages familiar to you from other M8 instruments like Macrosynth, as well as the M8’s send effects (which normally external audio can be sent to).
The disadvantage of External Instrument, relative to just using MIDI Out and audio in separately, is that there are only four CC slots available instead of ten, because space is needed in Instrument View for the usual filter and amp controls. Also, the MIDI Out instrument permits default values for the CCs, to be sent on program change to initialize parameters that are not stored in presets on the receiving device; there isn’t space for these default values in External Instrument.
Quick rendering is not available, because the MIDI instructions have to be played at tempo to make the receiving device respond properly. However, real-time rendering is available, using the same key combo (select and then double-tap [EDIT]). The dialog offers a third choice, where the first External Instrument found in the selection is recorded in real time. Furthermore, the audio mix can still be monitored, and any tweaks to the receiving device (for example, twisting knobs on the S-1 to alter the timbre) would of course be recorded. In System Settings, there is an option for a count-in metronome to facilitate real-time recording.
Between what we’ve written here and what is in the M8 manual, you should be able to figure out External Instrument for the S-1, or for the MIDI receiving device of your choice.
8.6 Using MIDI to affect M8 tracks
The S-1 also transmits MIDI (on the single channel chosen) so we can use it to discuss receiving MIDI on the M8. If we connect S-1’s MIDI out port to M8’s MIDI in port using a stereo audio cable, M8 will receive the MIDI messages from S-1. But how do we tell M8 what to do with them?
The most obvious source of MIDI on S-1 is the button keyboard, and of course using it results in MIDI note messages. This miniature keyboard is not velocity-sensitive like fancier keyboards; the velocity sent is chosen by a menu item on S-1. We can have these affect M8 by using the Track MIDI Input table near the bottom of MIDI Settings View. This has an entry for each track on M8, allowing one to select a MIDI channel for the track and an instrument. That instrument will be used to play a MIDI note message on that track. This will happen whether or not M8’s sequencer is running. If it is running, the sounds from MIDI note messages will be interspersed with the notes programmed on that track, which of course can use any instrument. The default setting is track 1 uses channel 1, and so on.
If program change is turned on in MIDI Settings View, a program change message on a MIDI channel can be used to change the instrument associated with tracks using that channel. A given MIDI channel may be used by several tracks. The MODE setting here offers varying interpretations of this setup. Choosing MONO means that each track plays its instrument at the same time. LEGATO is like this, but will not retrigger notes (only change pitch) if the notes overlap. POLY instructs M8 to use different tracks to play overlapping notes, thus achieving a polyphonic sound. Of course, there have to be enough tracks available, otherwise some notes will be cut off.
S-1 only transmits on a single MIDI channel, but some keyboard controllers will allow splits so different regions of the keyboard transmit on different channels, and a multitrack music device with MIDI out capability or sequencing software on a computer, table or phone will be capable of transmitting on multiple channels simultaneously. These can be used to turn M8 into an eight-voice music source with instrument selection, driven not by its internal sequencer but externally via MIDI.
A more pragmatic use of a MIDI keyboard with M8 is to facilitate note entry into phrases. To this end, MIDI Settings View allows one to choose a MIDI channel to be the Rec Note Channel. The default is channel 9 (the first one not used by defaults for tracks). This can be changed, or we can change our keyboard to use this channel. If M8 is in Phrase View with the cursor in the note column, and a MIDI note message is received on the rec note channel, then the note will be entered at the cursor.
If you have some facility with keys, you might want to play notes into M8 in real time. You can do this by tapping [PLAY] in Phrase View. The playhead will start moving, any notes already inserted will play as expected, and note messages will result in note insertions. Velocity information is also recorded (and can be varied with a velocity-sensitive keyboard). If you don’t play precisely on the beat, DEL commands will be used to approximate your timing. But remember that the tick resolution is six ticks per quarter note, so some quantization will take place. Sometimes this will erase a bit of sloppiness on your part, and sometimes it will magnify it.
If you wish to record into several phrases, set them up as empty, and then use [SHIFT]+[PLAY] in Phrase View to play the whole song. The playhead will continue past the phrase being viewed, and recording will happen in another phrase; you just won’t be able to see it. Unfortunately, metronome count-in is not available for this. If you have a spare track, you can set this up yourself.
You are likely to decide that a take isn’t good enough, and if there are too many edits for you to salvage it, you might want to start over. There isn’t an undo operation here, but a workaround is to drop into Mixer View ([SHIFT]+[DOWN]), and tap [SHIFT]+[OPTION] to save a snapshot of the empty phrases. If you later want to erase a whole take, you can return to Mixer View and tap [SHIFT]+[EDIT] to restore the empty snapshot.
There is a list, at the end of the S-1’s manual, of which MIDI CCs are recognized or transmitted. Most devices with fixed MIDI CC implementations will have such a list somewhere. M8 does not have one, because its response to CCs is configurable. This is known as MIDI learn. We saw that CC 74 would control filter cutoff on the S-1. There is also a knob for this, and if one turns the physical knob on S-1, it will transmit a CC 74 message with the knob value. We could use this value to control a filter on M8, but we could also use it to control something entirely different.
But let’s stick with a filter for now. We can set up instrument 01 on M8 to be FMSynth. In Instrument View, we can move the cursor down to filter cutoff. To have S-1’s knob affect this on M8, we only need hold [OPTION], and turn the knob on S-1 to send a CC 74. The words ASSIGNED MIDIMAP appear at the bottom of M8’s screen to let us know that learning has taken place.
The list of MIDI mappings set up so far can be seen in MIDI Mappings View, also accessible from Project View. You are permitted 128 MIDI mappings, which should be plenty.
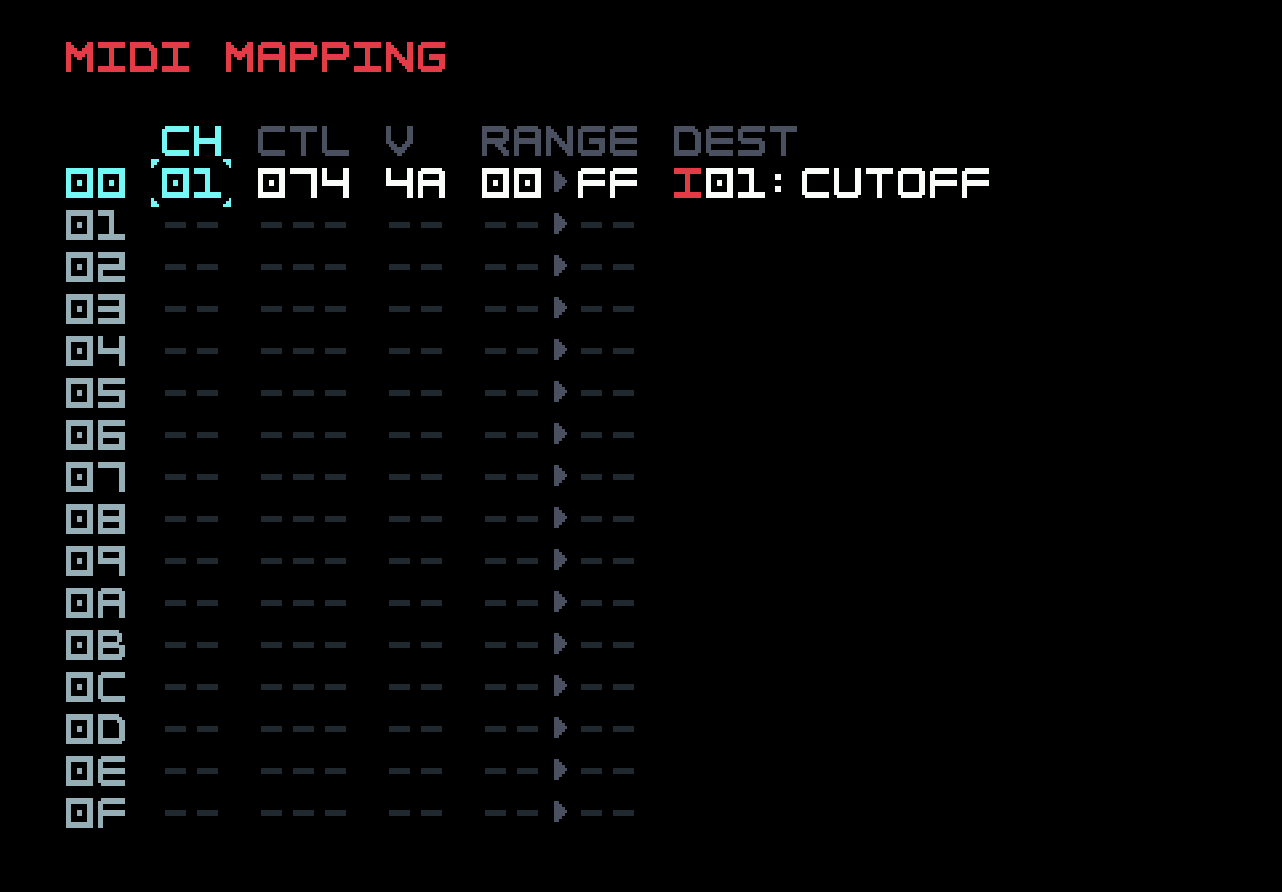
The V column contains the last received value. If you turn the filter cutoff knob on S-1, you will see this value change. The change is also visible in the filter cutoff display in Instrument View.
MIDI learn can be a fraught or messy process on many devices; it’s nice to have it be so straightforward on M8. But it still can take some time, if one wants to use many knobs and buttons. This has to be done at least once, but one can save a project template to reuse the mappings for a specific device in future.
Some editing is possible in MIDI Mappings View. You can edit the channel and CC number. You can specify a range to which the value associated with the CC (normally in the range 0-127) will be mapped, for more subtle effects on the chosen M8 parameter. A parameter can only be affected by one CC mapping, but one CC can be mapped to several parameters. If we do this with CC 74, the filter cutoff knob on S-1 becomes a macro knob, which can have complex effects on M8. This is quite useful both in the studio and for live performance.
Sooner or later, it occurs to one to try to run a cable from the MIDI out port of a device back to the MIDI in port on the same device. This is known as MIDI loopback, and the point is to try to gain more control, for example, to implement macro knobs on a device that does not directly support them. For some devices, such as S-1, this is pointless, or results in unacceptable feedback loops. But for others, such as Elektron boxes, it is a useful, if somewhat awkward technique.
We don’t have to do this on M8, because Tim has made the rare but commendable decision to allow internal MIDI routing. That is, a track on M8 can receive MIDI from a MIDI Out instrument on another track, just by setting this up in the relevant menus. M8 has no knobs, so we can’t get macro knobs this way, but we can immediately adapt the polyphony idea above to have one MIDI Out instrument play several other M8 tracks to create polyphony that is more general than what we have previously seen. Another use would be to send an envelope or LFO (albeit steppy) to a parameter that is not normally available as a destination of an instrument modulator.
All we have to do to use internal MIDI is, in Instrument View for a MIDI Out instrument, set the Port to Internal. Previously we set this to MIDI, avoiding USB, and both MIDI+USB is also possible. Internal is the fourth setting. Then any MIDI message sent by this instrument is available (only) internally on the chosen channel, which can affect other tracks by an appropriate setting in the Track MIDI Input table in MIDI Settings View.
It’s not immediately obvious how to use MIDI learn to have a track affected by MIDI CC sent internally, since there is no knob to turn on the internal track, unlike with an external MIDI controller. Here’s where the touchscreen comes in handy. Either the vertical or horizontal touchscreen axis can be assigned to control any parameter, in the same way as MIDI learn (hold [OPTION] and stroke in the right direction). Then that mapping can be edited in MIDI Mappings View to instead use CC from an internal MIDI track.
There are many MIDI keyboard controllers available, as well as controllers with various numbers of configurable knobs, buttons, faders, and pads. Just remember that if you want direct connectivity, you need one with a physical MIDI output, either DIN or TRS (and maybe you need a type converter). If you already have a computer, tablet, or phone involved in your system (or you have one of the rare devices that acts as a USB MIDI host), then you may be able to use that to route MIDI to/from the M8 over USB.
8.7 External control surfaces
The third line in MIDI Settings View (accessible from Project View) allows one to specify a control surface. At present, there is only one choice supported, the Novation Launchpad Pro mk3 (LPP). If any other possibilities arise, we will document them here. Although there are several Launchpad models, for the time being, it has to be exactly this model to use this mode (even mk2 will not work). Tim added some support in firmware 5.0 for use in his own live performances, and expanded it in 6.0 in response to user enthusiasm. This mode does not need configuration, unlike the various uses detailed above, though this necessarily means it cannot be customized, either. The best video demo of the use of an LPP, at the time of writing, is Tim’s overview of the 6.0 firmware, available on Dirtywave’s YouTube channel. Most of what follows in this section is taken from that video, with additional clarification from Tim and others on the Dirtywave Discord.
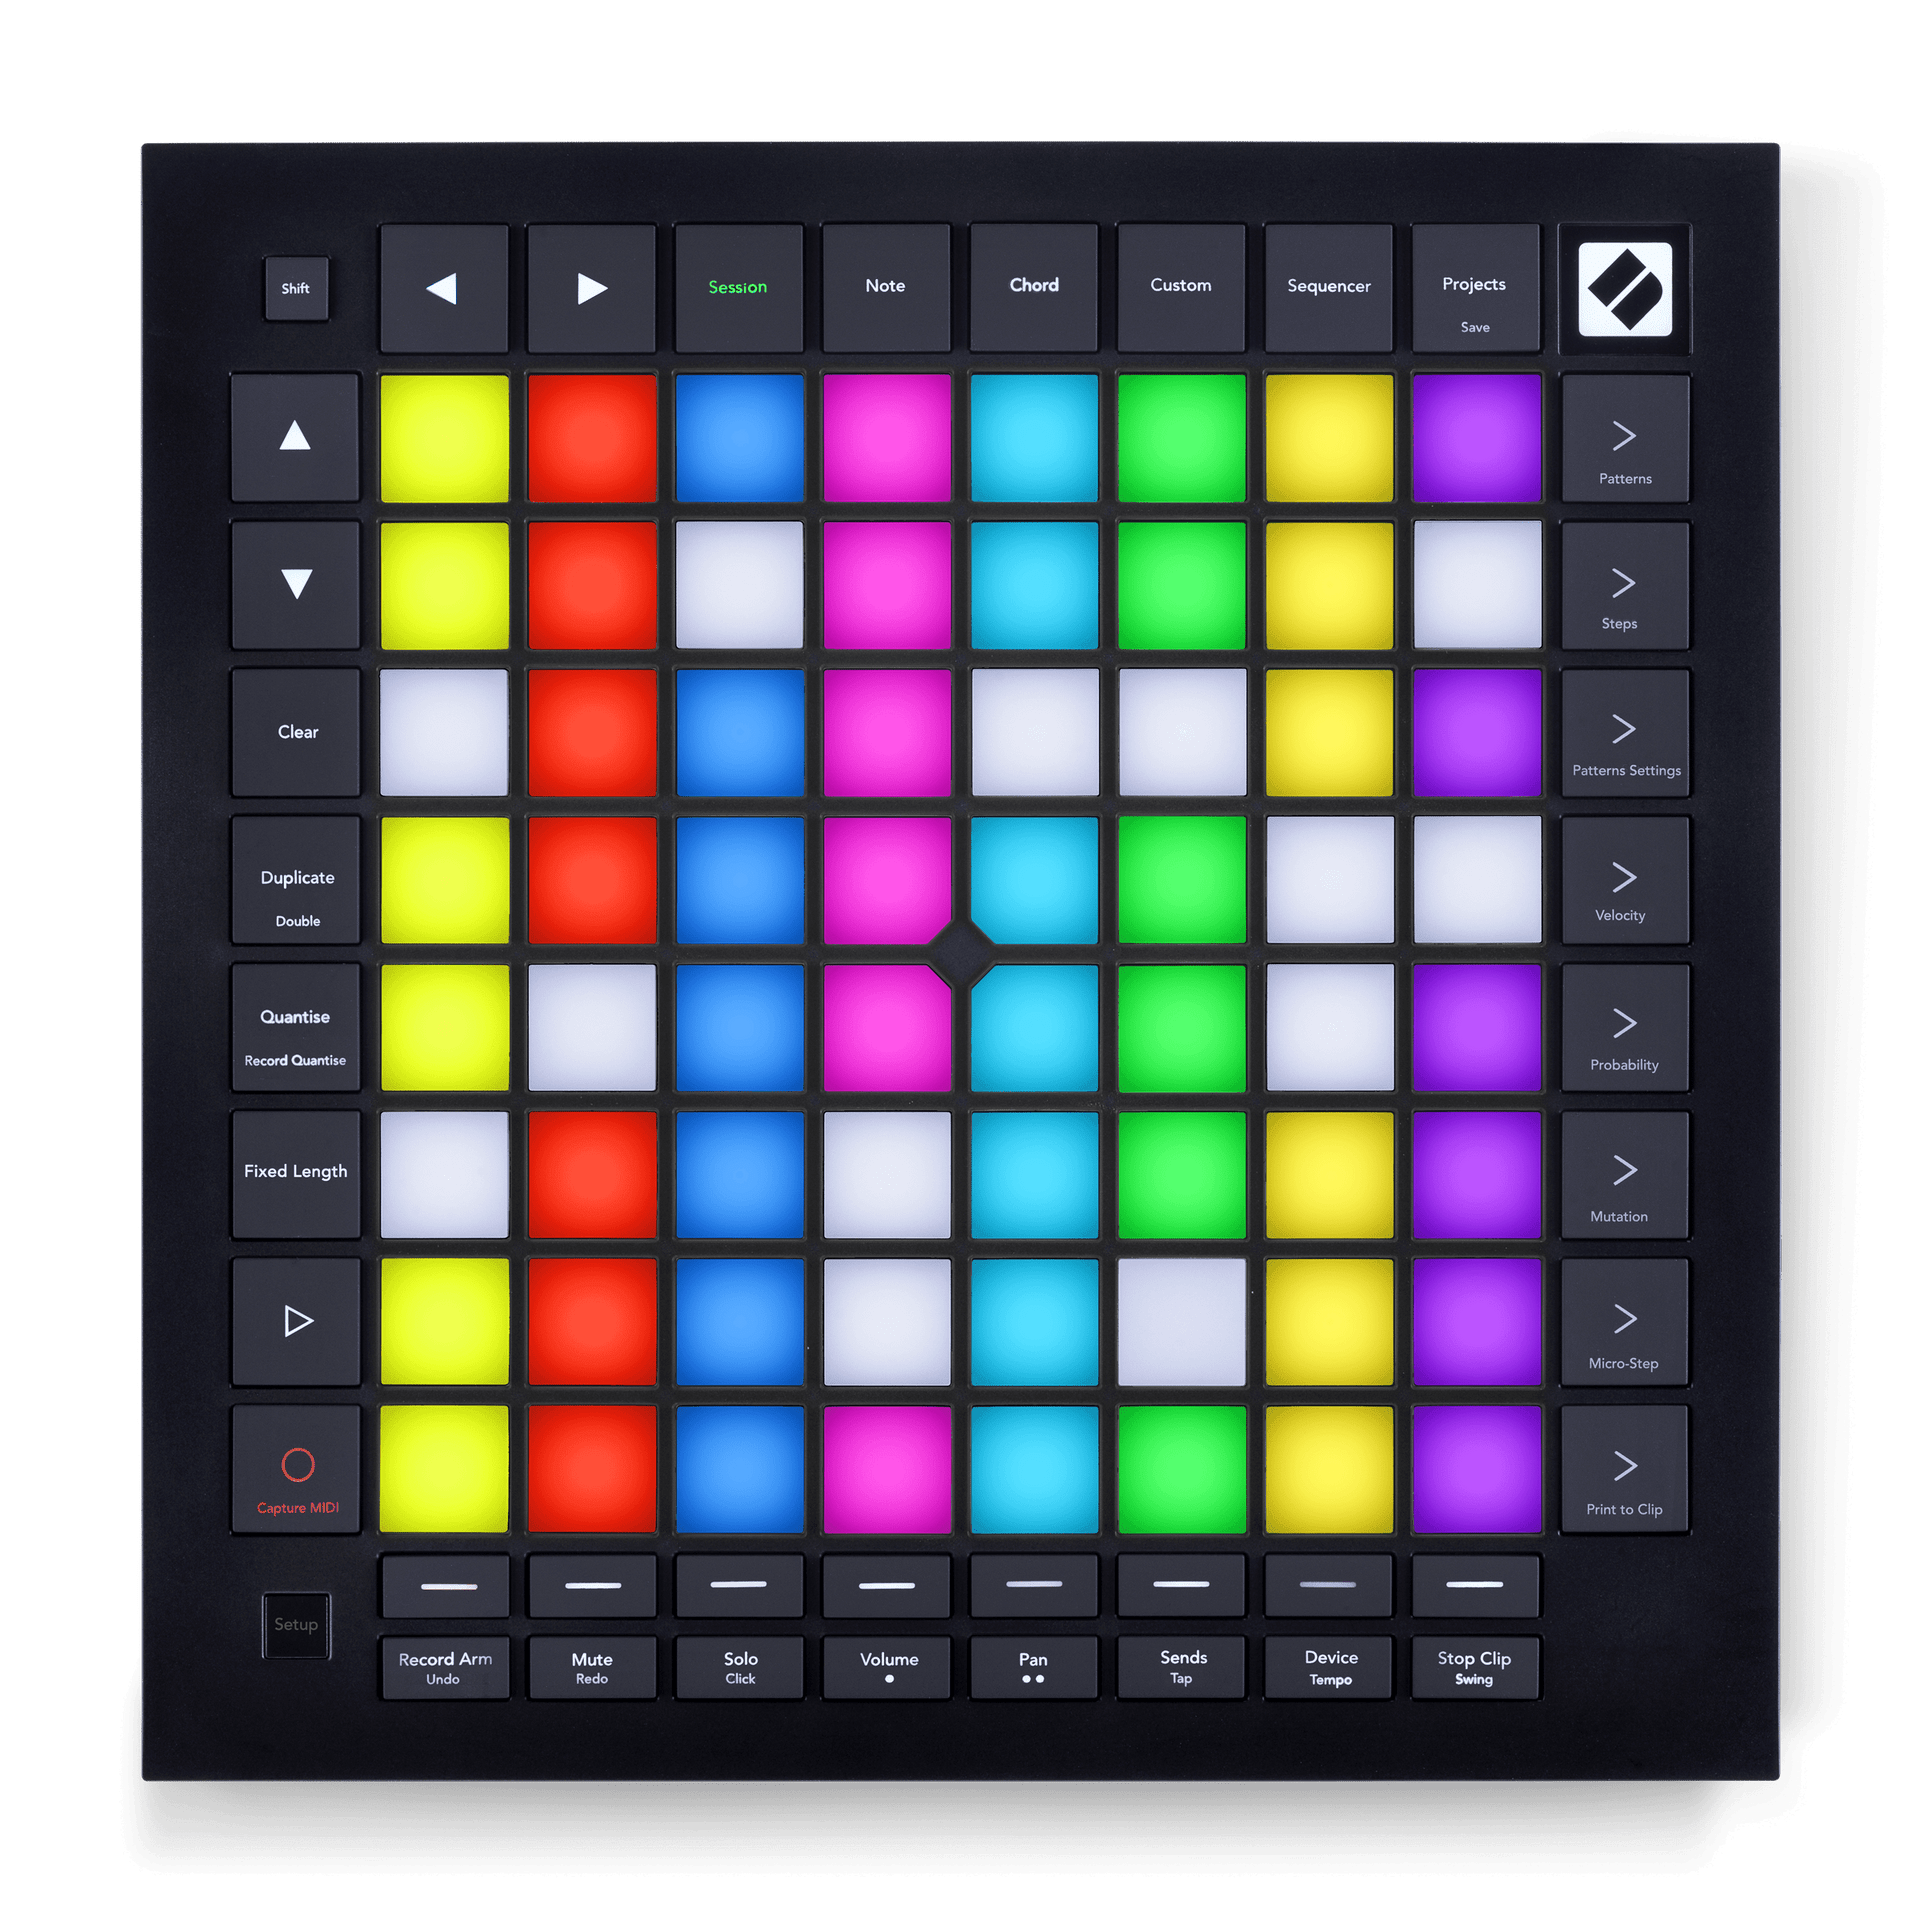
(image from Novation.com)
The LPP is a popular MIDI controller, with an 8x8 grid of velocity-sensitive pads (with multicolour LEDs beneath) surrounded by control buttons (with fixed labels, but also some lighting options). On release, it was primarily intended for use with the digital audio workstation Ableton Live, and this is reflected in the permanent labelling of the control buttons. But many other software products provide support for controlling them via LPP, and LPP is fully programmable via MIDI SysEx messages. This, combined with its 1/8" TRS MIDI in/out matching M8’s, is what makes it so suitable for additional control of M8 (and explains why many M8 owners already owned one for other reasons). Although the control modes are aimed at live performance, they can also be useful in song development, as we’ll see. The M8 continues to function exactly as it would if LPP were not attached, that is, all the button combos and views on M8 work the same way. Sometimes you will need to look at M8’s screen for information, as LPP does not have a screen.
The first thing one must do with LPP in order to use it with M8 is to update LPP’s firmware to the latest version using Novation’s Components software. Do this even if you bought it new in a sealed box, otherwise it may not respond as you expect. LPP requires USB power; M8 cannot provide this. You will need two 1/8" TRS cables (plugs on both ends). One goes from M8 MIDI out to LPP MIDI in, and the other from LPP MIDI out 1 to M8 MIDI in. Once that is done, you can turn on M8, and select LPP mode if you have not done so already. M8 will send the necessary programming commands, and the pad lighting on the LPP will change.

This photo (taken in dimmer light so the pad colours are visible) is showing Song View for the demo2 project. Relevant control buttons are lit. There are three relevant modes on the LPP: Session, Note, and Sequencer (plus a fun hidden mode we’ll describe later). You can see that the Session control button in the top row is lit up in blue to indicate that that mode is active (this view is just after turning M8 on), but Note and Sequencer are lit white to show that they can be selected. Session mode was the only one available in the 5.0 firmware; the rest were added in 6.0.
8.7.1 Session mode and global actions
In Session mode, the pads mirror the Song View grid, so each column of pads represents one track. But you can scroll the LPP view independently of the view on M8, using the up/down triangle buttons at the top of the left control column. Since there are no labels on the LPP pads, colours are used to provide some partial information. Unused phrases are unlit; empty phrases are dull pink; nonempty phrases are white. If you hit [PLAY] on M8, the top row of pads on LPP will turn green, indicating the playhead position for each track. But you can also hit Play on LPP (right-pointing triangle, second from bottom on the left control column) and the same thing happens.
Certain actions on LPP are global, that is, they work in all three modes. These include the Mute and Solo buttons on the bottom control row. When Mute is selected, it will light red (white when unselected), and this permits muting/unmuting of each of the eight tracks, using the track selection buttons at the bottom of each pad column (with horizontal lines on them, white for playing, red for muted). When Solo is selected, a track selection button will solo the corresponding track (tap the track button again to bring in the other tracks). For both Mute and Solo, pressing them again will cause them to flash, and in this mode, pressing and holding a track selection button will have the desired effect, but only as long as you hold it (allowing more rapid interactions).
Another global action allows saving of a snapshot, by holding Shift (top left) and pressing Record Arm (leftmost on bottom control row). The Record Arm button will stay lit to indicate a saved snapshot, and you can revert to that at any time by pressing Record Arm again. You can see how this would be useful in live performance, to improvise and then return to standard play.
In Session mode, the pads on the right control column, lit and marked with the > character, can be used to start playing on a given row. You can switch into M8’s Live Mode by holding Shift and tapping the left-triangle button just to its right. The Novation logo at top right will light up to tell you on LPP that you are in Live Mode on M8; repeating the action goes back to Song Mode on M8. While in Live Mode, individual chains can be cued on LPP using the pads.
The Projects button (rightmost on top control row) will take you into the Load Projects View on M8. You can either use the M8’s buttons (since you have to look at its screen anyway), or use the LPP navigation pads at top left. Tapping Shift on LPP selects the new project under the cursor. Note that there is no "do you want to save the old project?" dialog as there would be in M8 navigation; LPP mode assumes you have messed up the old project with live improvisation and don’t want to save your spontaneous changes; you really just want to start the next song in your performance.
8.7.2 A slight digression for Note mode
There is an editing submode of Session mode, but we’ll first describe another, simpler mode, namely Note mode. In Note mode, each pad of the LPP plays a distinct note. Lower rows play lower notes, and upper rows play higher notes. It isn’t nearly as easy to use as a proper keyboard, but it does have the advantage of respecting the global or track scale, so every pad plays a note in scale. The root notes in each octave are lit white.
But which instrument is playing? The track selection buttons still work in this mode, but as you know, M8 has no notion of a default instrument on a track. The instrument that is playing is the last one selected on the chosen track. Holding Shift and pressing one of the Up/Down buttons below it will pull up the Instrument Pool View on M8, after which the buttons can be used to move around and select another instrument. If you want to add to the pool, the Projects button will bring up the Load Instrument dialog on M8, which can be navigated like the Load Project dialog above (arrow keys to move, Shift to select, tap Projects again to exit without selecting). These two instrument-focussed interactions also work in Sequencer mode, as described below.
8.7.3 More on Session mode
Back to Session mode. The bottom button on the left control column (just below the play button) has a circle on it, often used as the symbol for recording. It also says "Capture MIDI" below that circle. We’ll call this the Record button. If you tap this while in Session mode, it enables editing on the LPP, and the button will light red to remind you of this. Tapping it again leaves the editing submode.
While Record is lit, the cursor position is indicated on LPP by a blue pad, and chain references identical to the one under the cursor will be pulsing (so you know where your edits will have an effect). By holding Record, you can change the note at the cursor in the current phrase using the keypads,
You will notice the Clear and Duplicate buttons on the left control column are also lit. To clear a chain, hold Clear and tap the pad you want. To duplicate a chain, hold Duplicate and tap the pad to copy (that pad will be lit red), then tap once elsewhere to clone into that spot or double-tap to deep-clone. Holding Duplicate and using the > buttons on the right control column will copy and paste entire rows. If, in Note mode, you hold Record and press Play, you can live-record into the currently-playing phrase using the keypads. But this is probably better done in Sequencer mode. Double-tapping a pad will go into Sequencer mode focussed on that chain, or you can just tap the Sequencer button to do so for the chain under the cursor.
8.7.4 Sequencer mode
Sequencer mode is the most complex. The 8x8 grid of pads is divided into three regions. The bottom four rows work as keypads, as in Note mode. The top right 4×4 grid represents the 16 phrase slots in the displayed chain (identical phrase references will pulse), and the top right 4×4 grid represents the 16 note slots in the displayed phrase. The up and down buttons scroll the keypads to reach higher or lower notes. The left and right buttons move within the same row to select different tracks. To loop play of a single phrase, hold the phrase pad and press the play button.
Tapping the Record button to engage edit submode opens up more possibilities. In this mode, one can hold a note pad in the top left 4×4 grid to edit it. The > buttons on the right let one change velocity in a coarse fashion (only 8 values possible), and the up and down buttons allow for quick octave shifts of the given note. Holding Record and tapping in the keypad section changes the note under the cursor. Remember that the pads are velocity-sensitive, so both pitch and velocity are recorded.
When Shift is held, the left/right buttons will rotate notes within the phrase. When a phrase pad is held, the up/down buttons will change the transposition of the phrase (as specified in Chain View on M8). The uses of the Clear and Duplicate buttons as detailed above for chains in Session mode also works for phrases in Sequencer mode (hold Duplicate, single-tap to copy, single-tap to paste, double-tap to clone). And remember that the instrument commands described above in Session mode and the live-record command mentioned for Note mode also work here!
8.7.5 Just a bit more...
Finally, the fun hidden mode is Beat Repeat mode. You enter it by holding Shift and pressing Session (which will turn red to remind you). In this mode, the bottom row turns blue, and the two rows above it represent the 16 slots of a phrase. You can hold just one pad to select a single slot, or two pads to select the range between and including them. In either case, while the playhead proceeds normally through phrases and chains, only the selected slots will loop on playback. That is, if slots 2-4 are selected, then for each phrase, the notes 2-3-4-2-3-4 will repeat for 16 steps, at the same rate as if the mode had not been engaged. You can, of course, change the selection on the fly.
The blue row represents tracks, and tapping a pad can exclude or include tracks from being affected. Between this, and being able to easily change the selection, there is a considerable range of possibilities. For any given song, it will take some experimentation to find the sweet spots, but the result will be nice and fairly easy improvisational variation.
That concludes our description of the LPP modes for M8 control. You may be concerned with the fact that the TRS MIDI jacks on M8 are entirely used up when it is connected to LPP. LPP has a second MIDI out port, which can be configured to mirror its MIDI in. The communications between M8 and LPP use MIDI channels 1-3, so if you want to use M8 to control other devices by MIDI, you can use this second out port on LPP, making sure that M8 is sending to those other devices on MIDI channels 4 and higher. Getting MIDI into M8 from other devices while LPP is connected is a bit trickier. You will have to use something with MIDI merge capabilities on the path from LPP MIDI out to M8 MIDI in, to merge in the MIDI information from those other devices.