2 Falistri: A Function Generator
Falistri, a module produced by the Italian company Frap Tools, was the first module I bought. While I bought other modules within a few hours or days, and never intended to use it all by itself, there is a surprising amount that can be done just with this module. It permits a focussed introduction to the subject of modular synthesis.
Here is what Falistri looks like (image from ModularGrid.net).
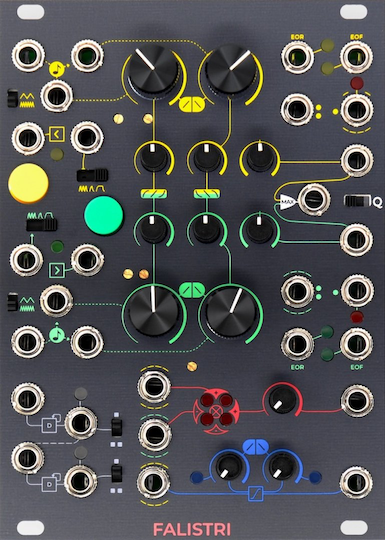
It is 5.25 inches (13.33 cm) high and 3.6 inches (9.14 cm) wide. Eurorack modules are typically measured using different units for height and length derived from an earlier standard for rack-mounted electronic equipment. A Eurorack module is usually 3u in height, with varying width based on the unit "hp" (horizontal pitch), one-fifth of an inch. Using these units, Falistri is 3u by 18hp. (There are some 1u modules, and some racks that have a strip for them.)
Some of the holes or jacks on the panel provide outputs, and some accept inputs. These are connected, within the module or to/from different modules, by means of cables with 3.5mm plugs on either end. The resulting flexibility of configuration, and the physical sensation of patching, are some of the reasons that people use Eurorack.
Falistri is an example of what is known as a function generator. The term was first used by Don Buchla to describe his 281 module, first available around 1976, and described as a "quad function generator". Most function generators available today are closer to the "dual universal slope generator" design of Serge Tcherepnin from about the same time. Tcherepnin was trying to make Buchla’s ideas more accessible and cheaper, and Serge modules continue to be produced today (as do Buchla’s, both in a 4u format).
When I started considering Eurorack, the single most popular module on ModularGrid.net, a site that allows one to look up details of Eurorack modules and design whole racks, was a function generator: Maths, produced by Make Noise, a company in Asheville, NC, USA (founded by a former Moog engineer, and located in the same town as Moog). It appears in tens of thousands of racks on the site. Of course, many if not most of these do not exist in physical reality (I have several racks on the site describing alternate or historical configurations), so it is impossible to tell how many modules are in active use. But received wisdom suggests that it should be among the first modules one buys. Maths looks quite different from Falistri, but shares much of its functionality.

Maths does a lot, but it can be difficult to understand the extent of what it does, due to its cryptic (though stylish) layout, and a less-cryptic but still sometimes confusing manual which tapers off with a series of briefly described patches pushing the module to its limits. The "Maths illustrated supplement", a samizdat document created by user demonanization on ModularGrid, adds some illustrations to those patches (coloured lines representing cables, drawn on a picture of the module) and a few graphs, which only partly mitigates the situation.
Falistri is in a smaller number of racks on ModularGrid, but has a good reputation among those who are aware of it. It has a more logical layout (to my eyes), and more cleanly-delineated functionality. The panel prioritizes iconography over text, a sensible decision in this multicultural world, and one that permits a greater density of components. The same reasons I chose Falistri in lieu of Maths make it a good choice for this expository text. While I wouldn’t necessarily recommend Falistri unreservedly to others (it is more expensive, and often difficult to obtain), lessons learned from studying it can be transferred to similar modules, including Maths. This mirrors choices I have made in my other flâneries, for which I have often chosen less-popular programming languages for pedagogical benefit.
Falistri also has an excellent manual. Frap Tools have put the manuals for all their modules into a single document, called Manualone. So when I refer to Falistri’s manual, I really mean the chapter on Falistri in this larger document. Manualone is really well-written, but it does, understandably, assume a certain amount of knowledge about Eurorack. Hence my more primitive set of notes, starting from zero.
2.1 What is a "function generator"?
To answer this question, one must understand that a Eurorack cable carries a voltage that varies with time, in the range -10V to +10V. We don’t need to understand the units (V stands for volt) or the physics of what is happening; we can think of this as a quantity that can take on negative or positive values. Some such varying voltages can be interpreted as audio signals, though to hear them requires translation of the varying voltage into physical motion of a speaker membrane, with the resulting air pressure waves interpreted as sound by our ears and brains. Again, we don’t need to understand anything more than we do when we plug our earbuds into a computer or mobile phone.
Other varying voltages cannot be interpreted as audio signals. They might move a speaker membrane, but not in a way that will result in an audible sound, because they are changing too slowly. These can still be useful as control voltages (CV), which can do the electronic equivalent of turning a knob. To add to the confusion, these two categories (audio and CV) can overlap, as we will see.
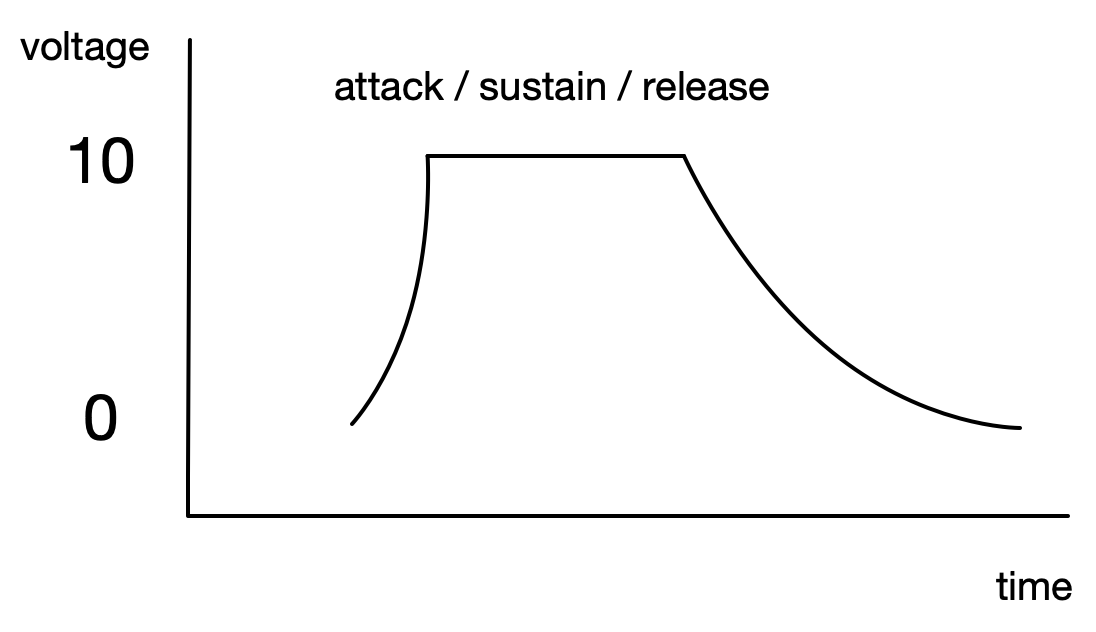
At its heart, a function generator makes a control voltage go up, and then down. We can picture this on a time-voltage graph like this:

You may notice that there are no units or numerical labels on this graph. As we will see, those depend on the use to which the function generator is put.
Looking at Falistri (or any other function generator, such as Maths) one sees a bewildering variety of jacks, switches, and knobs. The colours on Falistri provide a clue as to the functionality. The top third, coloured yellow, is a near-mirror of the middle third, coloured green. The bottom third has white, red, and blue parts. These colours indicate different functional components. We’ll initially focus on the middle green portion. Here is a closeup of the green portion, to which I have added a couple of labels (on the small switches) taken from the Falistri documentation (so that you can consult it as you see fit).
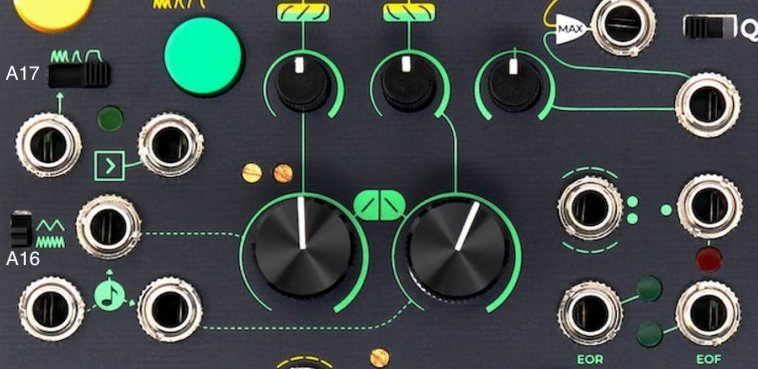
The most prominent features in this section are the large knobs. The left one controls the speed of the rise of the control voltage, and the right one controls the speed of the fall. On the graph above, this would be the slope of the lines, whether gradual or steep. There are no units or ticks on these knobs; they are to be adjusted by ear. At this moment, we have no way of hearing anything, or anything to hear, but that will come. We’ll start with the small switch A17 set to its middle position, and the small switch A16 set to its upper position. These will be explained later.
A control voltage that rises and then falls can be used to control the volume or amplitude of another signal (audio or CV), using a voltage-controlled amplifier (VCA). In a VCA, the control voltage replaces or supplants the knob that you might be accustomed to using to control volume on a TV or receiver/amplifier (if you actually use a knob and not a remote). A tone knob (bass or treble) on a receiver/amplifier boosts low or high frequencies. Similarly, a voltage-controlled filter (VCF) reduces low or high frequencies, but the knob that indicates where the reduction begins is replaced with a control voltage. When a control voltage is used in this way, it is typically called an envelope.
2.2 Creating an envelope
Falistri provides us with a way of creating an envelope and using the knobs to set the durations of its rise and fall, or attack and release (sometimes called decay). The envelope can be triggered by pressing the large green button at upper left, or by providing a rapidly-rising CV (looking like a near-vertical line on a voltage-time graph) into the jack near it labelled with >. Such a signal is often called a trigger or gate, and lots of modules can generate them (including Falistri). We can vary the shape of the rise and fall respectively by using the two smaller knobs directly above the larger ones. With a knob set to the middle position, the shape is a straight line; to the left, it is concave upward ("exponential"), and to the right, concave downward (commonly called "logarithmic", though this is a misnomer, as it is really inverted exponential decay).

These shapes vary the character of the sound when used with a VCA. A sound like a wood or metal block being struck might have a short exponential attack and decay. A piano or guitar note might have a short exponential attack and a longer delay, as the string continues to vibrate but loses energy. The swell of a bowed string instrument would have a longer (perhaps linear) attack and, if the bow is abruptly stopped, a short exponential decay. This is also the characteristic sound of a reversed recording.
An organ has a short attack and short decay, since a key abruptly starts and stops the flow of air through an organ pipe (or simulates it in electronic form). But it will also sustain a note at constant volume for as long as we hold a key down. We can get this behaviour from Falistri if we set the switch A17 to its rightmost position, giving us an attack-sustain-release (ASR) envelope. Then we can hold the green button to sustain the envelope voltage at its highest point, or if we are using the > jack, it will be sustained as long as the control voltage going into that jack is sufficiently high.
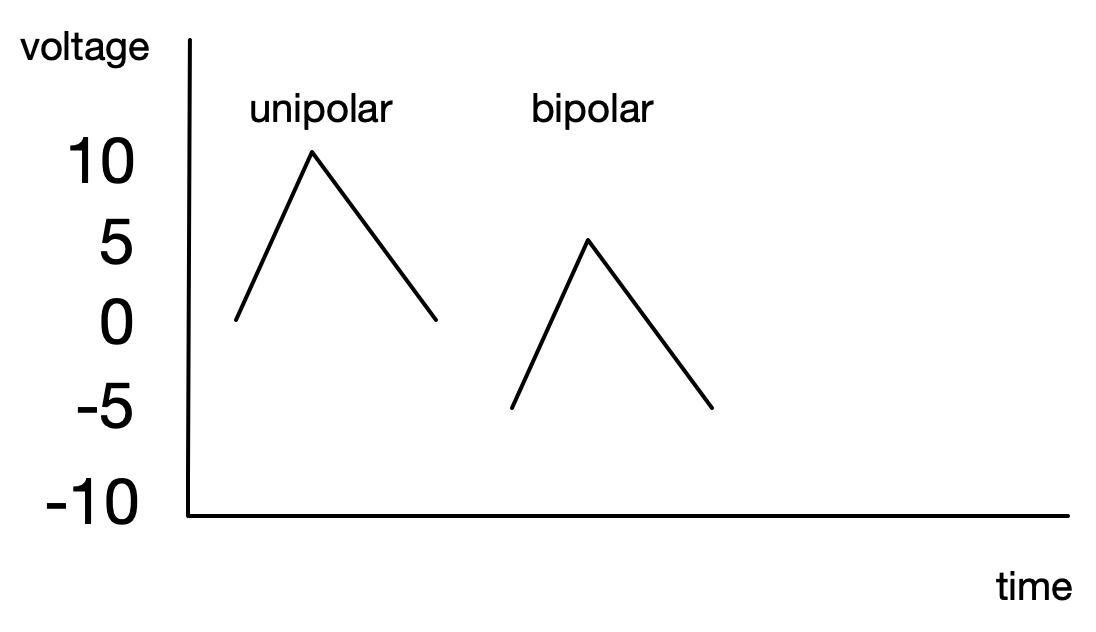
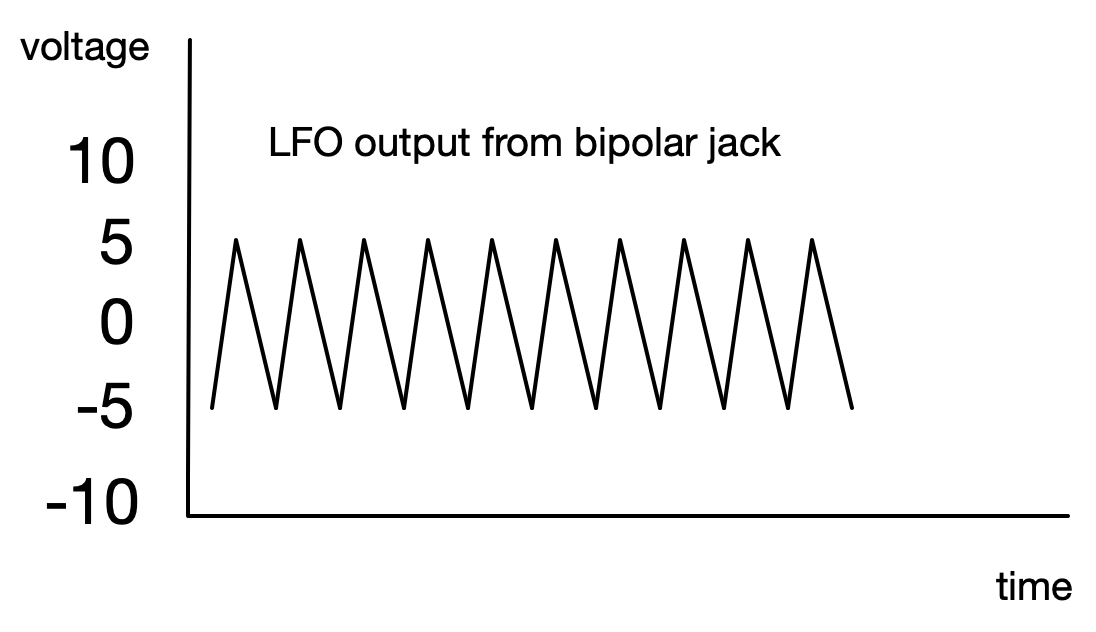
I’ve said Falistri is generating an envelope, but where is it available? The jack with the single green dot beside it will produce a CV ranging from 0V to 10V. This is unipolar, because it moves away from zero only in one direction, towards the positive. The other jack, with two green dots, is bipolar. It produces a CV ranging from -5V to +5V.
2.3 Creating an oscillator
The utility of the bipolar jack is not apparent at first. What does a negative CV mean to a VCA? What does negative volume mean? But thinking about CV in more general terms, we might want to vary the position of a knob above and below a particular setting. A slight variation in volume, back and forth, gives the effect known as tremolo; a slight variation of pitch is vibrato. "Slight" suggests that maybe the range shouldn’t be as large as in the above diagram. The jack at far upper right of the green section will provide CV with a smaller range, controlled by the small attenuverter knob to its left (with a green line to the jack). The word "attenuverter" is a combination of "inverter" and "attenuator", and refers to a knob that can not only go up from zero but go down below zero as well (zero being at the middle or twelve o’clock setting). Another word used for this is "polarizer". Setting the knob a little to the right of middle might give a range from 0V to 1V, while setting it a little to the left might give a range from 0V to -1V.
Tremolo and vibrato, though, are both a continuous, repeated variation, not a single rise and fall. We can get the repetition by moving the switch A17 to its leftmost position (in which case we no longer need to press the trigger button). At this point, we have created a low-frequency oscillator (LFO). These are quite useful in modular synthesis, as most modules have inputs for control voltages that can modulate various parameters affecting the function of the module. We can do the equivalent of twisting a knob back and forth, either slowly or rapidly, without any required physical action.
But oscillators are also used to create sound. We just have to make the frequency of oscillation high enough so that it is audible (or, more precisely, what it does to a speaker membrane is audible). Turning the rise and fall knobs all the way to the left will not suffice. The switch A16 changes the range of these knobs; moving it to its lower position will lower that range, thus lowering the period of oscillation and raising its frequency, which has the effect of making the repeated envelope into a potential audio signal. To hear this signal, we need to patch it to an output module (it is monophonic and at a higher voltage than is suitable for headphones, amplifier/receivers, or powered speakers) or to a mixer where one can attenuate it.
Here’s what it sounds like. I am twisting the rise and fall knobs together in the same direction.
The recordings here are going to seem quite plain compared to professional recordings or even amateur ones on social media sites. Typically, basic sounds are enhanced in a number of ways: passing them through filters to sculpt or enhance with resonance; using effects such as chorus, delay, reverb, compression; multiplying sounds with multitracking, looping, and sampling. I could do many of these things easily with the equipment I have, but it’s best to start at the beginning, with the basics.
2.4 Pitch and waveform
The pitch we hear depends on the period of oscillation, how long it takes one rise-fall cycle to complete. If we cut this in half, the frequency will double, and we will perceive this as a musically-pleasing one-octave rise in pitch.
The relative size of the rise and fall portions will affect the shape of the waveform and thus the timbre (meaning the way it sounds apart from pitch and volume). Equal-sized rise and fall periods gives a triangle wave, which sounds like a simple flute or recorder. (Comparisons to physical acoustic instruments are approximate, since each of those has many other factors affecting the sound.) A longer rise and shorter fall gives a sawtooth wave, which is reminiscent of a bowed string instrument. A square wave (like a rapidly-repeated gate, which can be made with Falistri) gives a woody or reedy sound, like a clarinet. Changing the shape of rise or fall stages (concave up or down) with the smaller knobs will also affect the timbre.
Here’s what twisting the rise, fall, and shape knobs separately sounds like.
An example of a waveform that cannot be made with Falistri is a sine wave. It resembles a rounded triangle (there are no straight lines), and has a pure, clean, plain sound. Mathematically, it is the height of a dot on the rim of a circle turning at constant speed, which makes it useful in the analysis of periodic functions (such as our waveforms). Sine waves will show up in the next chapter.
The large knobs change both timbre and pitch; the small knobs change timbre but not pitch. What if we want to change pitch but not timbre? We can do this by making proportional changes to rise and fall both, so that the shape of the wave does not change, only the length of the period (that is, the wave is stretched or compressed).
The jack at the lower far left of the green section, labelled with a little green musical note, does this. In addition, it is calibrated so that a one-volt signal in will cause the pitch to rise one octave. This V/oct behaviour is a widely-used standard. Putting in one-twelfth of a volt will cause the pitch to rise one semitone, since there are twelve semitones in an octave.
Not all function generators offer V/oct tracking, and not all preserve pitch when changing envelope shape. To cause the pitch made by Falistri to go up, we must shorten the rise and fall times, so the relationship between voltage and knob position is the opposite of what we might expect. Falistri also has separate CV jacks for rise/fall, and for these, a voltage increase corresponds to a time increase.
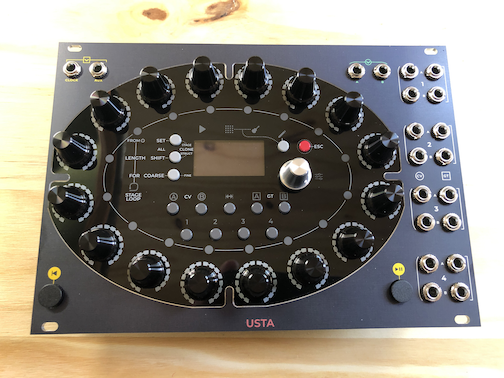
Where would we get one-twelfth of a volt, or even one volt? I pointed out the lack of numerical knob labels on Falistri and Maths, and this is common in Eurorack. These precise pitch voltages could be generated by a sequencer module which is programmed using the names of musical notes, or by a quantizer module which rounds arbitrary voltages to the values associated with a particular musical scale. Here’s an example of Falistri being played with a pitch sequence from Usta, the Frap Tools sequencer.
I’m going to include a photo of Usta, not because it’s germane to this discussion, but because it is so lovely. The design was inspired by the Buchla 250e "multiple arbitrary function generator".
The sound created by Falistri with pitch sequenced by Usta plays continuously. To hear separately-articulated notes, we would need another envelope that provides control voltage affecting the volume of a VCA handling our audio signal. But we have all we need for that in Falistri! The other envelope can be produced by the yellow section at the top, which mirrors the green section and offers near-identical functionality, and the VCA is down at the bottom right in the red section.
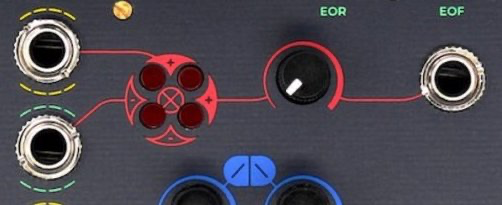
Furthermore, there is already an internal connection of the yellow unipolar output and the green bipolar output to the two input jacks of the red VCA, as indicated by the dashed coloured lines around the two input jacks at the left of the red section (and by similar dashed lines on the yellow unipolar and green bipolar jacks). This connection is referred to as "semi-normalled" in Falistri’s manual (often just "normalled" in other references) which means that the default connection can be broken by plugging an actual cable into an input jack. Since we want the default connection, all we have to do is move the output cable from the green bipolar output to the rightmost output jack of the red section, and adjust the volume to taste with the red attenuator.
Here’s what the result sounds like, using the pitch sequence from Usta as before to control the pitch of the green oscillator, but also an associated gate sequence from Usta going into the trigger input of the yellow envelope.
2.5 Modulating the oscillator
To take Usta out of the picture again, and return to using only Falistri, we can remove the cables carrying the pitch and gate sequences from Usta, and put the yellow envelope into cycling mode by moving the yellow A17 switch to its leftmost position. The resulting sound is a note of constant pitch, produced by the green oscillator, with a repeating volume envelope produced by the yellow section (which we can tailor to taste). If we then speed up the yellow envelope to audio rate, we get an interesting change in the sound.
This is amplitude modulation (AM). If you are interested, Falistri’s manual goes into more detail about the relationship between the frequencies of the oscillators and the frequencies one hears in the output. This might be important if one wants to add more musical structure (such as a pitch sequence) rather than just making an interesting sound.
Most VCAs expect unipolar volume control, where 0V is off, and an increase in voltage in the positive direction increases the volume. They will treat a negative volume CV as zero. The one built into Falistri is unusual, in that it is bipolar. It interprets negative volume CV by inverting the audio signal. In effect, a bipolar VCA simply multiplies the two signals. There aren’t dedicated audio and CV inputs to Falistri’s VCA; the two inputs are symmetric (as is multiplication). This is alluded to in the design of the panel, with a red multiplication sign at the heart. Falistri’s manual calls the red section a "four-quadrant multiplier".
To explore the effect of this design decision, we can break the semi-normalization by patching a cable from the bipolar output of the yellow oscillator to the top input of the red section (replacing the normalled unipolar output). Here’s what the result sounds like.
The sound is similar to amplitude modulation but not identical. Again, for more technical details, see Falistri’s manual. This is known as ring modulation (RM), because the original implementation of this circuit used a ring of four diodes. The circuit has many uses outside musical synthesis, but since it was relatively cheap to implement, it was included in many early synthesizers, and so its sound will be familiar to electronic music listeners.
Another thing we can modulate in this fashion is pitch. If we set up the yellow section as a slow LFO again, and plug one end of a cable into the attenuated unipolar yellow output with the attenuverter set close to zero, we will get a small, slowly-varying CV. Plugging the other end of the cable into the V/oct pitch input of the green section will make the pitch of the green oscillator warble slightly. This effect, as I mentioned earlier, is known as vibrato.
Now, as before, we can move the yellow LFO into audio range, and play with both the pitch of the yellow oscillator, and its attenuverter knob, which is controlling how much the yellow oscillator (the "modulator") modulates the pitch of the green oscillator (the "carrier"). This results in another interesting set of sounds.
You can probably guess the name of this technique: frequency modulation (FM). A sine wave is a good choice for the modulator, but we are using variations of triangle waves. This particular version is known as exponential FM. As with extreme AM and RM, exponential FM tends to not respond well to pitch sequences such as the one we created with Usta. We will hear changes, but they will no longer be melodic. This technique is better suited for making metallic or bell-like sounds, or more unearthly textures. Here is an example, using snappy exponential volume envelopes from another module going into the red section, In the clip, I am twisting only the yellow attenuverter.
Another variant, known as linear FM, does better at preserving pitch sequences. We can’t do linear FM with Falistri, but many modules which implement complex oscillators offer it, such as Make Noise DPO, Instruo CS-l, or Frap Tools Brenso. There is a good discussion of these two variants of FM in Brenso’s manual (which is in the same document as Falistri’s manual). You’ve probably heard the terms AM and FM used to describe radio stations. These two techniques are used to modulate radio waves with an audio signal that your radio extracts and plays for you.
2.6 Patches with some other modules
We haven’t reached the limits of possible experimentation. We could add to the FM setup by patching the attenuated unipolar output of the green oscillator into the V/oct pitch input of the yellow oscillator, so the two oscillators are (frequency) modulating each other. Some complex oscillators normalize this symmetric arrangement.
But if we bring in a couple of other modules, we can examine some classic and illustrative patches.
2.6.1 Krell
The 1956 movie Forbidden Planet is singular in many respects (it is worth watching if you haven’t seen it) but the aspect which concerns us here was the electronic music soundtrack by Louis and Bebe Barron, created on custom-built equipment. Later, Todd Barton created a patch for a Buchla modular system, and called it "the Krell patch" in homage to the ancient vanished race who once inhabited the referenced planet.
There are many variations on the Krell patch, but at its heart, there is a source of random values for the pitch of an oscillator that also affects the rise and fall times of an amplitude envelope. The effect is pleasing if higher pitches result in shorter notes, so that lower tones linger more.
We can build this on top of the "complete voice" provided by Falistri. We need a source of randomness, and the first one I ever bought was the Doepfer A-118-2 module. It supplies a continuously changing random voltage, and a way of sampling and holding that voltage at the rising edge of a gate or trigger. (The idea of sample-and-hold is useful for non-random signals as well, but another module is needed for that.)
We can use the end of fall (EOF) output of the yellow section of Falistri (which is providing the amplitude envelope to the VCA in the red section) as the rising edge triggering the sample. We can patch that into the V/oct of the green oscillator. The pitch isn’t quantized to any scale, but the atonality adds to the alien effect.
We can also patch the random voltage into the V/oct of the yellow section to ensure that higher pitches have shorter notes (since an increase in V/oct reduces rise and fall times). But it’s tricky to adjust both the distribution of note times and the distribution of pitches with a single voltage.
A stackcable will give us two copies of the random voltage (normally one doesn’t do this for pitch voltage, but here we are not concerned with preserving it exactly) which can be put into separate channels of the Happy Nerding 3xMIA, which provides the ability to attenuate signals, as well as provide an offset. The outputs of the two 3xMIA channels goes to the two V/oct inputs on Falistri.
Then it is a matter of adjusting the offsets and attenuation (which defined the range of random voltages output by a channel) until it sounds good. Here is a sound excerpt.
But it wouldn’t be an alien sound without effects. I put the audio signal into the Xaoc Sarajewo, an analog delay. I set the delay relatively short, at 80 milliseconds, and mixed the three taps into the stereo field. The result is more like a reverb, but I turned the feedback up until it was just on the edge of overload, resulting in some swelling trails cut off by the next note. Does this sound more cinematic?
2.6.2 Bouncing ball
If you drop a small steel sphere onto a smooth horizontal steel sheet, it will make a sound on impact, then bounce and rebound almost to its original height. It will continue to bounce, but it loses some of its kinetic energy with each impact, so the bounces get shorter and shorter.
To create a sound like this, we can use Falistri’s green envelope (set to slow, no-repeat AR) to create a ramp (very short rise, slow fall). This will be the decaying bounce time, so we can patch the attenuated unipolar output to the yellow envelope’s fall CV input.
We’ll trigger the yellow envelope with the manual trigger button, but we want it to repeat only when the button is pressed, until the ramp finishes, and then stop. We can accomplish this by patching the green end of rise (EOR) output (which provides a gate which does just this, as long as the ramp-up time is very small) into the LOOP input just above the yellow A17 switch where we select the yellow envelope’s behaviour to be AR. We don’t set the switch to repeat, but if the signal into the LOOP input is high, the envelope will repeat, until the signal goes low.
For the impact sound envelope, we can set yellow rise to very short, and fall to moderately slow (or shorter, to taste). But where will the sound itself come from? Not from Falistri; we are out of envelopes. We can use the Joranalogue Generate 3, a VCO module, patching its FULL output into the lower input of Falistri’s red VCA. (They were right next to each other when I wrote this.) The yellow envelope is normalled to the other input. We could use the output of the red VCA at this point, but it’s also nice to have the amplitude of the sound decrease with bounce time, since the impact will be at a lesser speed.
We need another VCA for this, and the Happy Nerding 3xVCA will provide it. Patching Falistri’s red VCA output to the input of a 3xVCA channel, and the green unipolar output (the ramp) to the CV input for that channel will produce the tapering sound at the output of that channel. Here’s what it sounds like.
I didn’t add any effects, and I didn’t try to make the sound more metallic by using FM on Generate 3. As with the Krell patch, many variations and embellishments are possible.
2.6.3 Subharmonics
If one triggers Falistri’s yellow oscillator, then retriggers it while the envelope is falling, it starts rising from its current voltage. It is possible to reconfigure the green oscillator so that it behaves differently: it ignores retriggers until both rise and fall are completed. What use can we put this to?
If we set the yellow oscillator to fast repeat mode, and set its rise and fall about the same and fairly short, we’ll get a triangle wave tone at its bipolar output. If we then set the green oscillator to fast AR mode, so it doesn’t repeat by itself, with even faster rise and fall times, and then patch the yellow EOF output to the green trigger, we’ll get the same tone (with a different timbre) from the green bipolar output.
Now suppose we lower the rise and fall times of the green oscillator. At some point, the retrigger from the yellow oscillator will arrive while the green oscillator is still falling, and be ignored. But the next retrigger will arrive when the oscillator is at rest, and will start the green envelope again. As a result, the frequency of the green oscillator will be cut in half. Listening while turning the knobs, we’ll experience that as a sudden octave drop in pitch. If we go further, every third trigger will be effective, which will be a further drop of a perfect fifth, and so on. Moog makes a semi-modular synthesizer called the Subharmonicon that uses this principle.
Instead of turning the green rise/fall knobs ourselves, we can put a slow triangle LFO into the green V/oct input. Here’s what that sounds like.
Instead of keeping the yellow oscillator constant, we can give it a V/oct sequence. Rather than use Usta, this time I’ll use slow random pentatonic minor notes from the Pamela’s New Workout module by ALM Busy Circuits (which also supplies the triangle LFO, and supplied the snappy exponential envelopes for the FM example above). Here’s what the yellow oscillator sounds like with that patched up.
And now the green oscillator, modulated by both the triangle LFO and the pitch change of the yellow oscillator, sounds like this.
Once again, we can tame this sound by using Sarajewo, in the same configuration as before, but with a longer delay, nearly a second. The result is a fairly basic example of the genre known as "ambient".
All we need to do is turn down the lights and pour ourselves a glass of nice wine.
2.7 What’s next?
A question of the form "What happens if we plug this into that?" has probably already occurred to you. It is this spirit of experimentation, and discovery of unexpected or unanticipated results, that draws many to Eurorack. But since this is a static Web page, you can’t ask me to try it.
The free program VCVRack will let you create a virtual Eurorack modular system on your computer. It has an extensive library with many contributors, in which you can find virtual modules similar to Falistri, for example, Befaco Rampage, which also exists as a physical module. You may find, as I did, that it only increases the desire for a physical system. Or you may be perfectly content with what it can do for you. There are ways to use VCVRack with other musical software on your computer, or even with other physical systems. In the next chapter, one section describes a starting configuration for exploration, including how to set it up on your own computer.
Software is highly flexible, and one is not restricted to emulation of a modular system. There are many possibilities for a digital audio workstation (DAW), some of which may be free, depending on your platform. There are also more modest sound creation programs and apps that can be a lot of fun. iOS for iPhones and iPads has a number of such apps at amazingly low cost.
A fixed-architecture physical synthesizer will give you access to the sound creation capabilities I have described, and many others, and is usually more economical than Eurorack. (Of course, you can spend $9000 on a Moog One, if you wish.) What you give up is the ability to change sound and modulation paths apart from what flexibility the manufacturer has built in, and the ability to make small incremental physical additions to your system that change its capabilities. You may not miss these things.
Semi-modular synthesizers combine some fixed-architecture ideas with a moderate amount of patch capability. Some of these are more specialized (like the Moog Subharmonicon); some try to be more general (like the Pittsburgh Modular SV-1b or Arturia Minibrute 2S). The Make Noise 0-coast packs a lot of functionality into an attractive and modestly-priced package, but ultimately it will make you want to move to full modular on the soon side, so if you’re considering it, you might as well skip this step (or, as I did, find a nice friend to lend you one for a short while). On the other hand, it may convince you that you don’t want to move to full modular, in which case it’s a step you don’t want to skip. Either way, you can probably sell it for something close to what you paid for it.
There are other semi-modular choices. Moog makes a number of these, of which Mother-32, DFAM, and Subharmonicon are most popular. Unfortunately, one pays a premium for the Moog name, and nothing the company has done since Bob Moog’s death really merits it. Mother-32 is the most conventional, but that makes it comparatively dull. DFAM (Drummer From Another Mother) is more percussion-oriented, while Subharmonicon explores the kind of frequency division we demonstrated with Falistri in the last section above. More recent additions to the line include Mavis, Labyrinth, and Spectravox.
Pittsburgh Modular, in collaboration with Cre8audio, released three small semi-modular devices in 2022. West Pest and East Beast are smaller boxes that work in the general area of the West Coast and East Coast approaches to synthesis, as explained early in this chapter. Taiga is a larger box that combines the approaches, with three oscillators and a patch bay running along the bottom of the device, rather than clustered on the side as with the Moog and other Pittsburgh devices. Once again, there are usability issues that prevent me from giving full endorsement.
Probably the semi-modular that has the most potential for being satisfying is Intellijel Cascadia, released in 2023. It is double-height (6u), and roughly 64hp wide. I have not personally worked with one, but from what I have heard through online demos and experience reports (and my own experience of Intellijel modules), the build quality and usability are very good. But it costs $2200 US, hardly something one might consider an exploratory purchase. Still, this is much less than a comparable set of modules and a proper case to house them would cost.
The Music Thing Modular Workshop System, introduced in 2024, is probably the best affordable semi-modular introductory system right now (along with the 0-coast), but it’s still not cheap. It was created as a kit that could be completed and used in a one-day workshop, and consists of a number of modules (some adapted from Eurorack, but fused into a single panel) that together form a complete system. The design has many clever aspects and overall is very well thought out, and it sounds good. It’s available for $650 as a kit, and $1000 assembled.
The open-ended nature of Eurorack is simultaneously a blessing and a curse. There’s always another module to tempt you, even though you may need another case into which to install it. Some Eurorack enthusiasts keep costs down (and add further interest) by putting together their modules from kits, or even designing their own modules from scratch.
Not every module is as complex or multi-functional as Falistri. Some are narrower and simpler, providing a specific function (for example, a module that provides one or two VCAs). Some are wider and more complex, but also more specialized, so again easier to categorize (for example, the Usta sequencer).
In the next chapter, I will continue to introduce Eurorack concepts and techniques, with reference to the modules in the current incarnation of my physical system. I’ll use my own rack not because it is particularly comprehensive or representative, but because it is the one I am best equipped to discuss. I will briefly outline what each module does, why I chose it, what the alternatives were or are, and what I do with it, usually in combination with others. Hopefully this will provide you with an illustration of one set of possibilities for a Eurorack system, and round out the lessons learned from this chapter. Many of the concepts will translate to the other ways of generating sound I discussed above.