E4: Colour
Objective 1
Write a colour tracker using hue range testing.
-
Use the code from E2 to capture and display frames from your camera (you don’t need to do any background subtraction). You may want to use median blur and/or other image processing filters to clean up the captured frame (remove noise, correct lighting, mirror, etc.).
-
Add code to convert each frame from BGR to HSV colour space. I used
cv2.cvtColorandcv2.COLOR_BGR2HSV. -
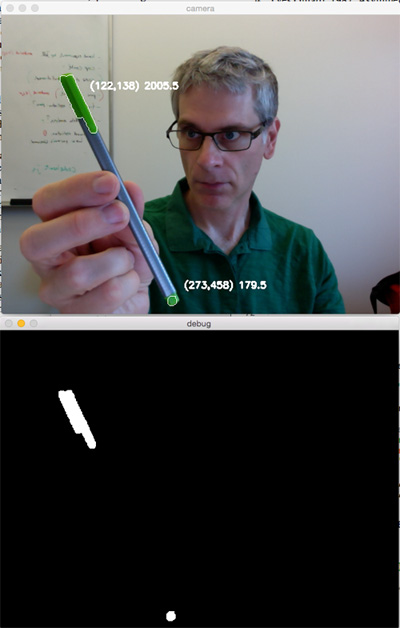
Find an object with an area of consistent bright colour. You should avoid objects that are planar (like a piece of paper) or red. I used a pen with a bright green coloured cap.
-
Capture a frame of the object using your code and find the range of hue values in the coloured area you want to track using Photoshop or an online colour picker like http://imagecolorpicker.com.
- You may run into problems with pure red hues! Think about why.
-
Add code to create a mask of all pixels within the hue range of the object you want to track, as well as a reasonable range of saturation and value to avoid very dark or grey objects. I used
cv2.inRange. Remember that OpenCV parametrizes hue in the range 0 to 180, while colour pickers will almost always give you hue as a value between 0 and 360 degrees. -
Add code from E3 to find the blobs in the colour mask. I used
findContours,contourArea, andmoments. Display the coordinates and the centre point of all blobs greater than a threshold area. I set my area threshold to 100 for my 640 x 480 frames to track the small end of my pen.
Optional Experiments
-
Try different colours including red and darker colours. One method to track pure red colours is using directional statistics (also called circular statistics). Essentially, you compute hue using the average unit vector and the translate that back to ranges that bridge the 0° to 360° discontinuity around pure red. If you think of other ways, make sure you talk about it in your description.
-
Change your code to track all brightly coloured objects, regardless of hue.
-
Try different objects including planar ones. Why do planar objects not work as well?
-
Add code to do something with your tracked object like draw lines, perhaps with different thickness depending on the size of the blob.
-
Add code to track two or more objects with different colours.
HINT: This will work much better if you turn off all the auto-exposure settings on your camera. You can try to do this in OpenCV, but it’s easier to use the camera settings panel in your OS. If you’re using a built-in camera on a Mac, you may need something like Sight Control (but I think that product is now defunct, let me know if you find a way to turn off auto camera settings on macOS).
Objective 2
Write a trainable colour tracker using histogram backprojection.
-
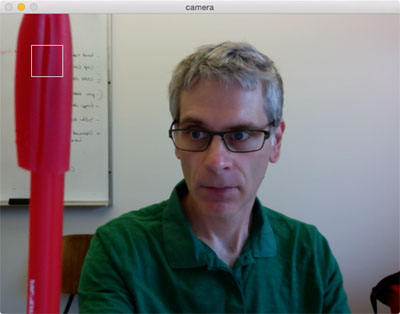
Add code to your objective 1 to define a smallish area in your frame as a training area. Do this my drawing a square somewhere.
-
Add code to train a 2D histogram. When the space bar is pressed grab the region of interest in the frame corresponding to the square you drew, and calculate a hue and saturation histogram from this region. I used
cv2.calcHistwith 16 bins. Note that some tutorials suggest normalizing the histogram to increase the probability density, but I’ve had better results when leaving this normalisation step out.) -
For debug purposes, display or write out images for the region you used to train and the 2D histogram (which is just a very small greyscale image).
-
Once trained, calculate the backprojection of each frame using the trained histogram. I used
cv2.calcBackProject. -
Turn the backprojection into a mask and use image processing operations to clean it up. I also used
cv2.inRangeto avoid masking very dark or grey pixels in the original image. -
Use the same code from objective 1 to track the blobs in this colour mask.
Training
Tracking
![]()
Optional Experiments
-
Try diffent bin sizes.
-
Try training on hue and value.
-
Try going one step further and use Meanshift or CamShift to track the object.
Submit
Follow the submission instructions on the course information page. Include your code and at least one frame capture from each objective that clearly shows everything was working. In your solution notes, write about any problems you ran into, and the main resource(s) you used (blog posts, online tutorials, stackoverflow posts, papers, textbooks, etc.). These resources should include brief descriptions of what the resource is and how it helped you. The writeup can be short, bullet points are recommended.
You must combine your code, screen captures, and notes together into a single PDF. The best way to do this is by doing everything in a single Jupyter notebook using markdown cells for your notes and inline images for your output. Then just export as PDF.