Overview • Before You Begin • Installing the Rack Kit Components • Installing a PowerEdge 8450 System in the Rack
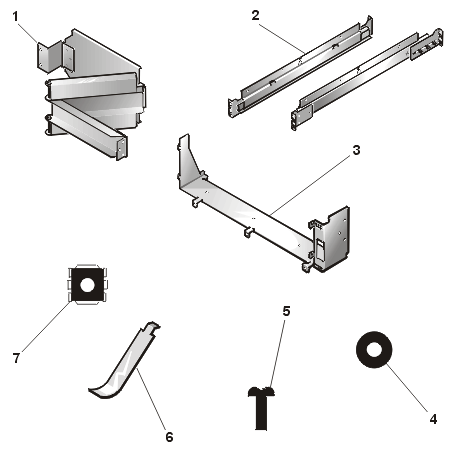
This section provides instructions for trained service technicians to install one or more Dell PowerEdge 8450 computers in a Dell rack. The rack-mounting components are included in a kit that comes with the system (see Figure 1):
Figure 1. Rack Kit Contents
| 1 | Cable-management arm |
2 |
Slide assemblies with mounting brackets (2) |
3 |
Cable tray |
4 |
#10 flat metal washers (14) |
5 |
Philips-head screws:>
|
| 6 | Cage-nut installation tool |
| 7 | 10-32 cage nuts (2) |
| NOTES: The quantity of parts may vary for rack
kits that were preinstalled by Dell. The nonmetric screws called out in illustrations and procedural steps are identified first by size and then by the number of threads per inch. For example, a #10 Phillips-head screw with 32 threads per inch is identified as a 10-32 screw. |
This kit is designed for use in a Dell rack with a extended-depth back door. If you have a early (white finish) version of the Dell rack, check that the back door does not contain flush-mounted glass. If it does, you will need to order a new rack door from Dell before installing your new system in the rack.
Before you begin installing your PowerEdge 8450 computer in the rack, carefully read the safety precautions and tool requirements in the following subsections.
Follow these safety precautions when installing your computer in the rack.
| WARNING: Dell server systems are certified as components for use in Dell rack cabinets using Dell customer rack kits. The final installation of Dell servers and rack kits in any other brand of rack cabinet has not been approved by any safety agencies. It is the customer's responsibility to have the final combination of Dell servers and rack kits for use in other brands of rack cabinets evaluated for suitability by a certified safety agency. |
This rack kit is intended to be installed in a Dell rack by trained service technicians. If you install the kit in any other rack, be sure that the rack meets the specifications of the Dell rack.
| WARNING: Installing PowerEdge 8450 computers
in a Dell rack without the front and side stabilizer feet installed could cause the rack
to tip over, potentially resulting in bodily injury under certain circumstances.
Therefore, always install the stabilizer feet before installing components in the rack. |
| WARNING: After installing computers in a rack, never pull more than one computer out of the rack on its slide assemblies at one time. The weight of more than one extended computer could cause the rack to tip over and injure someone. |
The stabilizer feet help prevent the possibility of the rack tipping over when a PowerEdge 8450 computer or other components are pulled out of the rack so that the slide assemblies are fully extended. Refer to the Dell PowerEdge Rack-Mountable Solutions Installation Guide provided with the rack for instructions on installing the stabilizer feet.
To install the rack kit components, you need the following tools:
| NOTES: If you purchased a Dell rack along with
your PowerEdge 8450 computer, the slide assemblies are preinstalled in the rack. For instructions on installing the computer itself, see Installing a PowerEdge 8450 System in the Rack. |
To install the slide assemblies in the rack, perform the following steps:
You must remove the doors from the rack to provide access to the interior of the rack and to prevent damage to the doors while installing the kit. To remove the doors, perform the following steps.
| WARNING: To prevent personal injury due to the size and weight of the doors, never attempt to remove the doors by yourself. |
Figure 2. Opening the Latch on the Door
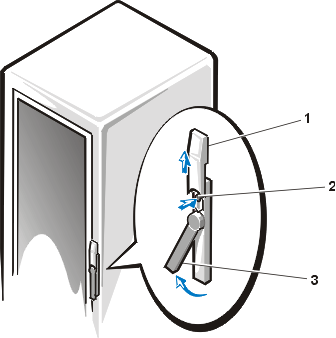
| 1 | Button cover |
| 2 | Push button |
| 3 | Handle |
Figure 3. Removing the Rack Doors
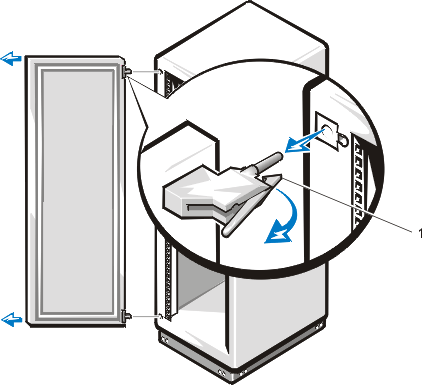
| 1 | Hinge release lever |
Store the two doors where they will not injure someone if they accidentally fall over.
You will need to remove the side panels from the rack to gain access to the rack's interior. To remove a side panel from the rack, follow these steps.
| WARNING: To prevent personal injury due to the size and weight of the side panel, never attempt to remove the side panels by yourself. |
Figure 4. Removing the Side Panels
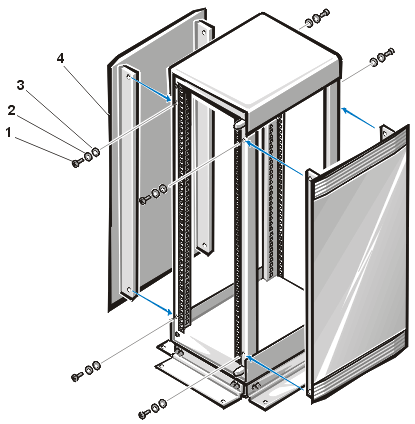
| 1 | Screws (4 per panel; 2 per edge) |
| 2 | Washers (4 per panel) |
| 3 | Serrated washers (4 per panel) |
| 4 | Side panels (2) |
To install the slide assemblies in the rack, perform the following steps:
WARNING: If you are installing more than one computer, install the first computer in the lowest possible position in the rack. If you intend to install more than one PowerEdge 8450 computer in the rack, you must install the slide assemblies so that 7 units (U) (12.25 inches) of vertical space is between the top of one slide assembly and the top of the next. In the Dell rack, the rails of the rack are marked by small indentations in 1-U (1.75-inch) increments.
| NOTE: When installing the slide assemblies, be sure that the white plastic stops at the ends of the channels are at the back of the rack. |
Figure 5. Installing the Slide Assemblies
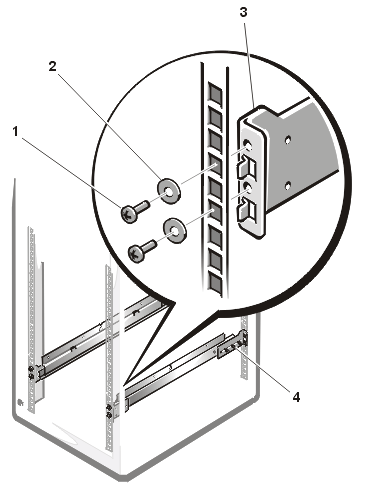
| 1 | 10-32 x 0.5-inch Phillips-head screws (2) |
| 2 | #10 flat metal washers (2) |
| 3 | Slide-assembly mounting brackets (2) |
| 4 | Slide alignment screws (3) |
The subsections that follow include instructions for installing a PowerEdge 8450 system in the rack.
Attach the cable tray on the PowerEdge 8450 computer chassis by inserting the two tabs on each end of the tray into the corresponding slots in the back of the system chassis. Secure the tray using three 6-32 x 0.25-inch Phillips-head screws (see Figure 6).
| WARNING: Do not grasp the cable tray when lifting the system. The cable tray and its mounting are not sturdy enough to support the weight of the PowerEdge 8450 chassis. You should only lift the system by the chassis edges. |
Figure 6. Installing the Cable Tray
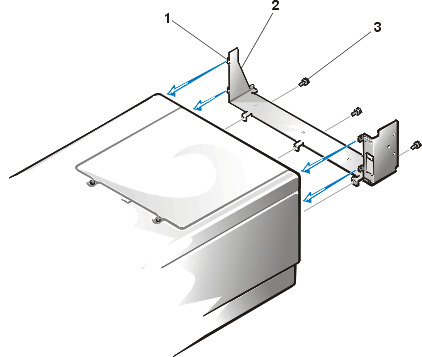
| 1 | Tabs (4) |
| 2 | Cable tray |
| 3 | 6-32 x 0.25-inch Phillips-head screws (3) |
To install the computer in the rack, perform the following steps.
| WARNING: If you are installing more than one computer, install the first computer in the lowest position in the rack. Never pull more than one computer out of the rack at a time. |
Figure 7. Installing the Computer in the Rack

| 1 | Interior slides (2) |
| 2 | Release levers (2) |
| 3 | 8-32 x 0.25-inch countersunk Philips-head screws (12) |
| WARNING: Due to the weight and size of the computer, never attempt to install the computer in the slide assemblies by yourself. |
| NOTE: As you push the computer into the interior slides, the slide assemblies lock in the extended position. Press the release lever on the outer side of each interior slide (see Figure 7) to release the locks, and then slide the computer completely into the rack. |
Figure 8. Installing the Cage Nuts

| 1 | Cage-nut installation tool |
| 2 | Cage nut |
| 3 | Vertical rail |
To install the cable-management arm, perform the following steps:
Figure 9. Installing the Cable-Management Arm
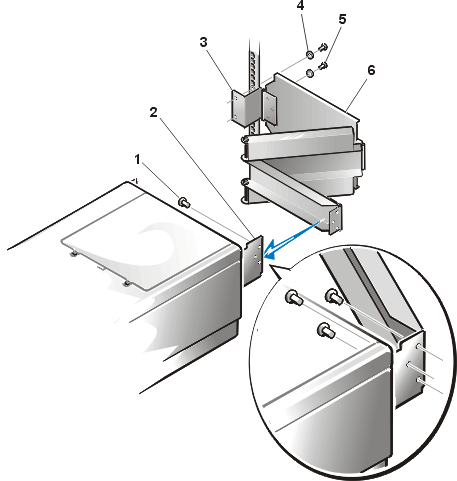
| 1 | 10-32 x 0.313-inch Phillips-head screws (3) |
| 2 | Cable tray |
| 3 | Right-angle bracket |
| 4 | #10 flat metal washers (2) |
| 5 | 10-32 x 0.5-inch Phillips-head screws (2) |
| 6 | Cable-management arm |
Once you have finished installing the system, replace the rack side panels.
| WARNING: To prevent personal injury due to the size and weight of the side panel, never attempt to replace the side panels by yourself. |
To replace the side panels, perform the following steps:
| WARNING: To prevent personal injury due to the size and weight of the doors, never attempt to replace the doors by yourself. |
To replace the rack's front and back doors, perform the following steps: