Safety • Placing the Modem • Changing the Jumpers • Connecting the Modem to Your System • Installing the Modem in Windows • Configuring the Modem for Your Country • Configuring Communication Programs
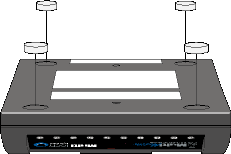
Place the modem close to your computer. If you wish to use the included self-adhesive plastic feet, simply peel them off the backing strip and press them into the recesses on the bottom of the modem.
Figure 1. Mounting the feet

This step is required only if you intend to use the modem on a leased line. It requires you to open the modem and move one or more jumpers on the modem's printed circuit board.
| NOTE: The following procedure must be performed by authorized service personnel. |
| CAUTION: The circuit board can be harmed by static electricity. Before you open the case, touch a grounded object, such as the metal chassis of your computer, to discharge any static electricity in your body, then touch the metal shell of the modem's RS232 connector to ensure that there is no voltage difference between you and the modem. |
Figure 2. Internal jumpers

As shipped from the factory, your modem is configured for normal dial-up operation. That is, the modem must dial a phone number to connect to another modem. To use the modem on a leased line, you must change jumper J10 to select leased line operation, and J11 to select whether it will be the originating or the answering modem. (If dial-up operation is selected, J11 has no effect.) See Figure 2 for jumper locations and positions.
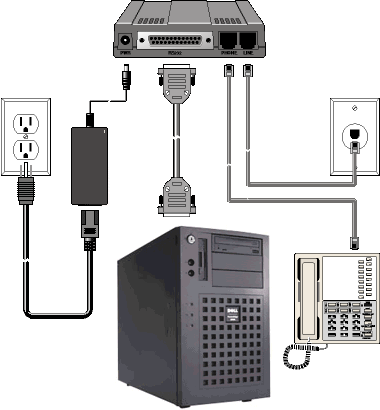
Connect the modem to your computer's serial port, to the telephone line, to AC power, and, optionally, to your telephone.
Figure 3. Modem connections

Plug one end of the serial cable into the RS232 connector on the modem, and the other end into a serial port connector on your computer, such as COM1 or COM2.
Plug one end of the phone cable into the modem's LINE jack, and the other end into a phone line wall jack.
| NOTE:
The LINE jack is not interchangeable with the PHONE jack. Do not plug
the phone into the LINE jack or the line cable into the PHONE jack. |
If you wish to connect a telephone to the same line as the modem, plug it into the modem's PHONE jack.
| NOTE:
The PHONE jack is not interchangeable with the LINE jack. Do not plug
the phone into the LINE jack or the line cable into the PHONE jack. |
Make sure the power switch is set to OFF. Plug the power adapter into into the PWR jack on the modem, and then plug one end of the power cord into the power adapter and the other end into an AC power outlet or power strip.
| CAUTION: Use only the power adapter supplied with the modem. Use of any other power adapter will void the warranty and could damage the modem. |
Test the modem by turning it on (a power switch is located on the right side). When you apply power, the modem performs a diagnostic self-test, indicated by several indicators flashing for a second or two, after which the 56 indicator should light. If this does not happen, check that the power switch is on, the power supply is solidly connected, and the AC outlet is live. If these measures do not work, see Troubleshooting.
Your modem has automatic lightning protection to protect it from electrical spikes on the telephone line. Nonetheless, power surges and other transient voltages on power lines, such as those caused by lightning strikes, can damage or destroy your modem. Therefore, we recommend that you plug the modem into a surge protector rather than directly into a wall outlet, preferably a surge protector that provides protection against electrical spikes on the telephone line as well as on the power line.
| NOTE:
Not even a surge protector can guard against damage from a nearby lightning strike. During an electrical storm, your safest course is to unplug your computer equipment from both the power outlet and the telephone line. |
If you are using Windows 95, Windows 98, Windows NT 4.0, or Windows 2000, you must install the modem in the operating system.
| NOTE: If Windows cannot detect your modem, your modem may be turned off, it may be unplugged, it may be plugged into the wrong connector on your computer, or the serial cable may be faulty. See None of the Indicators Light and The Modem Does Not Respond to Commands. |
When your new modem replaces another modem, the old modem installation remains in Windows after you install the new modem, and the old modem is still selected in HyperTerminal and other Windows applications. Though you can change the application connection descriptions one at a time, it is easier to force Windows applications to use the new modem by removing the old modem from Windows.
Different countries have different requirements for how modems must function. Therefore, before you use the modem, you must configure it to match the defaults of the country in which you are using it. You can use one of two configuration methods:
Global Wizard Configuration Utility. This configuration utility is recommended for computers running Windows 95 and 98, Windows NT 3.51 and 4.0, and Windows 2000. Using Global Wizard, you can configure your modem for a specific country with just a few mouse clicks.
AT Commands. If you are comfortable using AT commands, or wish to fine-tune the operation of your modem, you can do this using firmware-based AT commands and S-Registers. You must enter these commands in your communication program's terminal window and must have a broad understanding of the impact reconfiguring AT commands will have on your application.
Communication programs designed for Windows 95/98 and Windows NT normally do not need to be manually configured, since they use the configuration in the Windows modem driver. Communication programs designed for DOS and other operating systems, however, may need to be manually configured to work with your modem. Though each communication program is different, the following generic procedure should apply to most of them.
| NOTE:
To change the modem's default configuration, type new commands in
the software's terminal window, adding the &W command to store them in the
modem's nonvolatile memory. For instance, to create a default configuration that turns off autoanswer, type AT&FS0=0&W. The new configuration loads automatically whenever the modem is turned on or receives the ATZ command. |